2-Link Gripper Controlled by a DC Motor and IR Sensor
by Amir-mohammad-4311 in Circuits > Robots
372 Views, 1 Favorites, 0 Comments
2-Link Gripper Controlled by a DC Motor and IR Sensor

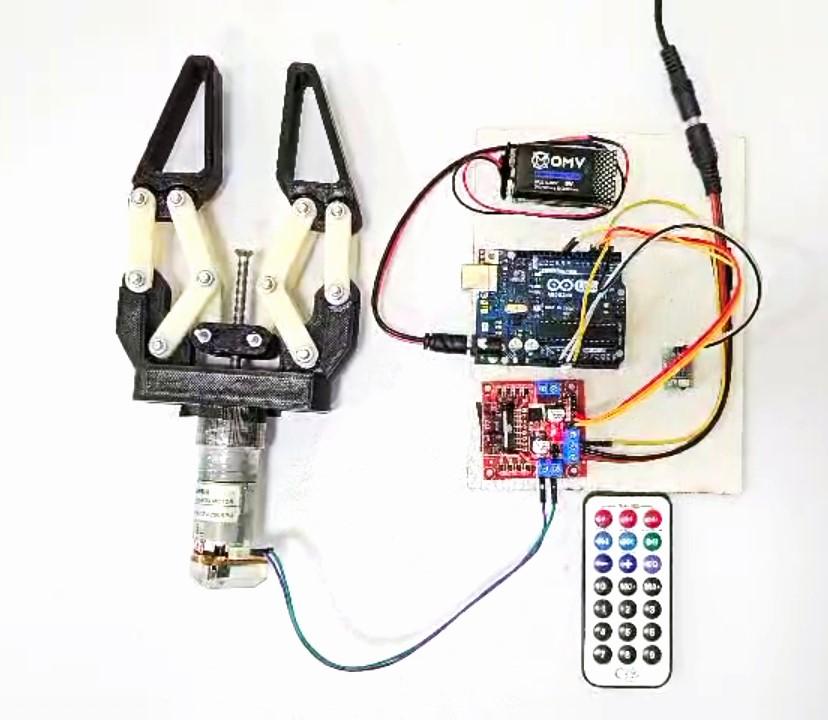
Welcome to this comprehensive Instructable, where we will walk you through the process of building a simple yet effective 2-link gripper, controlled by a DC motor and an IR sensor. In this project, you will learn to create a 2-link gripper that mimics the functionality of a human hand, making it an excellent addition to any robotic arm or standalone robotic project. The gripper is powered by a DC motor, which provides the necessary torque to open and close the jaws. An IR sensor will be used to control the motor, allowing you to operate the gripper remotely with an IR remote control. This setup not only adds a layer of interactivity but also demonstrates fundamental principles of robotics and sensor integration.
Supplies

Materials:
- DC motor with gearbox( 200rpm - 12v )
- Motor driver ( L298N)
- IR sensor module( YL_55)
- IR remote control
- Arduino board ( Arduino Uno)
- jumper wires
- Power supply (battery pack & adaptor12v)
- 3D printed parts (PLA)
- Bolts and nuts
- Flat washer
- coupling
Design the Gripper


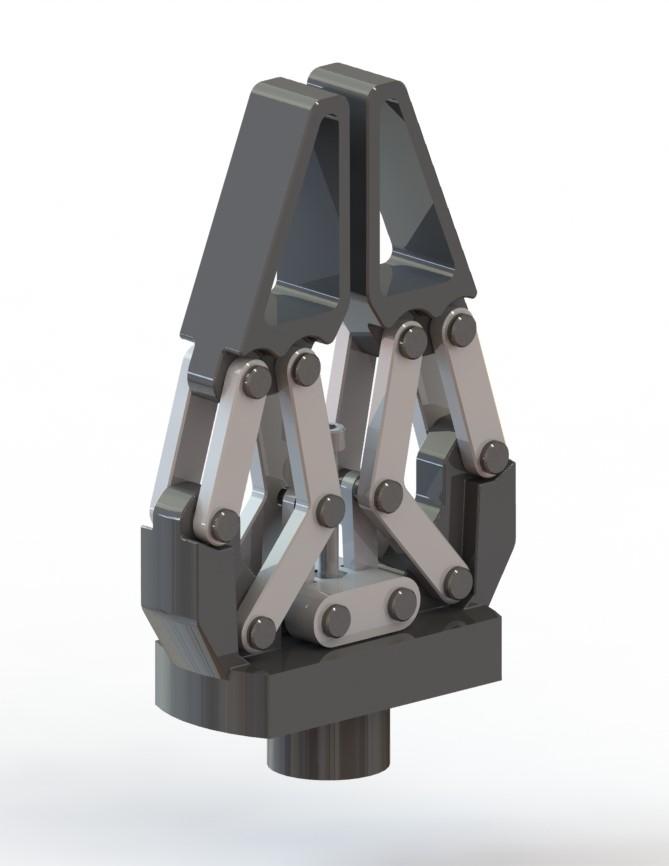
Design and assemble the gripper parts in Solidworks
Get the STL format in Solidwroks to print every parts using 3D printer
3D Print the Parts

Prepare the 3D Printer:
- Ensure your 3D printer is calibrated and has enough filament for printing.
Print the Parts:
- Load the STL files into 3D printing Cura software .
- Print each part with 80% infill , ensuring high quality for functional parts like the gripper claws and linkage arms.
Post-Processing:
- Remove any support material and smooth any rough edges using sandpaper or a file.
Assemble the Linkage Arms
First Connect the screw to the DC motor shaft using appropriate coupling . then Attach the DC motor to the 3D printed base . Connect the 3D printed gripper parts using nuts and bolts with flat washer between each parts .
Wire the Electronics

Steps:
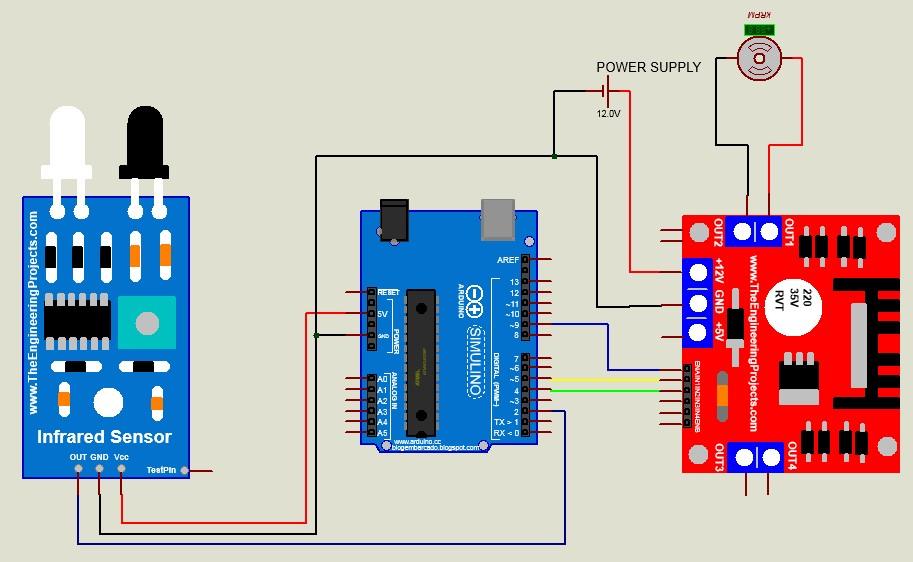
- Connect the DC motor to the motor driver.
- Connect the motor driver to the Arduino using jumper wires. the motor driver (L298) will connect to PWM pins for motor control.
- Connect the IR receiver module to the Arduino. Connect the power (VCC) and ground (GND) pins, and the output pin to a digital input pin ( pin 2) on the Arduino.
- Connect the power supply (12v adaptor ) and ensure it can power both motor driver, and DC motor. use a 9v battery for Arduino power supply .
- Use a breadboard to manage the connections if necessary, ensuring all grounds are connected.
Program the Arduino
Explanation:
- Header and Definitions:
- #define DECODE_NEC: This preprocessor directive enables the decoding of NEC infrared protocol signals.
- #include <Arduino.h>: This includes the Arduino standard library, providing basic Arduino functions.
- "PinDefinitionsAndMore.h": Presumably, this header file contains additional pin definitions and configuration settings specific to your project.
- <IRremote.hpp>: This includes the IRremote library, which facilitates IR communication on Arduino.
- Global Variables:
- int EN = 9;: Defines the pin connected to the motor driver's enable pin.
- int motor1pin1 = 4; and int motor1pin2 = 5;: Define the pins connected to the motor driver for controlling motor direction.
- Setup Function (setup()):
- Initializes serial communication with a baud rate of 115200 for debugging purposes.
- Configures motor1pin1, motor1pin2, and EN as output pins to control the motor and motor driver.
- Prints startup information to the serial monitor, including file name, compilation date, and the version of the IRremote library used.
- Initializes the IR receiver (IrReceiver) to listen for IR signals on the IR_RECEIVE_PIN (presumably defined elsewhere) and enables LED feedback.
- Main Loop Function (loop()):
- Checks if an IR signal has been received and successfully decoded (IrReceiver.decode()).
- If a valid IR signal is decoded:
- Prints a summary of the decoded IR data to the serial monitor.
- Checks if the protocol of the received IR data is unknown (UNKNOWN). If so, it prints raw IR data for further analysis.
- Resumes the IR receiver to listen for the next IR signal.
- Motor Control Based on IR Commands:
- Depending on the decoded IR command (IrReceiver.decodedIRData.command):
- If the command is 0x44 (hexadecimal), it sets the motor to rotate clockwise by driving motor1pin1 LOW and motor1pin2 HIGH. The motor speed is set to 200/255 (approx. 78%) using PWM via analogWrite(EN, 200).
- If the command is 0x40, it sets the motor to rotate counterclockwise by driving motor1pin1 HIGH and motor1pin2 LOW. Similarly, it sets the motor speed to 200/255.
- If the command is 0x43, it stops the motor by driving both motor1pin1 and motor1pin2 LOW. The motor driver enable pin (EN) is set to 0 (zero duty cycle), effectively turning off the motor.
Test and Calibrate
Steps:
- Power on your Arduino and run the code.
- Use the IR remote control to send signals to the gripper. Observe the movement of the gripper and ensure it is functioning correctly.
- If necessary, adjust the button codes and motor control timings in the code to fine-tune the gripper's movement.
- Test the gripper with various objects to ensure it can grip effectively.
Final Adjustments and Finishing Touches
Steps:
- Secure all components and ensure there are no loose connections.
- If desired, add any additional features or modifications to improve the gripper’s functionality.
- Consider enclosing the electronics in a protective case or mounting the gripper on a robotic arm for practical use.
Conclusion
By following this guide, you have successfully built a 2-link gripper controlled by a DC motor and an IR sensor. This project not only provides hands-on experience with basic robotics but also lays the foundation for more complex projects in the future. Feel free to experiment with different gripper designs or control methods to further enhance your robotic creations.
Happy building! If you have any questions or run into issues, don’t hesitate to seek help from the robotics community or refer back to this Instructable for guidance.
BY
Amir Mohammad Mohammad Khani
Alireza Mohammadian