3D Printed Modular Frame for Screen-printing
by VirgileC in Craft > Printmaking
1997 Views, 7 Favorites, 0 Comments
3D Printed Modular Frame for Screen-printing


In this Instructables, I will describe a way of making a screen-printing frame based on a modular design allowing a small range of frame size (and shapes!).
By using this modular screen frame technique, you can make reusable frames and adapt its size (within reason) to your project, making for a very flexible solution.
Supplies
8mmOD aluminum rod (you can choose steel rods, but aluminum is just easier to cut)
4mmOD aluminum rod
Screen-printing mesh
Pliers
Metal saw
Screen-printing emulsion (I use an easy to use single step emulsion)
UV Lamp (or sun !)
Access to a 3D printer (models to print here)
Concept
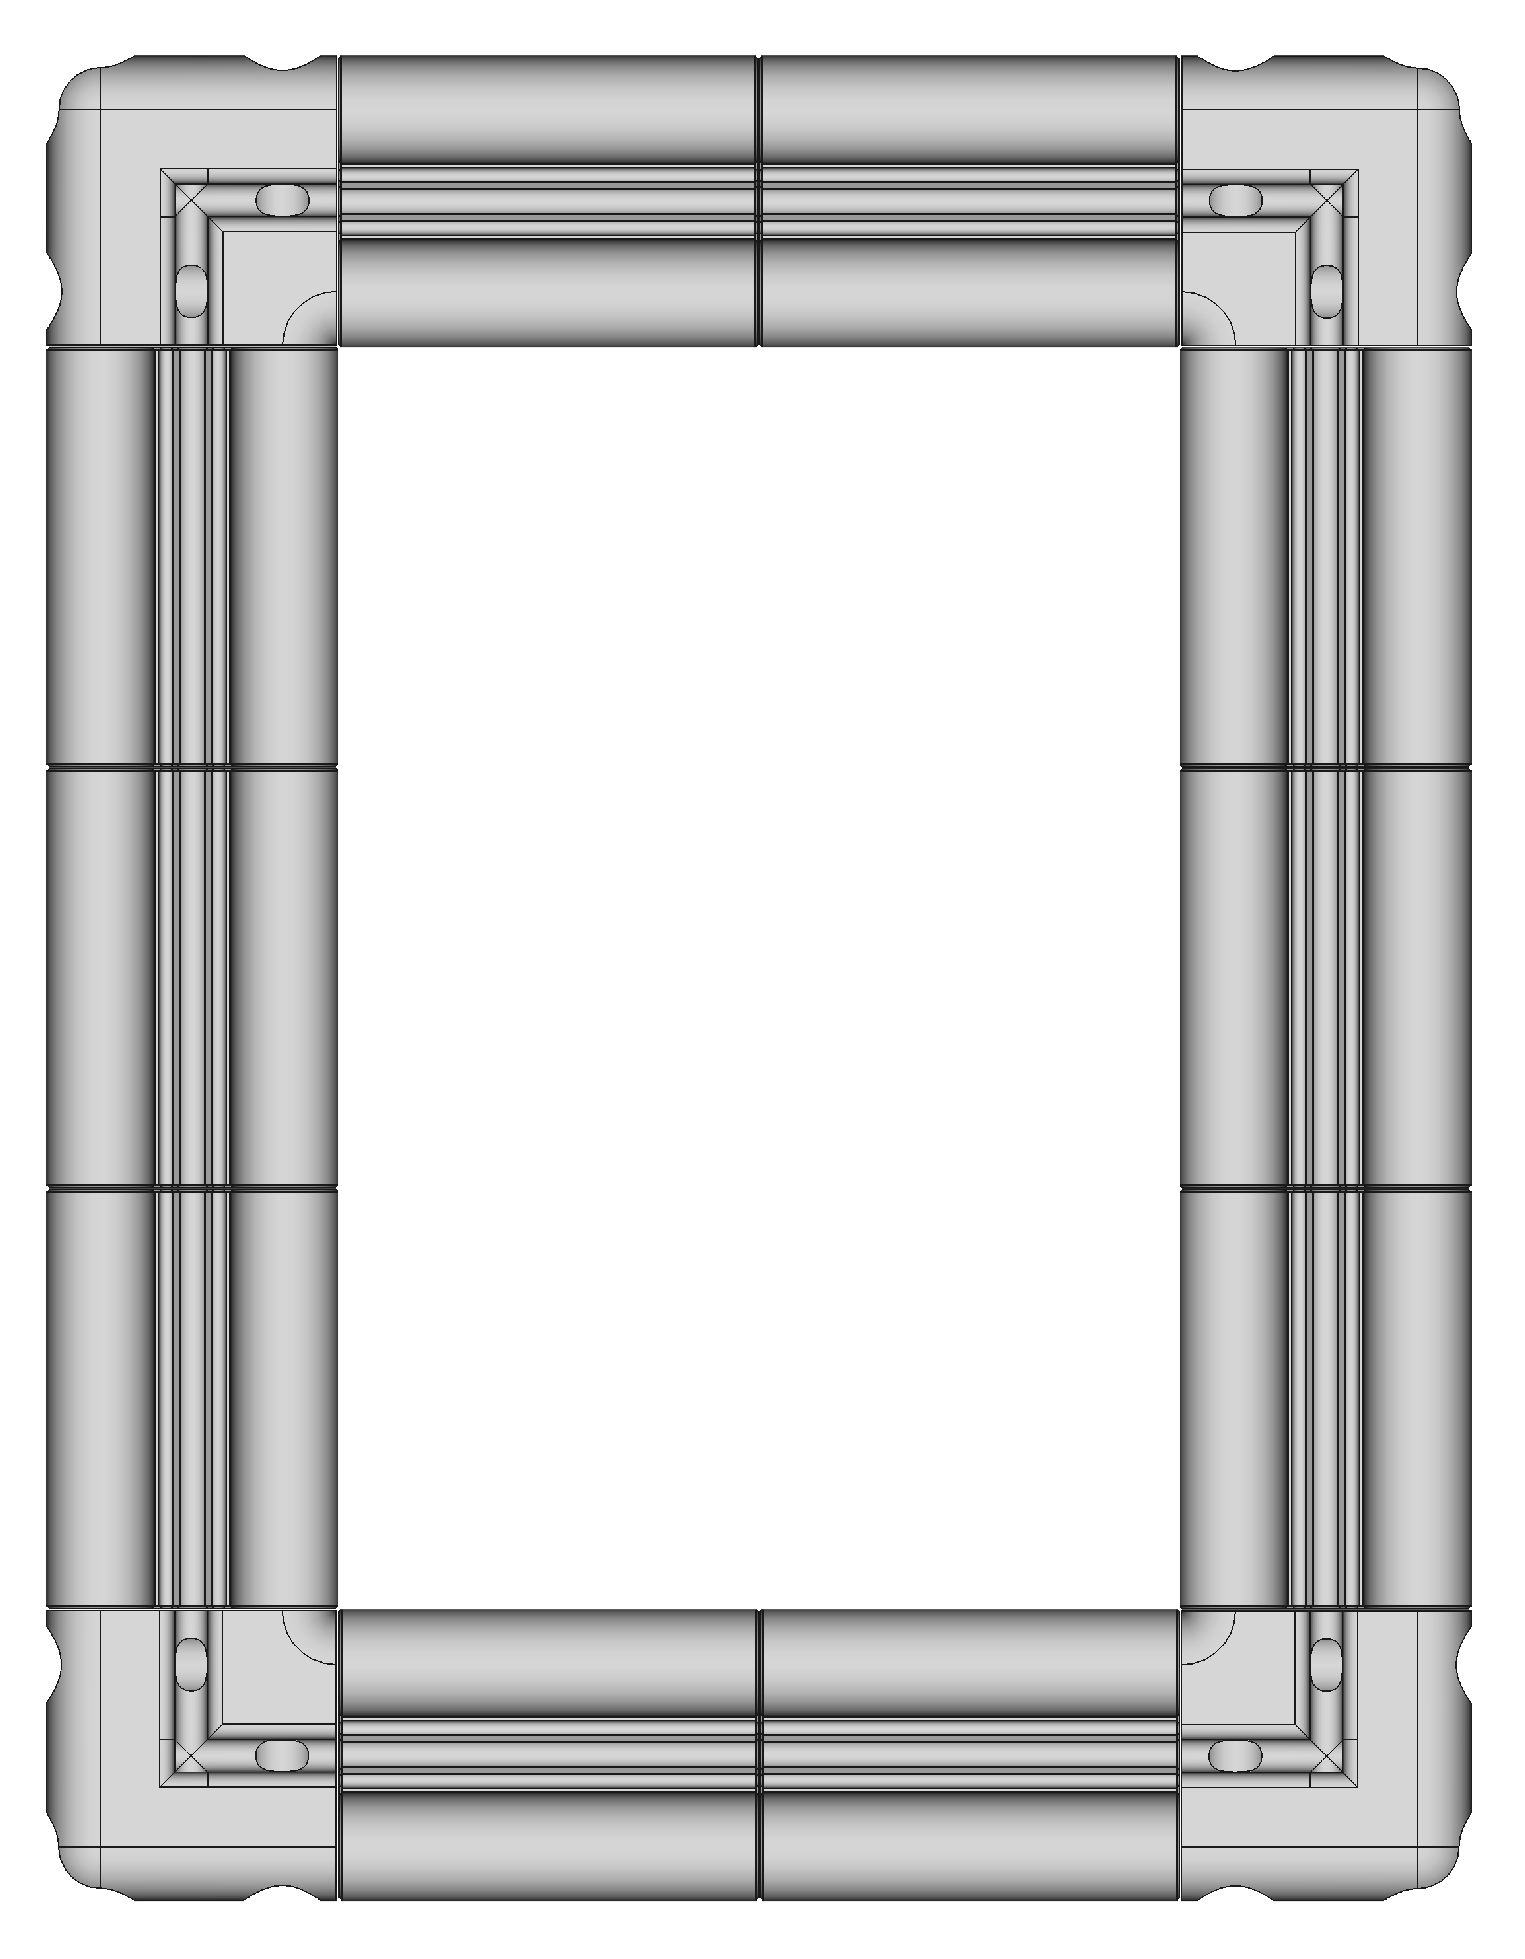

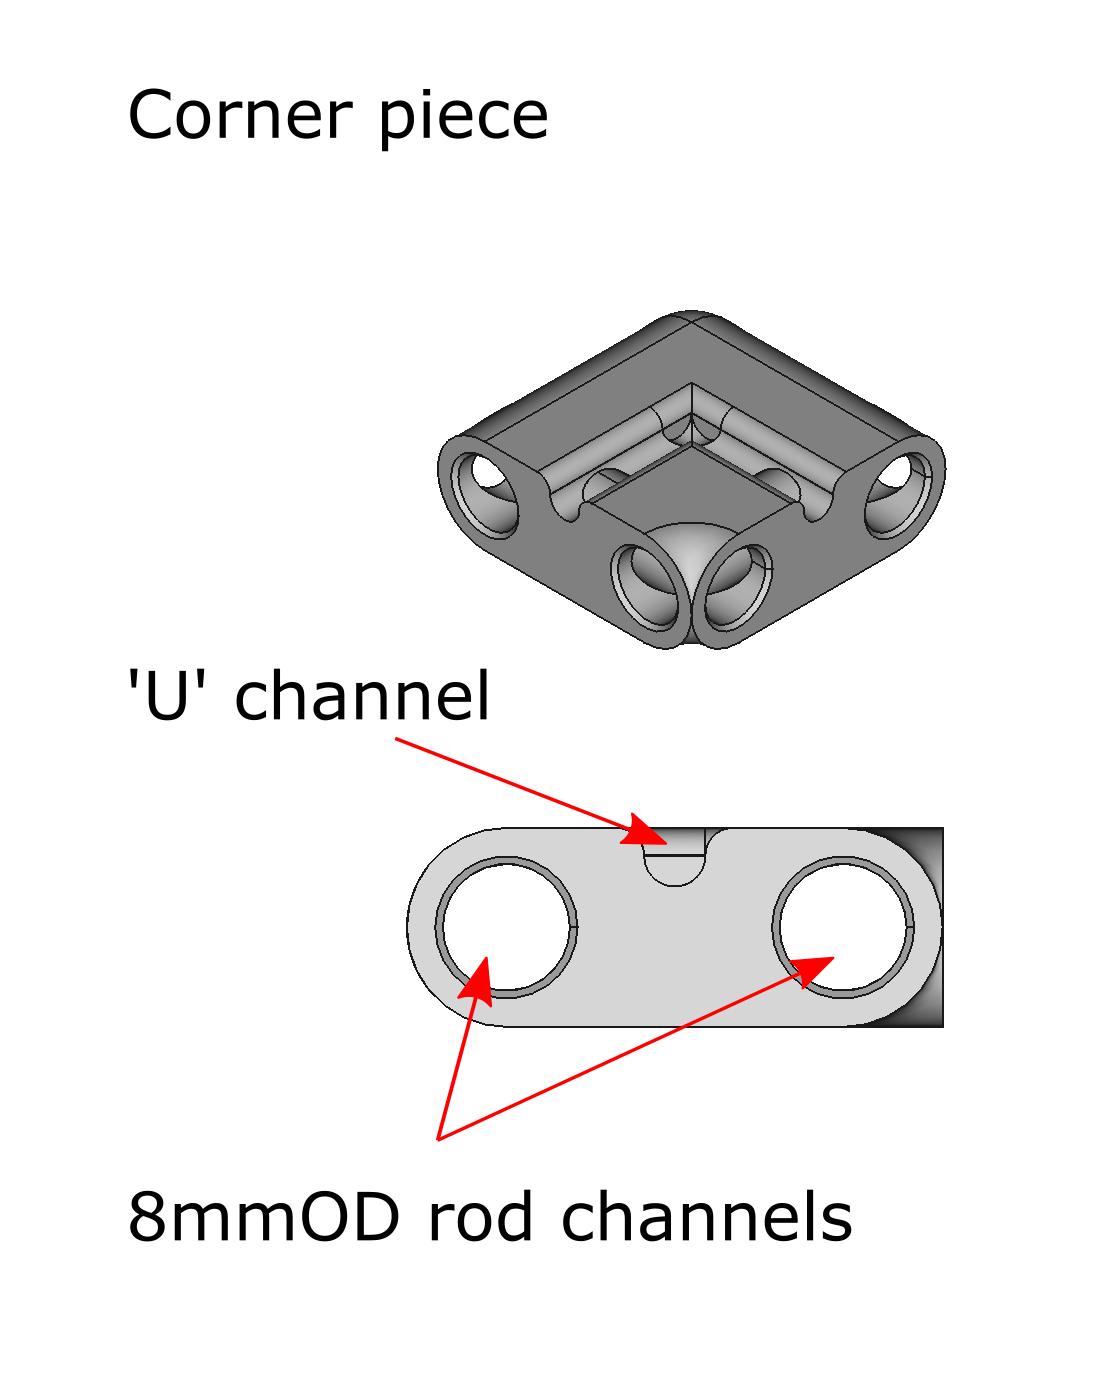

The frame is composed of 2 types of 3d printed pieces, the side pieces and the corner pieces
- Side pieces
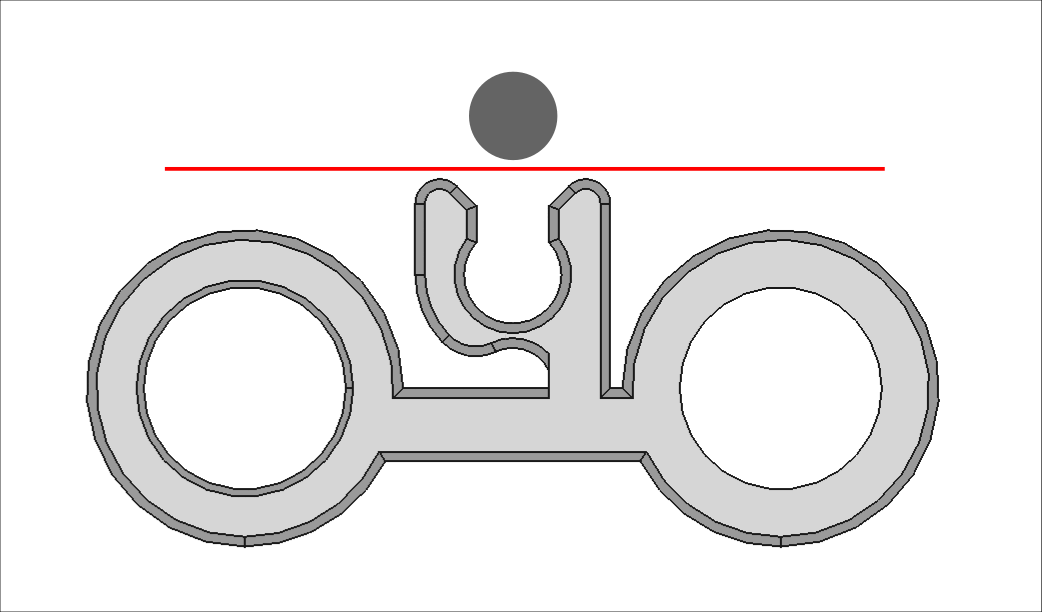
Looking at the profile of these model, you can see 3 channels, 2 large circular channel (8.3mm in diameter) and a small ‘U’ shaped channel.
In the large circular channels will run 8mm rods linking the different pieces together. The ‘U’ shaped channel is actually 4mm in diameter near the bottom and a little more closed of at the top, the bottom of the ‘U’ is 1mm thin allowing a tiny bit of flexibility. During the assembly step, in the ‘U’ shaped channel, the screen will be pushed down and fixed in place through the combination of the flexibility of the channel around the screen and a metal rod (4mm in diameter)
- Corner pieces
The corner pieces are here to provide a good transition between 2 perpendicular sides, you will find the 3 channels: the 2 large circular ones and the ‘U’ shaped channel
Assembly


Choose the size of your screen taking into account at least 5cm as a margin all around your design
Print the four corners of the frame (note that technically, with this technique, you can change the shape of the frame to any polygon by designing your own corner piece)
Print enough side pieces to match the size required by your design to screenprint. The models provided are 50mm in length but you can print shorter and/or longer ones. In the example presented in this instructable, I am using 2 side pieces in width and 3 in length (I printed 10 side pieces total +4 corners)
Cut the rods to size, you will need one long 8mmOD, one short 8mmOD and one 4mmOD rods per sides. If ‘N’ is you number of side pieces on a given edge, cut the long 8mmOD to (N*50+59)mm, the short 8mmOD to (N*50+27)mm and finally the 4mmOD to (N*50+33)mm
With the two 8mmOD rods, assemble the side pieces with the rods poking out of the sides pieces as shown on the figure above
Press everything together to form the frame. Tensioning the screen (in the next step) will hold everything together hence, there is no need for screws nor adhesives to hold the frame together
Setting the Screen on the Frame
.gif)


In screen-printing, everything comes down to the right tension at which the screen is placed around the frame. Traditionally, the screen is stretched over the frame and held in place with staples going into the frame (although I think modern aluminum screen-printing frame are done differently nowadays). This make this “3d printed” frame a bit easier to reuse.
To start the process, once you have cut a larger-than-frame piece of screen, hold it in one corner of the frame and press down the screen into the ‘U’ shaped channel by pressing down on the 4mm rod, the rod is supposed to flex the bottom of the channel and get stuck in the channel holding the screen in place
Go to the other side of the frame and repeat the process whilst making sure the screen is streched as much as possible during the process. Do the other 2 sides and this should get the screen rid of any and all wrinkles. If you are not satisfied with the result, you can actually redo this process as long as the screen is not damaged. To help you set the 4mm rods in place, I have used a plier to force them into locking in the channels
And now, you are done ! The rest of this instructable is just an example of regular screen-printing technic
Screen Coating

The emulsion is what will fill the holes in the screen as to mask the parts you do not want to paint at the end. I am using a 1 step emulsion I found on Amazon but I am sure that there are other solutions. The emulsion is UV photosensitive, the next steps (all the way until the end of the development process has to be conducted in a UV-free environment)
For a small screen like that, I use a credit card shaped card as a spatula onto which I pour the “high” viscosity emulsion, I usually apply the emulsion in 3 passes, first the top side (side that will be pressed down on my final workpiece), then the back side then the front again. I have learned through experience (although now that I think of it, it should have been more obvious) that drips residue of the emulsion on the screen can cause big problems later. It is of paramount importance to not give the screen more emulsion than necessary.
Creating a Mask


The mask is the pattern that we will develop onto the screen emulsion (much like photographs only much easier), the dark parts of the mask will be the parts through which the screen will let the ink (or paint or whatever) go.
Solution N°1 Inkjet printer on tracing paper
Usually, I simply print my design on tracing paper using an entry-level inkjet printer (I suspect that it would also work on a laser printer) and running the same sheet of tracing paper maybe 3-4 time in order to build up the layers of ink for the design to be as opaque as possible but my printer does not seem to be working, onto solution number 2!
Solution N°2 Drawing with a sharpie on tracing paper
You can simply draw your design on the tracing paper using a very opaque ink felt pen which is exactly what I did in this Instructable. I drew my mask on both sides to make the design as opaque as possible.
Drawing your mask on tracing paper also allows you to copy an existing design on the tracing paper that immediatly becomes the mask for the next step, you can copy, combine, correct the mask very easily this way (especillay if you know how to draw which I dont)
Developing the Screen


After having the frame with the screen drying in a dark room for several hours (I usually wait 24-48h), I placed the frame front side up, I laid down the design upside down and then a piece of glass or acrylic (to press the mask flat against the emulsion) and I put my UV lamp above (30-40cm). Of course it depends on the emulsion and the lamp you are using, but for me, an exposition of 30s is enough. After those 30s, I turned off the UV light and washed the frame in the sink using light strokes of a soft brush (I am using an old toothbrush). I can then dry the screen (the screen is safe to be exposed to sunlight at this point)
Happy Printing !


You can use different inks and paint through a screen, it has to be runny enough that you can push it through the mesh of the screen but not so much that it would get under the screen and mess up the crisp lines you get by using something like acrylic paint. Place your paint on one side of the screen (not directly on top of your design) and then drag the paint with a spatula over your design.
There are 2 things to be carefull about:
- Make sure that the screen will not move during the printing process
- The screen should not touch the surface of your art piece, it should ideally be 1-2mm above. Through the applied pression of the spatula as your are dragging it along your design the screen should strech a little touching the artwork and then coming back up. This prevent smudges along the lines of your design and makes sure you keep a crisp line on the edges of your artwork. I have used 2 strips of thin cardboard (~1mm between the screen and the substrate on which I am printing)
Here you can admire the result of not having to write by hand “BOX N°” on my cardboard boxes for my next move!