A Low Cost 3D Printer With Basic Tools
by hschlech in Workshop > 3D Printing
180295 Views, 1727 Favorites, 0 Comments
A Low Cost 3D Printer With Basic Tools
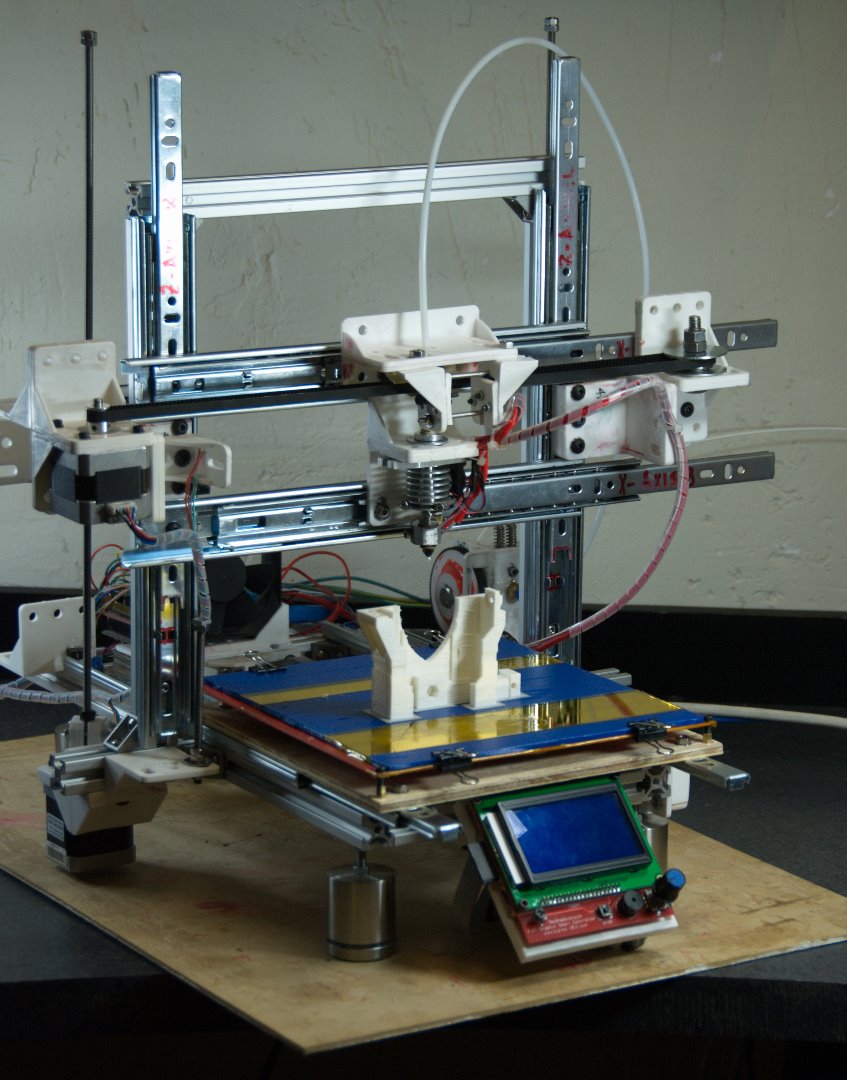
Introducing the 'Ad(str)apto'
Welcome to our 1st attempt at doing an instructable. This is a cheap, quick and very 'hackable' bootstrap printer loosely based on the reprap 'Adapto' (http://reprap.org/wiki/Adapto) The print volume of this printer is approximately 8 litres (200x200x200mm), but could easily be adapted to print a bigger volume.
But first, a few words of warning:
- Use safety glasses when using the power tools, especially the Dremel - the glasses are much cheaper than a visit to an eye specialist.
- You will be working with high voltages (120v/240v) when building the switch and connecting the power-supply, so common sense should prevail - contact an electrician for advice if unsure.
- Although Acetone is not considered a hazardous chemical, you will be working with it a fair amount of time and it could cause some problems if not using gloves and/or working in a well ventilated environment.
- You will be working with items that get hot, e.g. cutting metal and plastic, soldering irons, the 'hot-end', which by its very name is designed to get extremely hot, etc. - so take care when handling it.
- And finally, a warning copied from the reprap.org wiki:
"Once you start putting electricity into your Reprap - even at just 12 volts - you have to take basic common sense precautions to avoid fires. Just in case these fail - test your workshop smoke detector. Got no smoke detector? Get one!"
Who this guide is for
Anyone who wants to own a 3D printer, but does not have access to a laser cutter, CNC milling machine or 3D printer.
What this guide covers
This instructable will cover everything that you need to build your very own 3D printer. We will not go into great depth regarding the electronics or software, but will provide you with enough information and links to sites to get you started. Although we did our best to provide accurate and concise information, we worked with a very tight deadline and are sure that we did omit something. Please indicate such in the comments section and it will be updated. Also, any suggestion, shortcut or improvement will be appreciated.
In action
Usage
- Normal text will be used for standard content
- Italics for quotes and warnings
- Bold text to highlight a point
These text boxes for our ramblings, which can be safely ignored
- Look out for little 'Note' rectangles on the photo's - they will highlight errors, omissions or important points when you hover your mouse cursor over them.
And finally it's time to dip into your wallet, dust off the Dremel, crank up the volume and melt some plastic!
Results - 1st Print
.jpg)

.jpg)

.jpg)

We printed a 'Quick-Fit X carriage and Extruder - LM8UU', an excellent design by RichRap (http://www.thingiverse.com/thing:1959), in the video in the previous step. The part on the right hand side of the 3rd photo was printed with a 1mm nozzle, and required some attention with a stanley knife. The 2nd part (still stuck to the print bed) was printed with a 0.4mm nozzle - both at 0.3mm 'Quality' and 30% infill. The M5 nut was pulled into the trap with the minimum amount of fuzz.
The last photo might be a pointer to our next instructable - 'a low cost, lightweight, freely available iPhone tripod mount with no tools'...
Shopping List


This is the bill of materials, based on the components we used.
I did not shop around – so I’m sure you will get better deals on eBay or alibaba.
It will be interesting to see what the basket cost, broken down into the four categories, is for the various countries – please post a comment if you do get around to building the printer.
Here are links to the Excel workbook & pdf:
http://www.cirius.co.za/rr/BOM.xlsx
http://www.cirius.co.za/rr/BOM.pdf
(There are some corrections on the 2nd photo - I've updated the .pdf and .xlsx accordingly - 26 June 2015)
Here are links to some of the local suppliers we used:
(instructable bug: right-click and select open in new tab)
Tools, Consumables, Electronics & Fasteners

.jpg)


Tools
- Dremel
- Drill (bench drill recommended)
- Vise
- Stanley knife
- Allen keys (4.0, 3.0, 2.5 & 1.5mm, ball-end set recommended)
- Woodworking marking gauge
- Square
- Metric wrenches (13, 10, 8, 7, 6) & 5mm socket
- Shifting spanner
- Tap (M5x-0.8) & T-wrench
- Vernier, digital caliper or ruler
- Pliers & side cutter
- Hammer (small)
- Metal files (2nd cut round, half-round & square)
- Soldering iron
- Glue gun (optional)
- Flat screw drivers
- Drill bits (22, 16, 5, 4, 3, 3.2, 2mm)
- Compass
- 10mm drill chuck (optional)
- Multi-meter (only resistance & continuity required)
- Pencil & permanent marker
- Scissors
Consumables
- Acetone (200-300ml)
- Rubbing alcohol (50-100ml)
- 3-in-1 oil
- Superglue
- Glue stick
- Lint free cloth & cotton wool pads
Electronics
- Arduino MEGA 2560
- RAMPS 1.4 & 4x Allegro A4988 driver boards. (You could also use alternatives, e.g.RUMBA, 4Pi, Duet, etc.)
- 5x Stepper motors - we used the Wantai model 42BYGHM809 for the Y-axis and DFRobot FIT0278 for the rest.
- Mk2A PCB Heatbed by Josef Prusa (http://reprap.org/wiki/PCB_Heatbed)
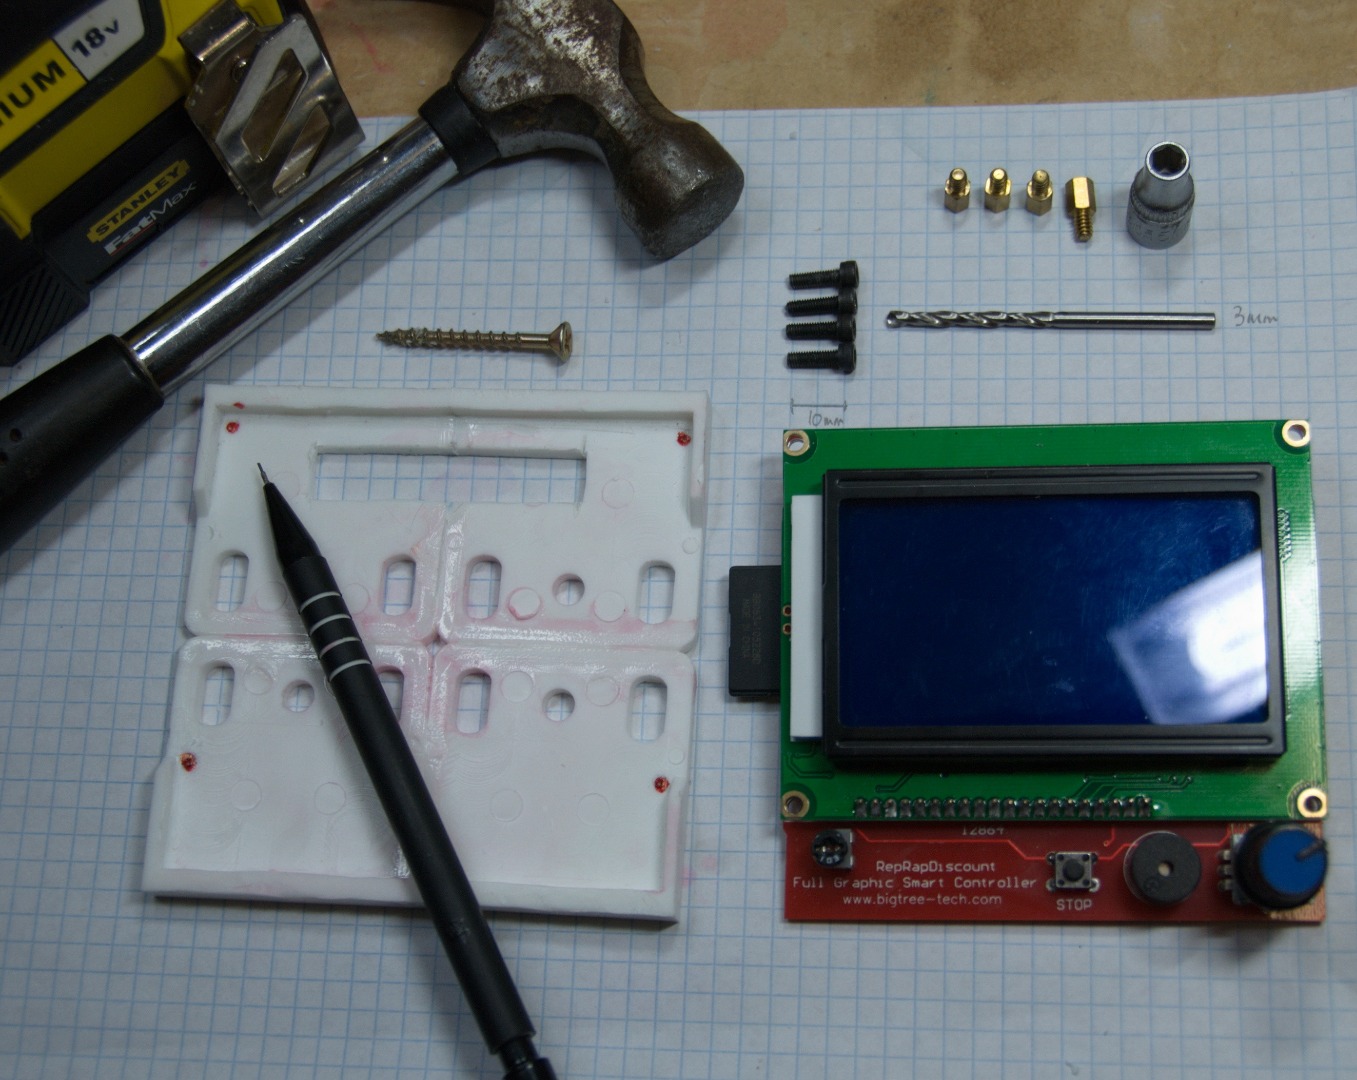
- Optional LCD smart controller (http://reprap.org/wiki/RepRapDiscount_Full_Graphic...)
- 12v / 20A Power supply
Working With Plastic Brackets

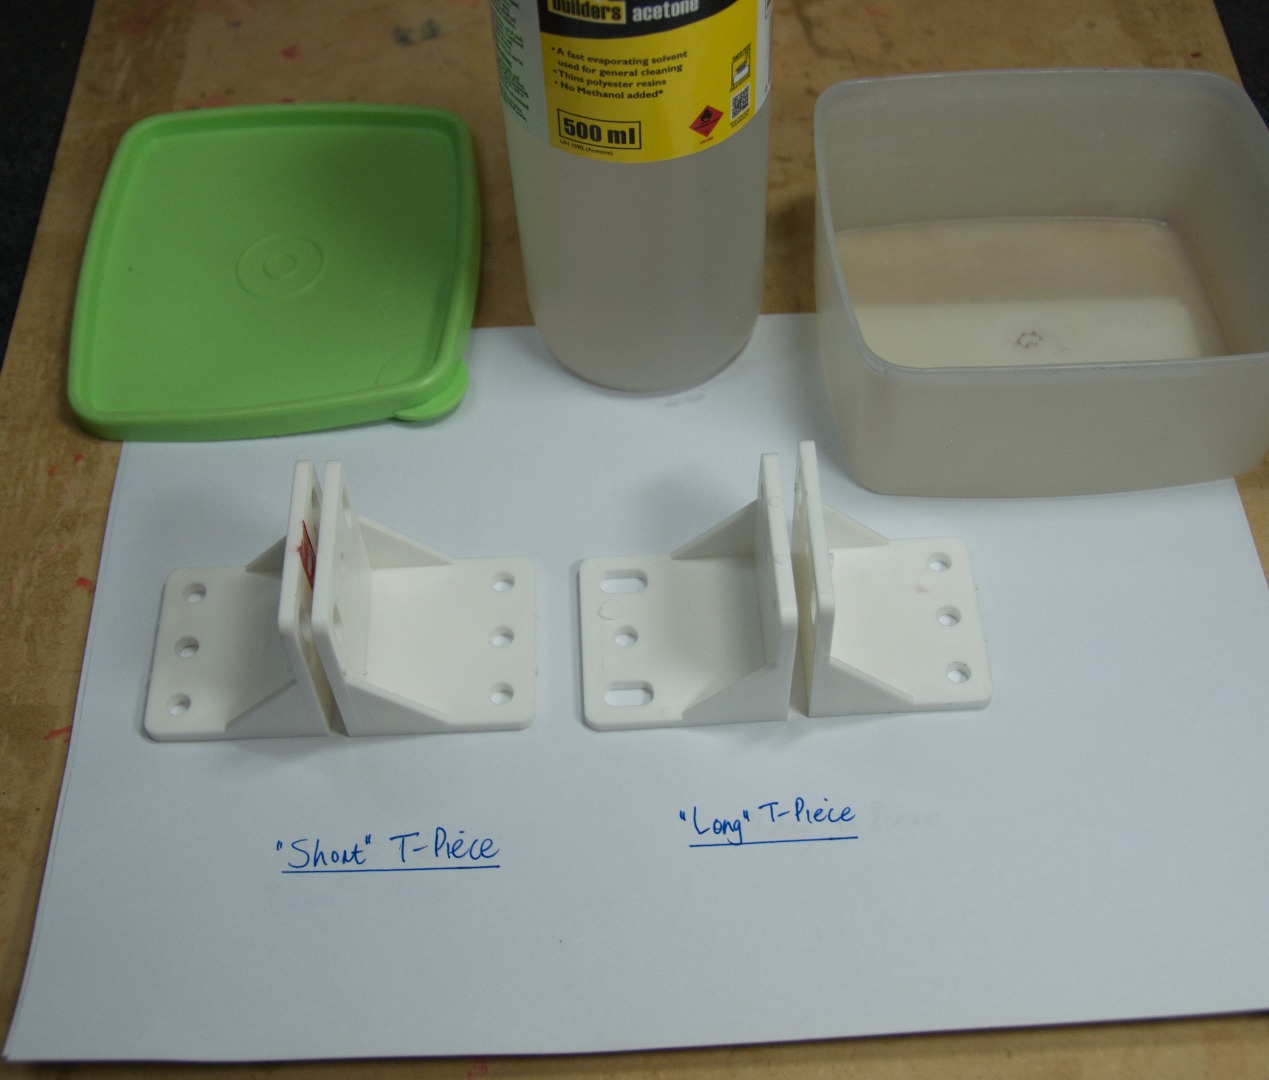


These plastic brackets are lightweight but rigid enough to hold everything in place, while still allowing you to drill and join them easily.
Joining brackets
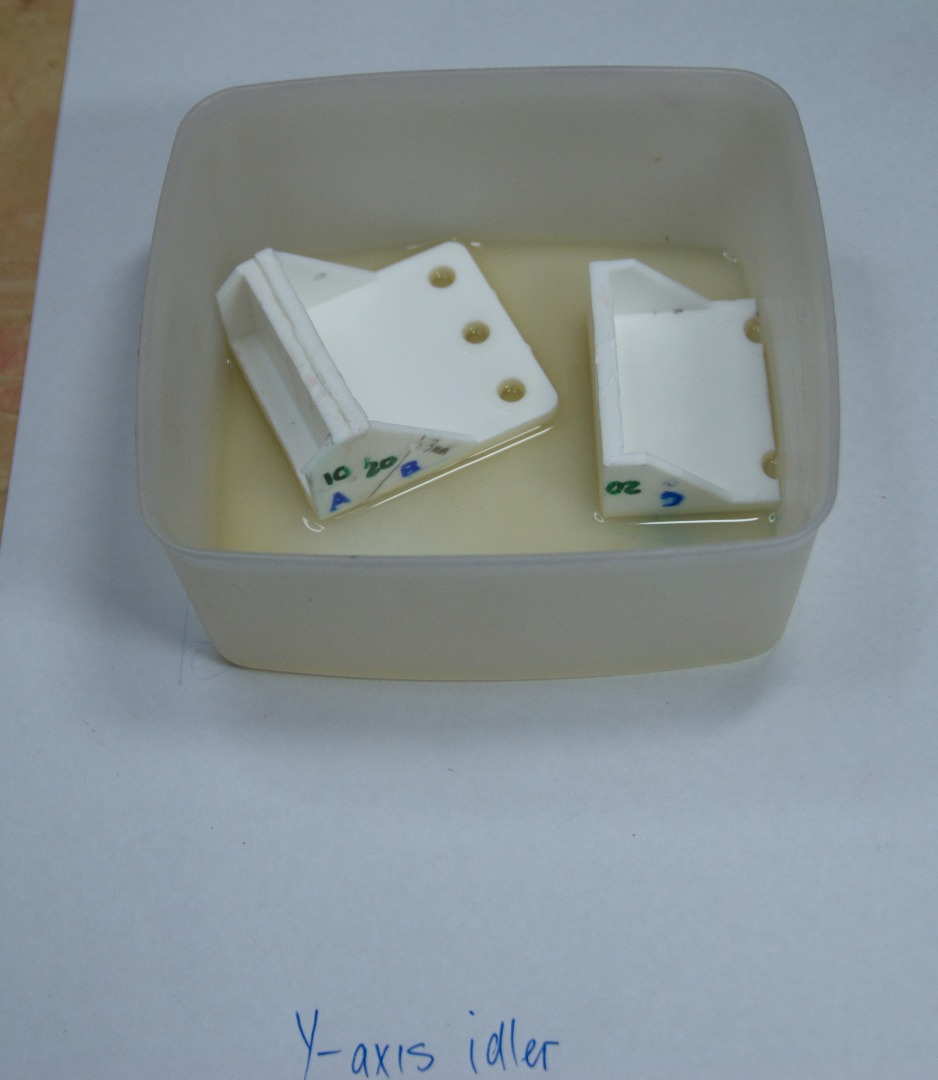
For a lot of this build we join together plastic brackets using a method called solvent welding - it will only work with ABS plastic though. To do this, pour a little acetone (about 3 mm deep) into a container that will not melt – most plastic food containers will do. Place the brackets that you want to join into the acetone, immersing the sides that you wish to join. After about 30 seconds remove the brackets and push the 2 wet sides flush together. Hold them there for about 30 seconds. They should now be stuck together but will take about 30 minutes to fully cure. In this time, do not put stress on the join, but you should be able to continue working with the piece.
For more info on this look here: https://en.wikipedia.org/wiki/Plastic_welding#Sol...
Working With Ball Bearing Drawer Runners

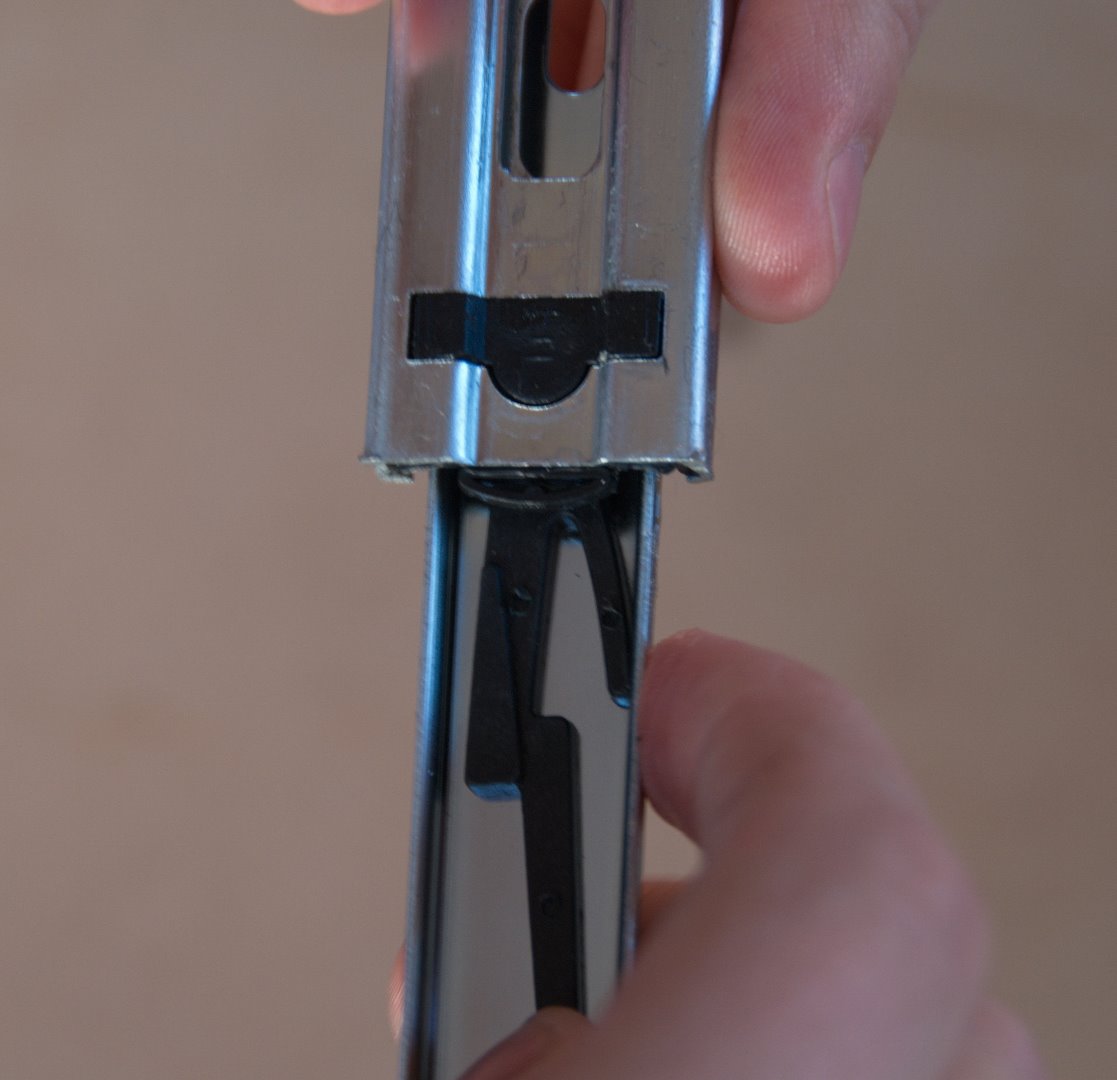
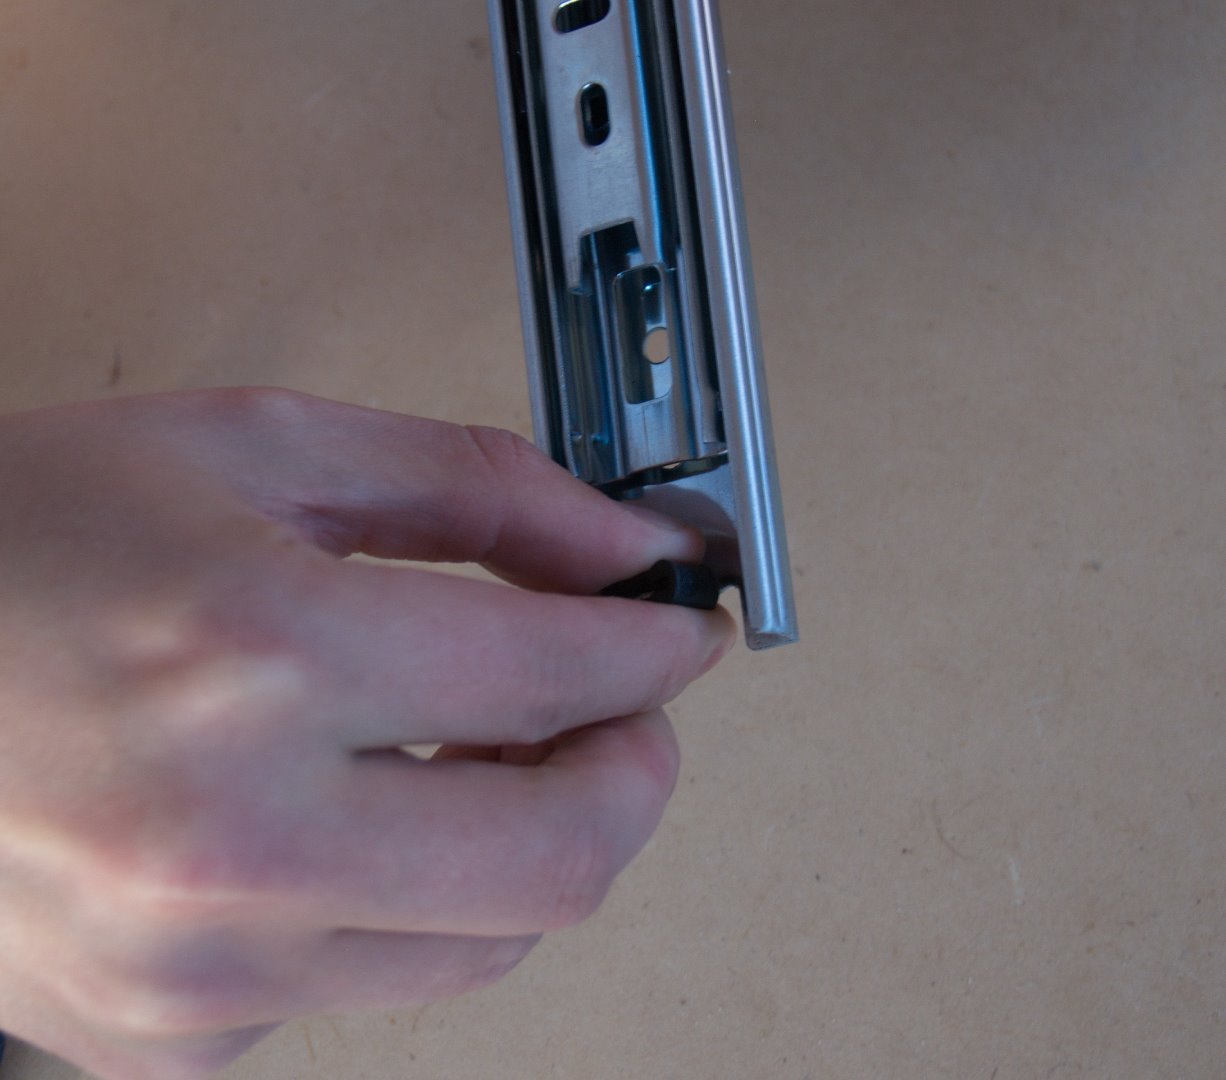

These drawer runners are the reason why you can build a very robust printer for such a low price - you get fairly precise movement on all the axes for the price of a single pair of linear bearings. They are easy to work with and take apart, they offer a smooth linear motion, but are rigid enough for precision printing.
Where to find them
A quick Google for “ball bearing drawer runners” should be able to help you find them locally. They are available from most hardware or DIY kitchen stores and you should be able to source them for approximately ZAR20.00 ($2.00) per pair, e.g.
http://www.ebay.co.uk/itm/Ball-bearing-drawer-runn...
http://www.gelmar.co.za/drawer-runners/35mm-full-e...
Try to keep the work environment clean when drilling, cutting or filing, since the bearings are exposed and the filings/shavings quickly gets engrained in the bearing grease.
Taking the runners apart is pretty simple – there are normally only 2 things holding them together:
- A small metal tab with rubber bumper that can easily be bend down (and back later), but permanently remove the rubber bumper - it is not required.
- A small plastic clip that is riveted to the inside runner.
If you can’t get them back in look at another complete one as a reference as to how they are put together.
Tapping holes in the runners
We tap holes in the aluminium runners where possible so that we don’t have to use nuts. This not only saves on the cost but it also means that the runners, or things that are mounted to the runners, can be removed easily without having to undo nuts. This will save you a lot of time as there will be many times that you will want to mount and unmount items from the runners.
How to tap a hole: Drill a hole 1 size smaller than the bolt you want to use. Slowly turn the tap in the hole until it has gone in a few millimeters. Slowly screw the tap and you are done
Print Bed: Materials & Tools


Materials:
- 220x220mm 6mm Plywood
- 2x 300mm ball bearing drawer runners
- 2x Type 'A' brackets
- 2x Type 'B' brackets
- 4x 20mm M5 cap screws
- 4x 10mm M5 button head screw
- 4x 10mm M5 button head screw (cut shorter to ~6mm)
- 1x 50mm M4 cap screw
- 4x 10mm M3 cap screws
- 6x M5 hex nuts
- 4x M5 square pressed nuts
- 1x M4 hex nut
- 4x M3 hex nuts
- 8x M5 star washers
- 4x PC motherboard standoffs
Tools:
- Electric drill
- Dremel, jigsaw, coping saw or hacksaw blade
- 8mm combination wrench
- 5mm socket
- M5x0.8 Tap and T-wrench
- 2.5, 3.0 & 4mm metric hex keys (Allen keys)
- 3, 4 & 5mm drill bits
- Light hammer & centre punch
- Stanley knife (not shown on the photo)
- Square ruler
- Woodworking marking gauge (optional)
- Pencil
You should be able to get an off-cut piece of 6mm plywood from any specialist wood supply store for free and only pay a nominal charge for having it cut to size (you want this cut fairly square). You can use either stainless steel or high tensile screws and nuts. Use some 4.0x 40mm cut-screws as a substitute for the centre punch.
Print Bed: Plywood Body


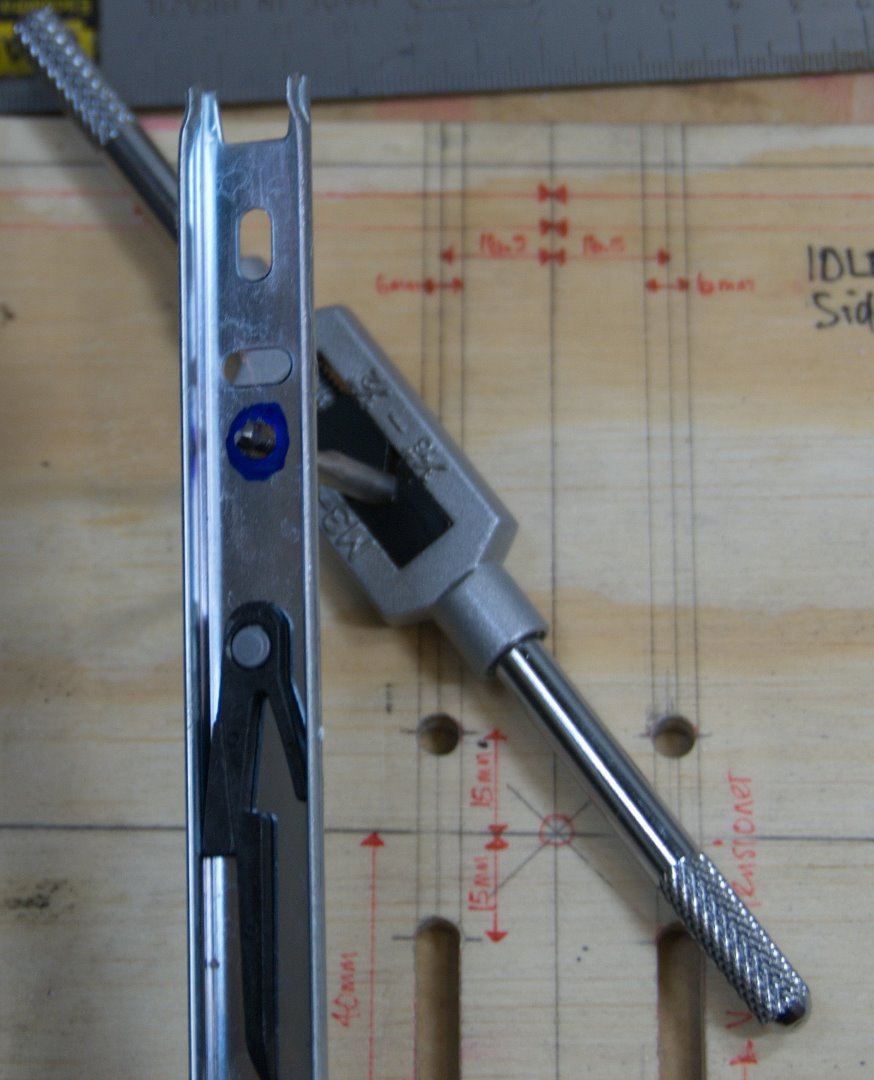


- Start by marking the centre of the 6mm plywood by drawing two diagonal lines from the corners.
- Draw 2 lines down the centre of the board to divide it into 4 quarters. (X-axis and I've marked the 'Idler' and 'Stepper motor' ends along the Y-axis).
- Mark and draw 4 lines 105mm from the centre lines. At each intersection of these lines, use a centre punch to mark the position for the four 3mm holes.
- Draw 2 lines 90mm from the centre Y-axis line. Remove the 300mm drawer runner centre piece (refer the 'how-to' in step '2') and use it as template along these lines to mark the position of the four 5mm holes.
- Mark four 5mm holes 15mm from the X-axis and 16.5mm from the Y-axis centre lines. Mark an additional two 5mm holes 40mm from the X-axis and 16.5 mm from the Y-axis centre lines.
- Centre punch and drill all 3mm & 5mm holes as indicated.
- Use the Dremel and/or hacksaw blade to cut the Y-axis tensioner slider channels.
- Tap the holes indicated in blue on the drawer runners to 5mm and enlarge the elongated holes (marked in red) with a 5mm drill bit.
- Fasten the drawer runners with 2x M5 10mm button head screws and star washers to the plywood board (the star washers go on the wooden side).
- Use the other two sets of M5 10mm button heads, nuts and star washers to fasten the runners to the plywood through the elongated holes indicated in red (the button head is on the runner side and the washers and nuts on the wooden side). Please note that I've got the runners mounted the wrong way on these photo's - the fold-down tabs, next to the holes marked in red, should be on the idler end.
- Turn the board around and use the 5mm socket to hand-tap the four standoffs into the 3mm corner holes.
Print Bed: Y-axis Tensioner


Tools: Drill, Dremel or saw, tap
Materials:
2 x Type 'A' brackets
2 x Type 'B' brackets
1 x ~750mmm timing belt
1 x 100 mm bolt
4 x M5 screws
4 x M5 star washers
Process:
Take the two Type 'A' plastic brackets and mark them as indicated. On the long side with the elongated holes:
- Mark & drill a 4mm hole for the M4 tensioner bolt centred, 8mm from the edge.
- Mark & drill two 3mm holes, 14mm apart and 18mm from the edge for the belt clamps.
- Drill three 3mm holes on each of the red lines, 26 and 31mm from the edge. Use a Stanley knife to cut ~8mm slots for the timing belt to fit through.
- With your Dremel, cut along the square's lines, 4mm from the centre line, break it off with some long-nose pliers and cut the inner edges square with a Stanley knife.
On the short 45mm side, mark & drill two 5mm holes, 12mm from the angle edge and 8mm from the sides.
Using the two Type 'B' plastic brackets:
- Measure and drill two 3mm holes, 18mm from the angle edge and 5mm from the side.
- Cut the end a further 5mm further on with your Dremel. Also cut the top, in line with the bottom, off as shown to be used as tensioner tabs.
Print Bed: Assembly


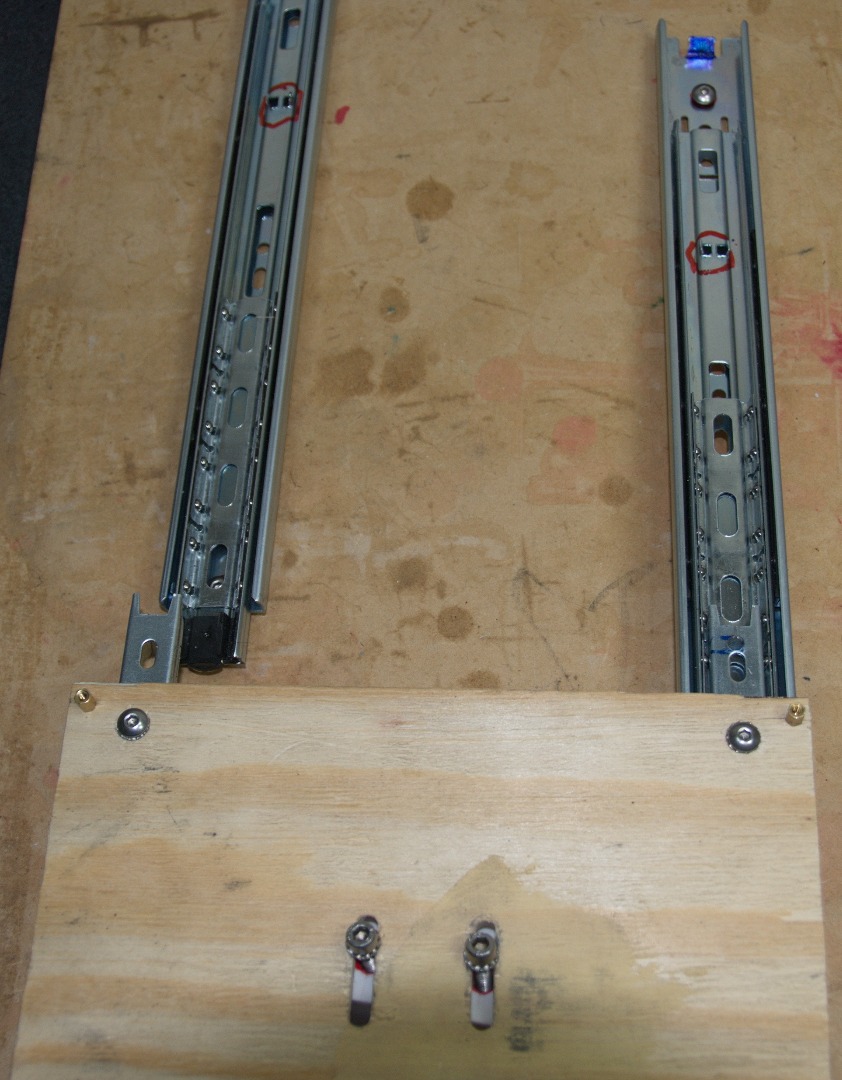

Mount one Type 'A' bracket on the idler side of the plywood board with two 20mm M5 cap screws, star washers and nuts and tighten until the star washers bites into the wood. Do the same with the other bracket on the stepper motor end, but only tighten lightly at this stage.
Wind the timing belt (teeth facing upwards) through the two cut slots in the idler side bracket and affix the one tab cut from the Type 'B' with two 10mm M3 cap screws and nuts, tightening it fairly tight. Do not affix the other end of the timing belt as yet - it needs to be wound around the idler bearing first.
Mount the 50mm M4 cap screw and nut through the 4mm holes of the two large brackets - this will be your Y-axis tensioner.
Now take the two 300mm drawer runner frames, remove the rubber bumpers and bend down the end-stops (highlighted in blue) with some pliers. Add a 6mm cap screw to each hole just below the end-stop and hand tighten a M5 square pressed nut at the back. Move the inner body of the runner over the blue end-stops to expose the hole at the other end of the frame, add another 6mm cap screw and M5 square nut. Move the inner body back into position and bend the end-stops back into its original position.
Y-axis: Idler




Y-axis: LCD Mount (optional)




Z-axis Threaded Rod Carriage (x2)


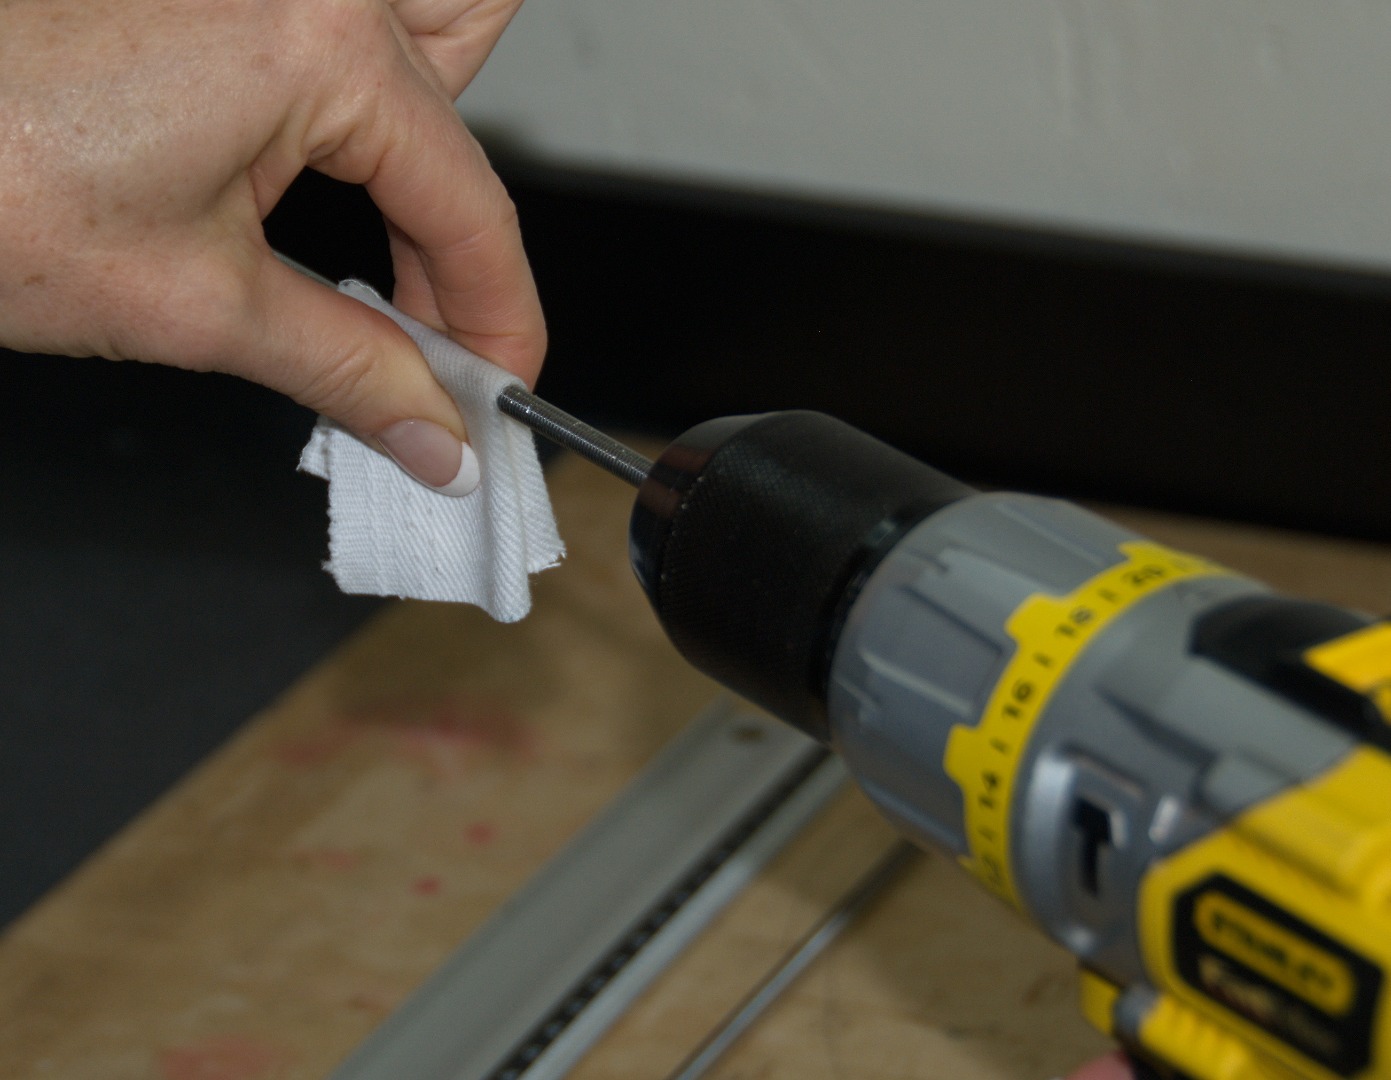


Materials:
- 2x 'Long T-Pieces'
- 4x 20mm M5 button head cap screws
- 12x M5 nuts
- 8x M5 star washers
- 2x 400mm M5 stainless steel threaded rods
- 2x 30.5x7.3mm steel compression springs (RS Components #751578, not reflected in the BOM, yet)
- 3-in-one oil
- Blue painters tape (or insulation tape)
- 4x M5 nuts (optional)
Tools:
- Drill & 5mm drill bit
- Epoxy
- 8mm wrench
- Small shifting spanner
- Lint-free cloth (we used some white denim material)
Drill a 5mm hole in each inner (mirrored) corner of the 2 'Long T-Pieces', 10mm from each side. Remove the thread from four M5 nuts with the same 5mm drill bit.Thread the rod through the hole of the 1st T-piece, adding a M5 nut without thread, followed by a M5 nut with thread, the compression spring, M5 nut with thread, M5 nut without thread and finally exiting the 5mm hole on the other side of the T-Piece. Repeat procedure with the other M5 rod and T-Piece.
Screw the M5 rod with your hands up and down the M5 nut/spring combination, until it screws in & out easily (it helps to lock 2x M5 nuts at the end of each M5 rod).
Mix some epoxy and glue the 8 M5 nuts (4 with thread and 4 without) into the corners of the T-Pieces, taking care not to get any epoxy on the threaded rod.
Final preparation
(This should only be done after the epoxy is set: 6-8 hours)
Wound approximately 3 layers of blue painters tape around the end of the M5 threaded rods. Drip some 3-in-one oil onto a folded piece of lint-free cloth and mount the threaded rod into the drill. Place drill in reverse mode and while firmly clamping the oil soaked cloth between your fingers, 'reverse' the cloth to the other end at a slow steady pace.
Screw the Z-axis carriage onto the threaded rod, add some more 3-in-one oil to the 'nuts with thread' inside the brackets and 'drill' the carriage to the threaded rod end closest to the drill, also at a steady and slow rate.
Optional: Add two M5 nuts to the far end of the rod and lock in place with the wrench and shifting spanner.
X-axis Motor & Idler Mount


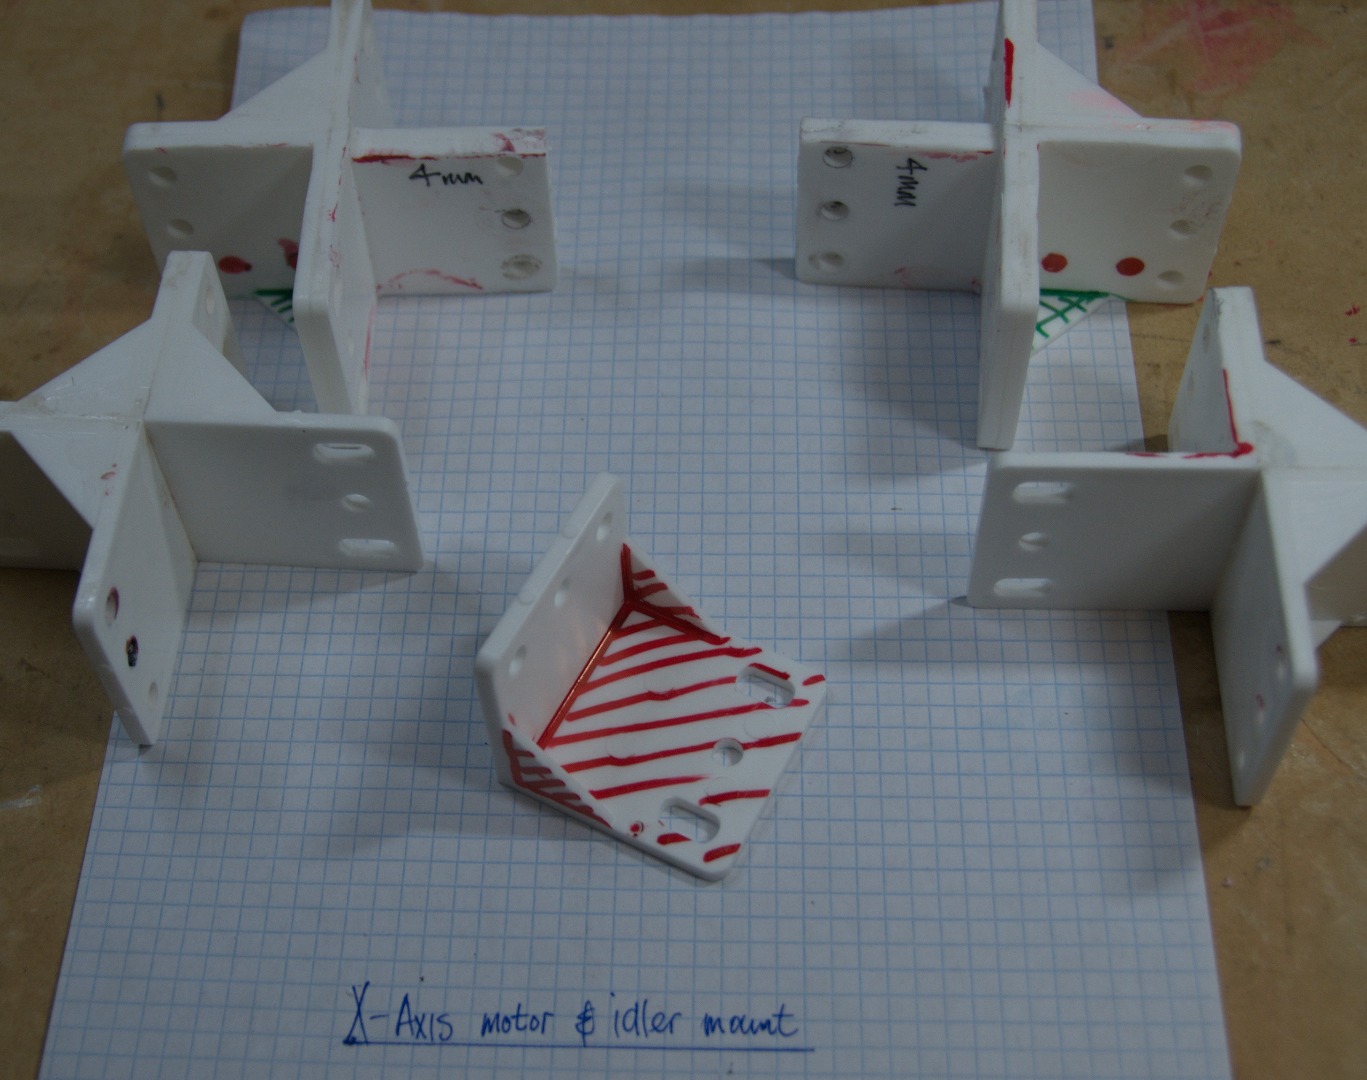


Materials:
- 2x 'Crosses (X)' - refer Step 4 - working with plastic
- 2x 'Short T-Pieces'
- 4x 'Type A' brackets
- 6x 20mm M5 Button head cap screws
- 2x 20mm M5 cap screws
- 16x M5 star washers (optional)
- 8x M5 nuts
- 4x 10mm M3 cap screws
- 4x M3 washers (optional)
- 1x 40mm M8 bolt (can be shorter - 25mm)
- 1x M8 nyloc nut
- 2x large M8 washers (38.0 x 1.5mm)
- 2x M8 washers (16.0 x 1.0)
- 608ZZ bearing
Tools:
- Dremel
- Marking gauge
- 13mm wrench
- Small shifting spanner
- Pencil or permanent marker
- Acetone
Cut away the corner pieces on the two 'Crosses (x)' and indicated in red in the 2nd photo. Note that the bottom corner pieces marked in green should not be cut away (3rd photo). Mark and cut away the 4mm edges - this is the part that will mount the X-axis motor and idler to the Z-axis runners.
Place the 'Short T-pieces' and two 'Type A' brackets in acetone and weld as shown in the 4th photo (take note of the location of the elongated holes when doing this)
Use another two 'Type A' brackets and cut the long edges away as shown in the 5th & 6th photo (only one shown). Mark and cut away 4mm from the edge (2x) and acetone weld these two pieces together. (We did this in two steps, since we though we'll only require one of these to be used as a spacer when mounting the X-axis idler to the Z-runners). Place these two welded spacers in acetone, dribble some acetone onto back of the idler (right hand) 'Cross (x)' where the 4mm edge was removed earlier (marked in green).
Cut away the corners of the motor and idler brackets as show in the 1st photo
Place the 3-bracket cross, welded in the previous step, onto the 4-bracket 'Crosses (x) from the 1st step as shown. Mark and drill the holes indicated in red and fasten with the 20mm M5 button head cap screws, (optional) star washers and M5 nuts.
Turn the brackets upside down and do the same from the other side and fasten with the remaining M5 button heads and two 20mm M5 cap screws in the 'tight' corner (9th photo).
Use the motor mount template, mark and drill the 3.2mm & 22mm holes for the stepper motor (left hand side bracket). Mount the stepper motor using the M3 cap screws and washers.
Use the same template, but only mark and drill the centre 'motor shaft' hole with an 8mm drill bit for the idler bolt. Affix the idler (M8 bolt, large washer, small washer, bearing, small washer, large washer and finally the M8 nyloc nut)
Do not attach the Z-axis threaded rod carriages now, it is only done in the last photo to show you how everything fits together
X-Axis Tensioner


The x-axis tensioner is used to tighten the belt that moves the hotend in the x-axis. The belt will go around an idler and the motor belt gear and then be joined in the center by the tensioner.
Tools: Drill, pen, dremel or saw, vice
Materials:
4x Type 'B'' brackets
2x Type 'C' brackets
4x 20 mm M3 screws
1x 50 mm M3 screw
6x M3 washers
5x M3 nuts
Belt clamps
- Take a Type 'B' and cut off the corner supports.
- Cut it in half at the bend - this will be used to clamp the belt against another Type 'B' bracket
- Take another Type 'B' and drill three elongated holes in it so that the belt can fit through them
- Take the other piece that we have just made and push it against the bracket. Mark and drill holes for the M3 bolts so that it does not interfere with the belt
- Thread the belt through the holes
- Thread the screws in the holes and the nuts on the end of the bolts but do not tighten yet
- Repeat the above so that we have 2 clamps
Tensioner
- Mark and drill holes in the long bracket so that it can be mounted to the x-axis. Use existing holes on the hotend carriage
- On the top of the long bracket mark and drill holes to attach the clamps. The one hole should be a elongated hole so that the one clamp can be moved closer to the other clamp to tension the belt.
As mentioned in an earlier step the belt should be tightened so that it makes a G note when plucked. We also added another Type 'C' bracket, acetone welded back to back to the other Type 'C' bracket for additional rigidity (will post an updated photo shortly)
Feet Construction


Materials:
- 4x Rubber doorstoppers
- 4x M5 square nuts
- 12x M5 nuts
- 4x M5 washers
- 8x M5 large washers (16.0 x 1.5mm)
- 4x 5 - 6cm M5 threaded rod
Tools:
- Dremel or hacksaw
- Drill
- 8mm metric wrench
- Small shifting spanner
- 5 & 8mm drill bits
Using some left-over 5mm threaded rod, cut 4 pieces between 5 and 6cm in length. Drill/enlarge the centre holes in the rubber doorstoppers to 5mm. Enlarge (counter sink) the hole at the bottom of the doorstopper with the 8mm drill bit to a depth of approximately 4mm. Push/screw the 5mm rod through the hole and add a small M5 washer and nut to the bottom, flush with the end of the threaded rod. Add a large M5 washer and nut to the other end. Use the 8mm wrench and shifting spanner to pull the M5 nut and washer into the 8mm bottom hole so it sits just below the surface of the bottom of the doorstopper. Add another M5 nut, M5 large washer and finally the M5 square nut.
To attach the feet to the printer, slide the M5 sqaure nut into the bottom slot of 430mm aluminium extrusion. Hand-tighten until the threaded rod touches the top of the T-slot extrusion, then tighten the adjacent M5 nut firmly with an 8mm wrench.
'Bling' option
http://www.gelmar.co.za/general/glass-accessories/...
Materials:
- 4x 25mm M5 Cap screws
- 4x M5 square nuts
- 8x M5 nuts
- 4x M5 large washers (16.0 x 1.5mm)
- 4x 40mm Glass supports
Remove the adjustable bottom part of the glass support. Enlarge the top hole with a 5mm drill bit. Use a normal Allen key to carefully guide the 25mm M5 cap screw through the hole, whilst holding the glass support vertically. (I've dropped a 25mm cap screw into the support and it's impossible to get out again)
Tighten with a M5 nut, then add another M5 nut, washer and finally the M5 square nut.
Frame: Y-axis


Frame: X & Z-axis


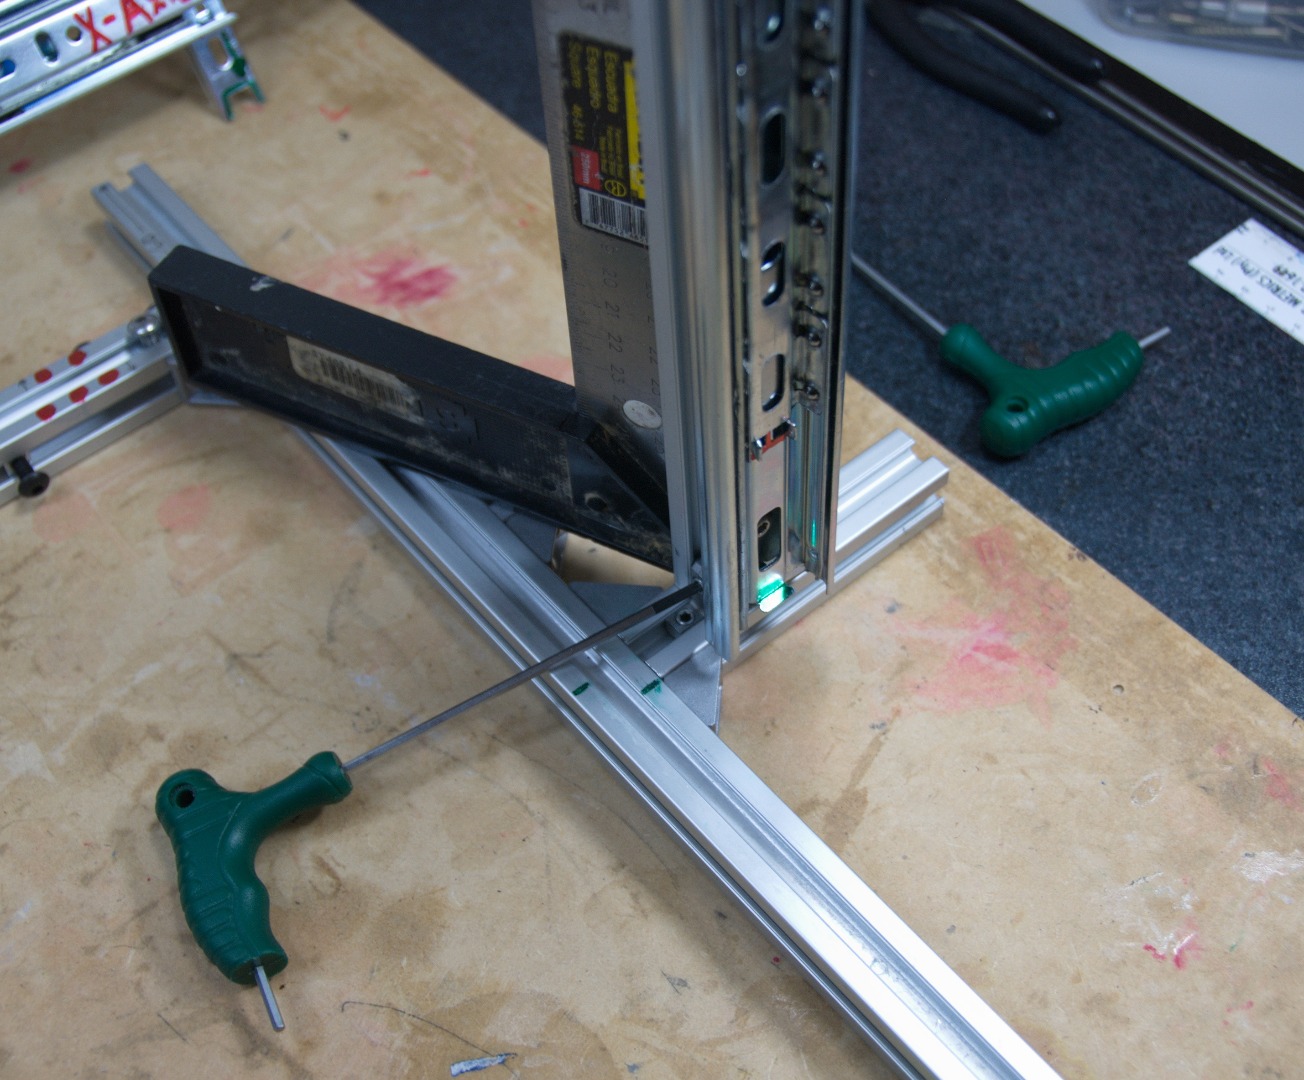
The z-axis frame is the vertical part of the frame. It holds the z-axis runners which in turn hold the x-axis runners.
Tools:
Materials:
4x 300 mm runners
2x 300mm pieces of aluminum extrusion (vertical frame)
3x 90mm pieces aluminium extrusion (vertical supports and motor mounts)
1x 300mm piece of aluminium extrusion (top)
6x Aluminium 'PG20 Die cast brackets'
6x ~6mm M5 bolts (frame to frame)
10x M5 square nuts
4x ~6mm M5 bolts (runners to frame)
Frame construction
- Layout the pieces of the frame
- Loosely attach the frame with the brackets
- Use the steal square to tighten the bolts to the frame. It is important to make sure that the frame is square
Attaching the runners to the frame
- Remove the top layers of the runners
- Using existing holes, thread bolts that will be used to attach the runners to the frame (If you're unable to source 6mm M5 bolts, then get 10mm bolts and cut shorter with the dremel)
- Screw the square nuts to the bolts
- Thread the top bolts onto the top (horizontal) part of the frame and the lower ones onto the vertical frame
- Tighten the nuts
Frame: Mount Print Bed


Z-axis Motor Mounts (x2)


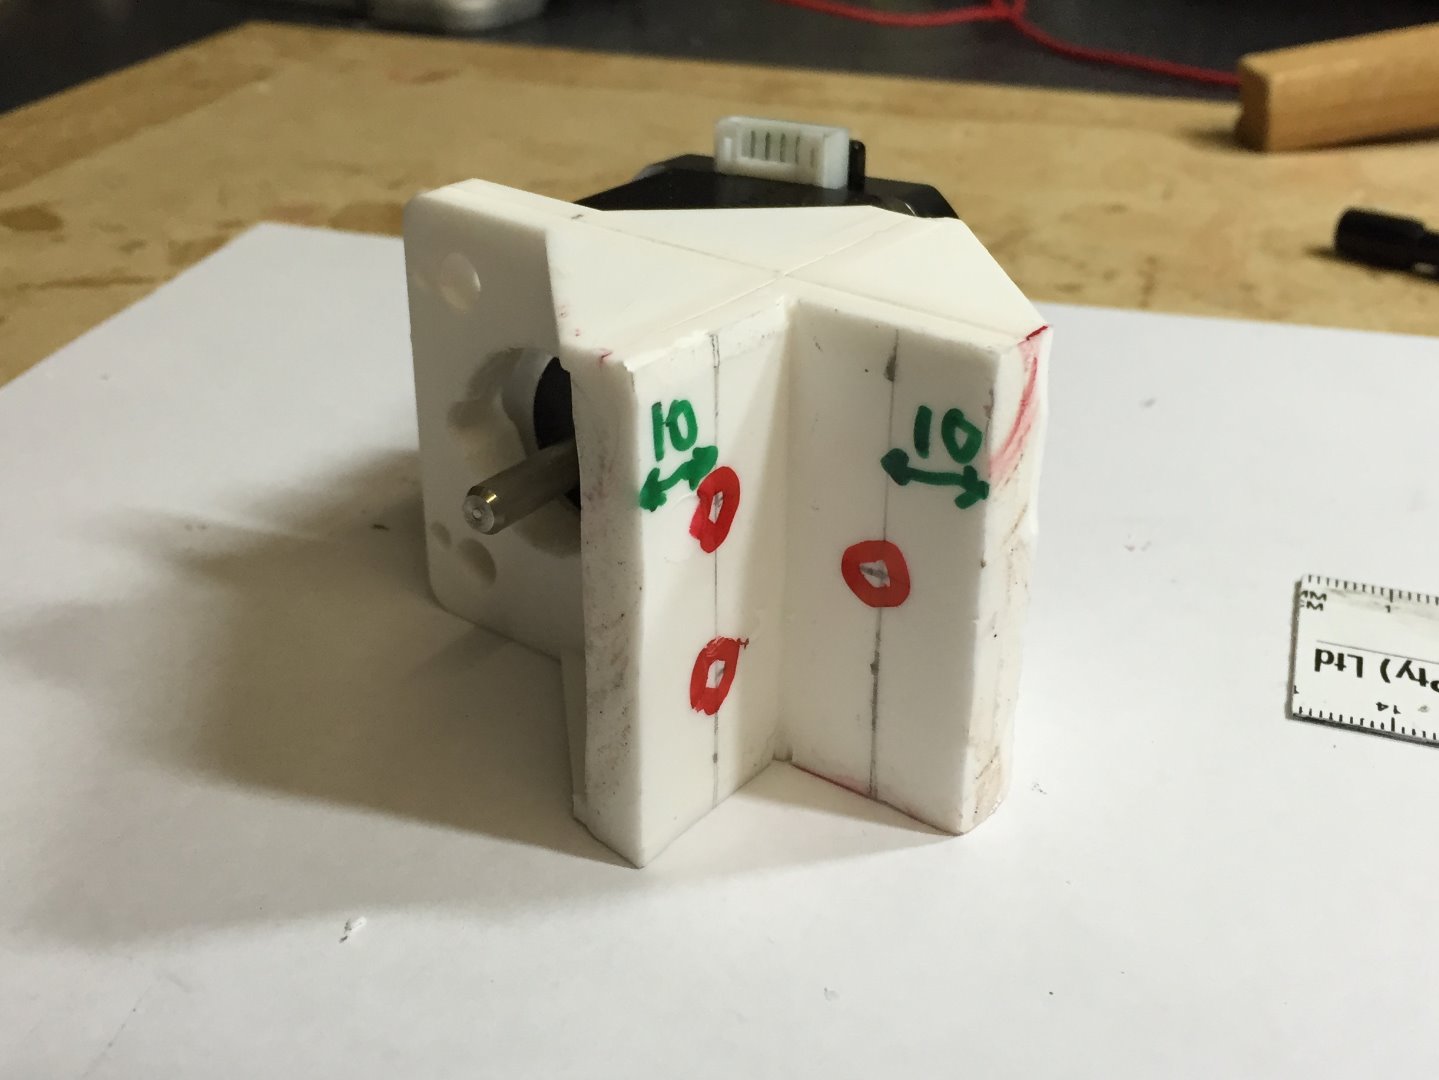
Materials: 4 standard size plastic brackets
Tools: Dremel, drill, 3.2mm drill bit, 22mm drill bit, file, acetone, hammer, nail, motor mount template (created above)
- Start by acetone gluing the 4 brackets together in an X shape using acetone.
- On one of the sides, use the motor mount template made in the previous step to mark where to mount the motor.
- Use the hammer and nail to create a mark for the drill
- Drill the motor mount holes using an M3 drill bit.
- Drill the centre hole with a large drill bit big enough for the motor (22mm).
- Cut off the 3 parts of the mount that are not being used
- Cut away the 2 corners of the brackets that will otherwise prevent you from mounting the motor mount against the frame
- Drill M5 holes where the motor mount will be attached to the aluminium frame. Since the frame is 20mm wide, this will be 10 mm from either side.
- Repeat the above so that you have 2 Z-axis motor mounts
- Mount the motor mounts on the 2 parts of the extrusion that stick out from the base of the frame.
Z-axis Assembly and Alignment
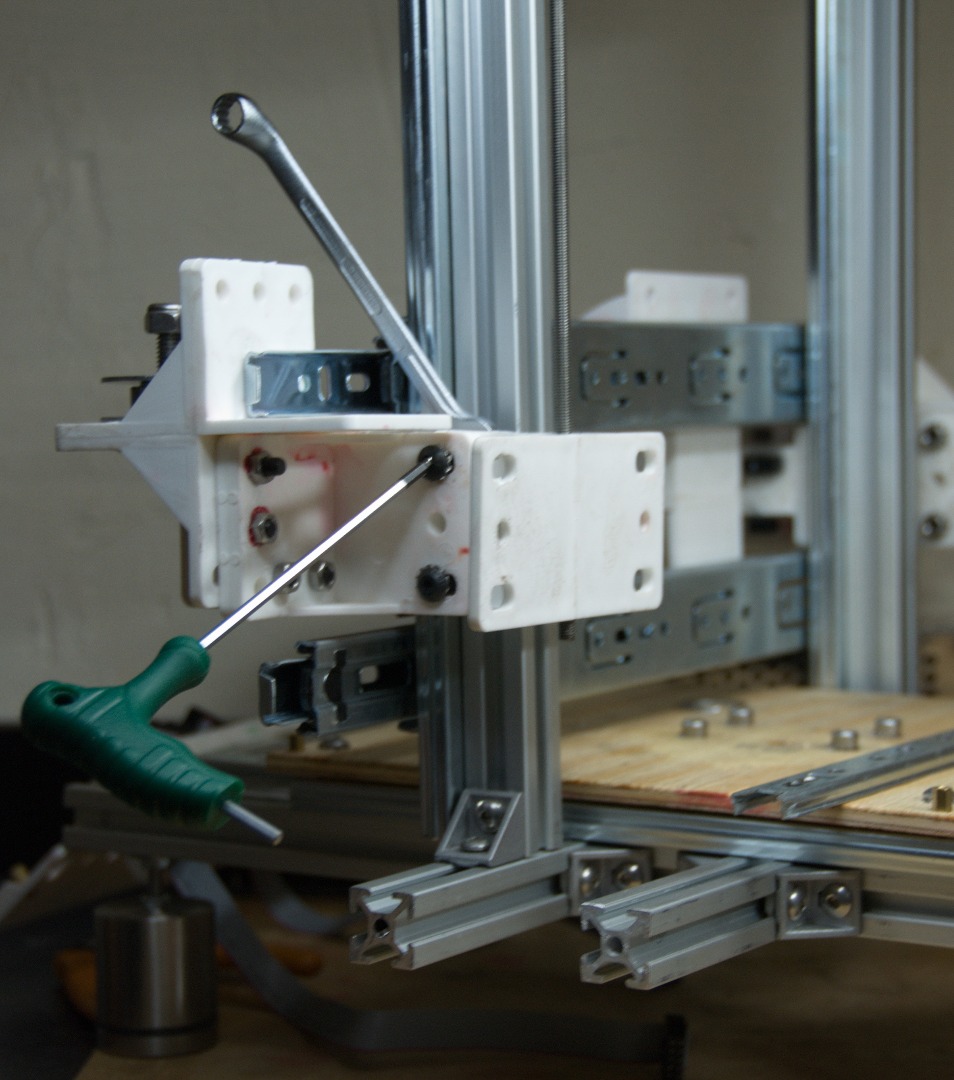


Z-axis Motor Couplings (clamps)
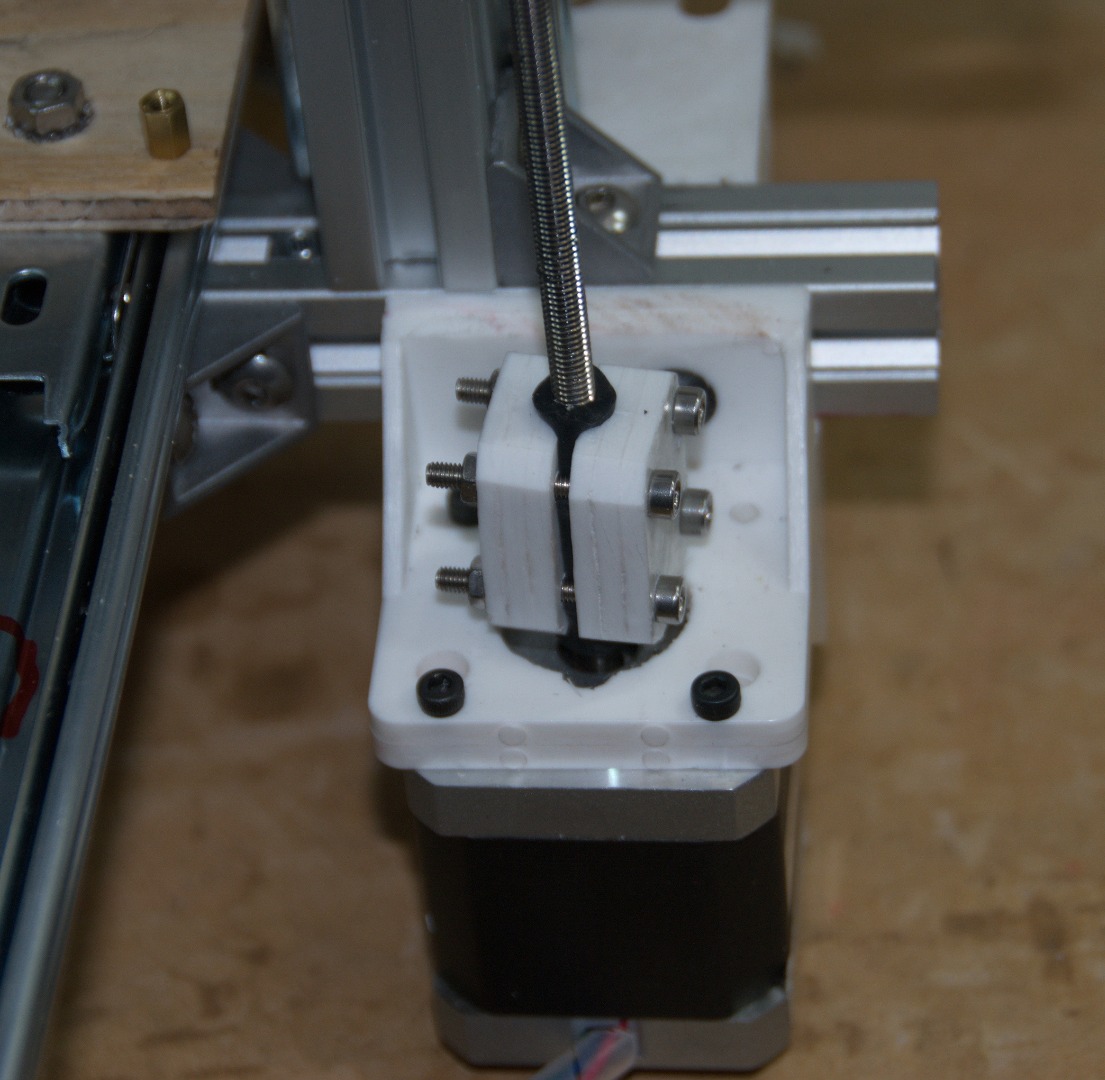


These couplings are 'blatant' copies of Nophead's excellent printed version (http://www.thingiverse.com/thing:9622) - I hope he doesn't mind. If you ever want to learn more about the 'art' of 3D printing, visit his blog (http://hydraraptor.blogspot.com) and also Richrap's blog (http://richrap.blogspot.com), but http://reprap.org/ should always be your first port of call.
Materials:
- 3x 'Type-C' plastic brackets (you might be able to get away with off-cuts for this)
- Acetone
- Latex surgical tubing: ~9mm OD & 4.5mm ID (we got ours from a slingshot)
- 8x M3 nuts
- 8x M3 washers (optional)
- 8x 25mm M3 cap screws
Tools:
- Drill
- Dremel
- 3.2mm & 6mm drill bit
Clamp construction
- Cut the long brackets into 4 pieces each (~30mm x 24mm) - you need 12 squares.
- Acetone glue 3 squares together, you will now have 4 blocks.
- Mount all four blocks in a vise and file the blocks down with a rough file until they're approximately the same size.
- File the corners down to reduce the chances of them catching on the motor mounts.
- Drill 4x 3.2mm holes, 7.5mm from the centre and 7.5mm from the top edge.
- Clamp two blocks together and drill the centre hole using a 6mm drill bit.
- Use some expoxy to lock the nuts in place.
- Optionally, file and sand the blocks a little further to improve the aesthetics.
Attaching the coupling
- Clean the end of the threaded rod and motor shaft with some rubbing alcohol.
- Push-fit the latex over the motor shafts to about midway into the tube.
Loosely attach the clamps over the latex tubing.
Align the threaded rods with the motor shafts and slowly lower the X-Z axis. The threaded rods should easily slip into the latex tube. If not, re-check your alignment.
- Now tighten the screws until the latex 'pop' out slightly from the couplings.
Extruder


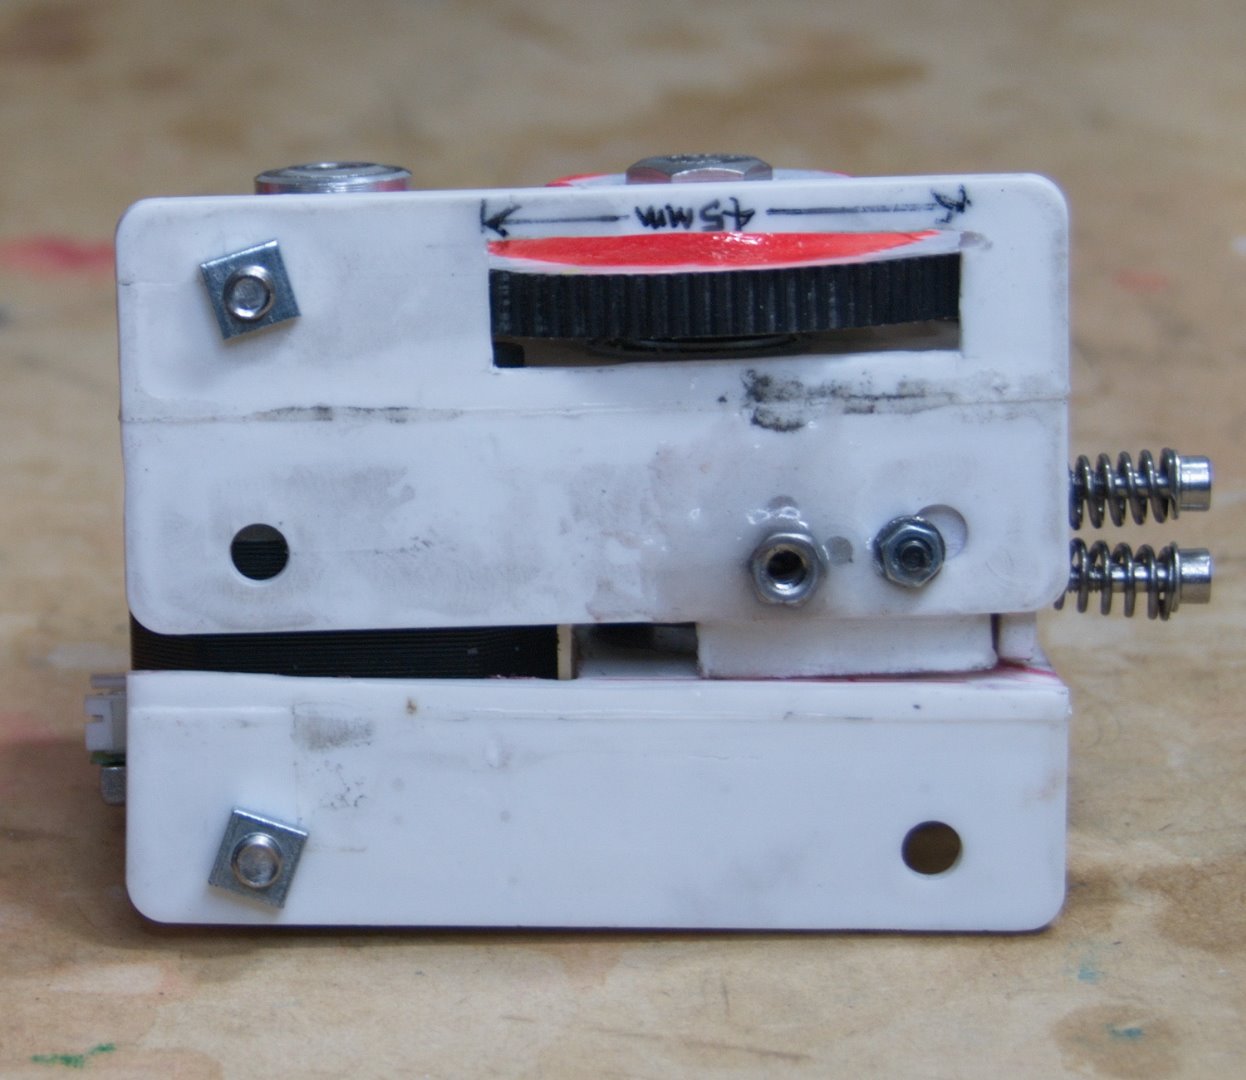
The extruder and hot-end are arguably the most important part of your 3D printer and will determine the difference between being a frustrated 3D printer owner and hours long of hassle-free printing. The next few steps will be the most challenging, so measure carefully and double check everything by visual verification.
Extruder: Gear


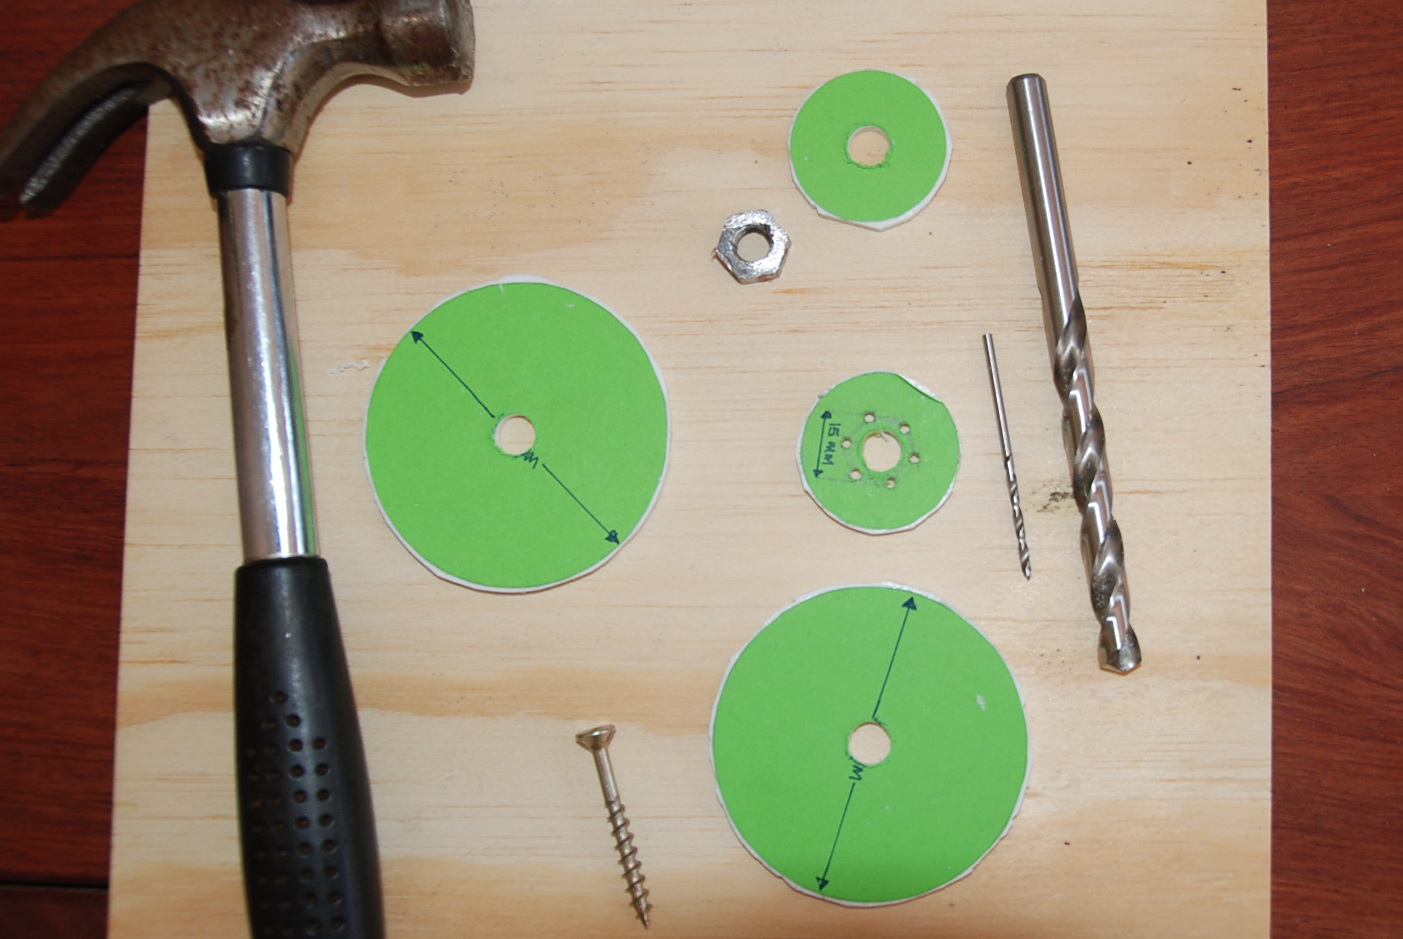


.JPG)
.JPG)


Extruder: Body


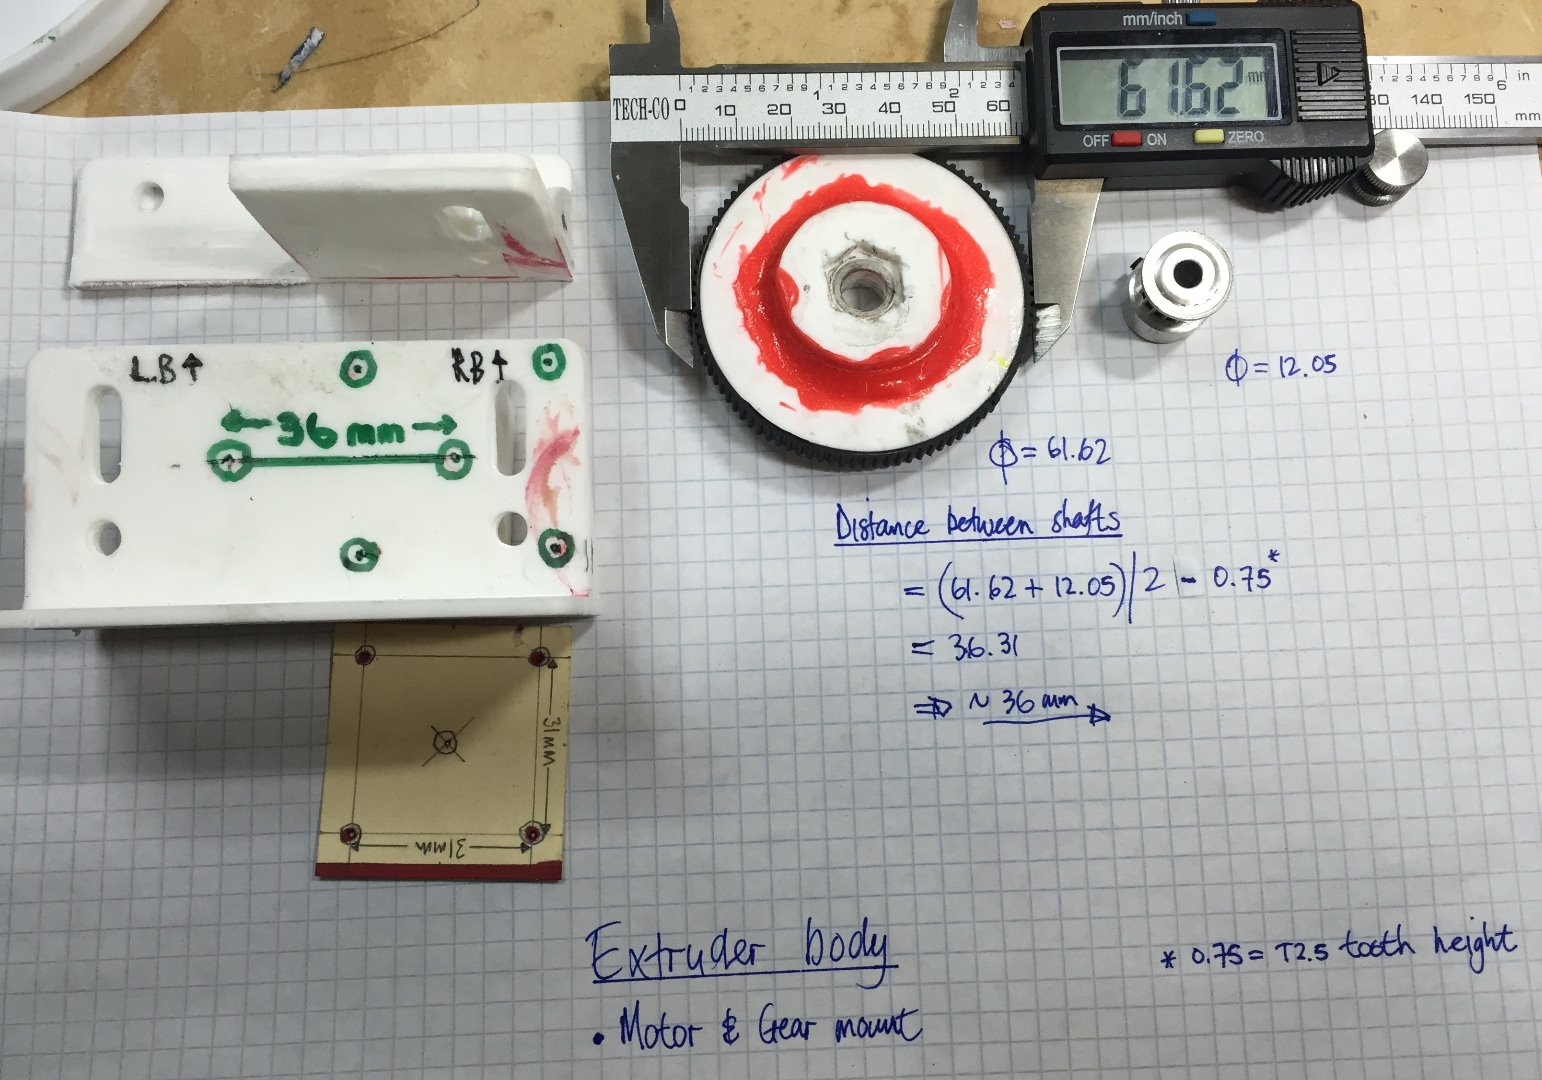

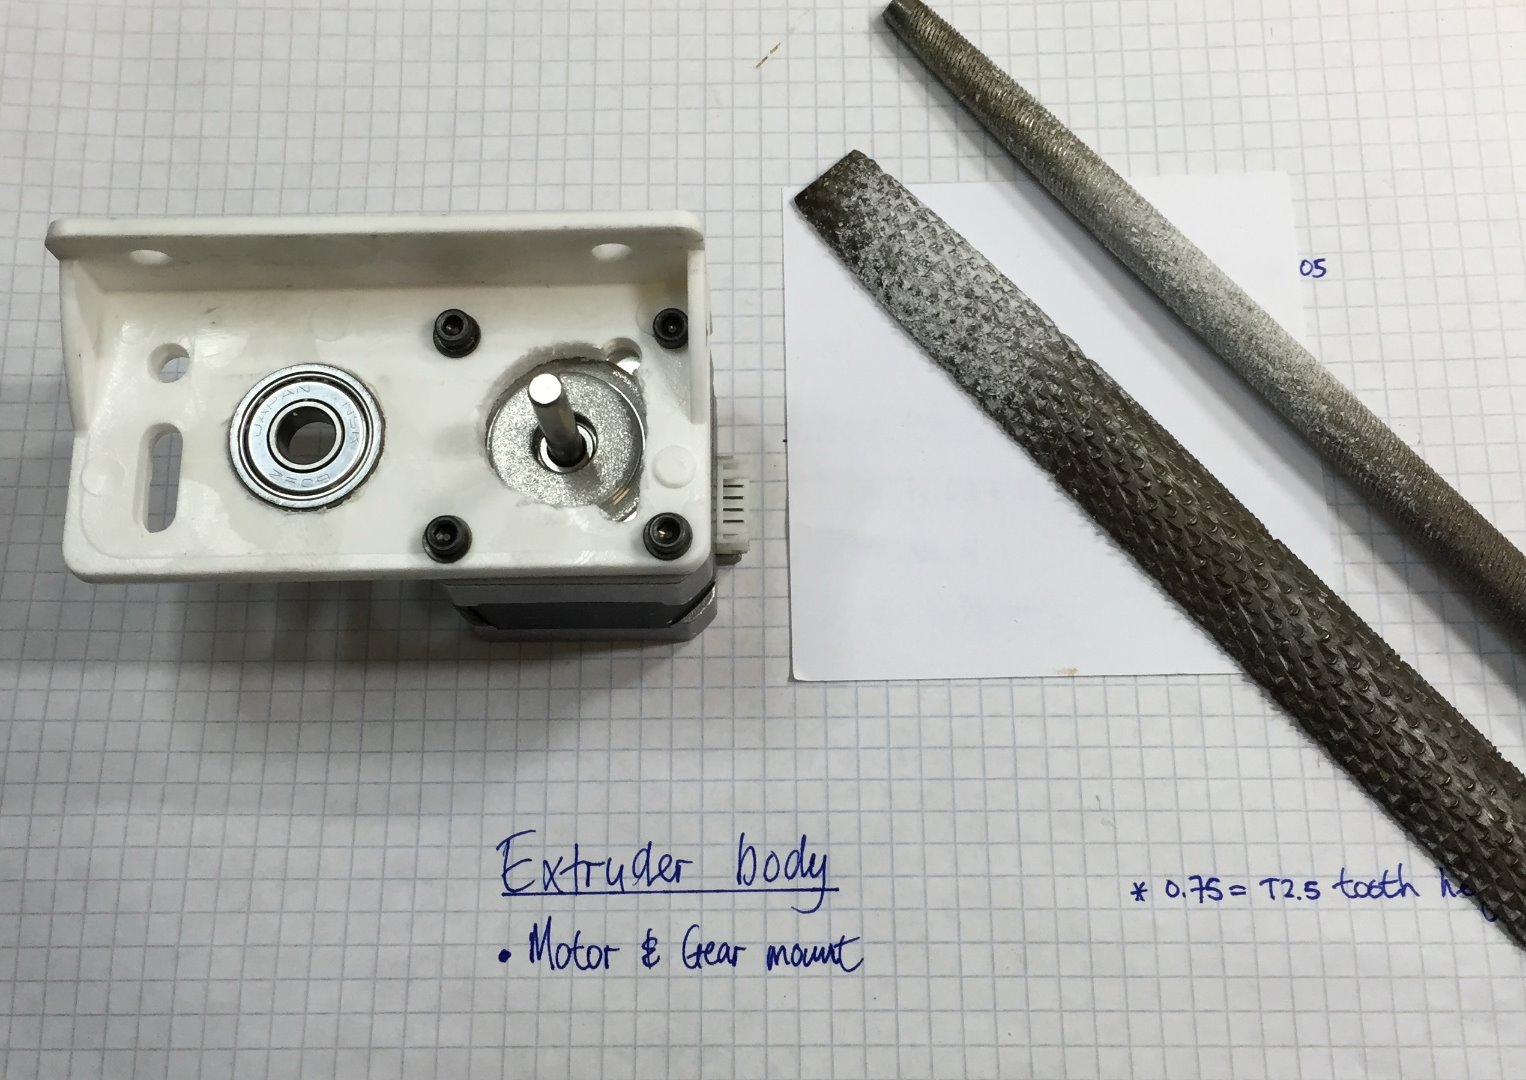

Extruder: Idler
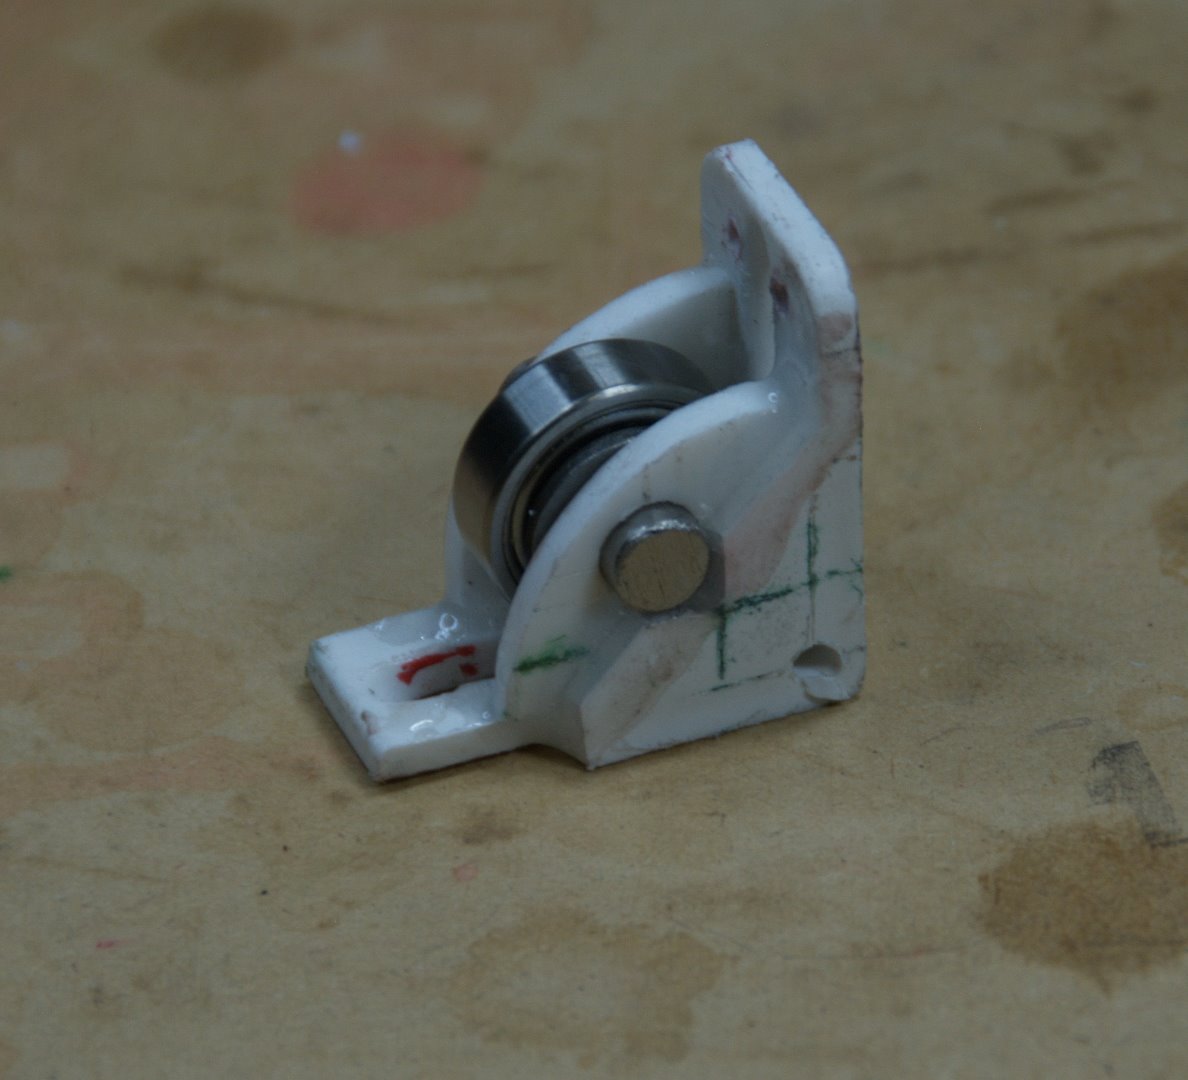

.JPG)


Extruder: Tensioner

.JPG)

.JPG)

Extruder: Assembly


Extruder: Bowden 'Quickfit' Alternative


The Hot-end!


Well, this is probably the most painful part of 3D printing - and I'm not talking about touching the nozzle at 240°C - closely followed by jamming extruders.
After using various commercial designs, trying a few reprap homebrew options (http://www.reprap.org/wiki/Hotend), I concluded that the only option to get a hotend is to buy one or throw money at the problem and get people with access to CNC machines to engineer one.
Since the commercial J-head I bought kept on jamming and the All-metal hot-end was leaking, dropping blobs of melted plastic on the print every 15 minutes or so, I decided to try my hand at being a 'designer' (copier?)...
Not having sufficient time to to learn other CAD programs, I did an initial design in Eagle CAD based on various other open source designs. The design evolved over the last 5 or so weeks - available at http://www.cirius.co.za/rr/Nozzle.brd.
The hotend seems to work well for about 4-6 hours, but then the car engine gasket (shower moment brainwave) that is inserted between the heater block, M6 nut (top) and nozzle (bottom) begins to disintegrate and the filament slowly starts to seep out. (Photos 3 and 4).
I am considering using PTFE 1.5mm sheet material as washers/gaskets, but would love to get some advice/feedback - since I only have one more chance to hand in a revision.
Endstops


If you are a first time builder you might think that endstops are not really required, but it is a lot quicker to make and mount them than to do this manually. Furthermore your printer will want to ‘home’ itself before every print.
Materials:
1 x 3 button mouse or 3 buttons
2 x small brackets
Wire (about 40cm x 6)
2 x square
Tools: glue, drill,
- Take the mouse apart (usually 1 screw underneath the mouse)
- De-solder the 3 buttons from the PCB using a solder sucker, solder wick or compressed air
- Solder new wires to the buttons (2 per switch)
- Note: it doesn’t really matter which pins you solder the wires to as you can change the switch from normally closed to normally open and vice versa using the software configuration (Marlin firmware based controllers)
- Find suitable places to mount the switches where the runners will press the button when the axis reaches its end. This is easy for the Y-axis but more difficult for the other 2. See the photos for a good spot to place the endstops
80mm Fan Mount
.jpg)


Power Switch (optional)


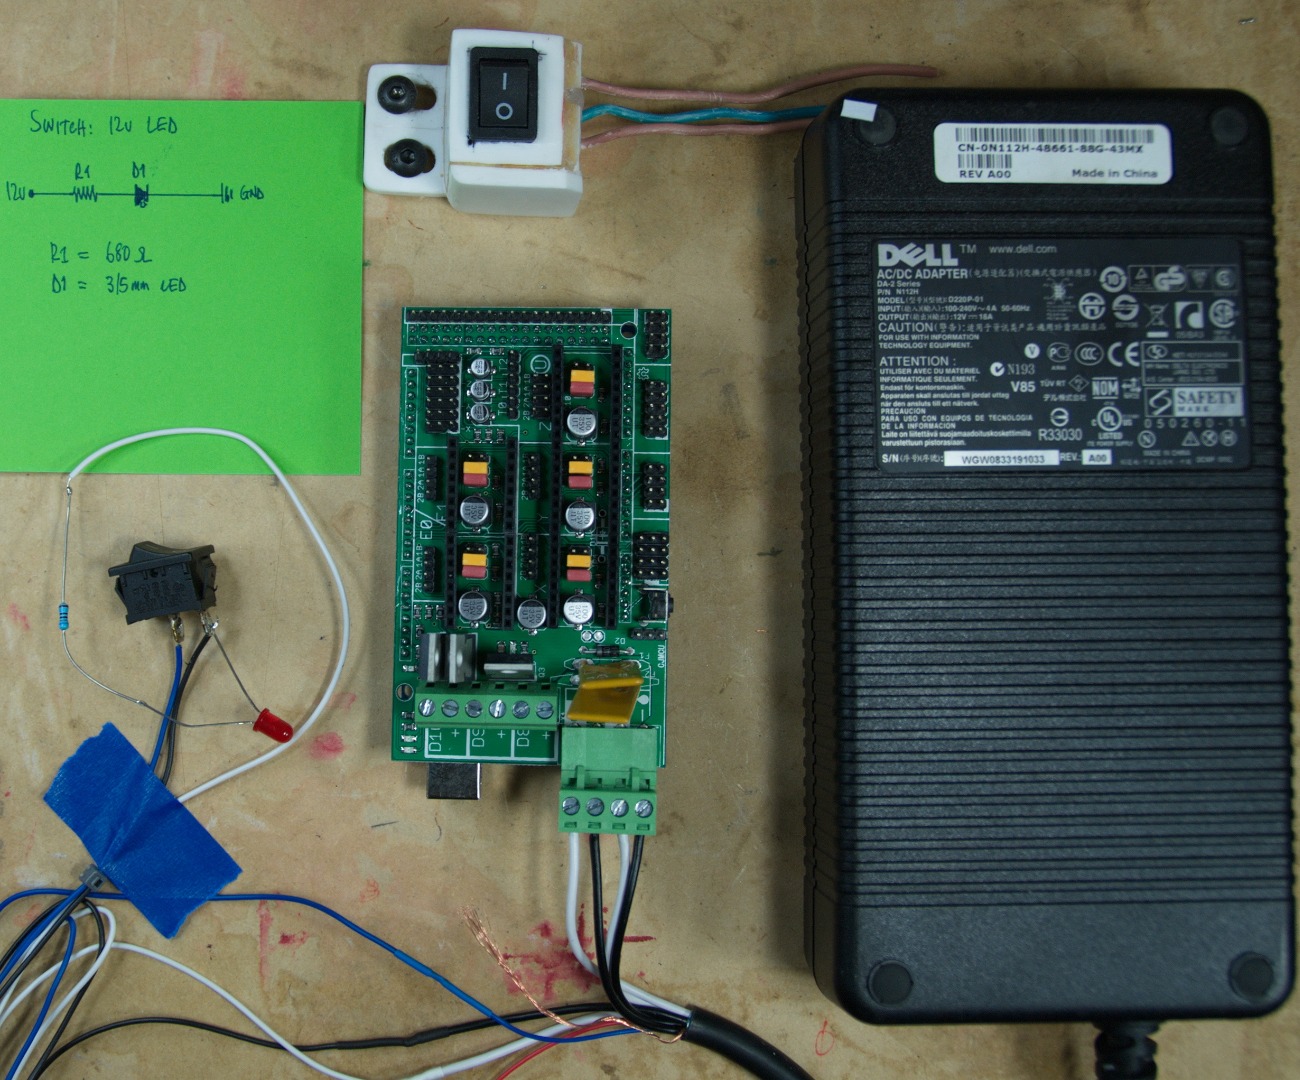
Electronics Mount


.JPG)
Materials:
- 1x 'Type-C' bracket
- 3x M3 PC standoffs/risers
- 2x 8mm M5 Button head cap screws
- 2x M5 square nuts (inserted into the 160mm rear extrusion in Step 16 - Frame: Y-axis)
- 3x ~5mm M3 cap screws
Tools:
- Drill
- 3mm drill bit
Place your Arduino mega or Rumba board on the bracket and mark the position of the 3mm holes for the standoffs/risers. Drill the holes, self-tap the risers into the bracket and fasten the Arduino - only one or two screws are required for this. We also added an insulation washer to the centre hole - not sure if this is required. Mount the bracket to the back of the Z-axis/print bed frame, utilizing the two M5 square nuts you inserted into the frame prior to fastening the 160/430mm extrusions.
(We ended up mounting the Arduino on the top of the 'Type-C' bracket, since it was difficult to attach the USB cable when mounted on the inside of the bracket)
Electronics Wiring
Wiring will depend on the controller board that you have chosen to use. The most common boards are an Arduino Mega with a RepRap Arduino Mega Pololu Shield, or RAMPS shield on top of it. You can find out more info about this baord here: http://reprap.org/wiki/Ramps
Wiring might also depend on the power source that you have chosen to use to power your printer. A good cheap option to power the printer is a PC PSU (power supply unit). Here is a simple list of the things that you will need to connect to get your printer to work: power (normally +12V),
Software: Installation


Overview
There are various open & closed source options available on the Reprap wiki to drive your printer – refer to http://reprap.org/wiki/RepRap_Options#Software_To... for all the options.
You require one product from each of the following categories:
- CAD & CAM tools – Not required initially – use this to design a part in terms of ‘Constructive Solid Geometry’, e.g. FreeCAD, OpenSCAD or in terms of ‘3D Polygon Mesh’, e.g. Blender, 3d Studio Max, SketchUp. This can then be exported to STL which will be the input of your ‘slicer’ program. OpenSCAD (http://www.openscad.org/) is very powerful, but has a bit of a learning curve and requires some programming skills.
- Slicing software -‘slices’ the STL file into G-code or SNAP. We opted to use Cura and although not as flexible as Slic3r, the latter seems to produce new bugs with every new release.
- Interpreter/Sender software – Interprets and sends the G-code to the firmware running on the Arduino over a serial connection. We use Repetier-Host as the GUI with the Cura add-in doing the ‘sending’ part. Repetier-Host is the only component used here that is not open-source – although it is still free.
- Firmware – The software that receives the G-code on the Arduino and manages the stepper motors, extruders, end-stops, etc. We will cover Marlin in this step.
- Firmware hex uploader – Arduino IDE, ATMEL Studio and/or avrdude. If you are going to make configuration/code changes, then you will need something to compile the source code into a .hex file, e.g. Arduino IDE. If you only need to upload a .hex file that you downloaded, then you only need avrdude, but this is done from the commands line interface and is a bit tricky. (The Arduino IDE uses avrdude in the background to upload the .hex file)
(These instructions will assume a Windows 7/8 platform, but all the products will work on Linux and Mac as well)
Arduino IDE
https://www.arduino.cc/en/Main/OldSoftwareReleases...
The current version of Marlin is only supported on version 1.0.5 or 1.0.6 of the Arduino toolchain. After downloading one of these versions (both works fine), extract or install the IDE to a local folder. After installation, navigate to the selected folder and launch the IDE (arduino.exe) – a projects folder will be created under your home folder, e.g. c:\users\[you]\My Documents\Arduino\projects – if not, create the projects folder manually.
Now head over to https://github.com/MarlinFirmware/Marlin for the Marlin firmware. The latest release version can be downloaded by clicking the ‘Download ZIP’ button on the right-hand side the page. Extract the contents to your Arduino home projects folder.
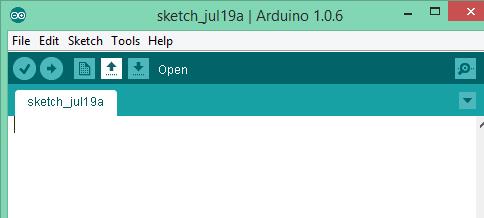
Switch back to the Arduino IDE, click the ‘Open’ button on the toolbar and select ‘Projects -> Marlin-Release -> Marlin. You will have to modify some settings in the Configuration_adv.h & Configuration.h header files, which will be covered a bit later.
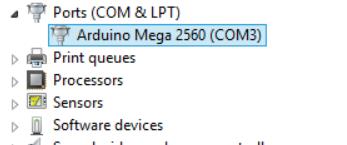
Attach the Arduino Mega to you PC using the supplied USB cable. To determine the COM port used, open your PC's Control Panel, select 'System' and then click on the 'Device Manager' link. If the Arduino Mega 2560 is not listed under the 'Ports (COM & LPT)' node, then check for 'Unknown device' under the 'Other devices' node. If it is listed here as 'Unknown', then right-click on the 'Unknown Device' and select 'Update Driver Software' from the context menu, 'Browse my computer for driver software' from the next dialog and browse to the 'drivers' folder under the location where you installed/extracted the Arduino software.
The port should now be reflected under the 'Ports (COM & LPT)' node once the driver is successfully installed, e.g. 'Arduino Mega 2560 (COMn)'. Switch back to the Arduino IDE, and enable this COM port on the Tools -> Serial Port -> COMn menu option. Also select the correct board on the Tools -> Board -> Arduino Mega 2560 or Mega ADK menu option.
Repetier-Host
Download ‘setupRepetierHost_1_x_y.exe’ (1.5.3 at the time of writing) from http://www.repetier.com/downloads/ and launch the Installshield wizard. Use the default options, but you could exclude Repetier-Server and the 135MB ‘Skeinforge Slicer’ download from the list of components for now.
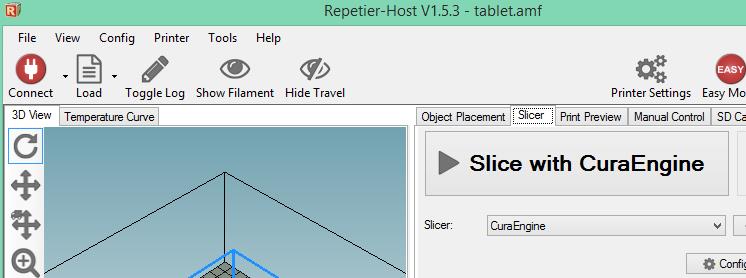
Launch Repetier-Host after installation and switch to ‘CuraEngine’ on the Slicer tab and disable the ‘Easy Mode’ option on the right hand toolbar.
Software: Marlin Configuration
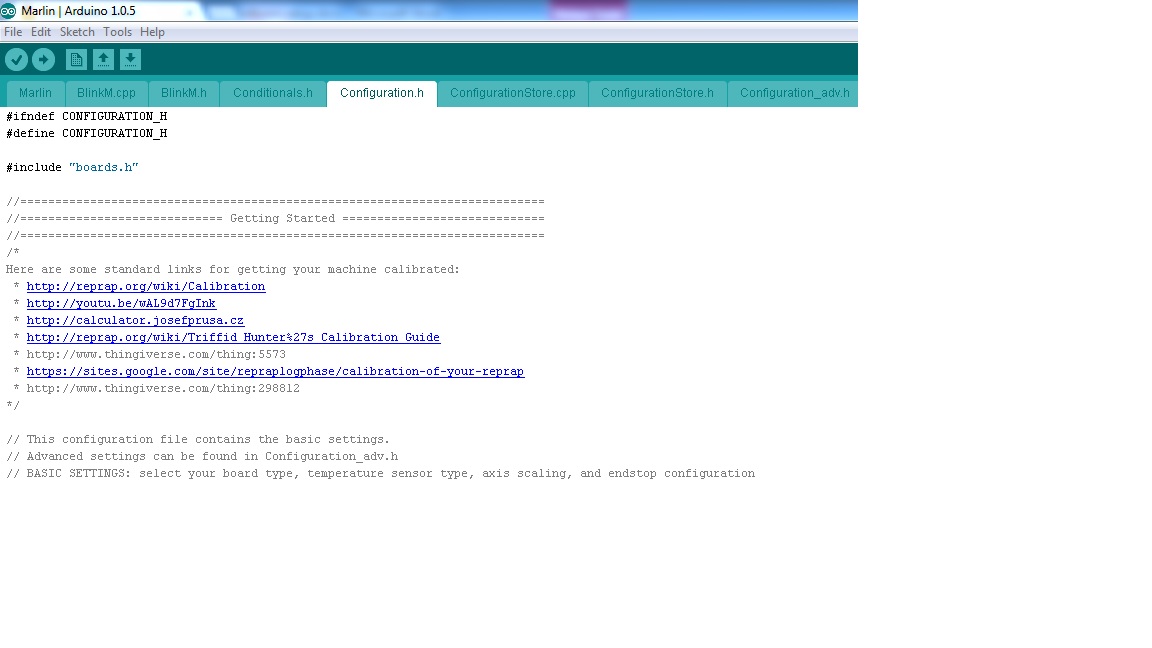
This is where you will configure the firmware running on the Arduino to reflect your printer configuration. The settings might be a bit overwhelming in these header files, but most of them are optional and the sections are fairly well documented with comments. (You can locate keywords in the IDE by pressing Control-F to open the 'Find' dialog box)
If not open already, re-launch the Arduino IDE and open the Marlin project as described in the previous step.
Microstep settings:
Switch to the Configuration_adv.h tab in the IDE and change the 'MICROSTEP_MODES setting to reflect your jumper settings on the RAMPS 1.4 driver board - we used 8 microsteps on all stepper motors:
// Microstep setting (Only functional when stepper driver microstep pins are connected to MCU.
#define MICROSTEP_MODES {8,8,8,8,8} // [1,2,4,8,16]
The following settings are all located in the Configuration.h header file and reflect our printer configuration. You can use these as a starting point, but you will have to customize it depending on your setup, e.g. whether you are using 'Normally Open' or 'Normally Closed' end stops, the size and number of teeth in your gears, thermistor selection etc.
(The settings indicated here only indicates the values changed from the default installation values)
Board selection:
// The following define selects which electronics board you have.
// Please choose the name from boards.h that matches your setup
#ifndef MOTHERBOARD
  #define MOTHERBOARD BOARD_RAMPS_13_EFB // EFB=Extruder, Fan & Bed
#endif
Thermistor selection:
We used the '10 = RS thermistor 198-961' on the extruder and a '1 = EPCOS 100k' on the heated print bed.
//============================= Thermal Settings ============================
#define TEMP_SENSOR_0 10
#define TEMP_SENSOR_1 0
#define TEMP_SENSOR_2 0
#define TEMP_SENSOR_3 0
#define TEMP_SENSOR_BED 1
Endstops:
Note that the MAX endstops are defined initially, but disabled with the last #define DISABLE_MAX_ENDSTOPS entry.
//===========================================================================
//=============================Mechanical Settings===========================
//===========================================================================

// coarse Endstop Settings

#define ENDSTOPPULLUPS // Comment this out (using // at the start of the line) to disable the endstop pullup resistors
#ifdef ENDSTOPPULLUPS
  #define ENDSTOPPULLUP_XMAX
  #define ENDSTOPPULLUP_YMAX
  #define ENDSTOPPULLUP_ZMAX
  #define ENDSTOPPULLUP_XMIN
  #define ENDSTOPPULLUP_YMIN
  #define ENDSTOPPULLUP_ZMIN
#endif

// The pullups are needed if you directly connect a mechanical endswitch between the signal and ground pins.
const bool X_MIN_ENDSTOP_INVERTING = true; // set to true to invert the logic of the endstop.
const bool Y_MIN_ENDSTOP_INVERTING = true; // set to true to invert the logic of the endstop.
const bool Z_MIN_ENDSTOP_INVERTING = true; // set to true to invert the logic of the endstop.
const bool X_MAX_ENDSTOP_INVERTING = true; // set to true to invert the logic of the endstop.
const bool Y_MAX_ENDSTOP_INVERTING = true; // set to true to invert the logic of the endstop.
const bool Z_MAX_ENDSTOP_INVERTING = true; // set to true to invert the logic of the endstop.

#define DISABLE_MAX_ENDSTOPS
//#define DISABLE_MIN_ENDSTOPS
Endstop settings:
// ENDSTOP SETTINGS:
// Sets direction of endstops when homing; 1=MAX, -1=MIN
#define X_HOME_DIR -1
#define Y_HOME_DIR -1
#define Z_HOME_DIR -1

#define min_software_endstops true // If true, axis won't move to coordinates less than HOME_POS.
#define max_software_endstops true  // If true, axis won't move to coordinates greater than the defined lengths below.

// Travel limits after homing
#define X_MAX_POS 200
#define X_MIN_POS 0
#define Y_MAX_POS 200
#define Y_MIN_POS 0
#define Z_MAX_POS 200
#define Z_MIN_POS 0
Movement settings:
The DEFAULT_AXIS_STEPS_PER_UNIT values needs to be fine-tuned after printing your calibration block. You might also want to reduce the ACCELERATION settings, especially when using a hand-made extruder (E value).
// default settings
#define DEFAULT_AXIS_STEPS_PER_UNIT   {45.5,45.9,4042,485}

#define DEFAULT_MAX_FEEDRATE          {500, 500, 5, 25}    // (mm/sec)
#define DEFAULT_MAX_ACCELERATION      {9000,9000,100,10000}    // X, Y, Z, E maximum start speed for accelerated moves. E default values are good for Skeinforge 40+, for older versions raise them a lot.

#define DEFAULT_ACCELERATION          3000    // X, Y, Z and E max acceleration in mm/s^2 for printing moves
#define DEFAULT_RETRACT_ACCELERATION  3000   // X, Y, Z and E max acceleration in mm/s^2 for retracts
LCD settings:
Ensure you download the correct (Arduino and not AVR) library from https://bintray.com/olikraus/u8glib and extract it to your Arduino libraries folder.
// The RepRapDiscount FULL GRAPHIC Smart Controller (quadratic white PCB)
// <a href="http://reprap.org/wiki/RepRapDiscount_Full_Graphic_Smart_Controller" rel="nofollow"> http://reprap.org/wiki/RepRapDiscount_Full_Graphi...</a>
//
// ==> REMEMBER TO INSTALL U8glib to your ARDUINO library folder: <a href="http://code.google.com/p/u8glib/wiki/u8glib" rel="nofollow"> http://reprap.org/wiki/RepRapDiscount_Full_Graphi...</a>
#define REPRAP_DISCOUNT_FULL_GRAPHIC_SMART_CONTROLLER
Now you can compile the code by clicking the 'Verify' button on the toolbar. Fix errors if any, then ensure Repetier-host is disconnected from the serial port and click the 'Upload' button to copy the .hex file to the Arduino.
Software: Repetier Printer Config
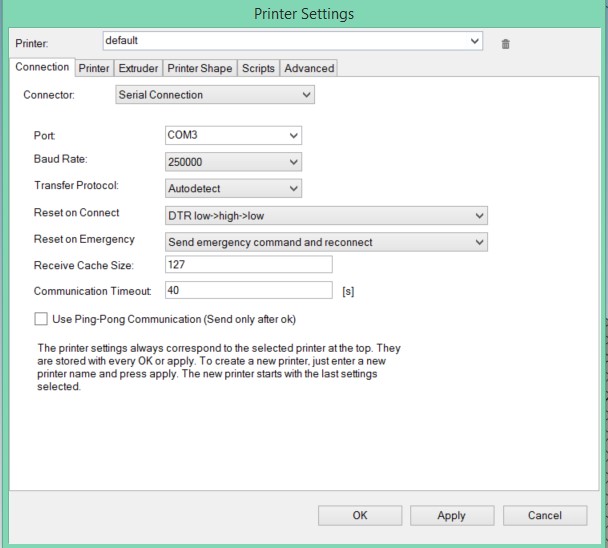
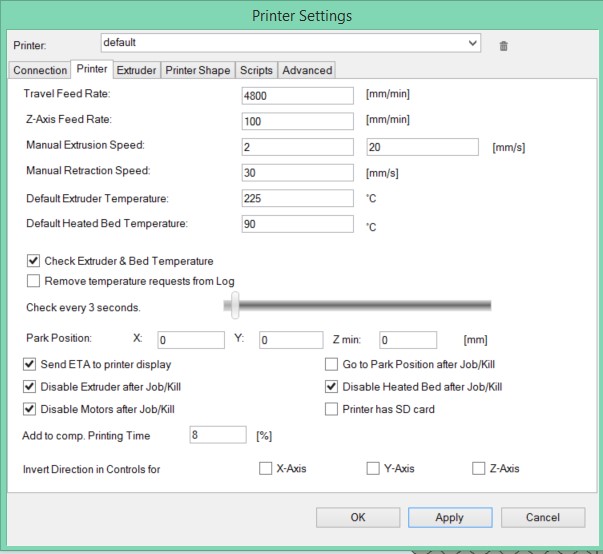
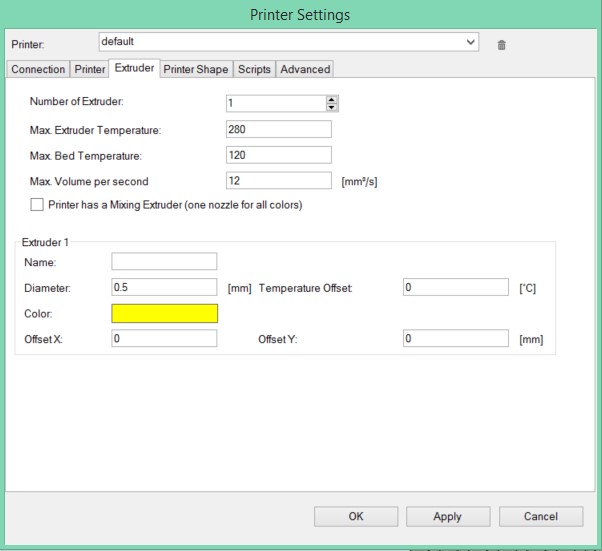

To change the printer configuration, click Config -> Printer Settings on the menu, or use the Ctrl-P shortcut.
We used a very standard printer configuration. The only settings changed were the following:
- Comport selection on the 1st tab
- Default extruder and heated bed temperature on the 2nd tab
- Extruder nozzle diameter on the 3rd tab
The 200 x 200mm X-max, Y-max, print area width and depth on the 4th tab is pretty tight on the print bed and I would recommend setting this to 180mm initially. You will also have to adjust the X_MAX_POS and Y_MAX_POS settings in the Marlin configuration.h file accordingly.
Software: CuraEngine Configuration


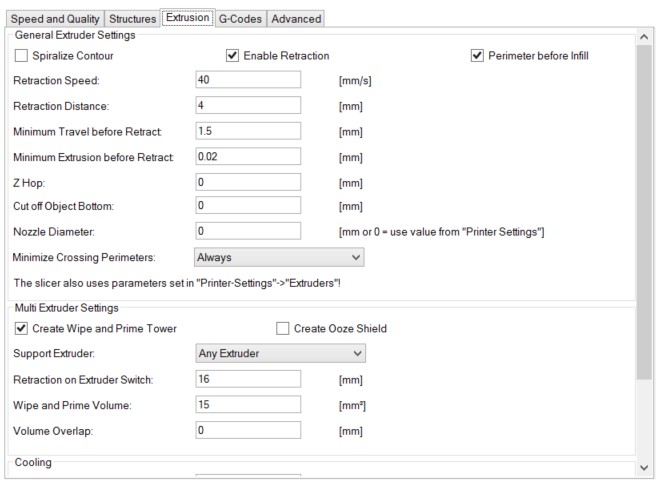
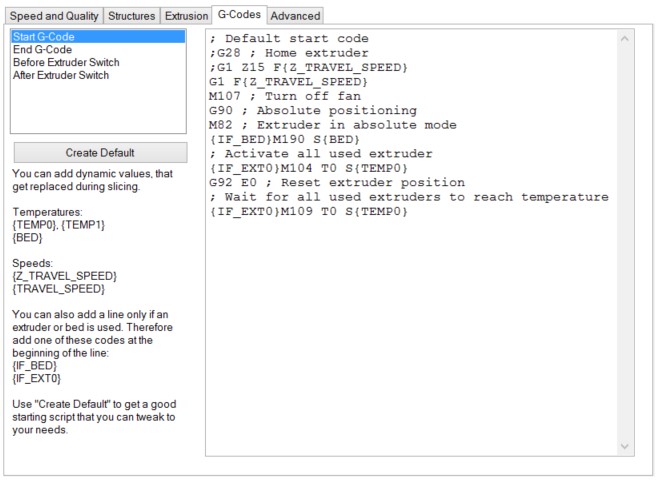
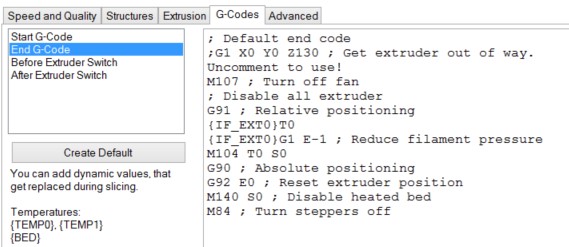
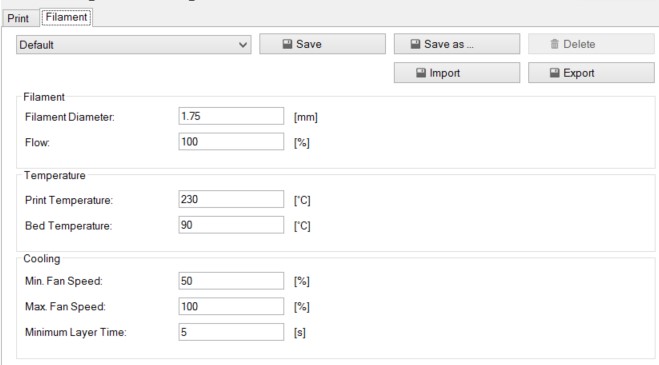
Leveling the Bed and Getting Ready to Print
Before we attempt a print there are a few things that we will want to check to make sure we don't have a disaster.
The first thing that we want to check is that the endstops work. To do this we want to 'home' the printer. Get ready to 'emergency stop' the printer if the endstops don't stop it for you. If the printer is not hitting the endstops, stop the print and adjust them until it does. Now home the printer again and we should nearly be good to go.
The next thing that we want to check before we start printing is that the bed is level. To do this get a small piece of regular paper. We want to get the print head as close to the bed as possible without pushing it into the bed. Start by moving the print head to the front left hand corner of the bed. Get the extruder as close the the bed as possible so that if you push the piece of paper under it you can only just not move it. That way we can ensure that the extruder is only the height of a piece of paper away. Next lift the extruder 10 mm up and move the print head to the front right of the bed. Now try the same trick again with the piece of paper. If the bed is too high tighten the screws on the bed so that the bed is lowered a bit. If the bed is too high loosen it a bit. Now repeat this for the other 2 corners so that our bed is completely level with the extruder.
If your prints don't stick to the bed it might be because the bed is too far away from the extruder.
The extruder will need to be calibrated so that it pushes the filament out at the correct rate. To do this we mark a couple of centimeters on the filament the other side of the extruder, tell the extruder to move by that amount and then calculate if that was correct. If it does not move the desired amount then we will need to adjust the firmware configuration file. Note that you will not be able to upload a sketch to your Arduino if the board is connected in repetier host.
Now you should be ready to print. If you are using a heated bed note that it can take some time to preheat it.
The first thing that you will want to print is not that exciting but unfortunately it is necessary - it is a calibration block. You should be able to find one on Thingiverse - here is one with X-Y directional information: http://www.thingiverse.com/thing:298812