ADXL206 Dual-Axis Accelerometer
by Qtechknow in Circuits > Arduino
6233 Views, 16 Favorites, 0 Comments
ADXL206 Dual-Axis Accelerometer


This Christmas, my dad got me a adxl206 sample (free) from analog devices. Surprisingly, this chip is in a dip package while most other accelerometers aren't. Just today, I decided to wire it up with the Arduino. I was amazed that an easy, simple to use, 2 axis accelerometer was free. That is why I decided to make this instructable. P.S. I'm 11 years old!
Note: This instructable and code can be used for any dual-axis analog accelerometer.
Note: This instructable and code can be used for any dual-axis analog accelerometer.
Parts

All you need are the following:
Mini Adhesive Breadboard
~ 10 Jumper Wires
Analog Devices ADXL206HDZ (DIP package, 8 pin)
Arduino Uno (or newer)
Note:
Analog Devices Samples change frequently, so this might not be on the list for free anymore.
Mini Adhesive Breadboard
~ 10 Jumper Wires
Analog Devices ADXL206HDZ (DIP package, 8 pin)
Arduino Uno (or newer)
Note:
Analog Devices Samples change frequently, so this might not be on the list for free anymore.
Wiring
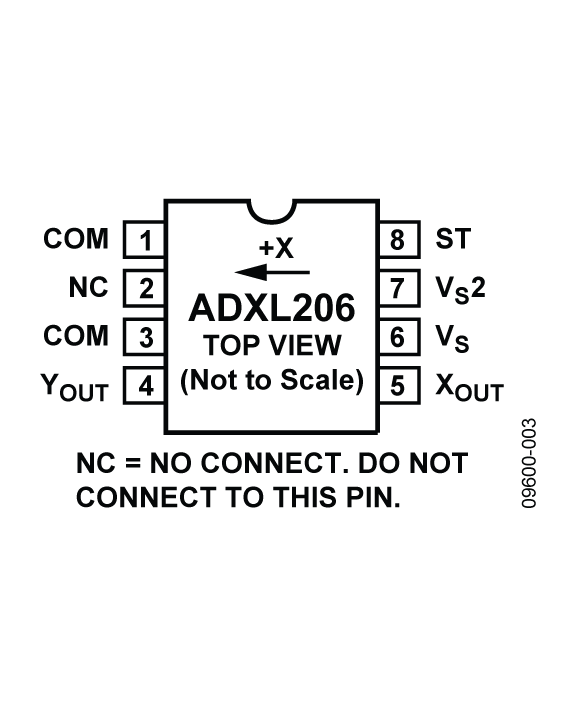
The first thing to look at when you have a new part is the datasheet. If you look at the pinout, you will see COM (basically ground), v1 (+5V), XOUT, and YOUT. Connect the following:
Pin 1 (COM) to GND
Pin 3 (COM) to GND
Pin 4 (YOUT) to A1
Pin 5 (XOUT) to A0
Pin 6 (Vs) to 5V
Pin 7 (Vs2) to 5V
Note : Do not connect pin 2 to anything or else this will not work.
Pin 1 (COM) to GND
Pin 3 (COM) to GND
Pin 4 (YOUT) to A1
Pin 5 (XOUT) to A0
Pin 6 (Vs) to 5V
Pin 7 (Vs2) to 5V
Note : Do not connect pin 2 to anything or else this will not work.
Code

Just copy and paste and upload to your Arduino.
/* AccelerometerRead Sketch
Uses the ADXL206 or other dual axis accelerometer and prints the value
to the serial monitor.
*/
int sensorValuex; // make variables for the values
int sensorValuey;
void setup() {
Serial.begin(9600); // begin serial communication
}
void loop() {
sensorValuex=analogRead(0); // assigns the variable to the analog pin
sensorValuey=analogRead(1);
Serial.print("x, ");
Serial.print(sensorValuex, DEC); // prints x and y values to the serial
Serial.print(", y,"); // monitor
Serial.println(sensorValuey, DEC);
delay(150); // don't let the readings go too fast!
}
Dual-Axis Fun!

Open the Serial Monitor and move the accelerometer around. Have some fun, attach to a robot or even use with an RGB led to make different colors!