Wheelchair-Accessible Raised Garden Bed for a Senior Center
by finn_rud in Outside > Backyard
2107 Views, 15 Favorites, 0 Comments
Wheelchair-Accessible Raised Garden Bed for a Senior Center
Welcome Instructables readers,
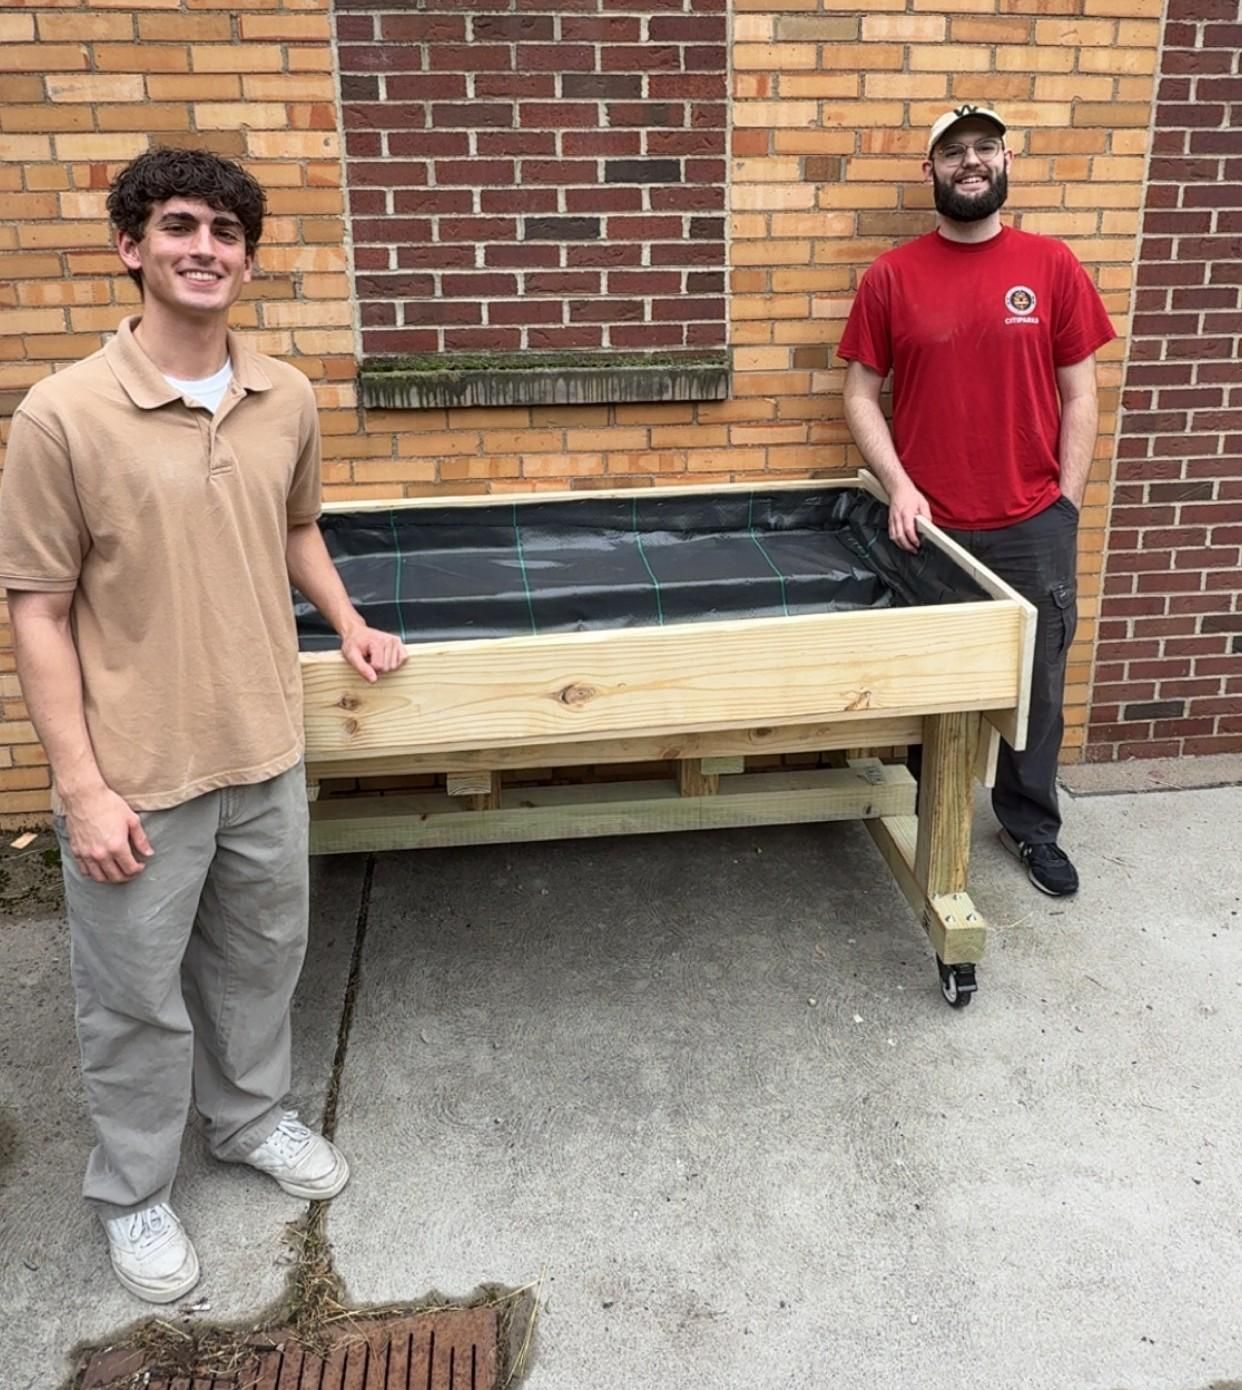
My name is Finn, and I am a second-year mechanical engineering student at the University of Pittsburgh. This project is an Accessible Raised Gardening Bed. It was designed for people with limited mobility to be able to sit down, either in a chair or a wheelchair, and enjoy the wonderful benefits of gardening free from its physical burdens. The bed features a 33" top height off of the ground along with 12" deep cutouts on either side, ensuring maximum comfort for any and all users.
Along with the written instructions in this Instructable, I am including a 3D model of the bed itself that I made in Fusion. I have found that working based off a 3D model always helps me to have a better grasp of the whole project while allowing me to focus in on one specific part at a time. I encourage you to adjust the model in whatever way helps you to best visualize and understand the project, as that is extremely important when working on a project like this. The model should hopefully be visible in 3D format in the viewer along with this step, but if not you can also view it by clicking this link: https://a360.co/4vCCzyH
I hope that if you give this build a go that you have as much fun as I had in making it. It was an awesome experience, and I'm already setting my sights on more projects like it for the future (probably with some inspiration from other Instructables).
Supplies
- Wood Used
- 4x4 x 10' (SPF or PT recommended) - (2)
- 2x8 x 12' - (2)
- 2x8 x 10' - (1)
- 1x12 x 12' - (1)
- 1x12 x 8' - (1)
- 1x1 x 10' (scrap works here) - (1)
- 1/2" plywood, 4'x8' sheet (scrap works here) - (1)
- 2x4 x 8' (1)
- Other materials
- A box and a half of 4" wood decking screws
- A box of 6" wood decking screws
- Gardening Fabric (like the kind that prevents weeds)
- 5" locking wheels (I used ones with a 600lb load capacity to ensure safety) (also optional)
- Tools that I used
- Impact driver
- Drill
- Mallet
- Stapler
- Circular Saw
- Miter Saw
- Orbital Sander
- Safety Glasses
- Dust mask
- Sawhorses and Clamps
- Wood Cut List (as demonstrated through the Fusion model)
- 4x4s - Miter Saw
- 36" (2)
- 60" (1)
- 15 1/2" (4)
- 2 1/2" (2)
- 2x8s - Circular Saw
- 60" (4)
- 13" (8)
- 1x12s - Circular Saw
- 36" (2)
- 60" (2)
- 1x1s - Any saw
- 60" (2)
- 1/2" thick plywood sheets - Circular Saw
- 60" x 10 1/4" (2)
- 2x4s - Miter or Circular Saw
- 16" (2)
Background and Key Features
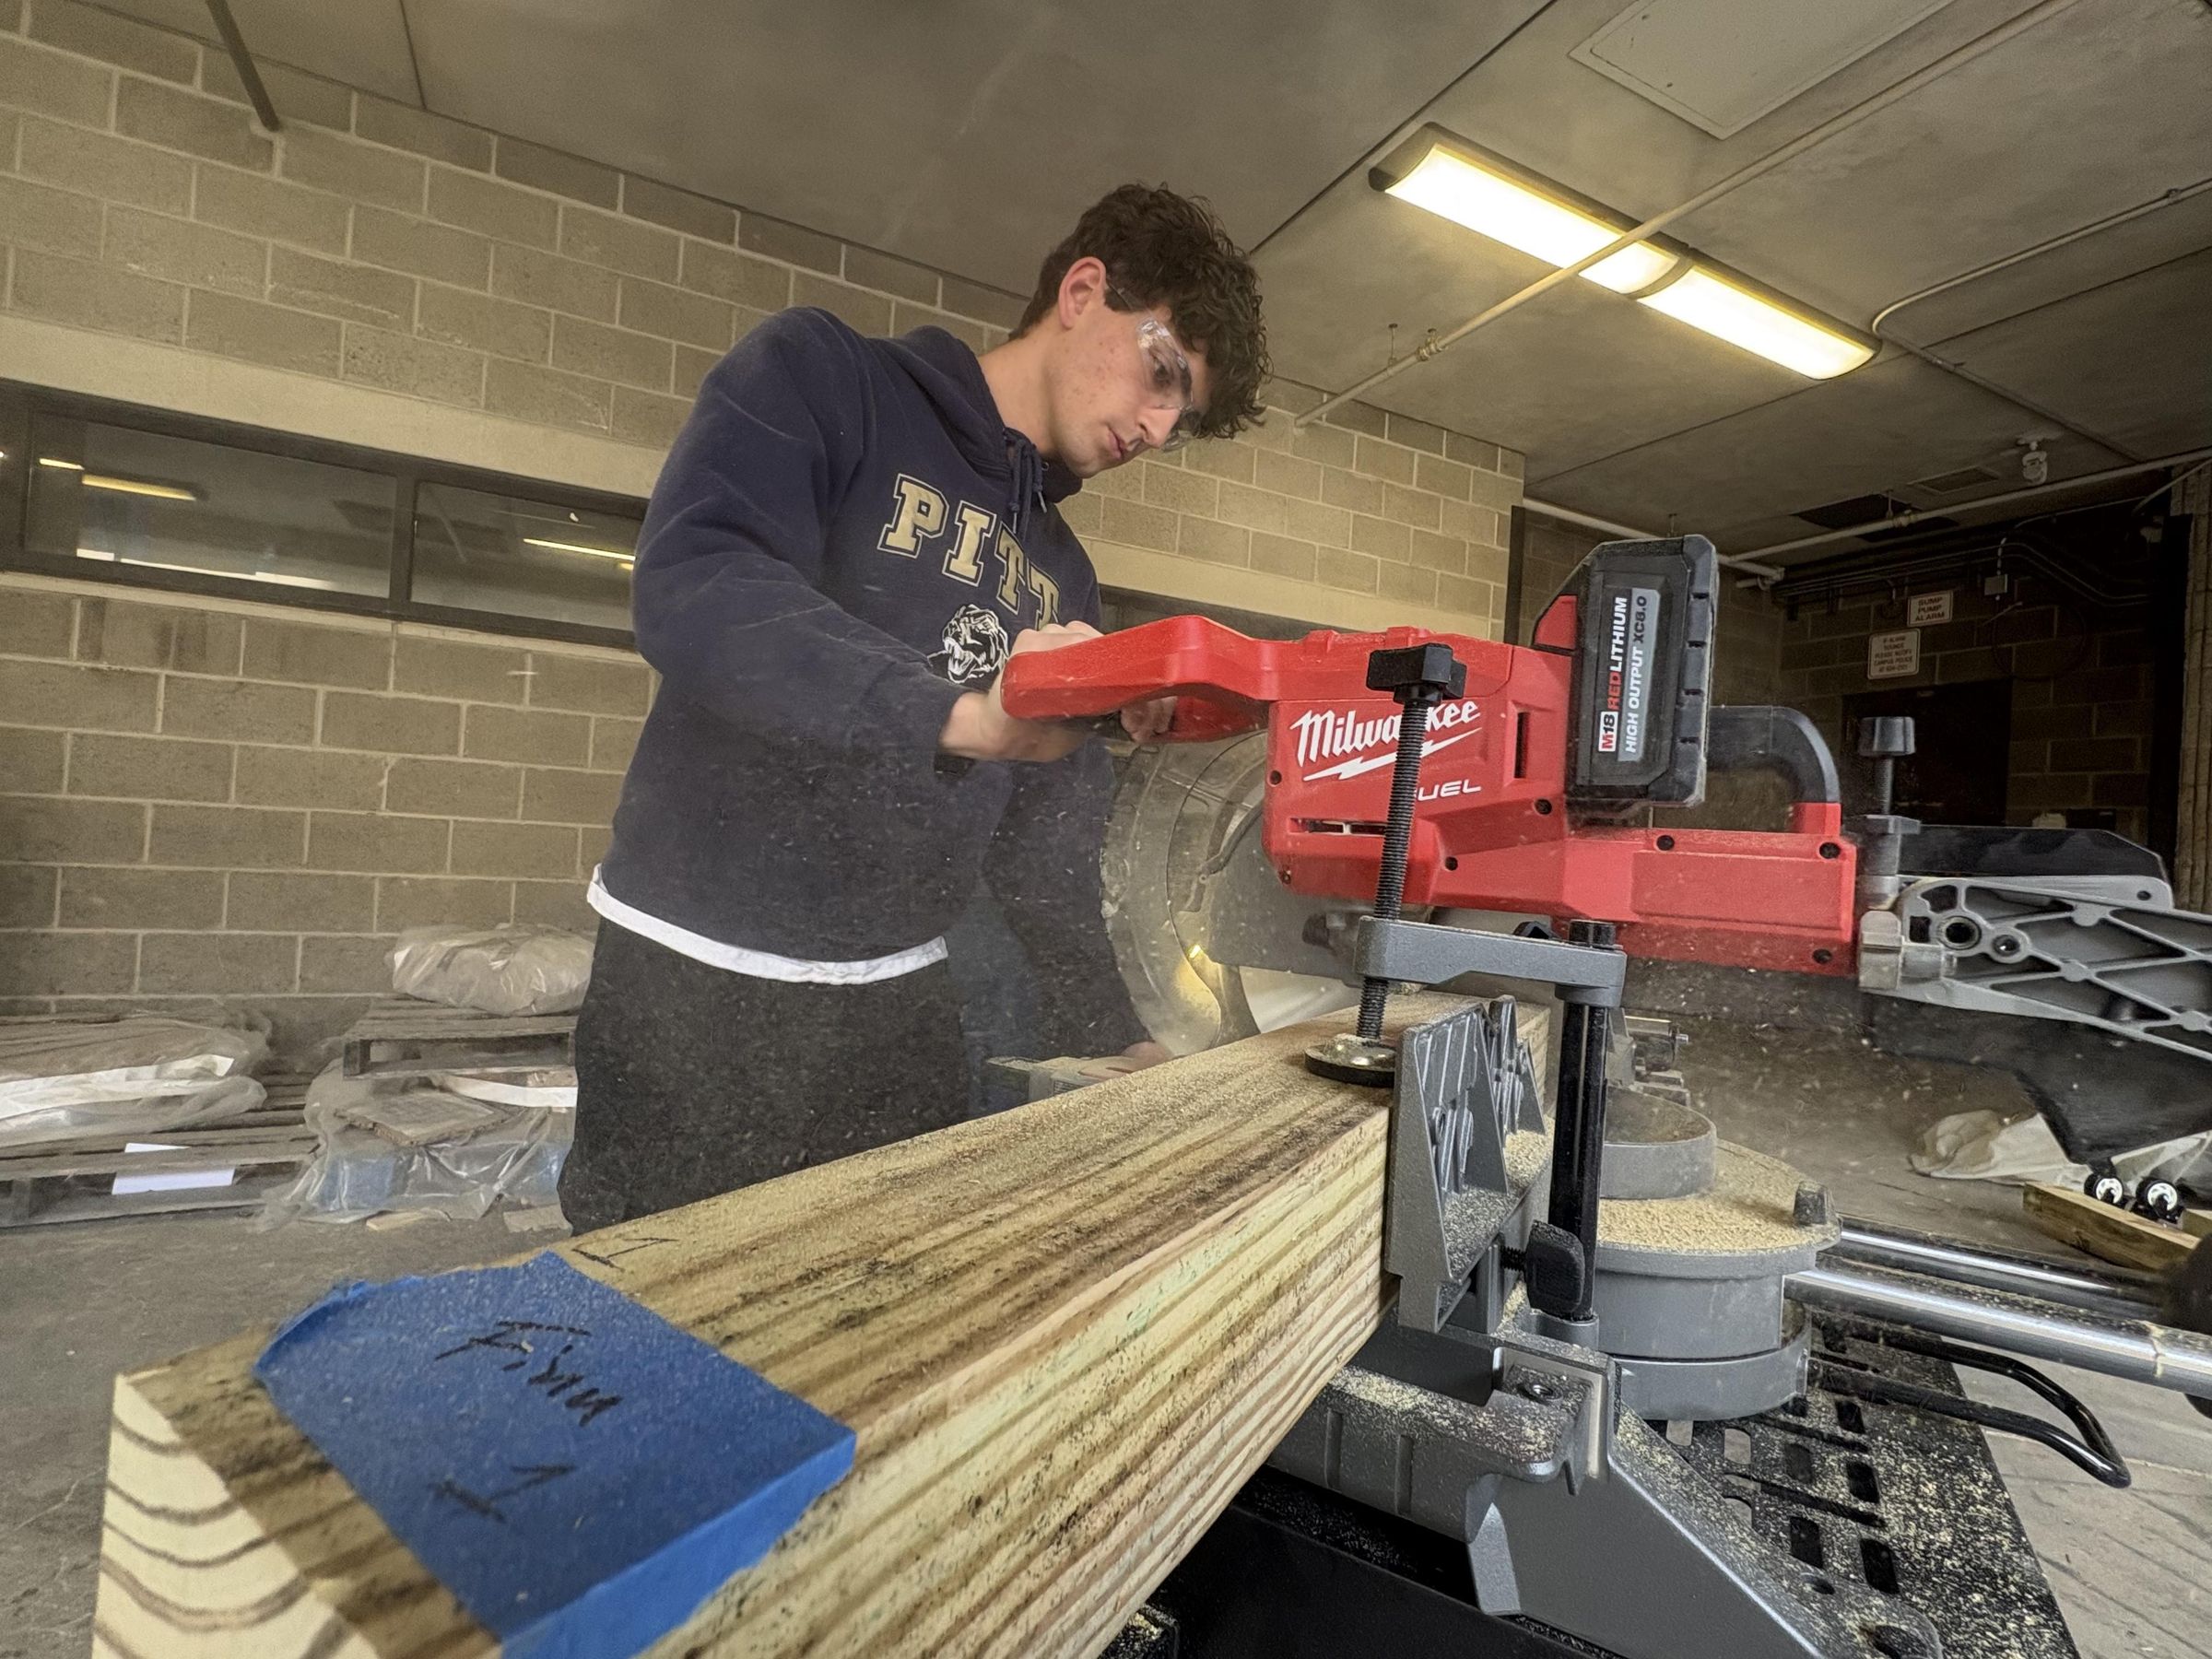
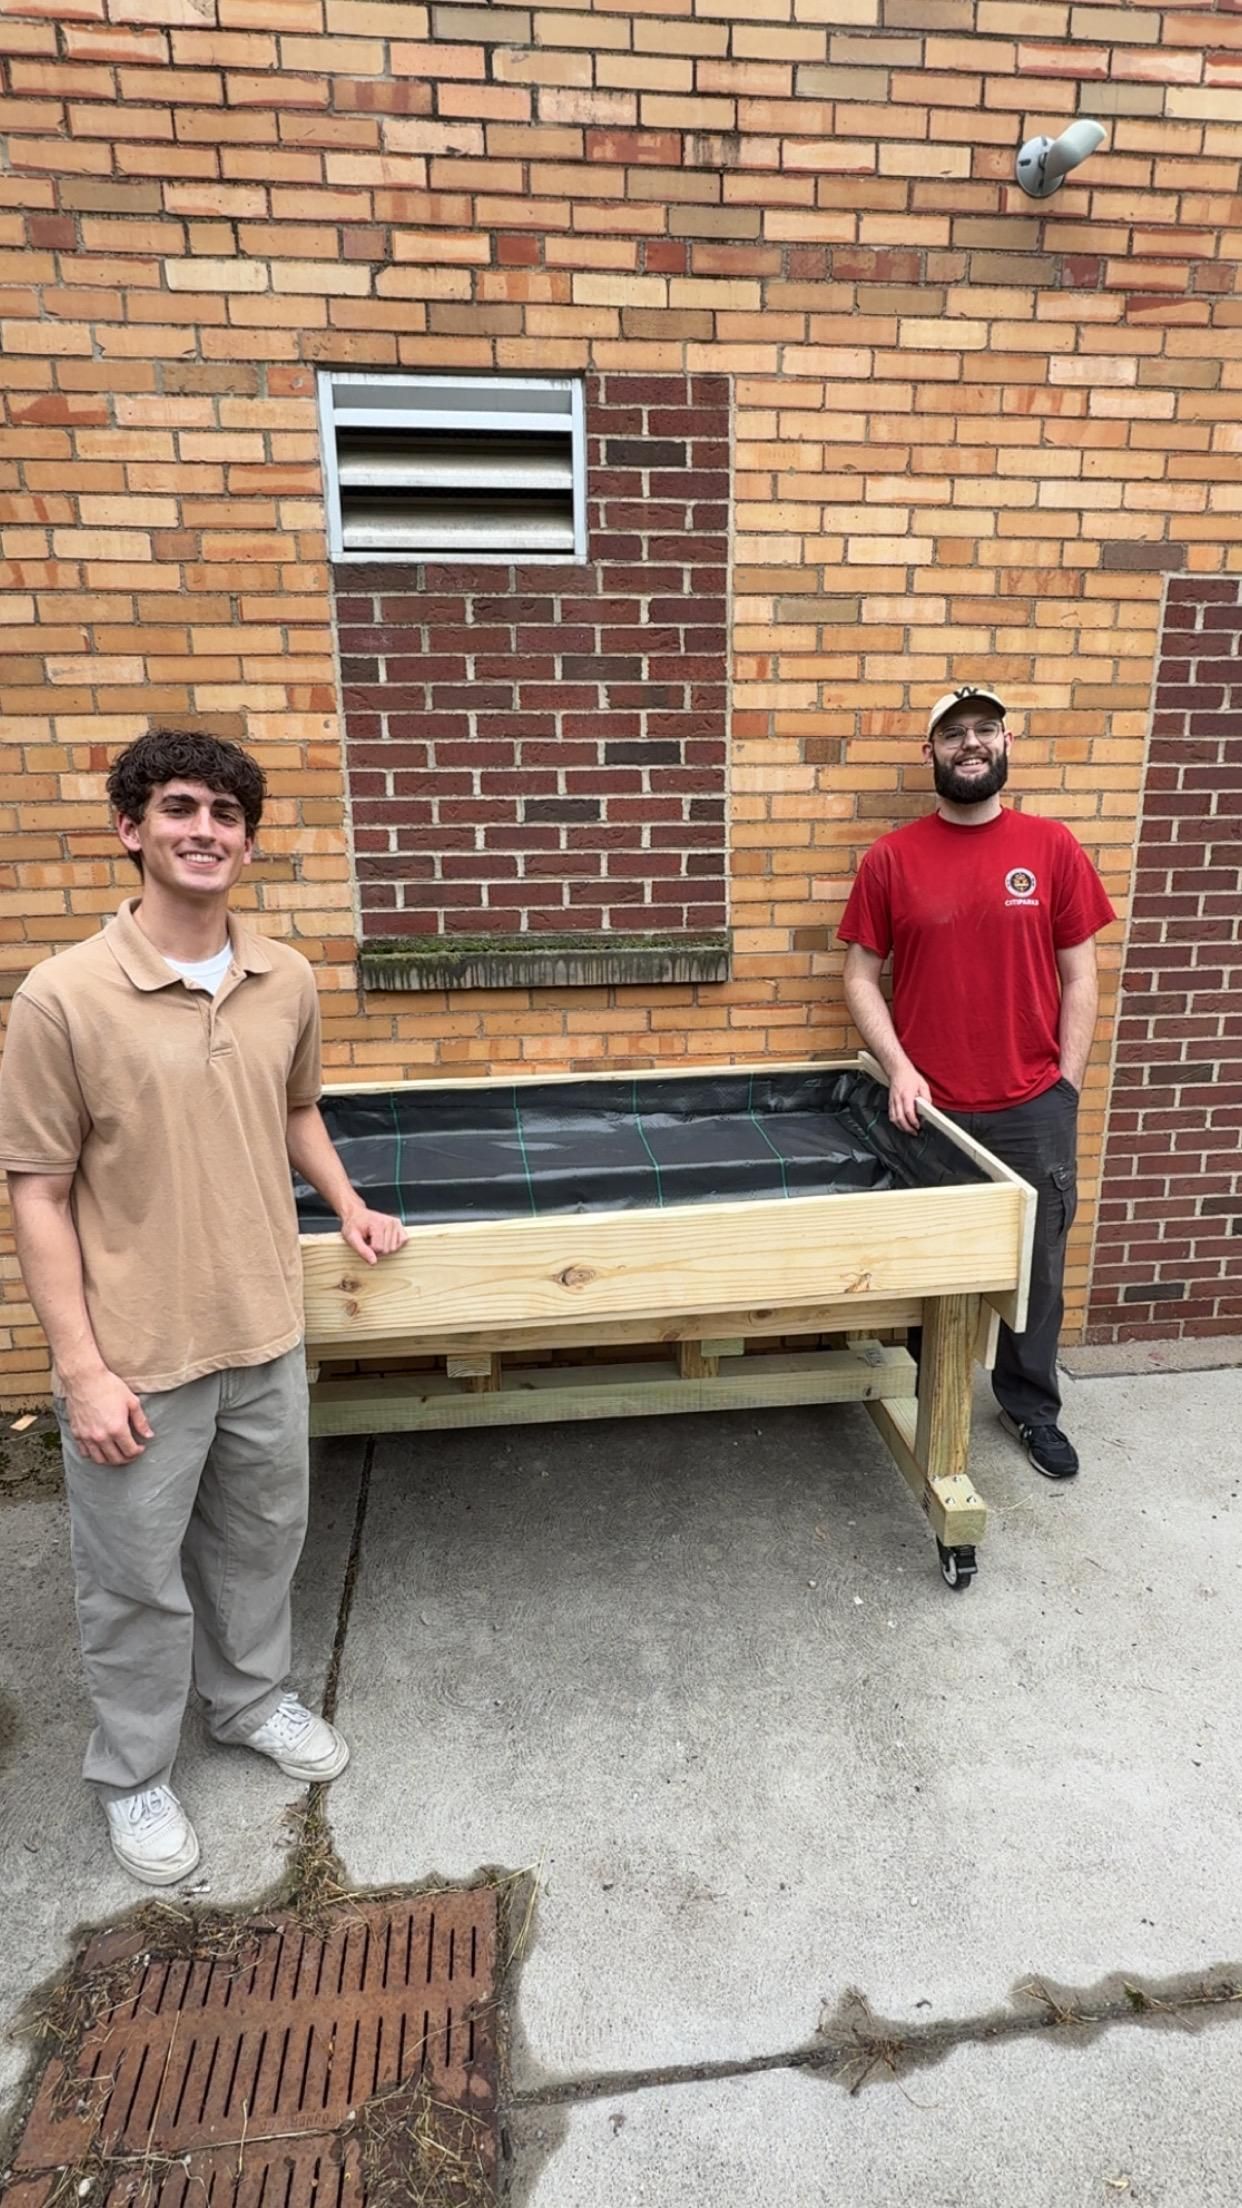
I made this project for one of my first-year engineering courses, Foundations of Engineering Design. The assignment was intentionally very simple: identify a community with a genuine need and engineer a solution for them. My main goal from the very beginning was to go beyond just completing the project for the sake of the assignment, and to make it something with real impact that I could be proud of. That is why I partnered with the Mount Washington HAL Senior Center in Pittsburgh and catered the build to their specific needs.
I am very proud of how this whole project turned out, from the building and designing side to seeing the impact it has already had in my local community. If you're looking to get into the woodworking world or are searching for a way to bring your community a little closer together, I would highly recommend you give this project a try, or maybe something like it.
Additionally, this was my first larger-scale woodworking project, so I definitely encountered a lot of challenges and set backs with it, but I'm very happy with the final design. That being said, due to the fact that I am still learning, there are likely ways to accomplish a lot of my design features through better means, so I encourage you to question each of my design decisions and to see if you can find a better one for your specific build.
Also, one last note. The senior center I worked with specifically requested the bed to have wheels on the bottom because they were likely going to move it somewhat often. Therefore, the wheels are definitely not required for this build, but could also still be rather helpful for other cases as well. You can decide this for yourself.
Some Important Notes for Building
- Final Dimensions
- The bed is 3ft by 5ft on top, and sits 33" off the ground, with 12" leg cutouts on either side.
- Time Taken to Build
- The building process for this project took me a week of working on it for a few hours a day. BUT that was because I was figuring out a lot of it as I went and was also studying for finals and everything that goes with the end of a college semester. I think if you followed these plans, you could get this done in 3-4 days at the longest.
- Skill Level
- As I mentioned before, I had never made a major woodworking project like this before. Therefore, I think it's safe to assume that the skill level for this build is probably Beginner to Intermediate.
- Important Note for the Cut List
- I highly encourage you to cut the pieces as you go, rather than all at once in the beginning. This will allow you to make the small adjustments to the measurements that will likely be necessary to get everything to fit together. In the end, it doesn't have to be exactly like the plans for it to be a successful build. In fact, it almost never is.
- Another important note
- A lot of the materials I used for this project came from my school's workshop. Therefore, I did not purchase the wood directly from the store for the cuts, as I was able to use a lot of off-cuts to achieve the desired lengths. Therefore, the materials list I drew up is how I think I would buy the wood if I were to build this project without having any materials prior. Some of the other materials, like the wheels, their bolts, and the screws, were also miscellaneous workshop finds, so I don't have specifics for those, but any materials that follow the general specifications I mention should work fine.
- Last important note
- For each screwed in connection with this project, I first drilled a pilot hole with a properly sized drill bit. I felt this was important enough to put into writing because if you do not do this, you risk splitting your wood, which is a big headache.
The Base
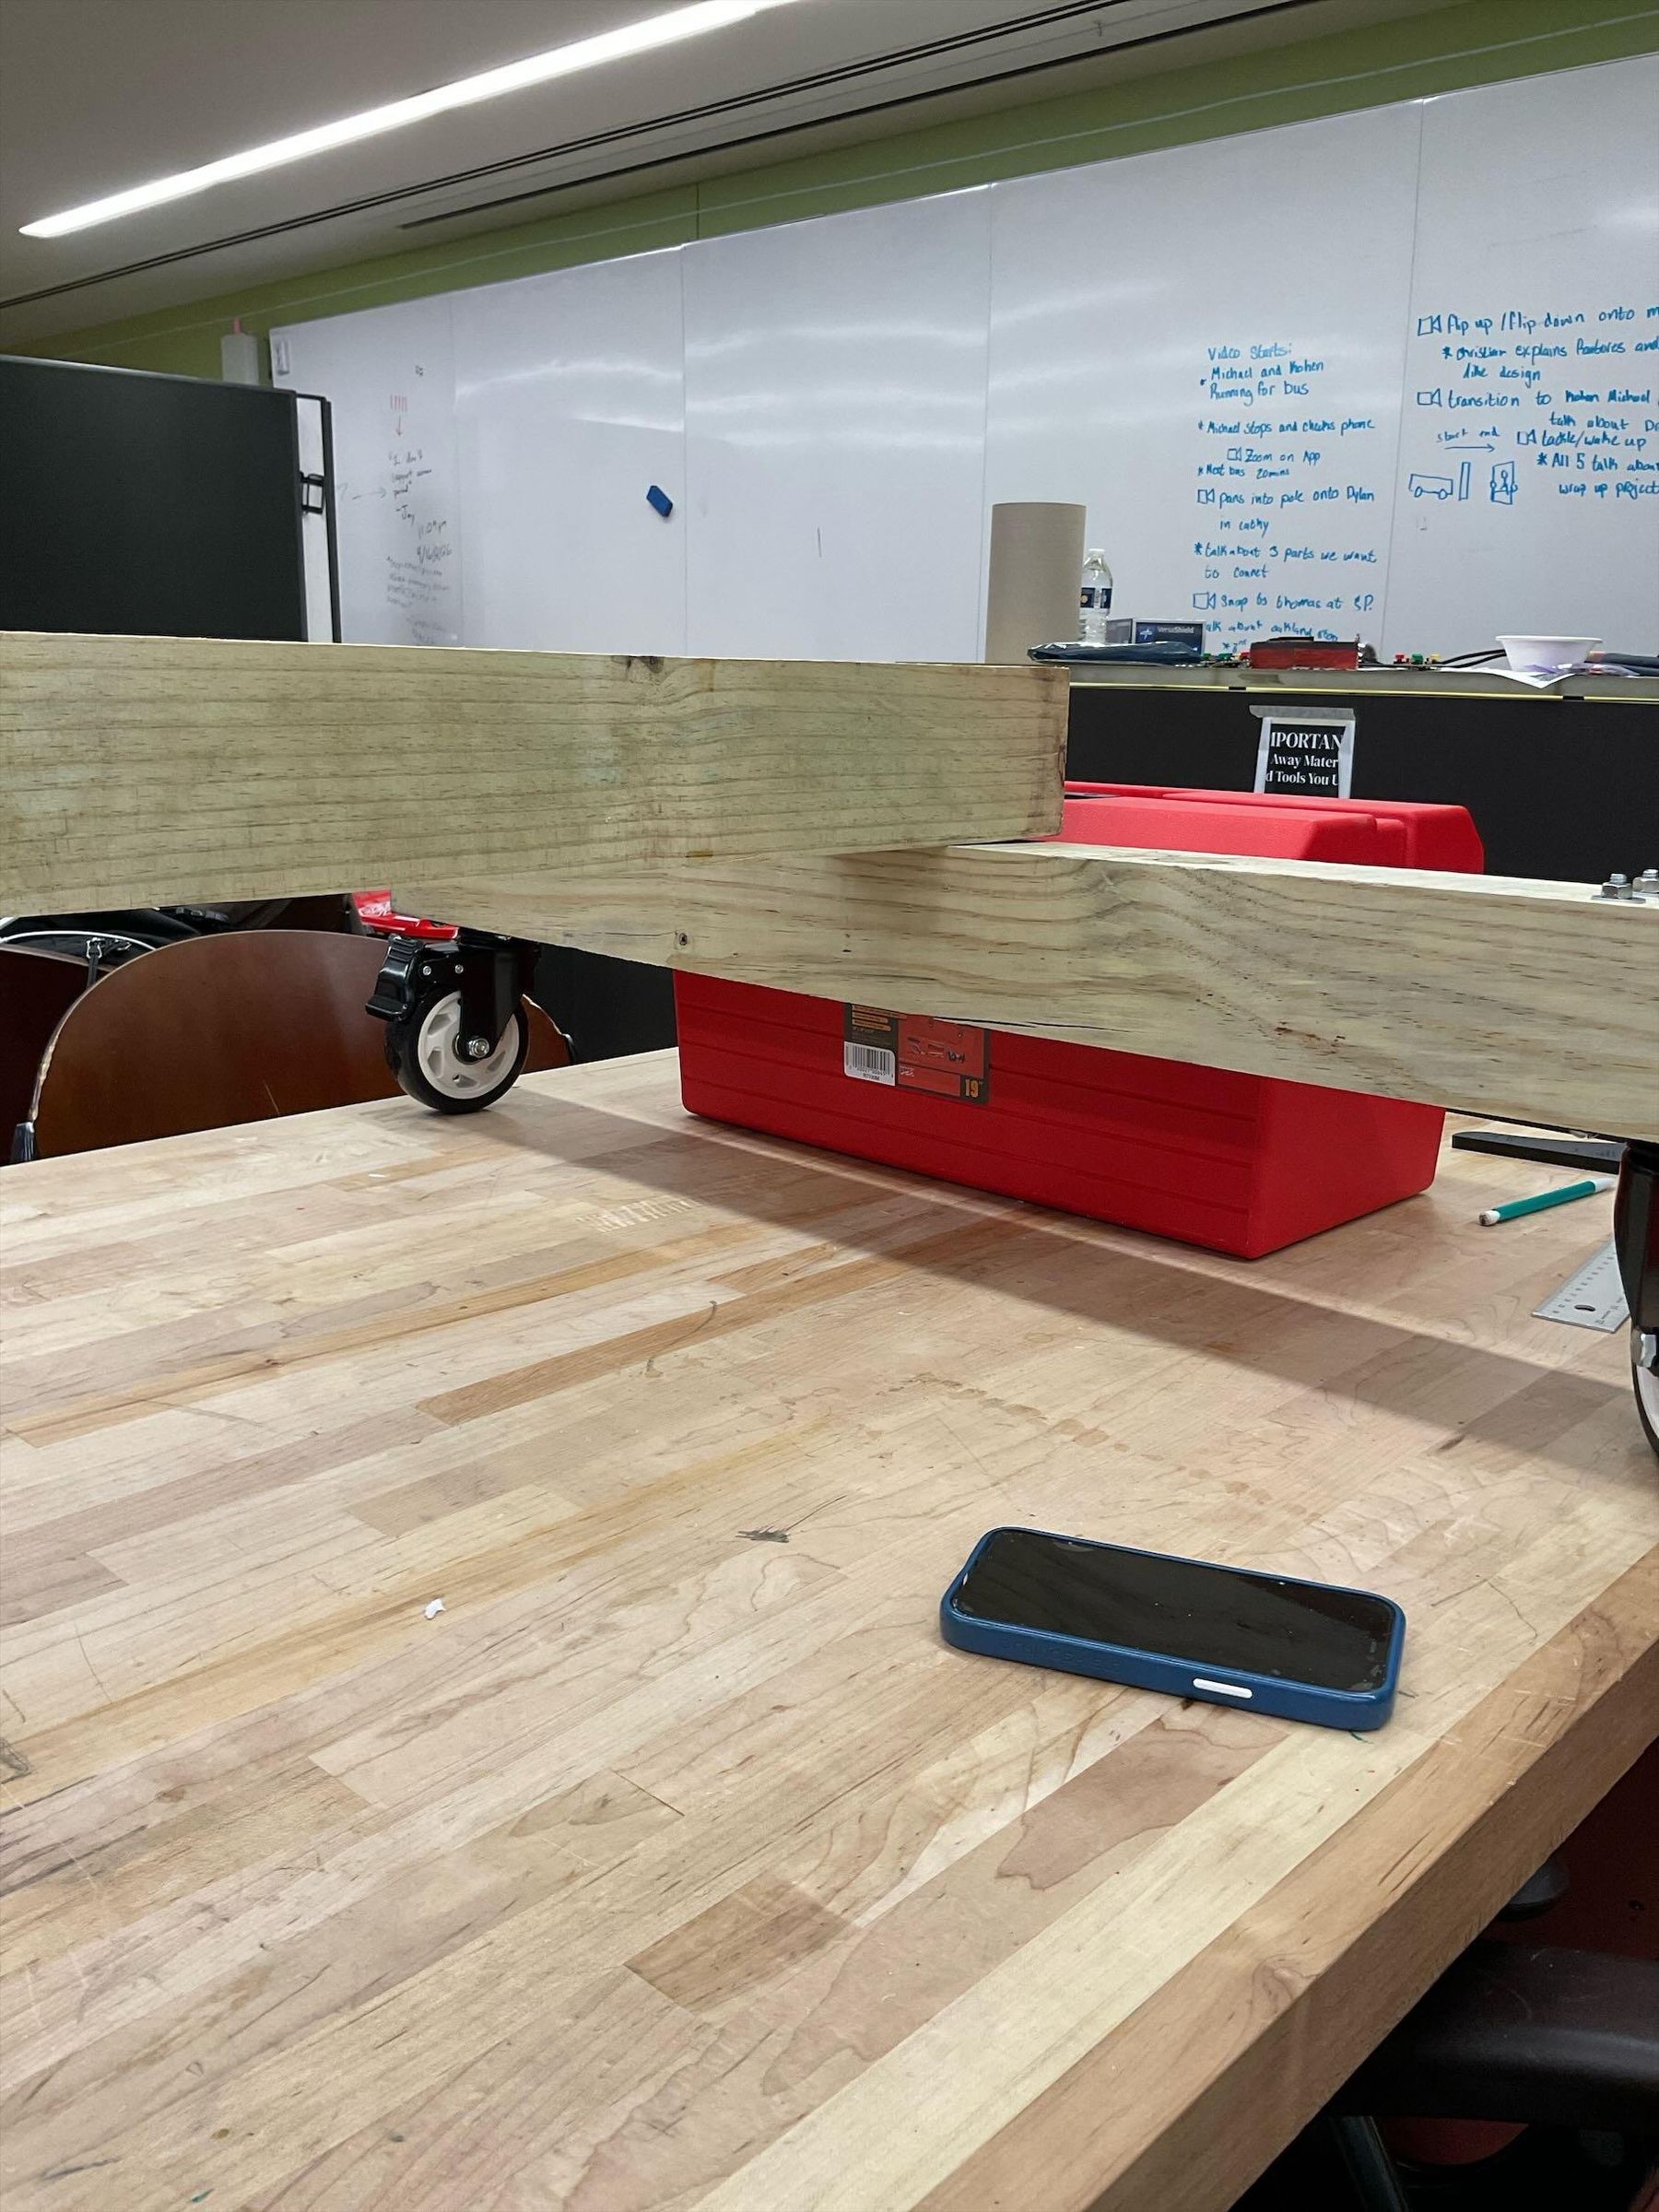
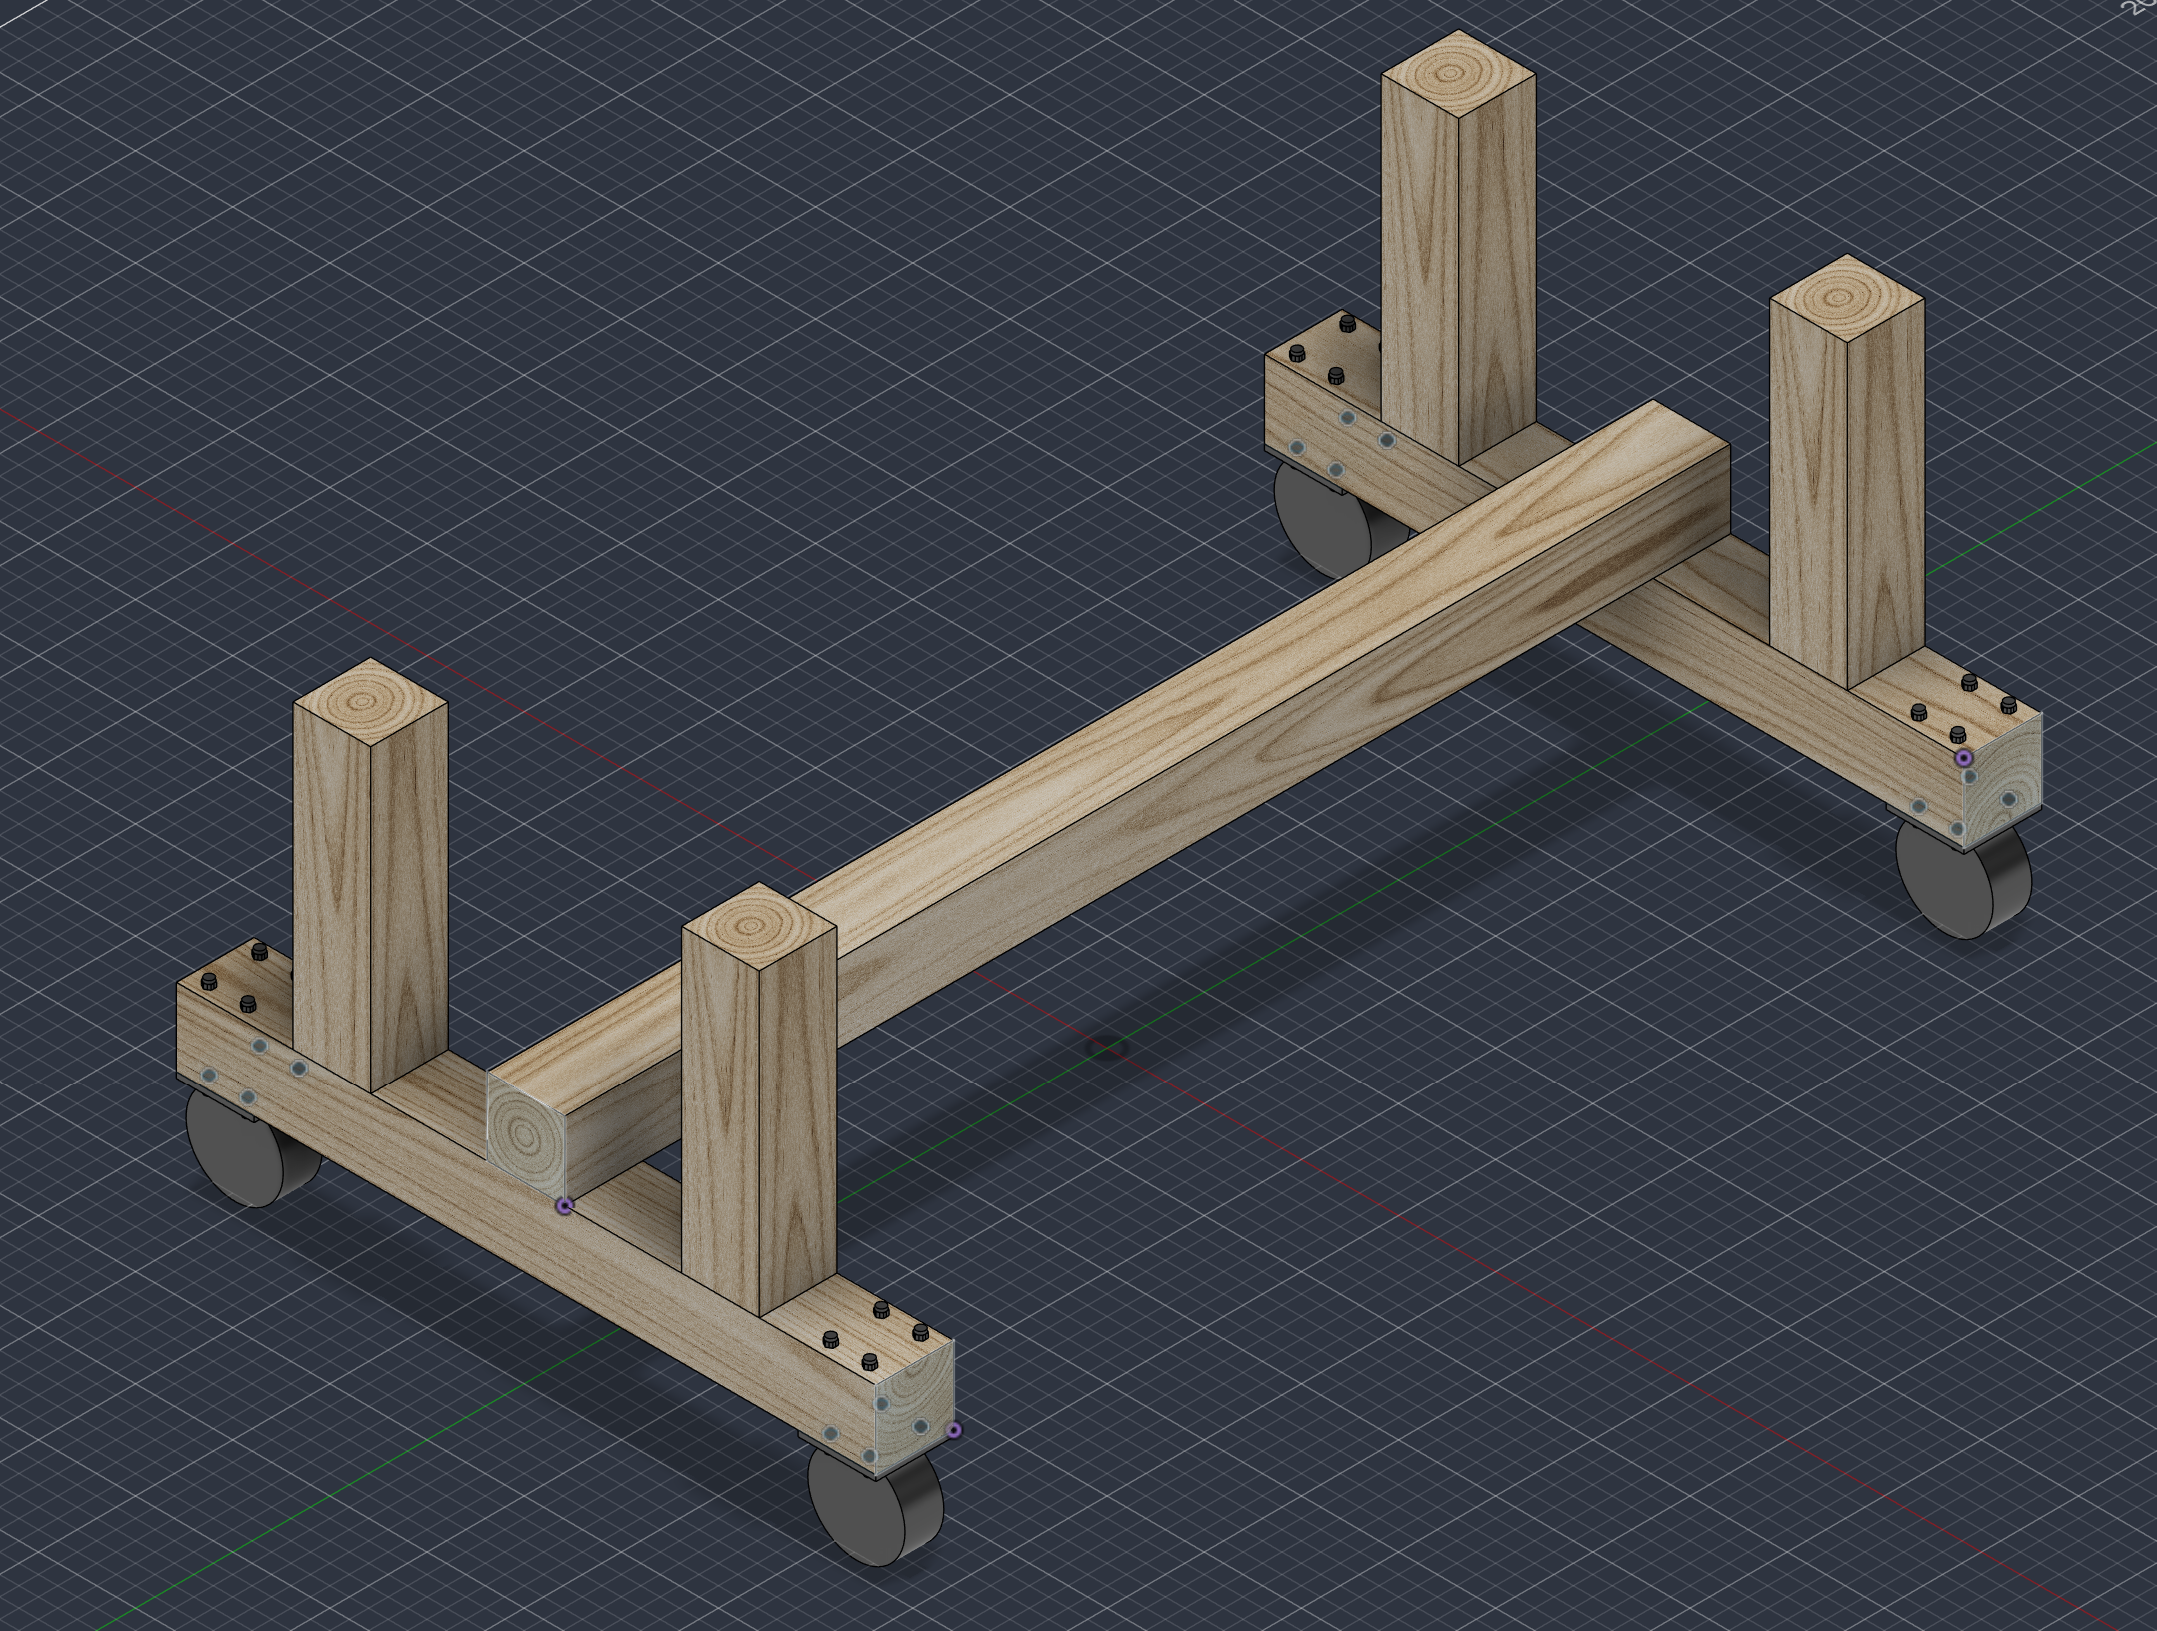
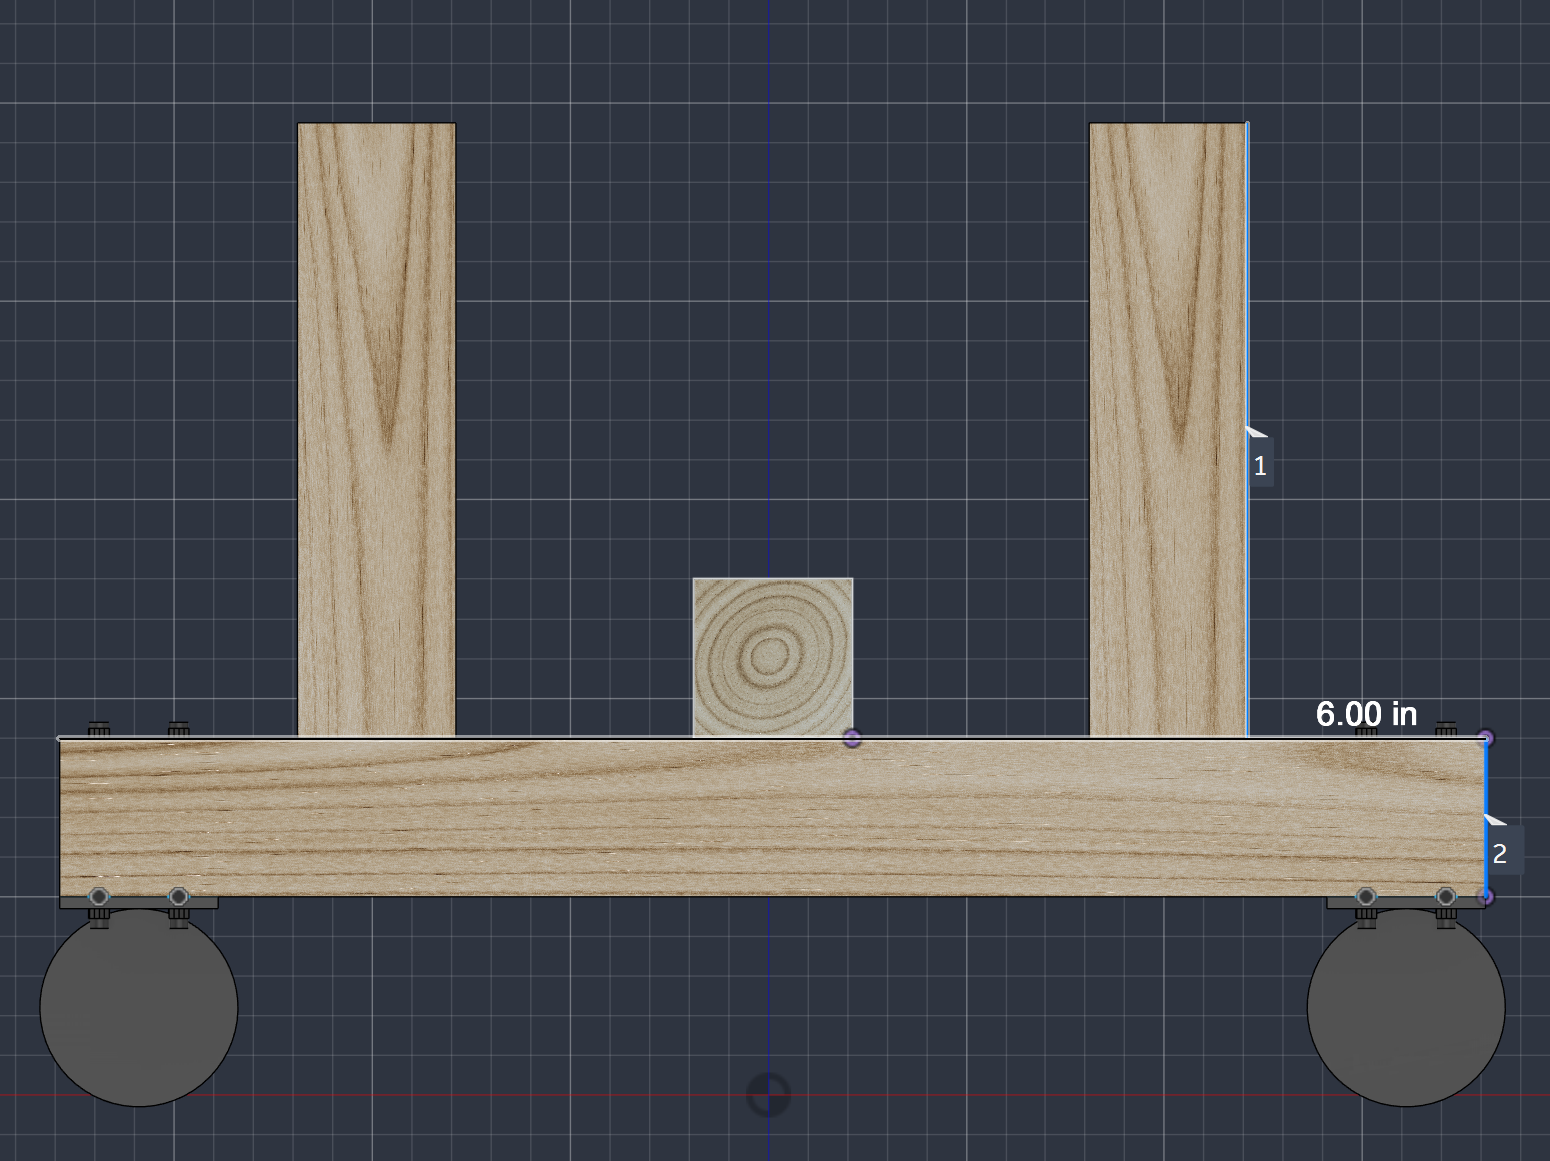
The best thing to do with a build like this is to start with the base and build off of that. In the case of this build, it's also the simplest.
For the base you will need:
- The four wheels (if desired)
- if using wheels, get hardware that matches the hole sizes on the brackets attached to the wheels.
- The two 36" 4x4s
- The four 15 1/2" 4x4s
- The 60" 4x4
- 6" deck screws
Now for the step-by-step:
- Attach two 15 1/2" 4x4s to a 36" 4x4, using (3) of the 6" screws for each one, in a triangle formation. The edge of each 15 1/2" piece should be 6" from each end of the 36" piece, as highlighted in the picture.
- I found it easiest to stand the 15 1/2" 4x4s up on the ground, then screw the 36" 4x4 down into them.
- Do this for both legs
- Attach the 60" 4x4 to the legs with 3 screws on each side. To do this, you can stand the legs up against a box, as shown in the picture, and then screw down through the 60" piece into the 36" pieces. The edges of the 60" 4x4 should be 6" from each 15 1/2" piece, or 16" from the edge of the 36" 4x4.
- If you are opting for wheels as I did, attach them now at both ends of the 36" 4x4s using the hardware for your specific wheels.
While building the base, ensure that everything is level as you go, as the end result should be roughly level, and doing this for each part instead of at the end will save a lot of time and headaches.
The Bed's Shell
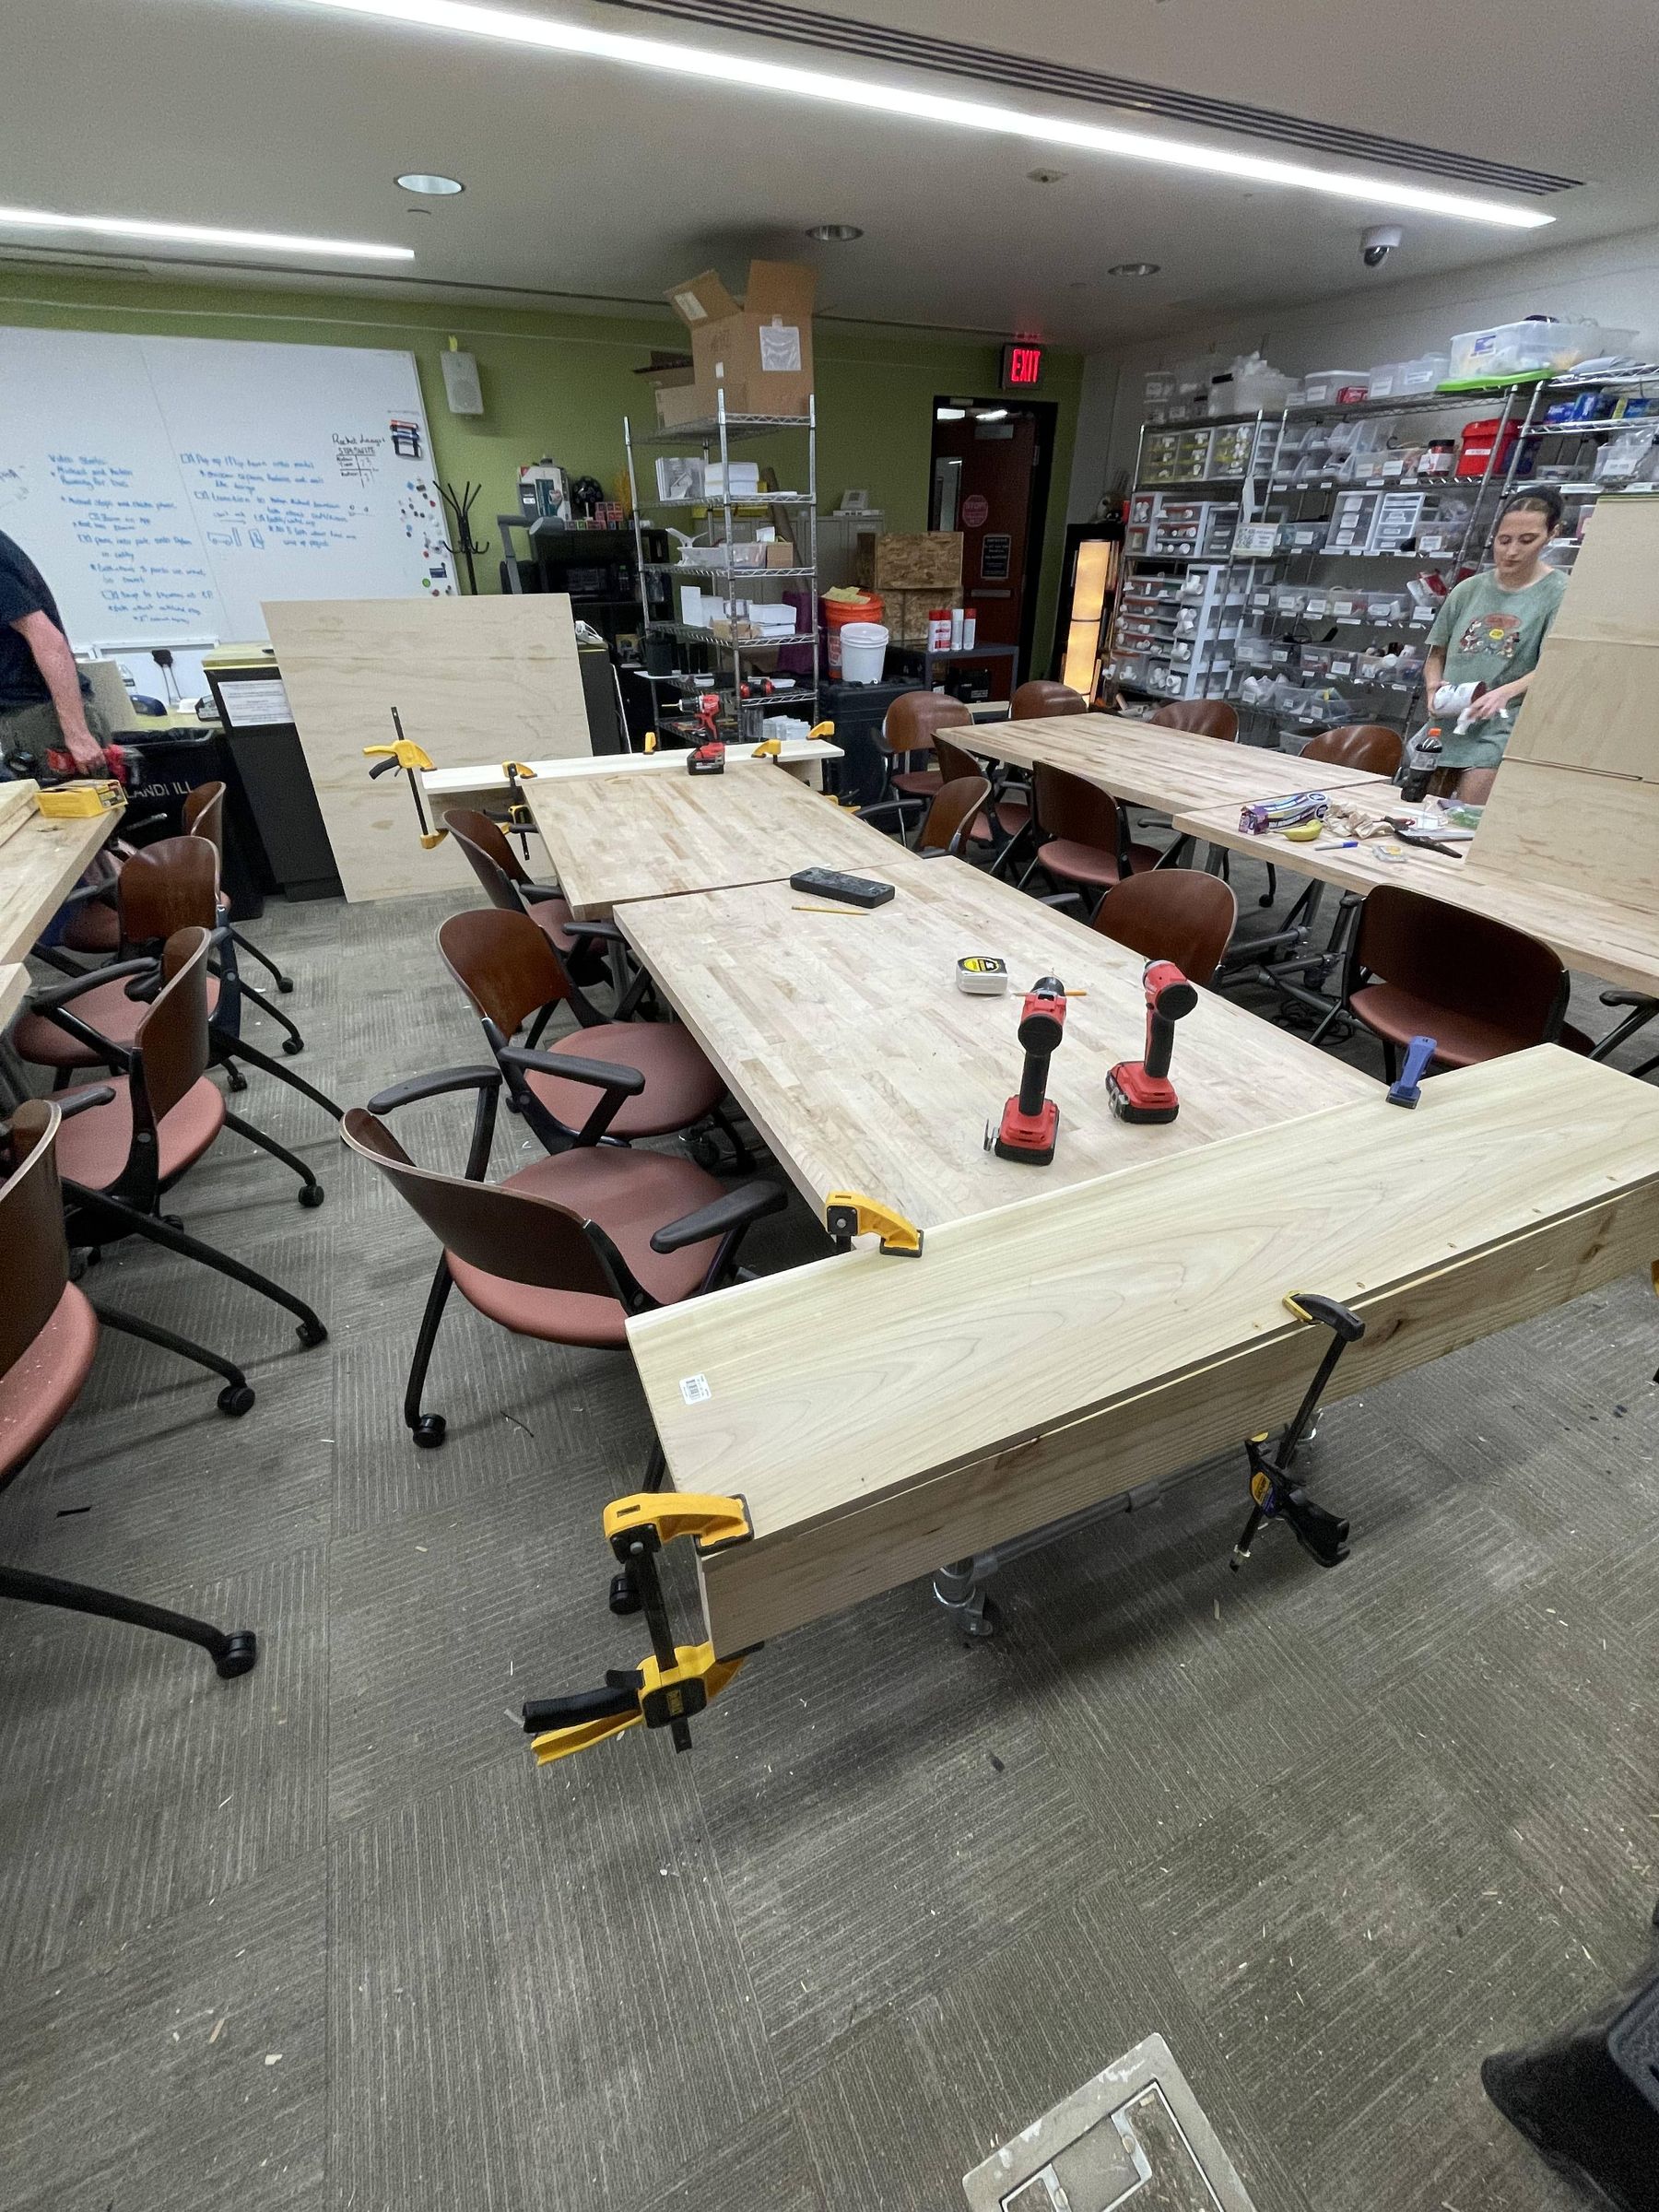
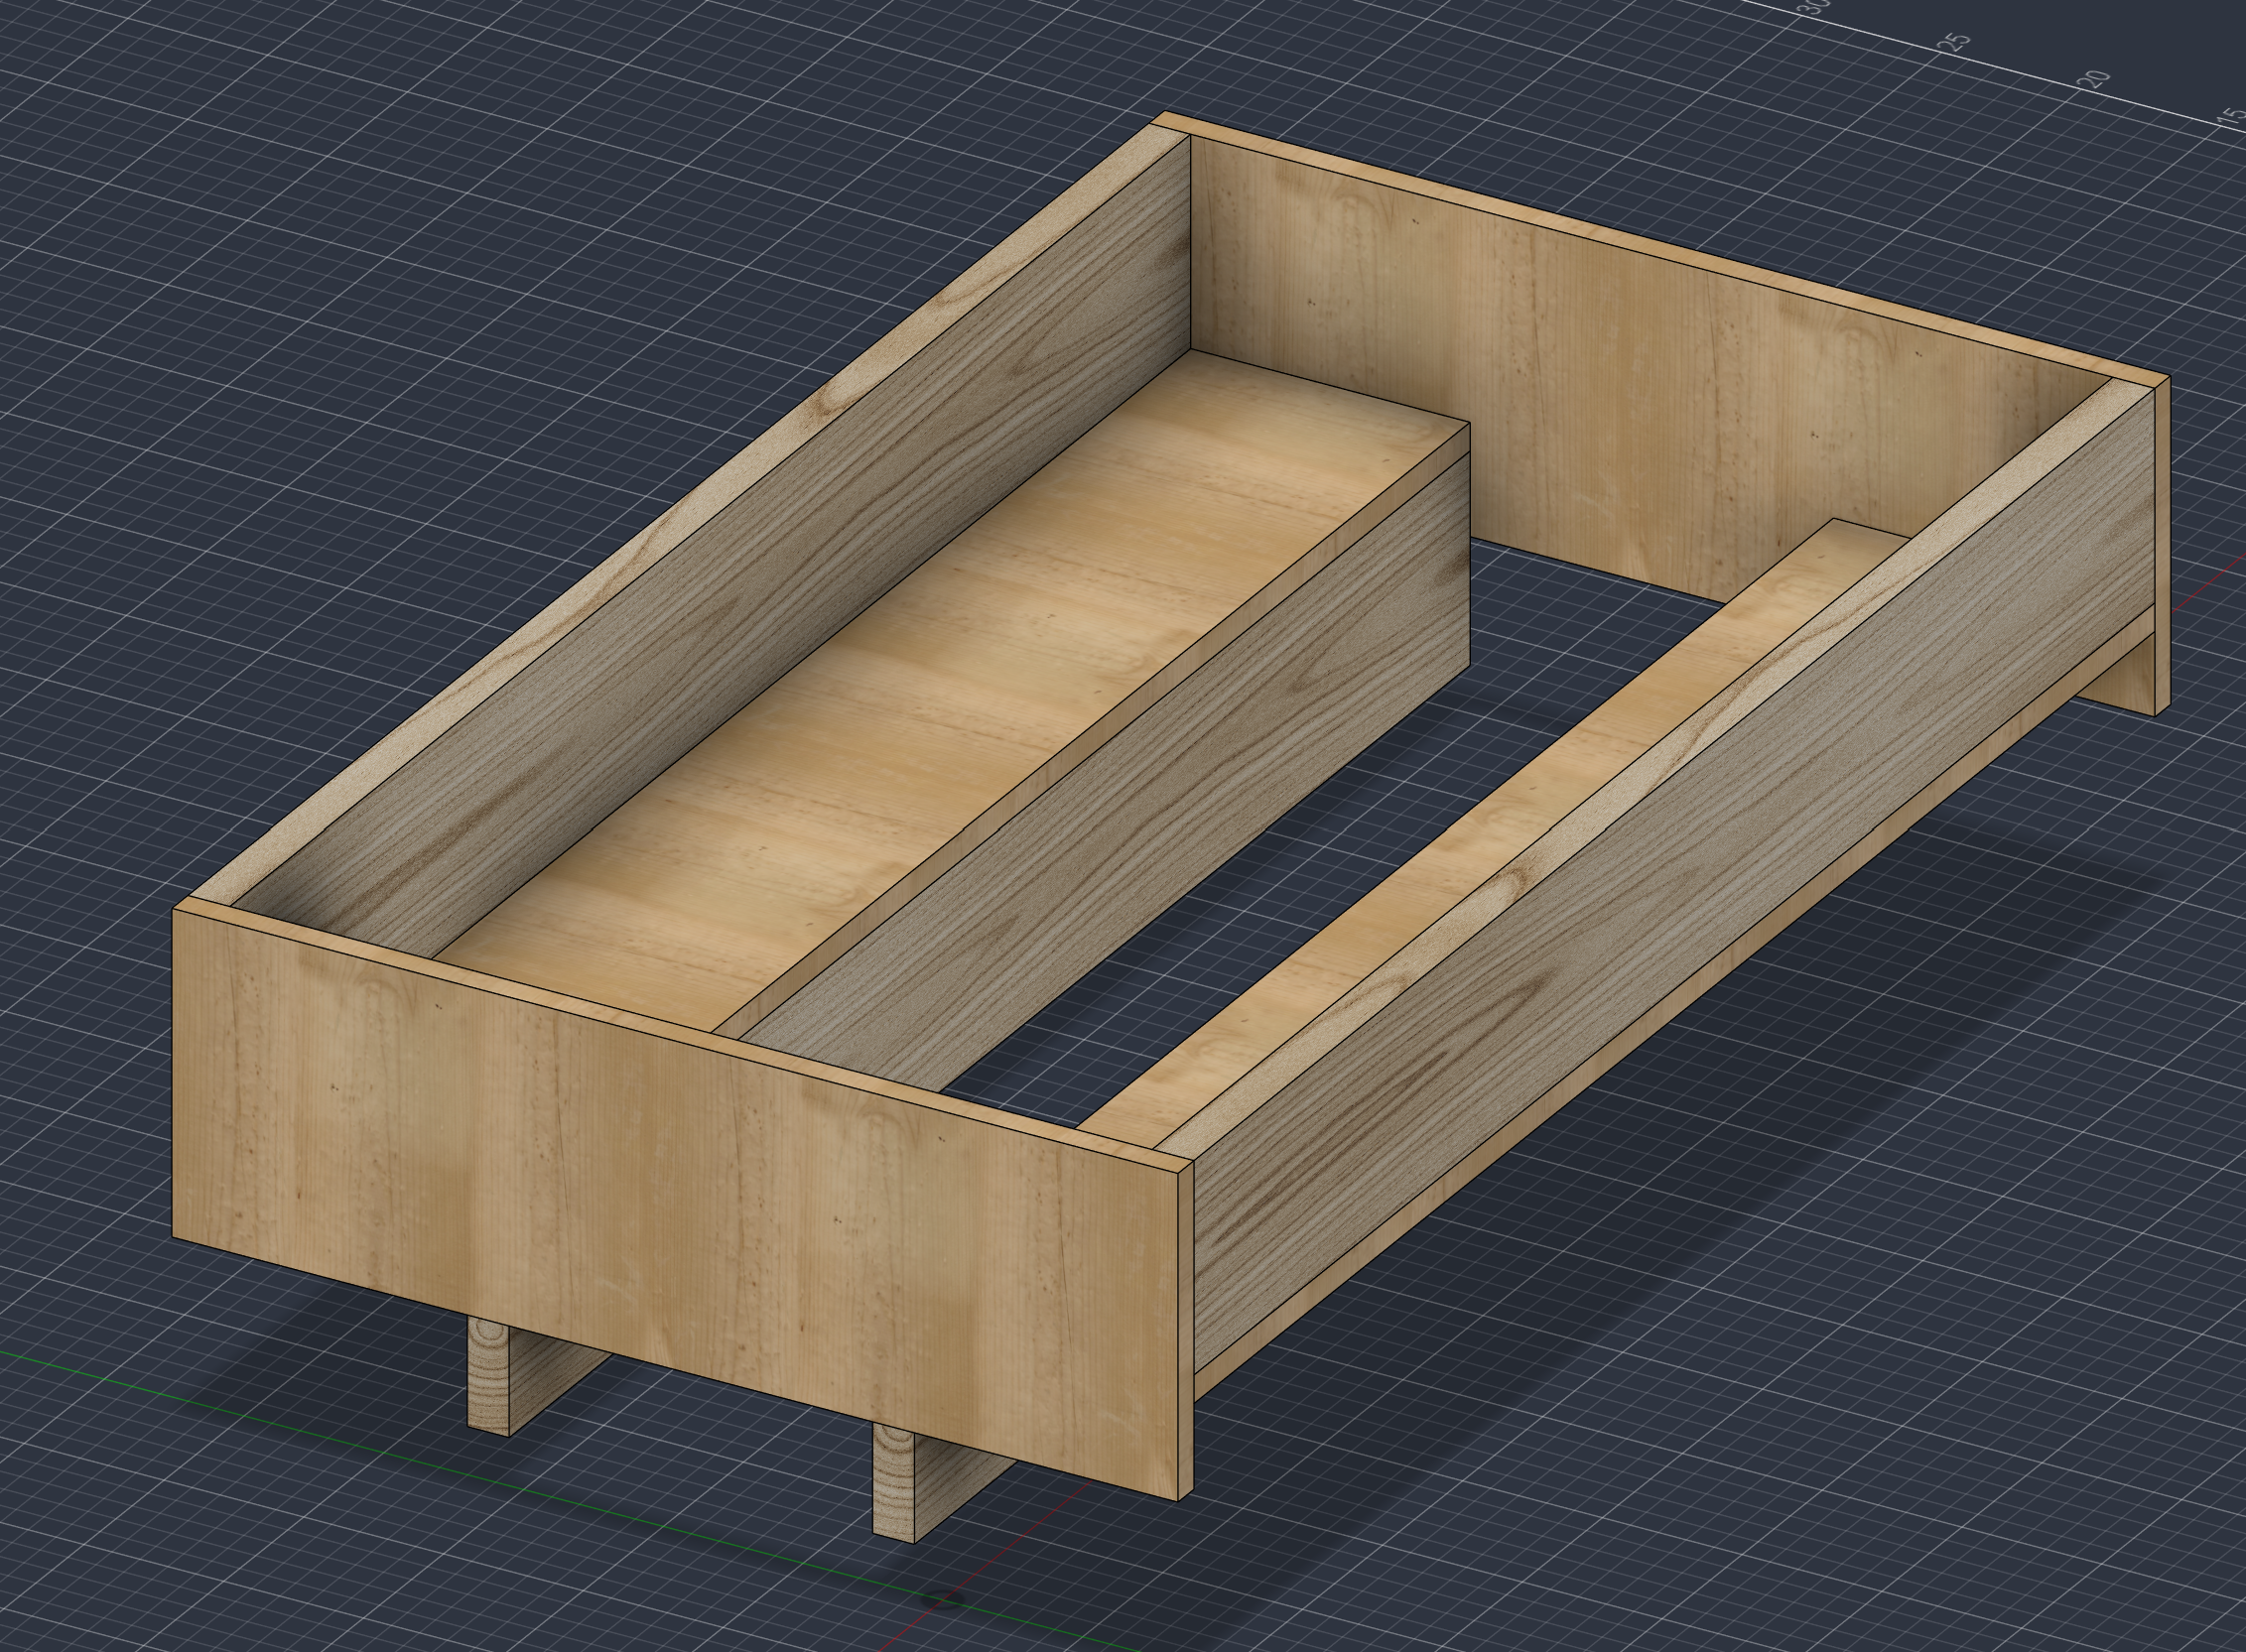
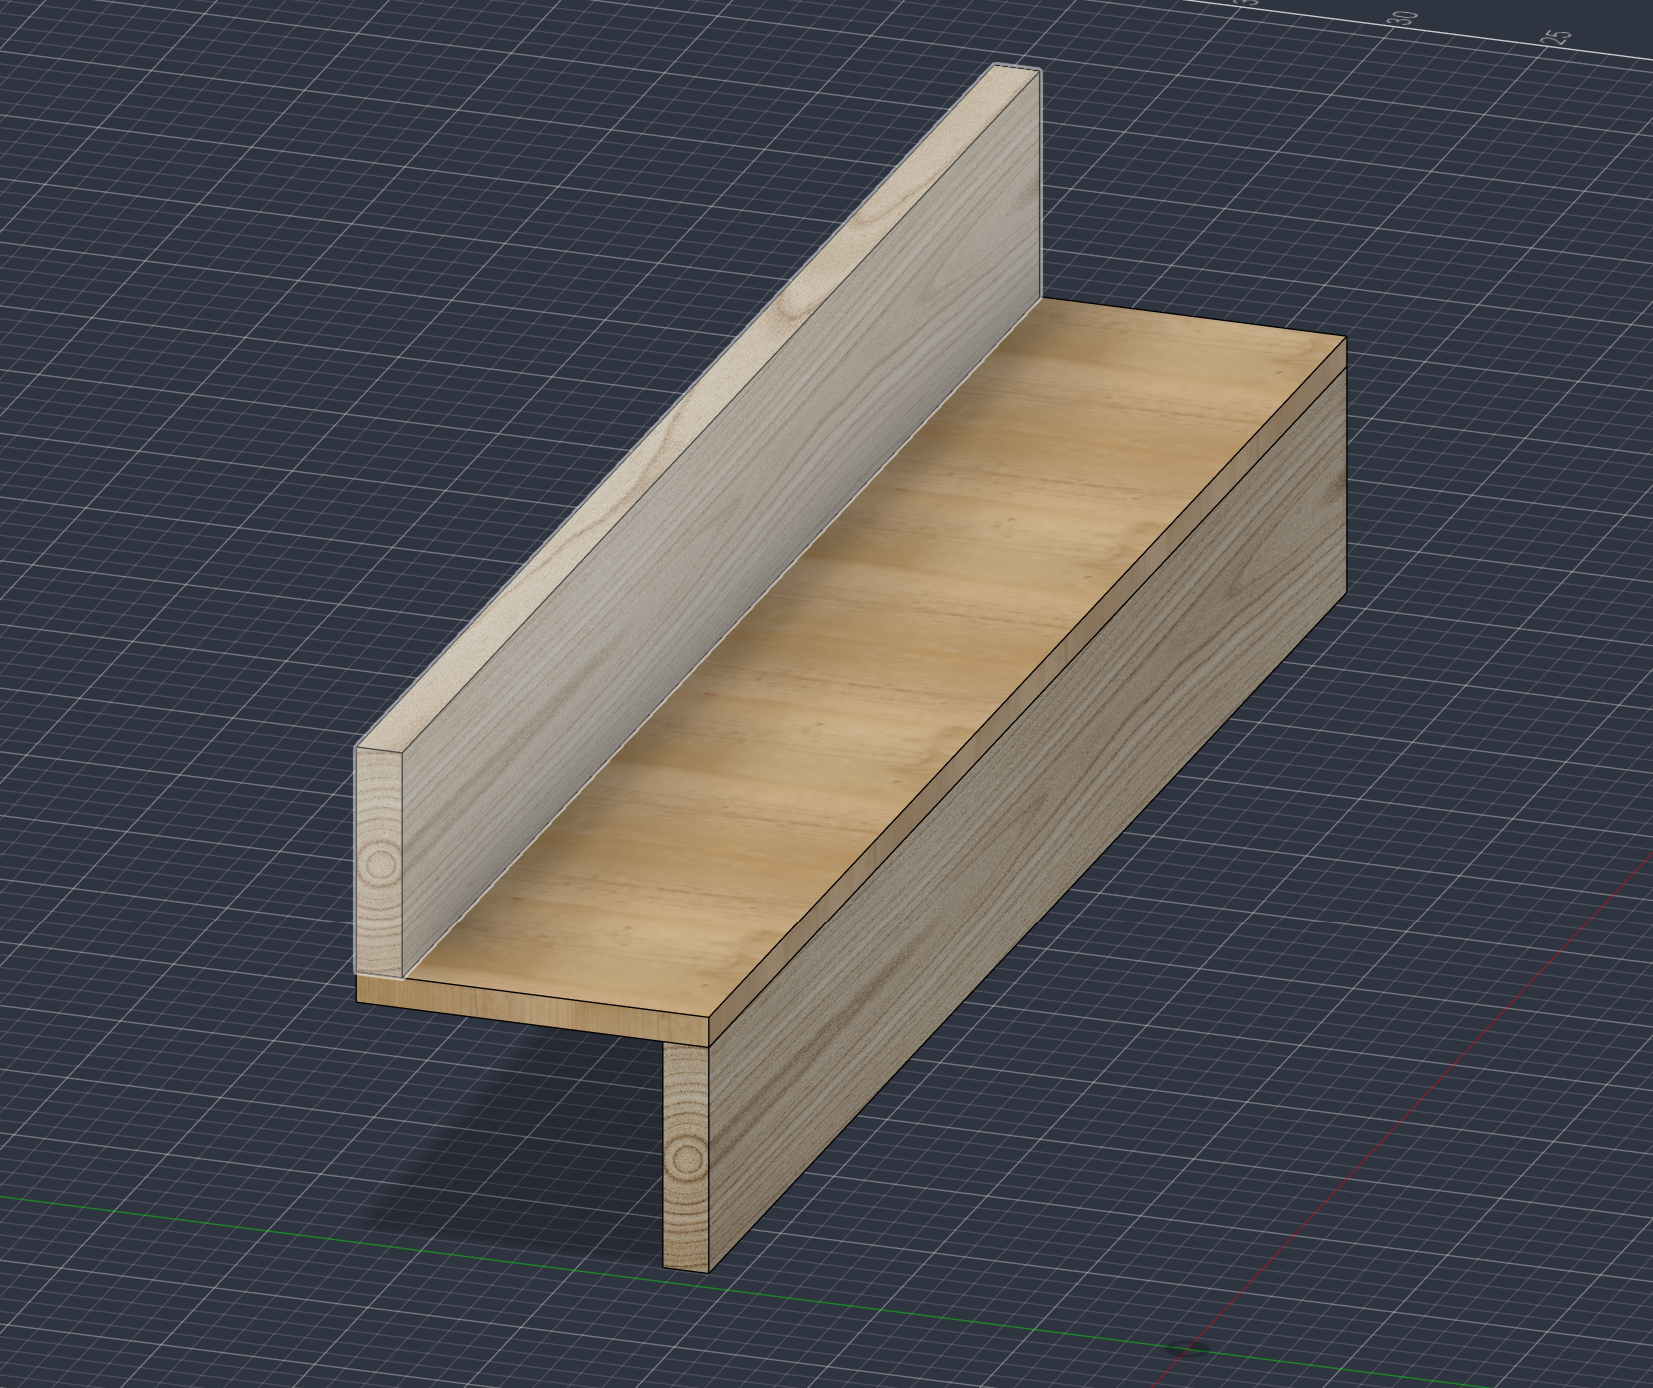
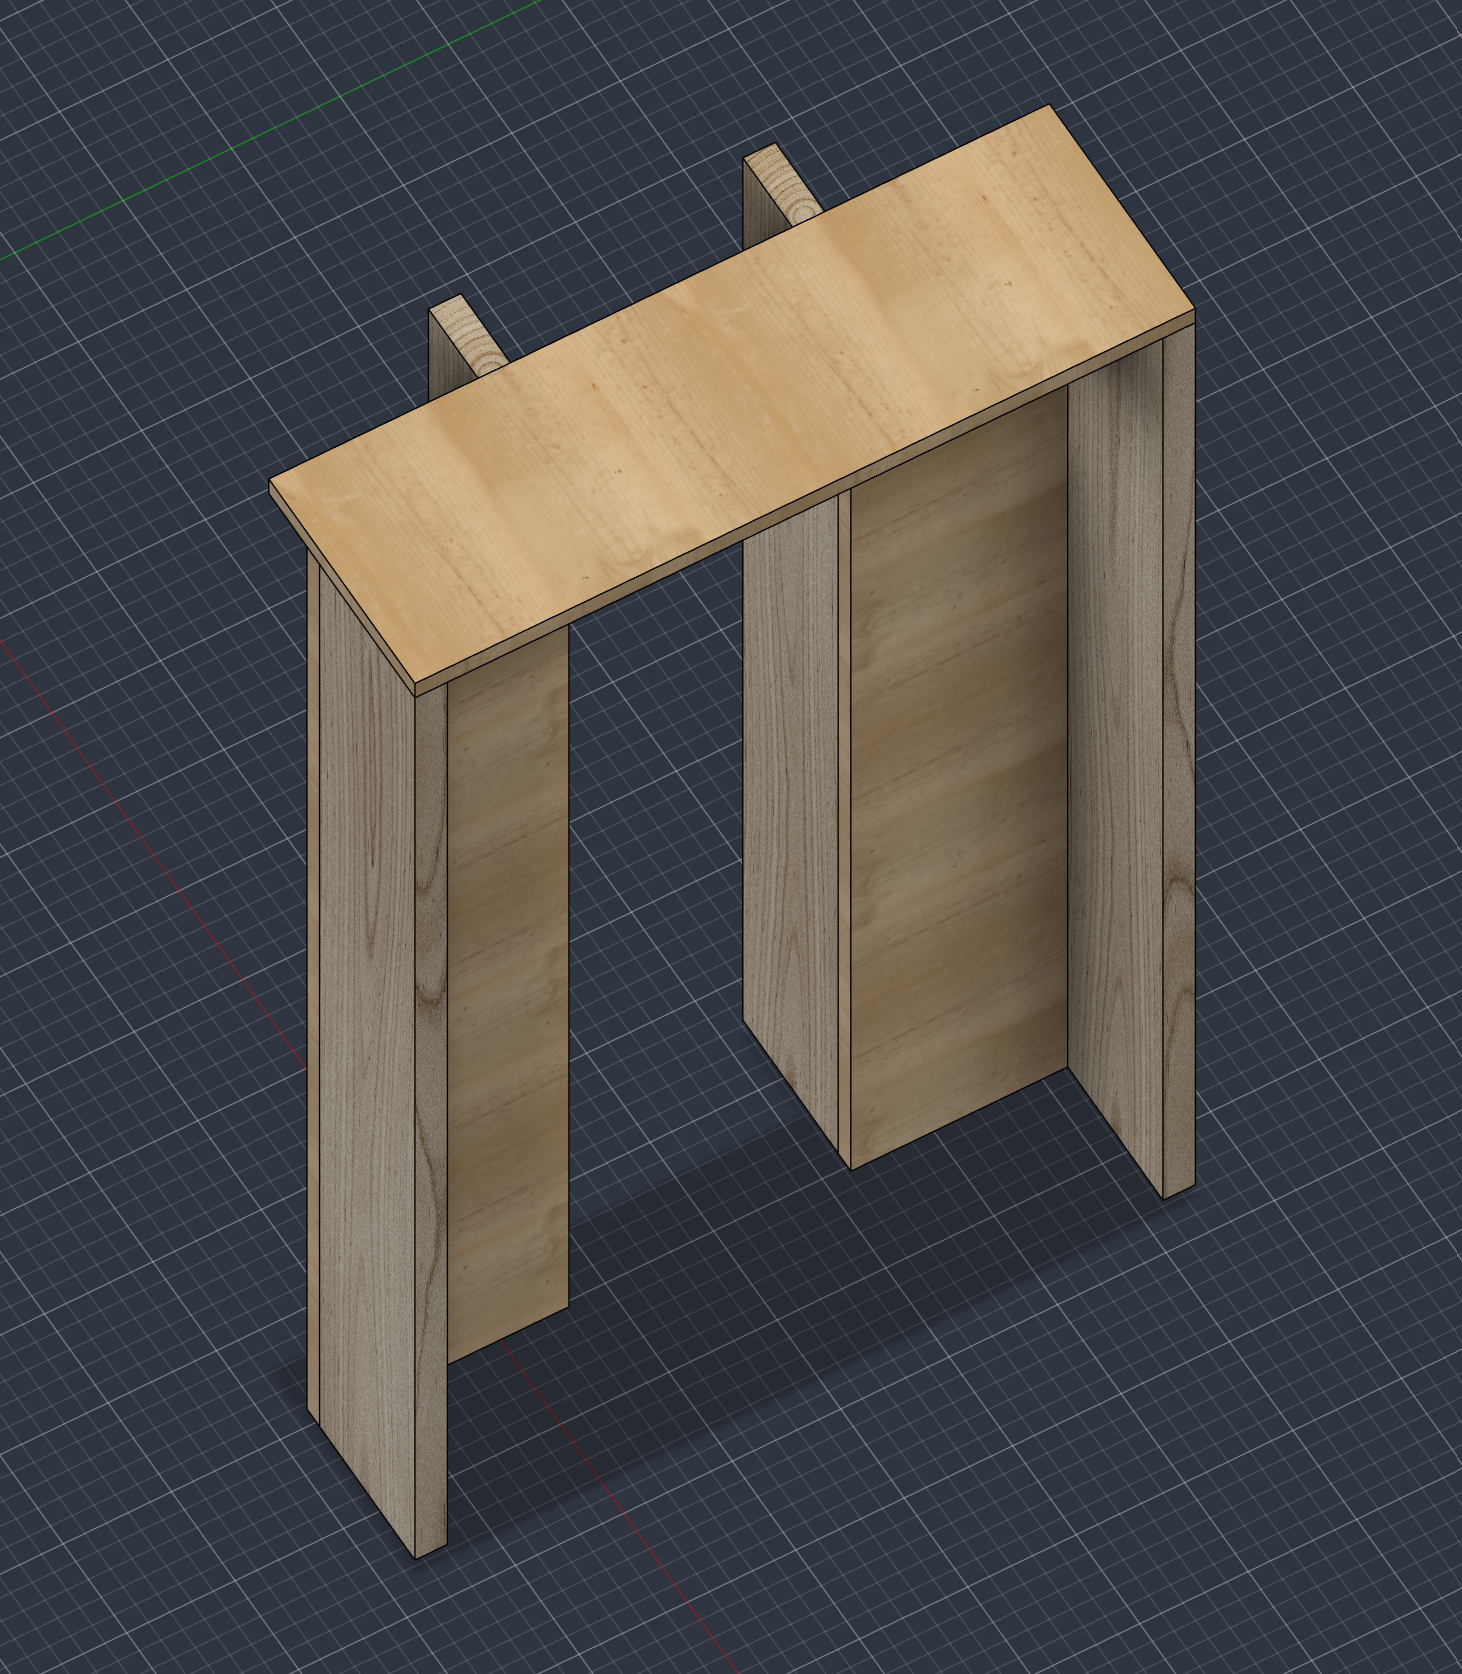
This step begins the main portion of the raised bed: the bed itself. For this part, you will use:
- The four 60" 2x8s
- The two 60" 1x12s
- The two 36" 1x12s
- 4" deck screws
For assembly, follow these steps:
- Screw one of the 60" 2x8s onto one of the 60" 1x12s with their long edges aligned.
- Then flip it over and screw another 60" 2x8 into the other side of the 1x12, forming a sort of stair shape, as shown in the picture.
- Repeat this so you have two of these stair shapes
- Next, screw both of these stair shapes into one of the 36" 1x12s, so that the 36" 1x12 forms the third side of the top "box."
- The way I did this was to stand the stair shapes up and screw the 1x12 piece down into them, as shown in the picture.
- This admittedly was a little challenging, so if you can figure out a better way, definitely go for it. If not, just be extra careful with this step.
- Repeat this for the other 36" 1x12 on the other side to form the fourth and final side to the top "box."
Bed Drainage System
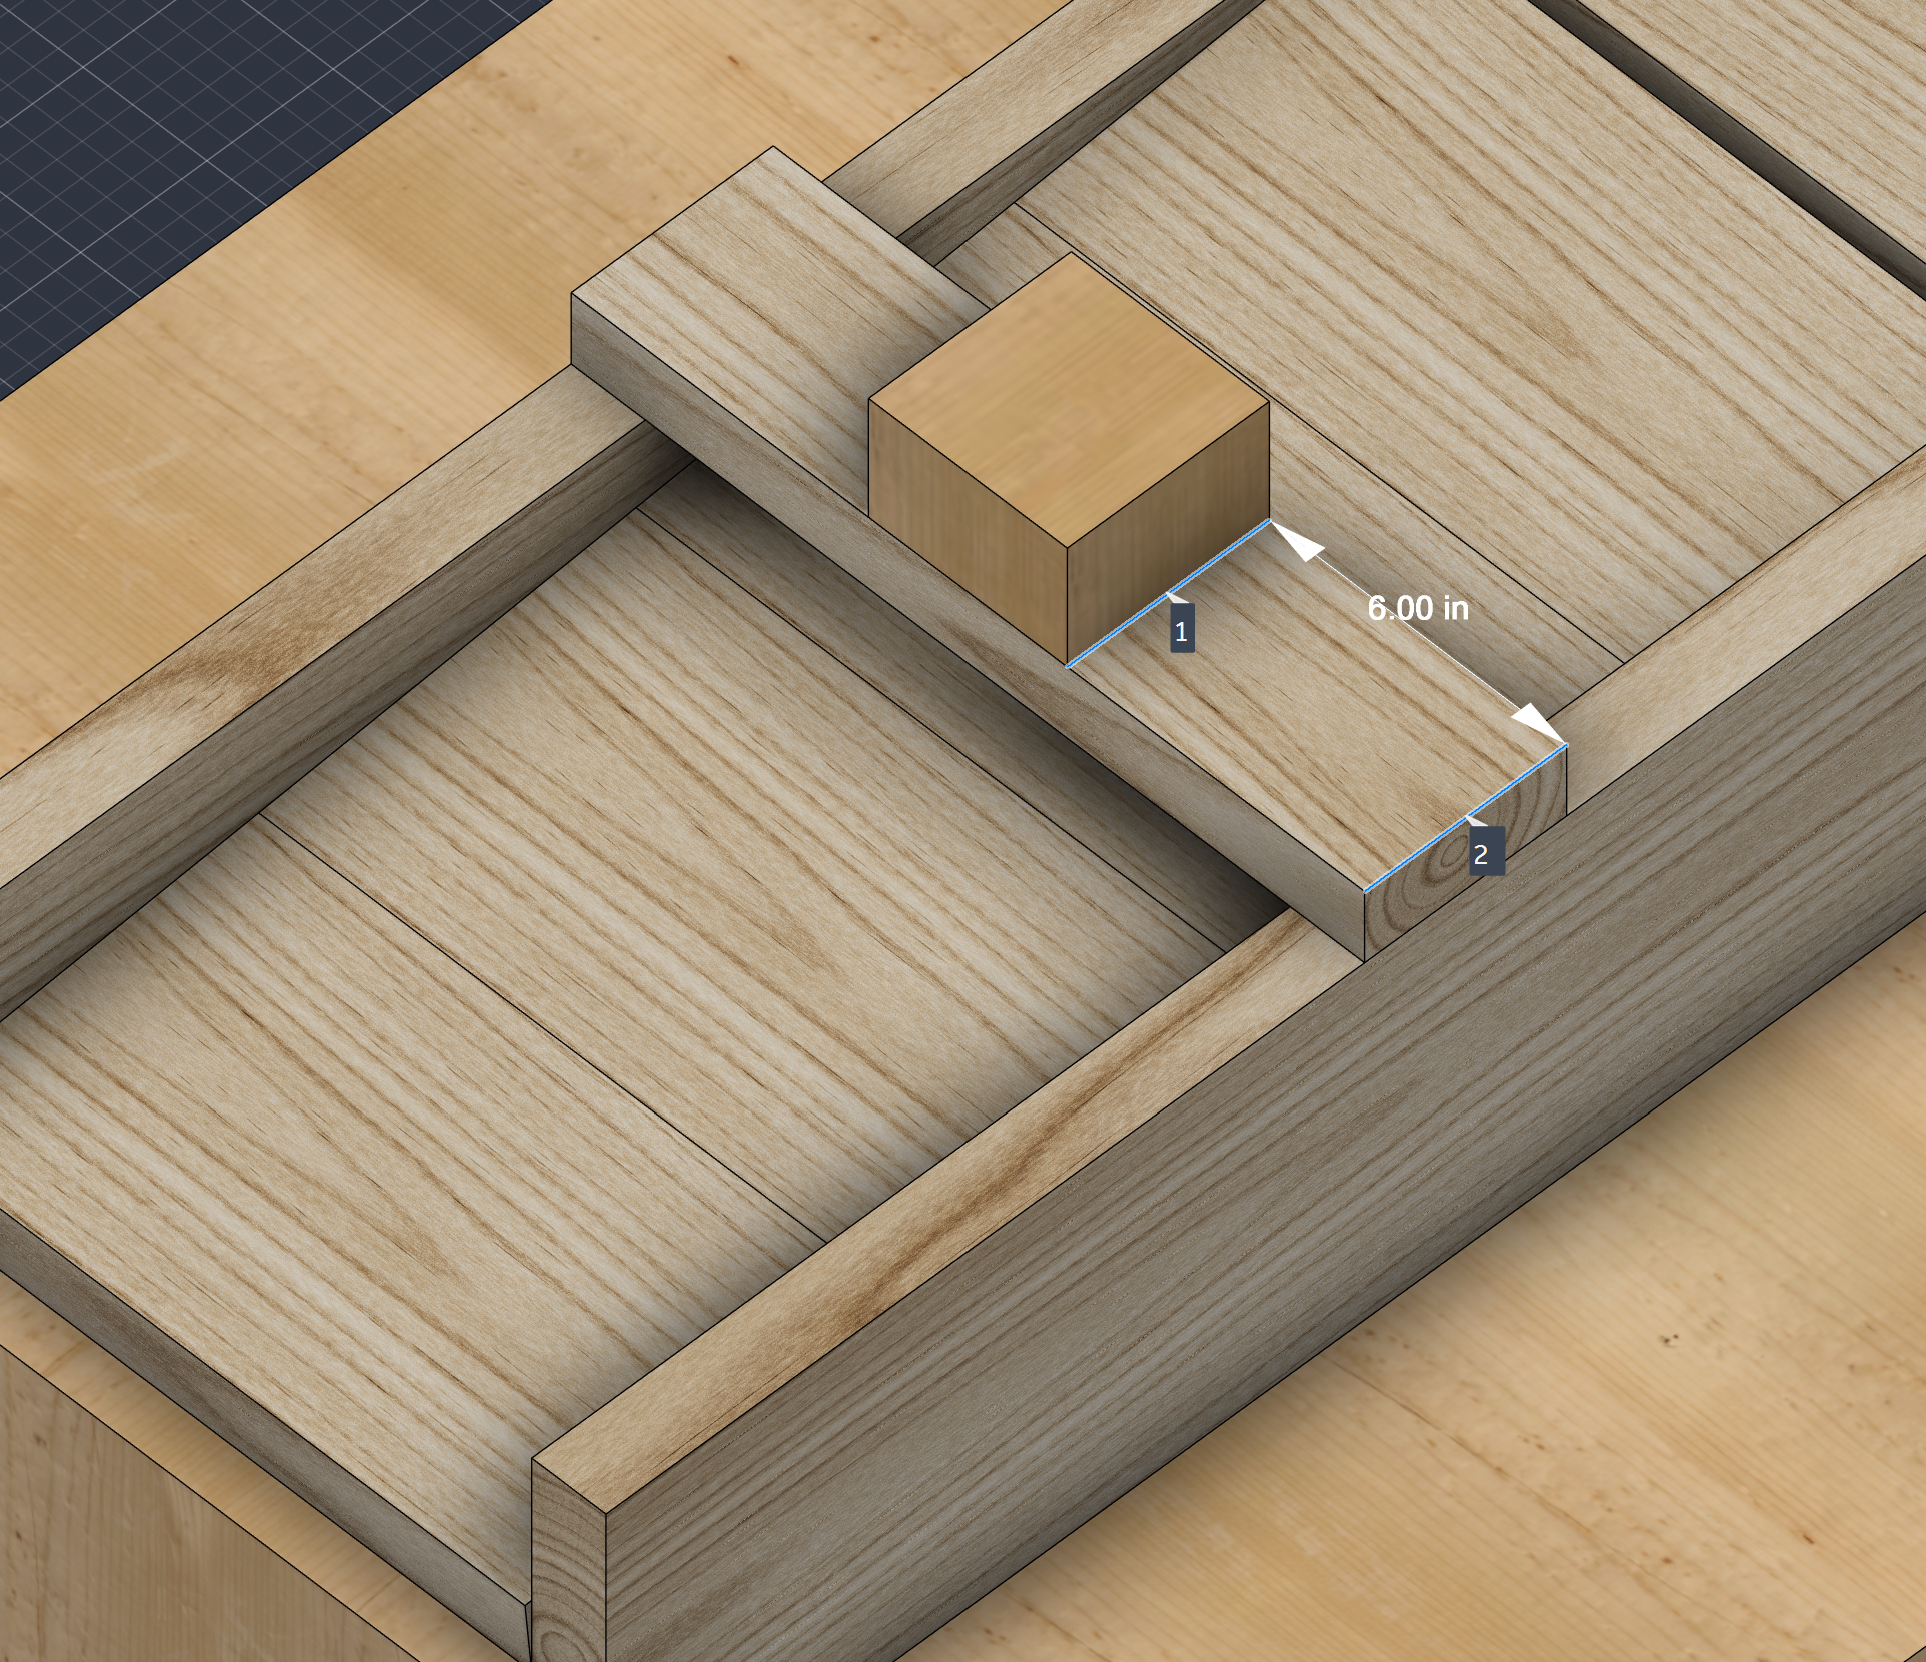
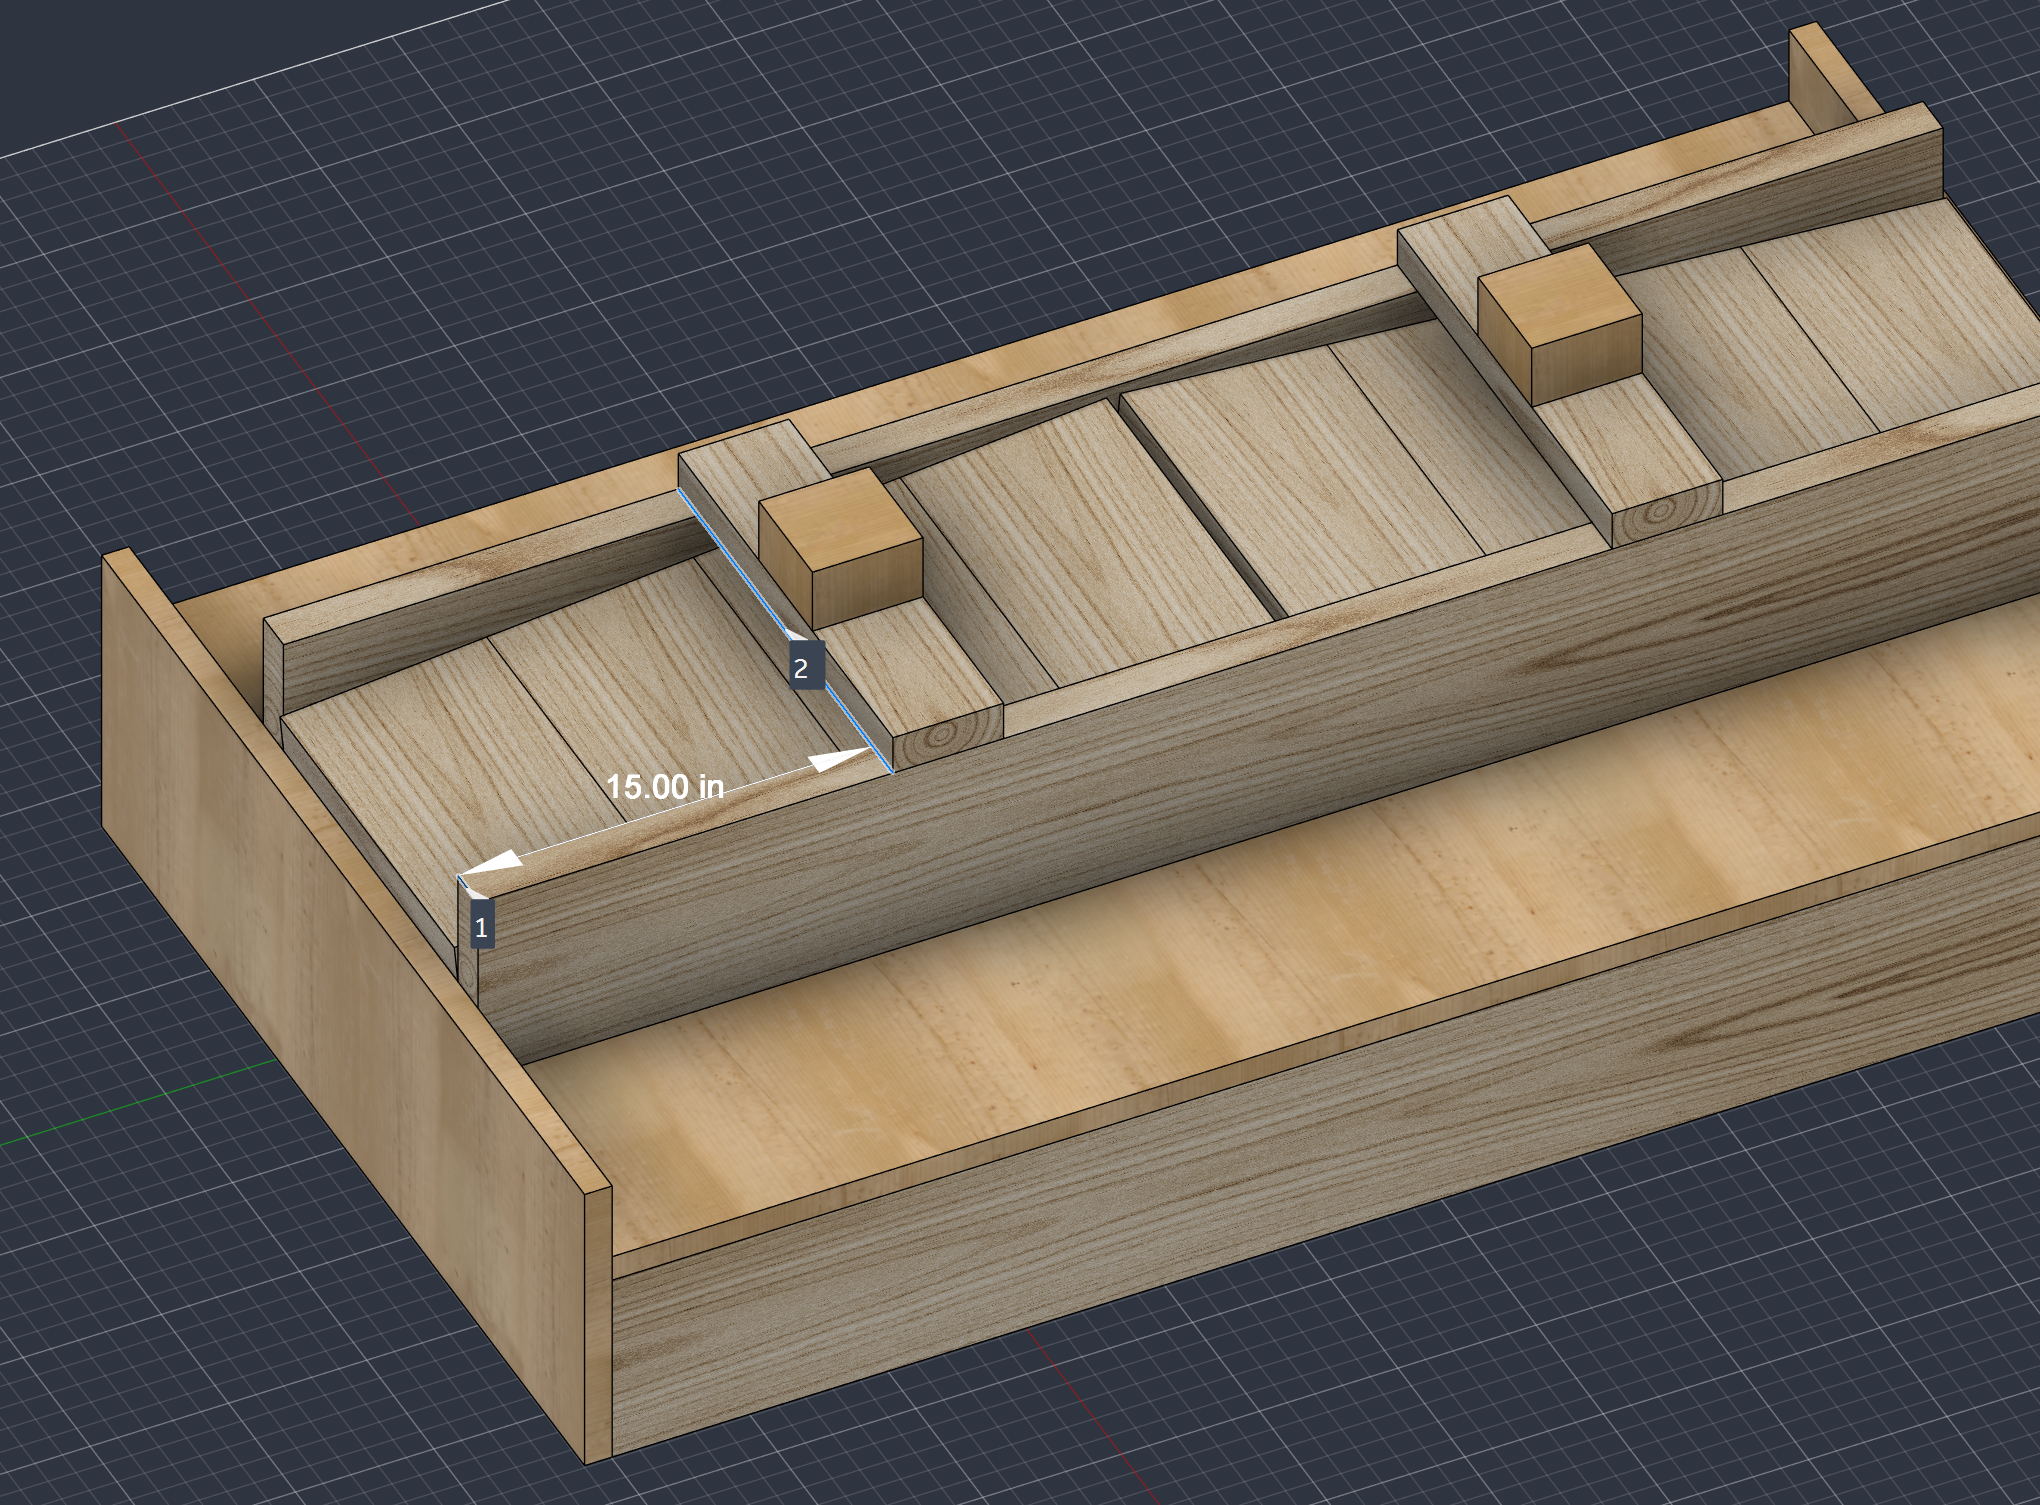
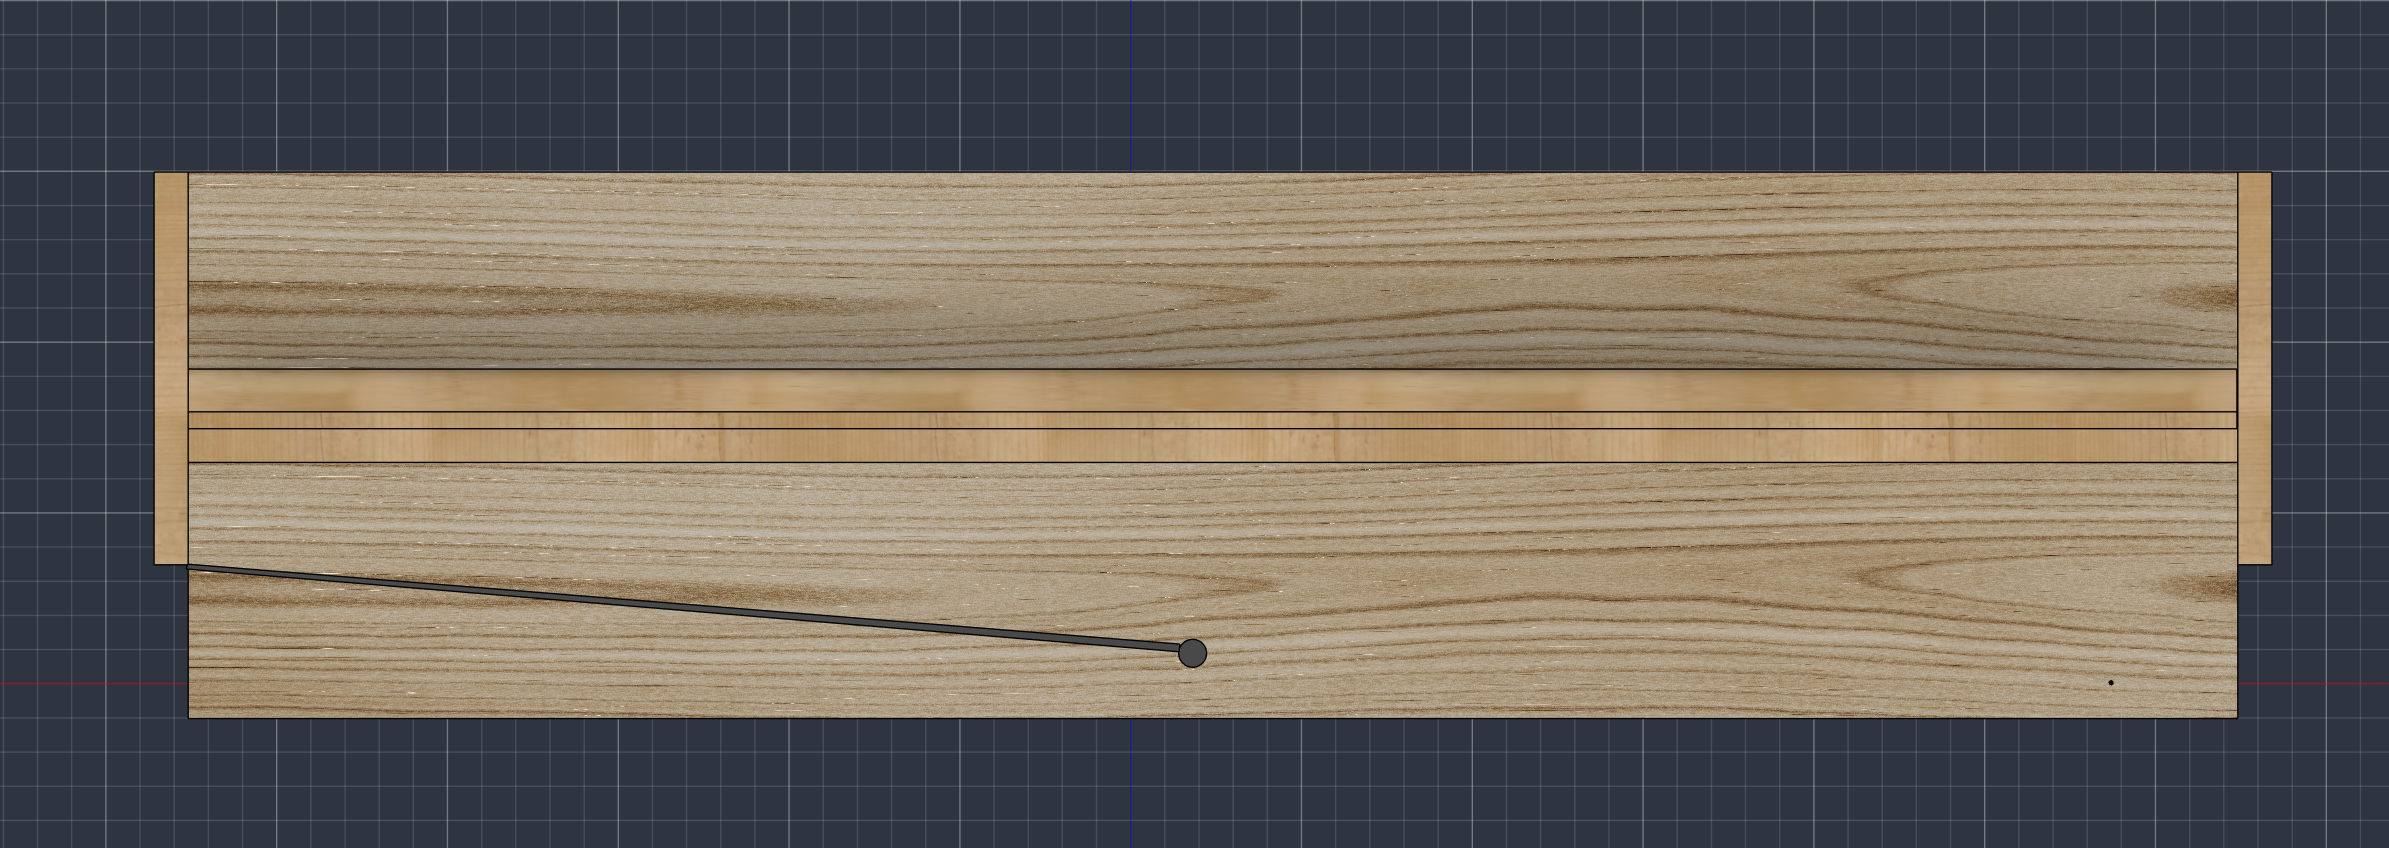
To protect against wood rotting and to ensure proper plant health, each tier of the bottom of the raised bed is at a slight slope downwards, all leading to a small gap in the center, through which water can drain. This step is definitely one of the trickier ones, but as long as you are careful and take it step by step, it will work out nicely.
For this step, you will need:
- The (8) 13" 2x8s
- The (2) 16" 2x4s
- The (2) 2 1/2" 4x4s
- 4" deck screws
- 6" deck screws
For the bottom slats, follow these steps: (use the 4" screws for parts #1-5 and use the 6" ones for part #6)
- Start by measuring out the slope line for the 2x8s by putting a tack or a nail on the halfway point of one of the bottommost 60" 2x8s, at 1" lower than the bottom of the side 1x12 (see the picture for the visualization here).
- Run a string along from the top of the bottom 60" 2x8 to the tack or nail from step one and trace that line.
- Don't forget to remove the string and tack after you have traced the line on both sides.
- Then screw the 13" 2x8s into the 60" 2x8s, following according to the line you just traced to ensure a consistent slope.
- I cut the 2x8 slats just a little shorter or longer than 13" depending on the actual size of the gap, so that I could get a snug fit. I then used a mallet to hit the planks into the correct spot before screwing them in.
- After that, flip the bed over so that the top is facing down
- Then, screw each of the 16" 2x4s fifteen inches from either end of the bed, as shown in the picture.
- Finally, screw the two 2 1/2" 4x4s into the middle of the 2x4s. This should be at a distance of roughly 6", as shown by the picture. Do this by screwing two screws in on a diagonal. This will leave room for two more screws to be screwed in during the next step.
- Make sure these 4x4s are exactly aligned with each other, otherwise they won't line up properly in the next step
Hardest step complete!
Full Assembly!
.png)
This is the last major step! Take a second to feel proud for getting this far and get excited to wrap this build up!
For this step you will need:
- 4" deck screws
- 6" deck screws
- A buddy
You are now going to attach the entire upper portion to its base. To do so, follow these steps:
- Position the base and upper portion so that they are both upright and close to each other. Make sure that if you included wheels on the base, that they are locked for this step.
- With the help of your buddy, lift the upper portion up and place it onto the base. It should fit everywhere and be able to rest comfortably on each of the 4x4 supports sticking out of the base.
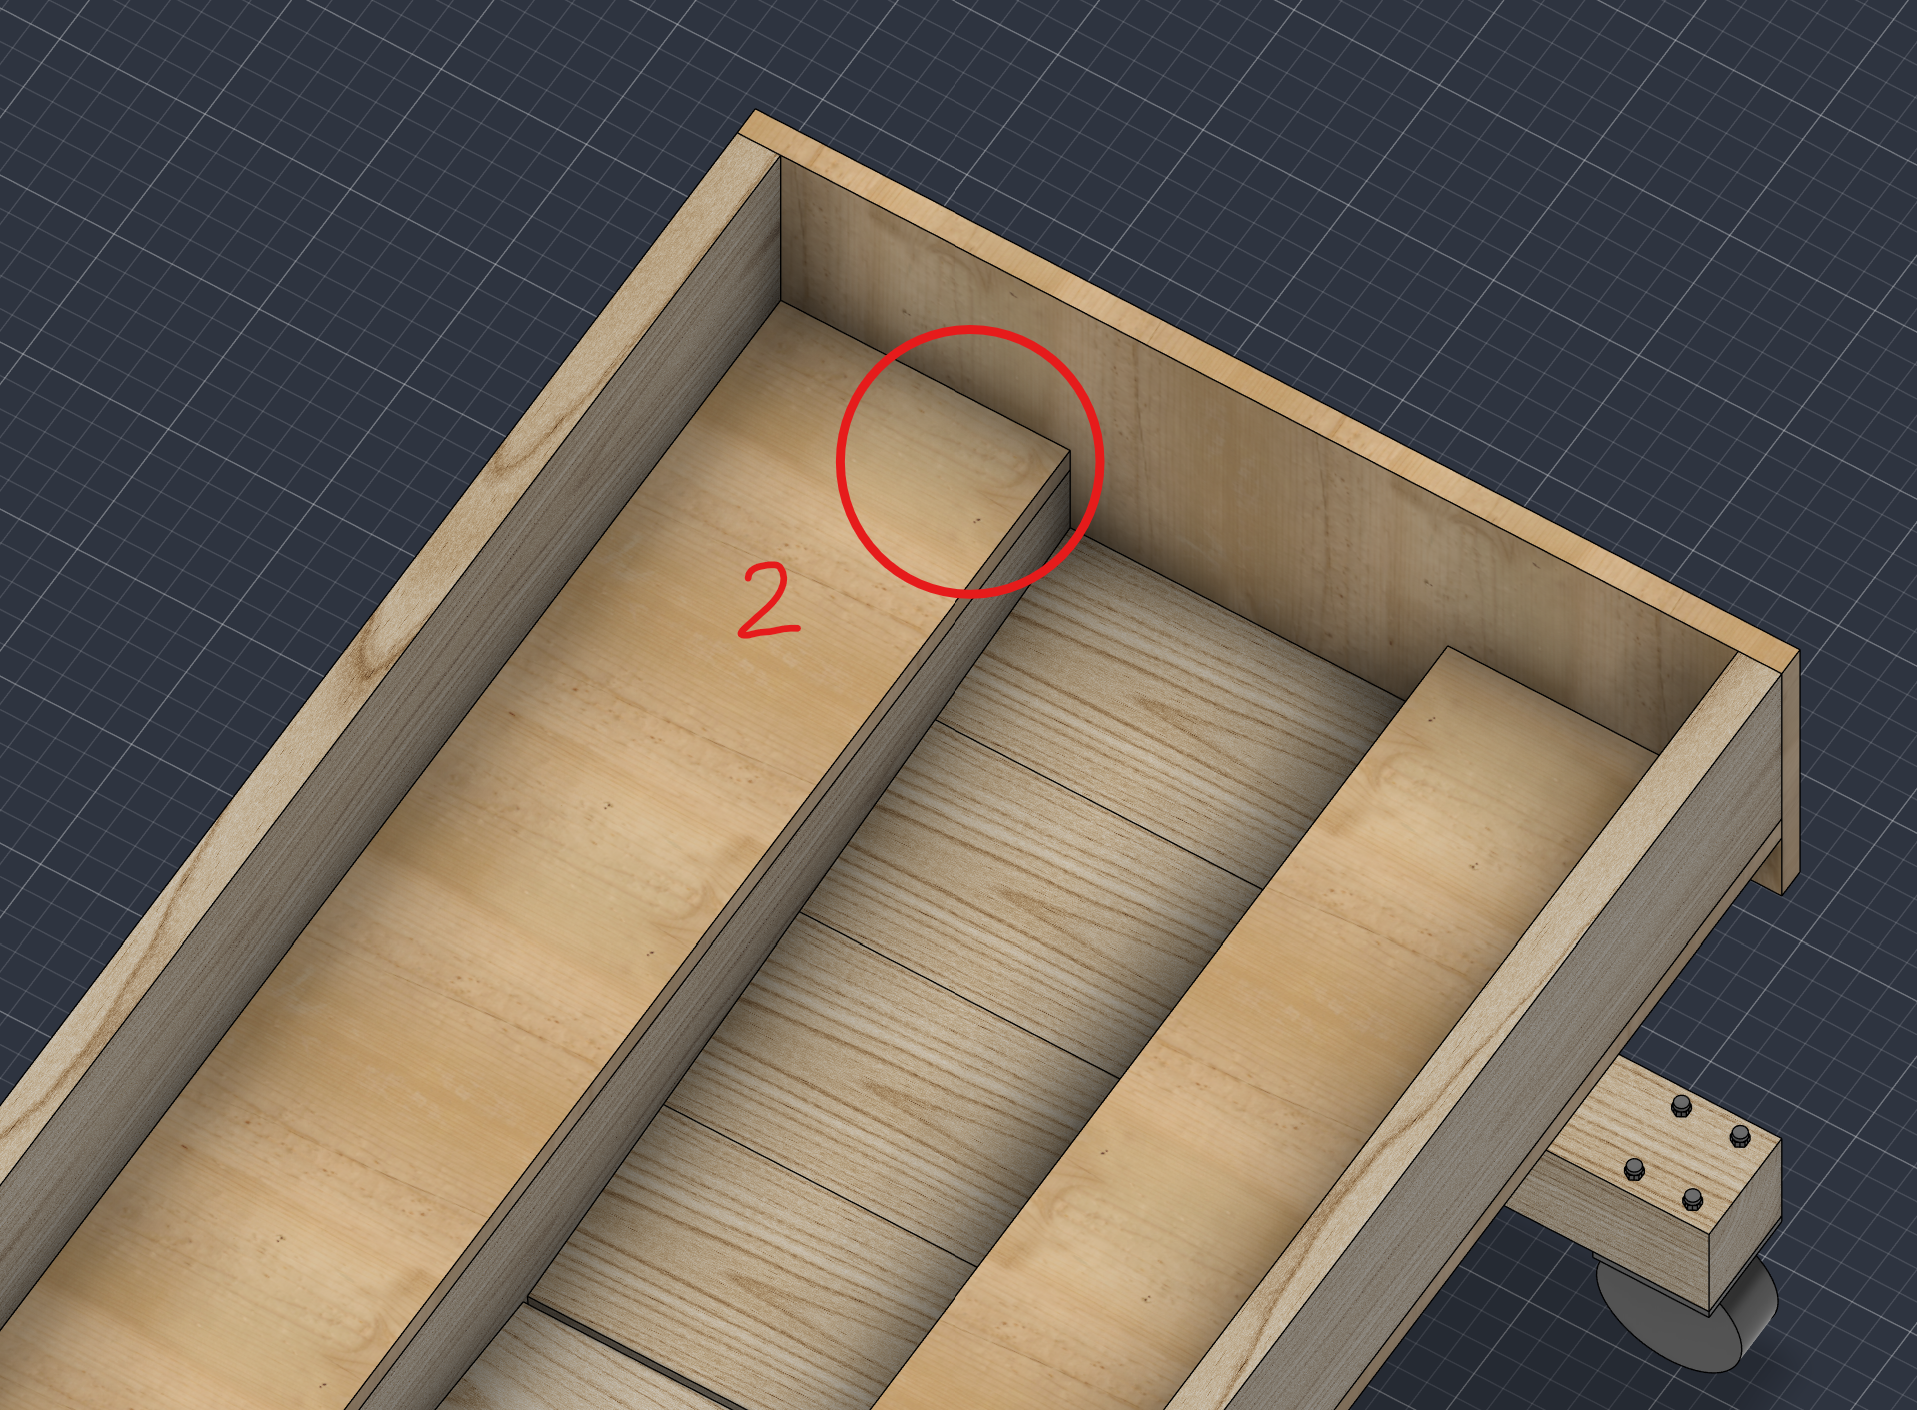
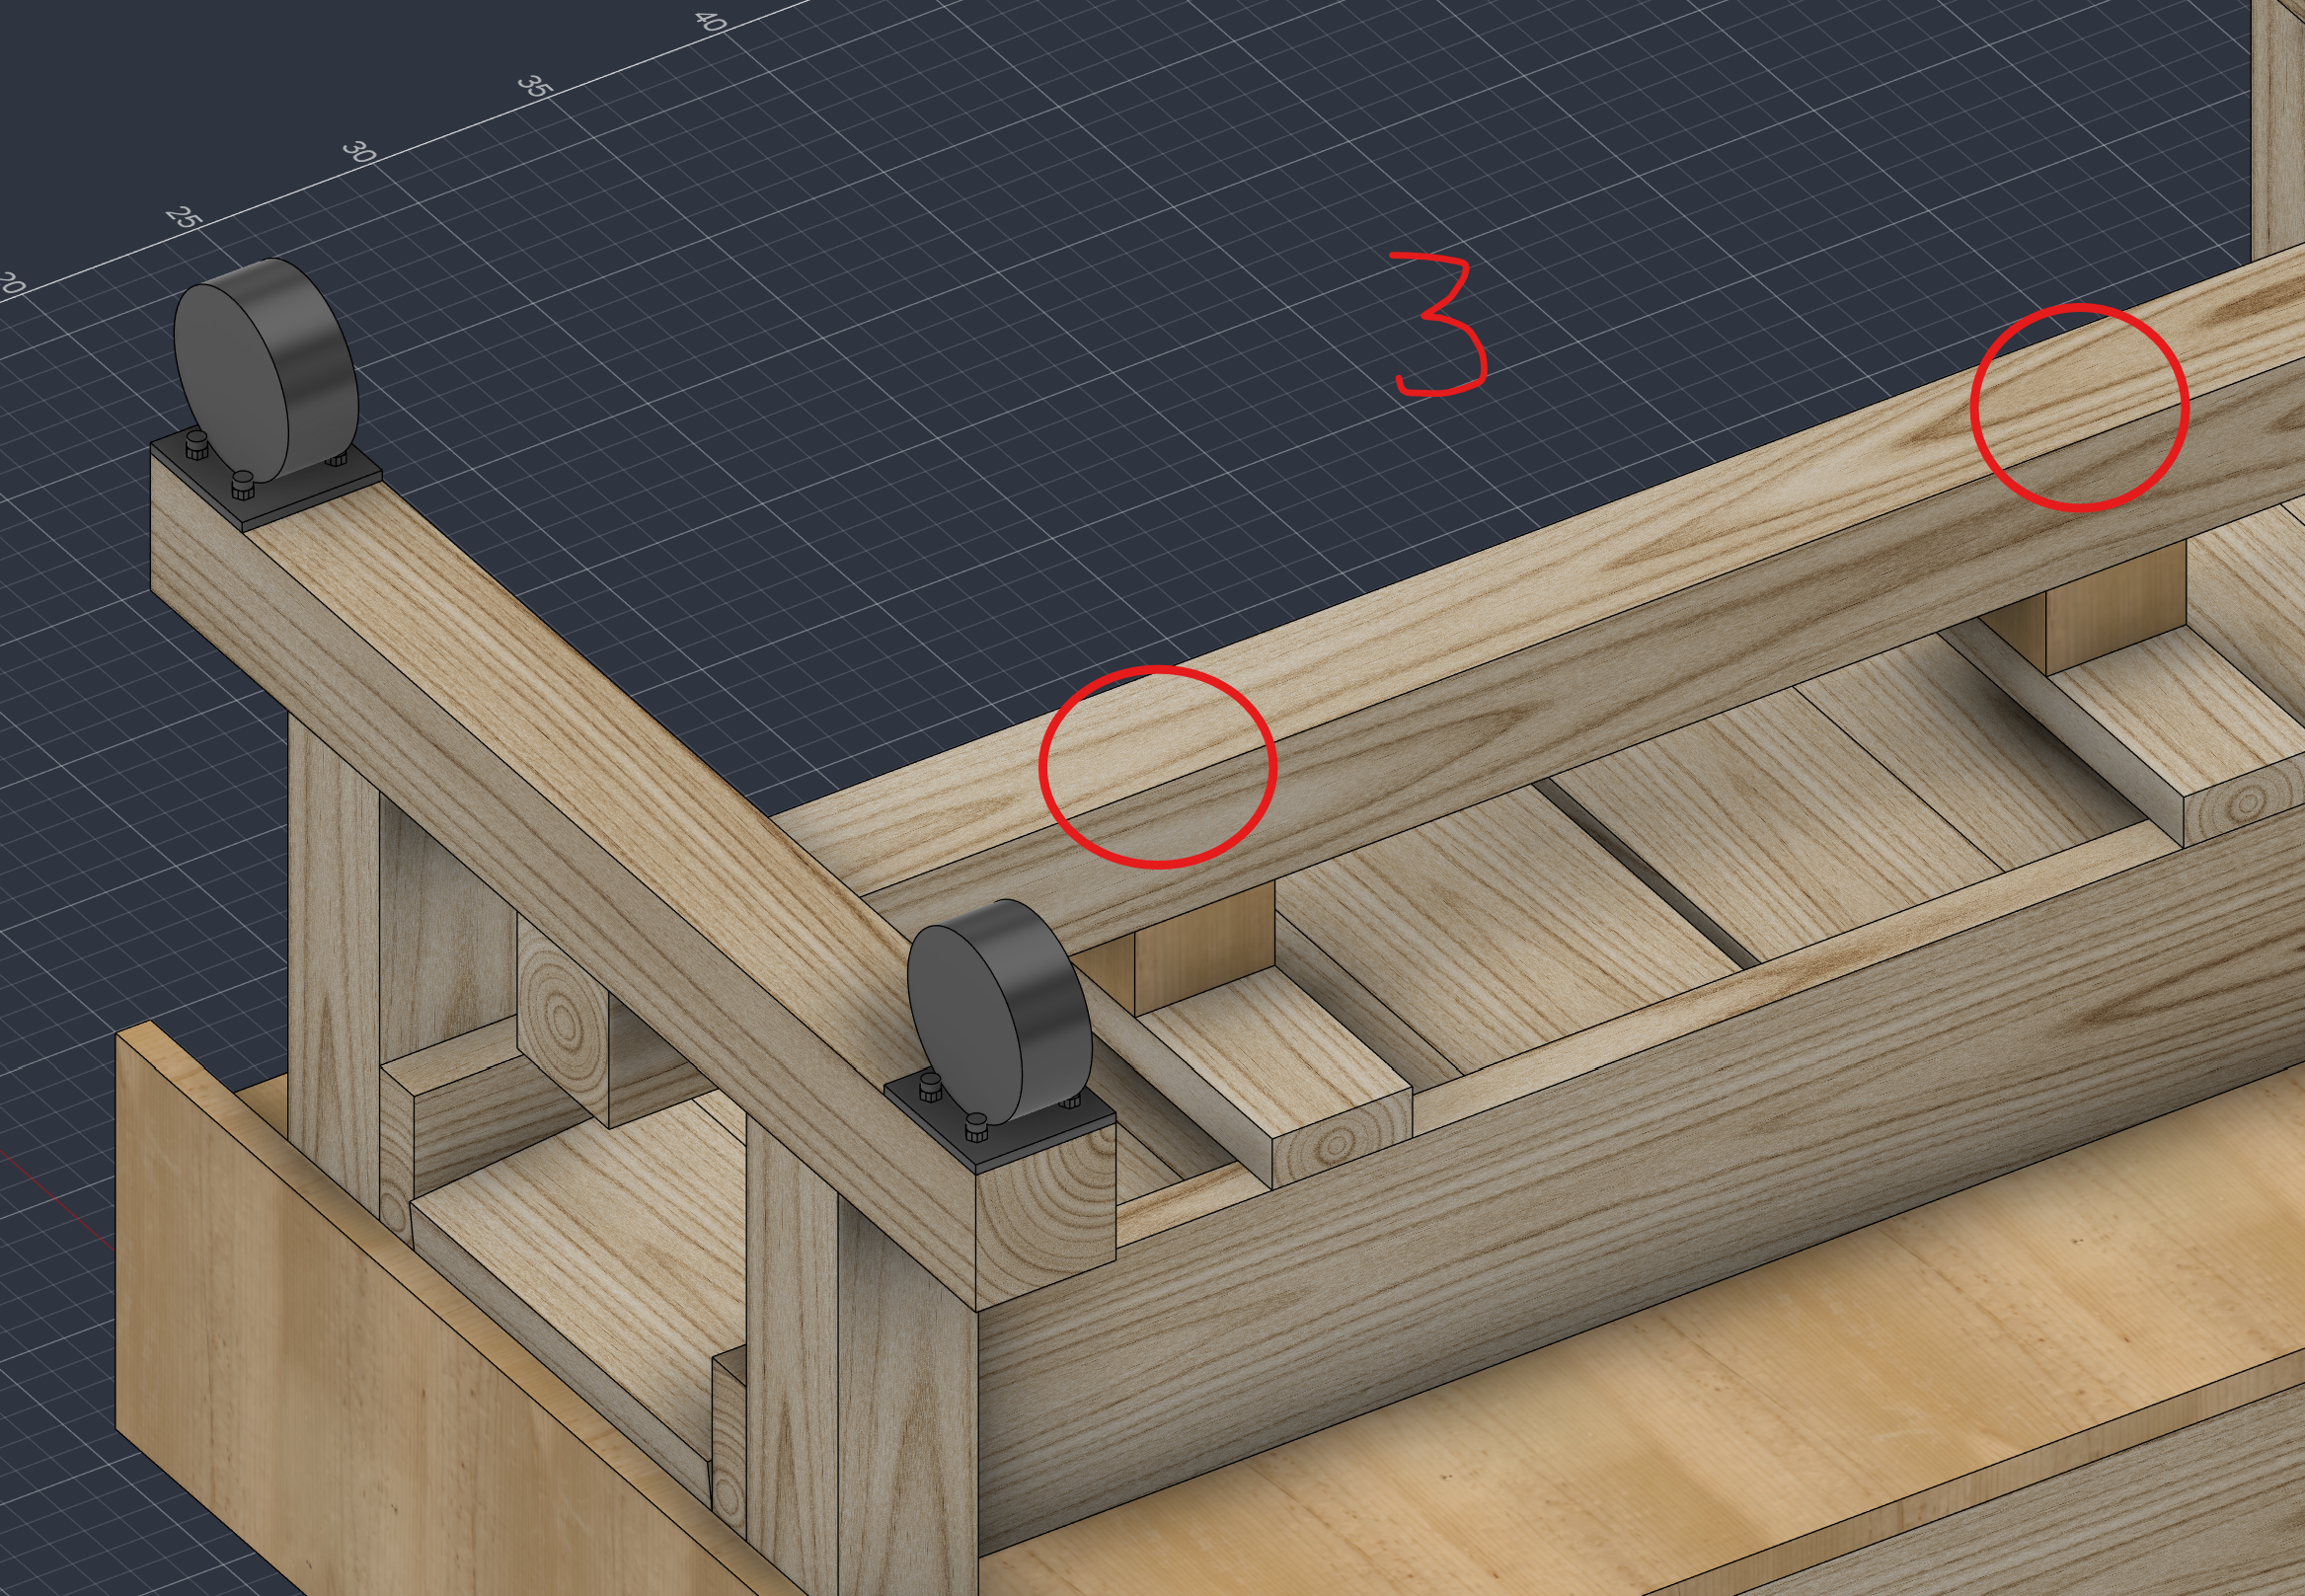
- Now screw the upper portion down into the base. Do this in the spots outlined in the pictures.
- For spot #1, screw through the 60" 2x8 directly into the base's upright 4x4 using 4" deck screws. Do this for each corner.
- For spot #2, screw down through the top 1x12 into the base's upright 4x4. I used 4" screws for this, but you could also use 6" if you so please. Do this for each corner.
- Lastly, for spot #3, use 4" or 6" screws to attach the main 60" 4x4 to the 2 1/2" 4x4s on the upper portion of the bed. You saved room for these attachment screws before, so make sure to screw on the diagonal where you left that space. I found it easiest to flip the bed over for this step so that I could access the spots where I was drilling.
Voila! The bed is now almost fully assembled. Just a few more finishing touches to add.
Finishing Touches
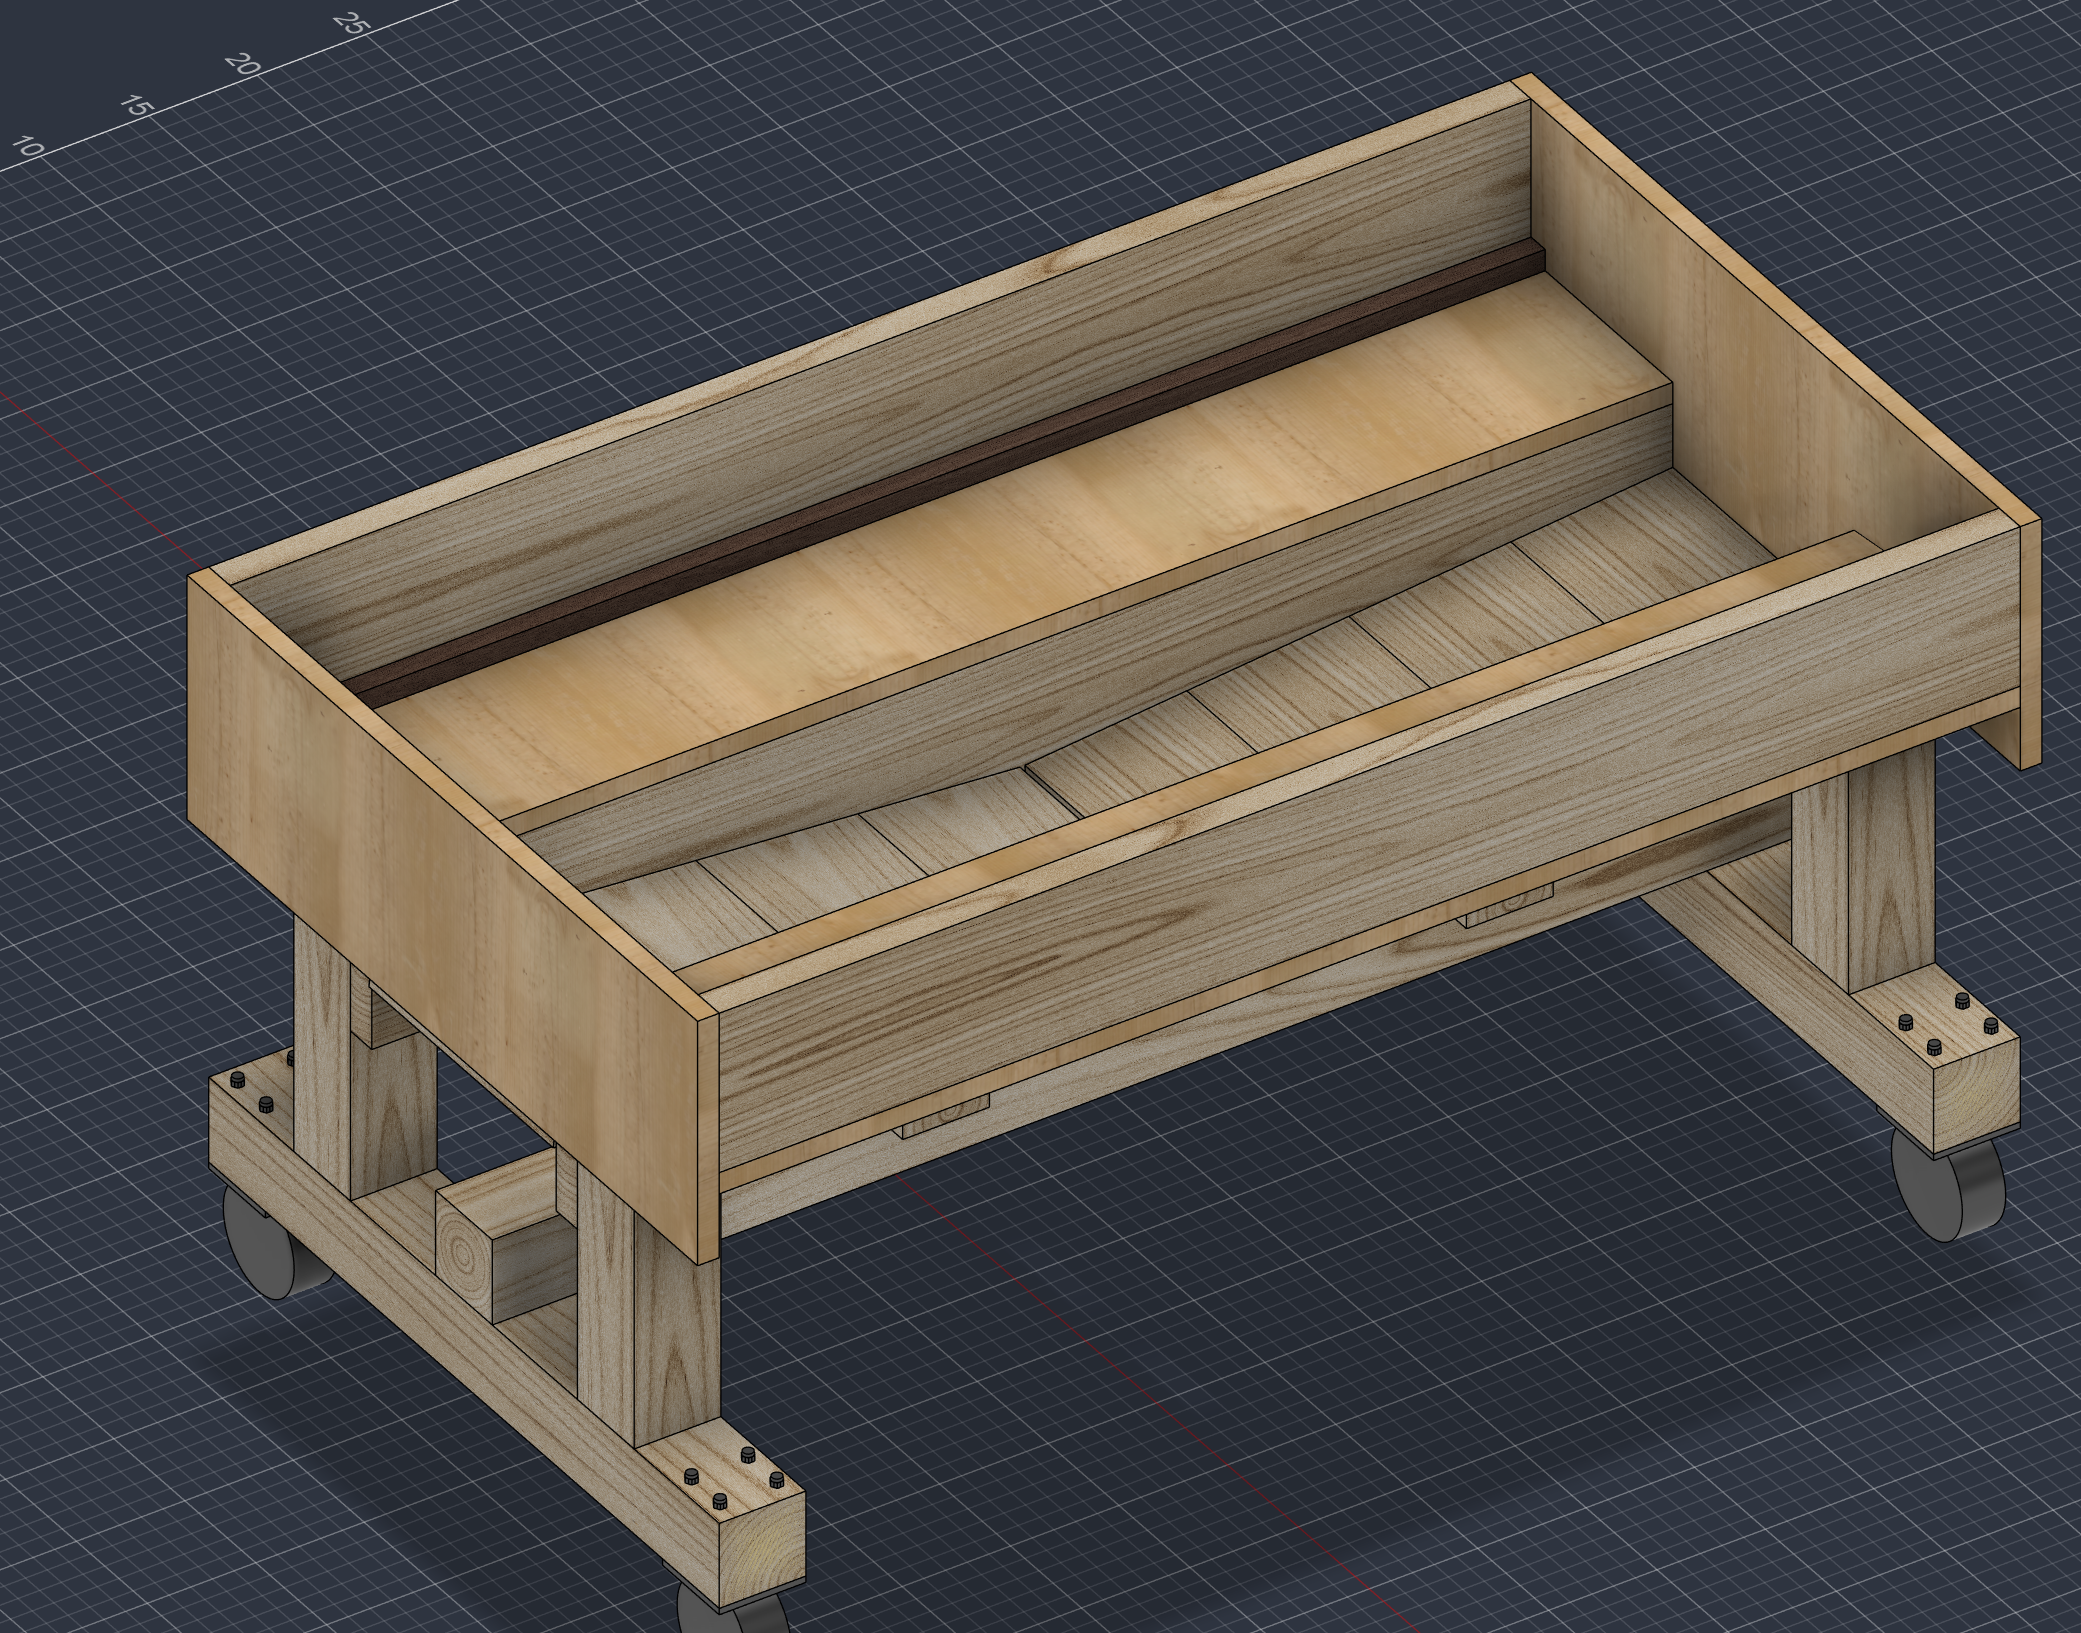
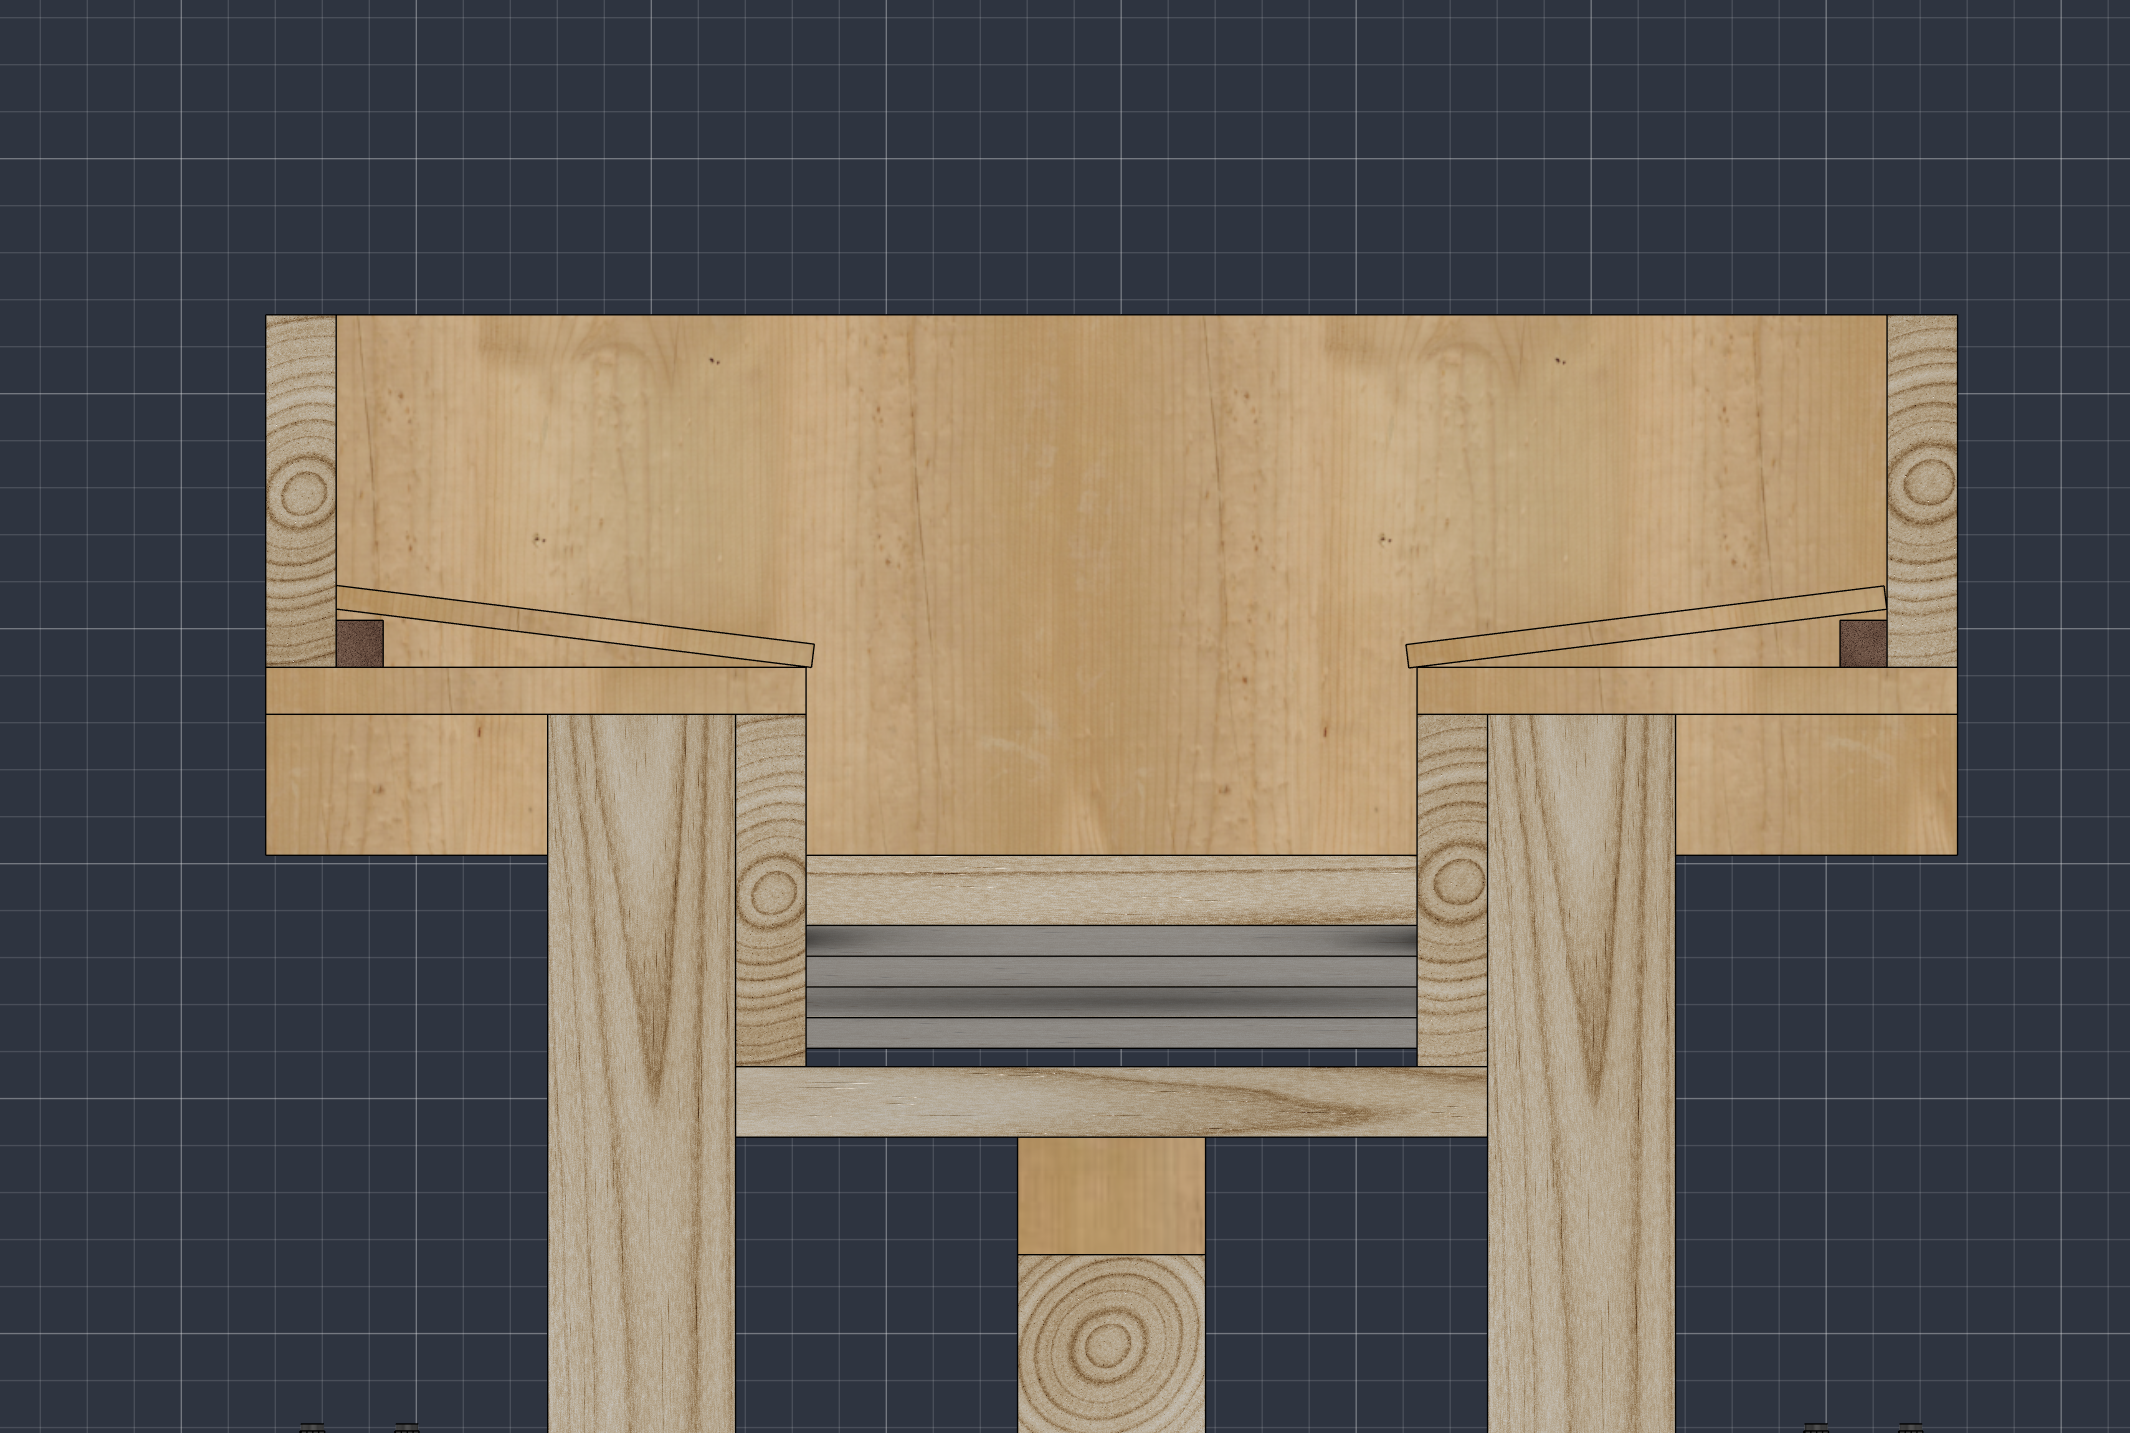
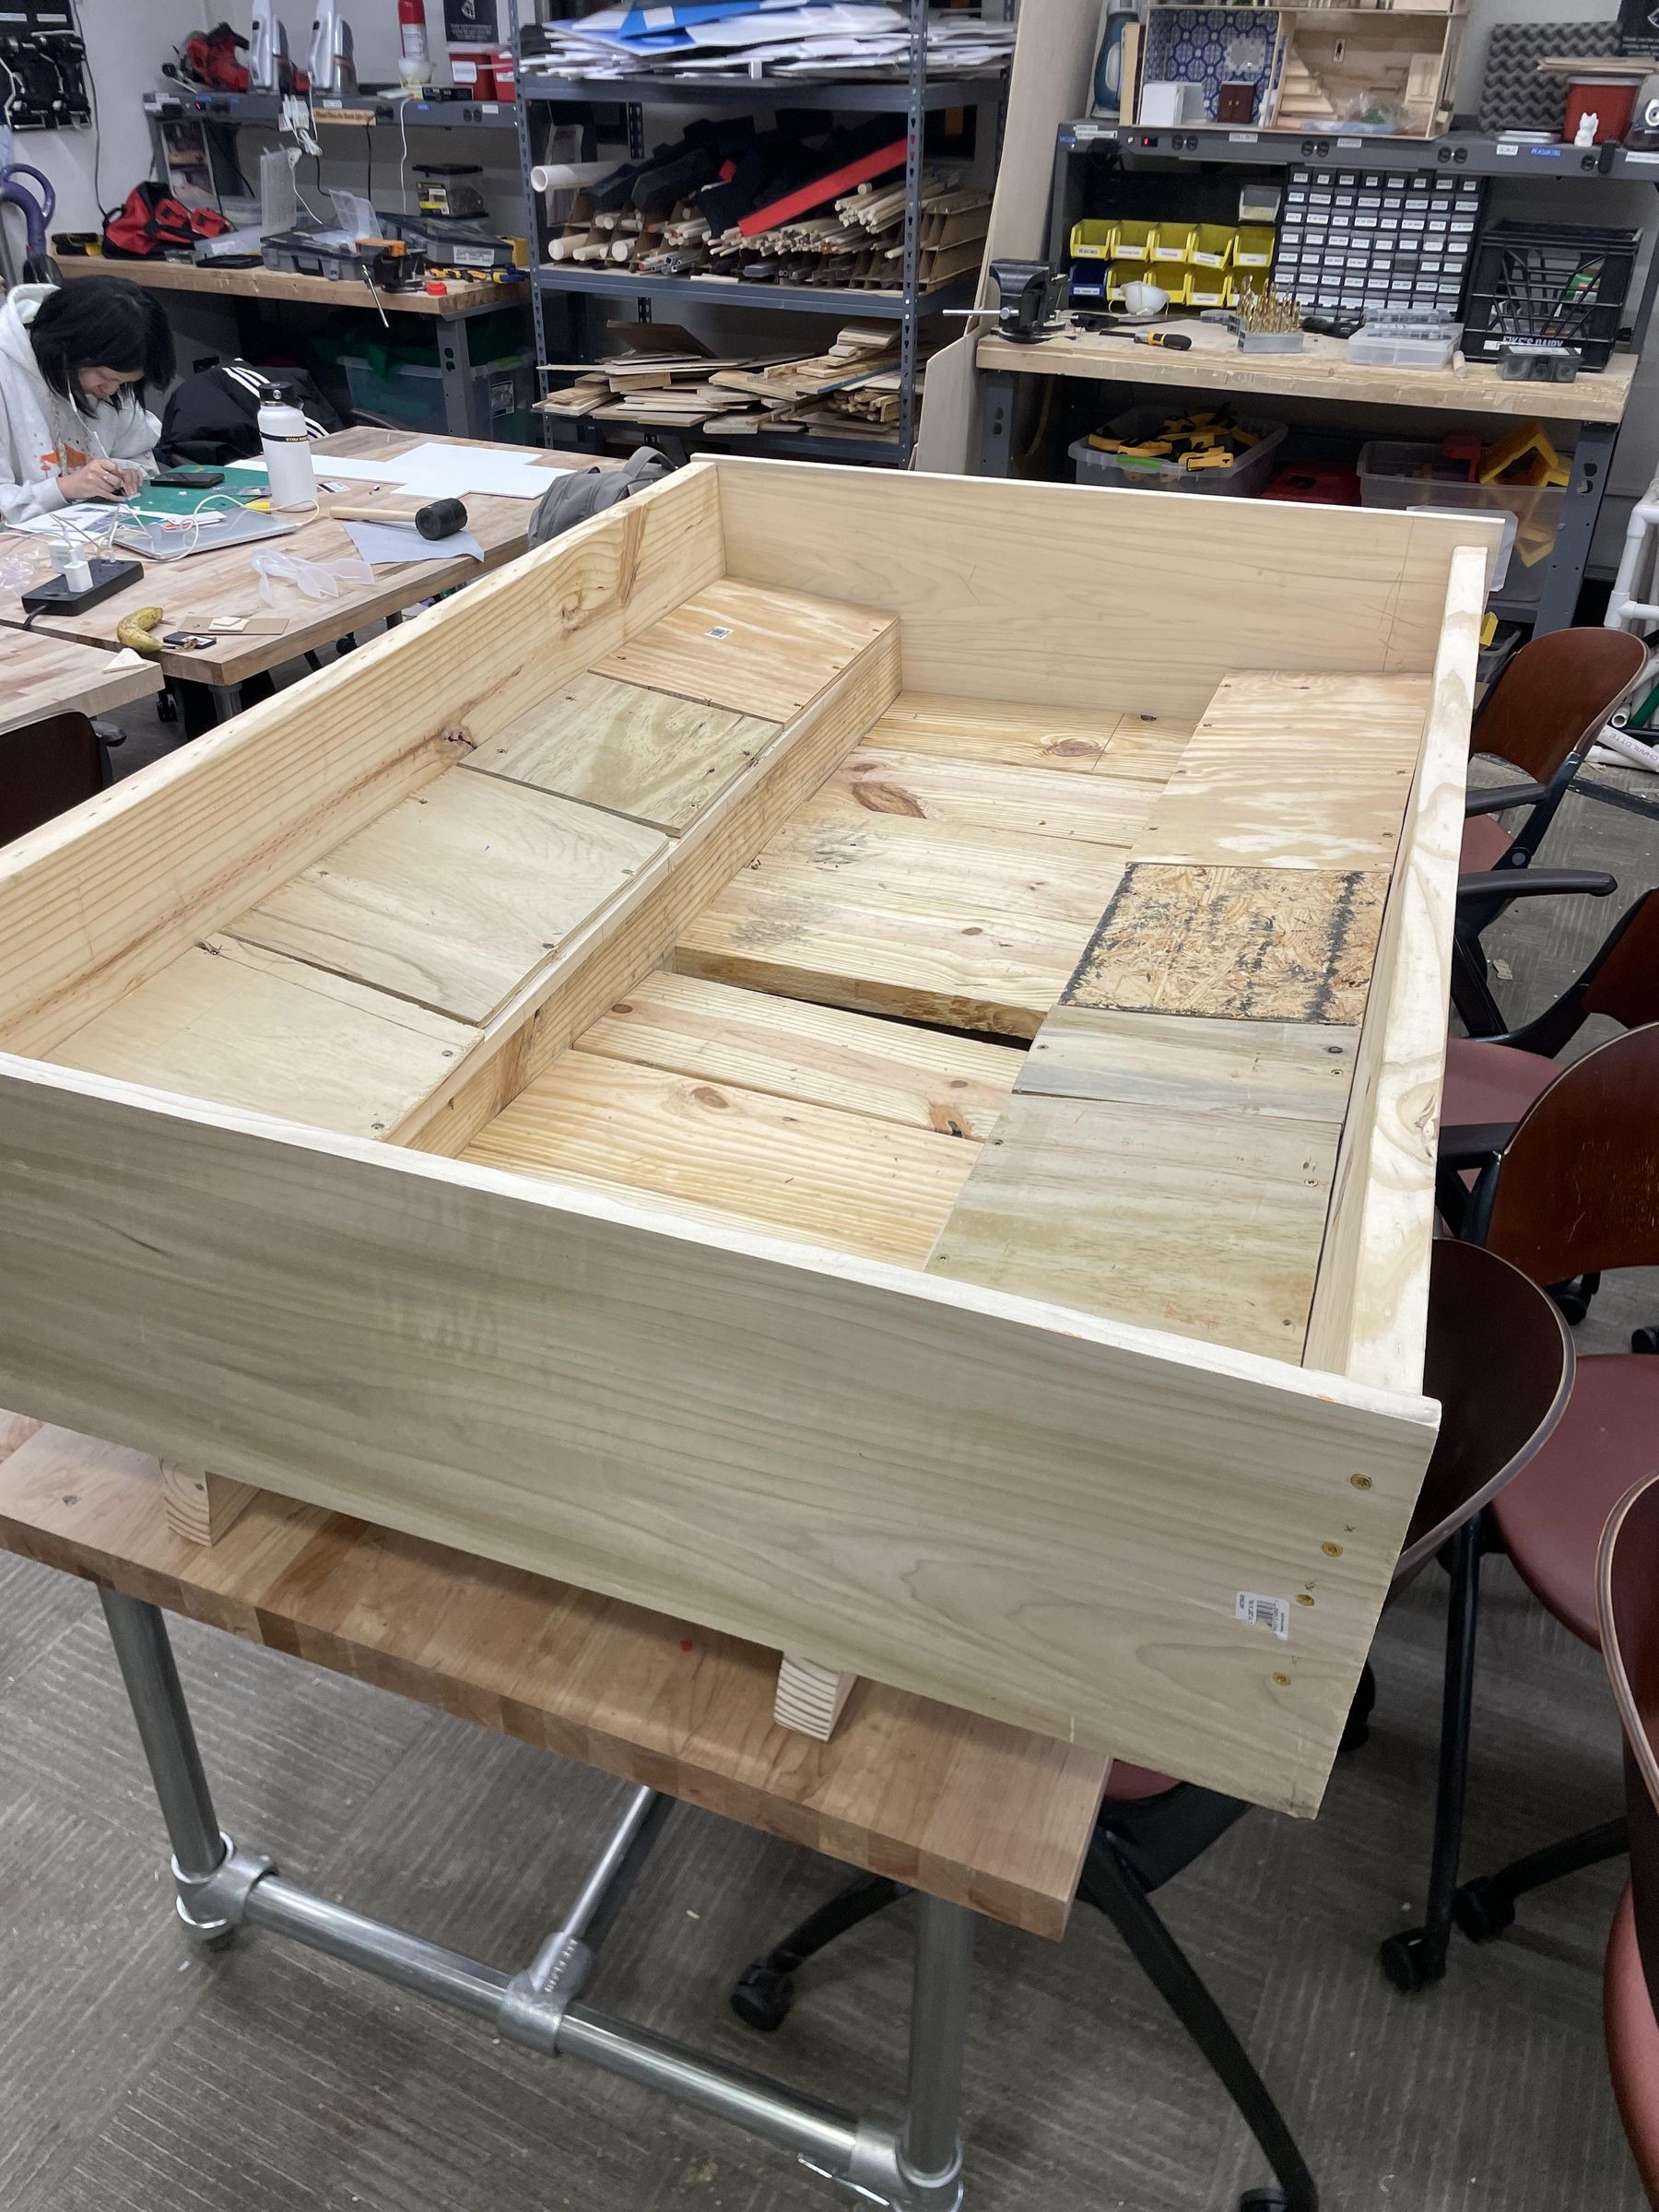
This is the final building step, and is definitely one of the easiest.
For this step, you will need:
- The (2) 60" 1x1s
- The (2) 60" x 10 1/4" plywood sheets
- 4" screws
- The gardening mesh
This step finishes off the drainage system for the bed and adds the gardening mesh which serves to protect the wood and also to make everything look a bit nicer.
To finish the bed, follow these steps:
- Screw the 1x1s into the corners on each of the long sides of the bed, as shown in the picture. To reiterate, these 1x1s do not have to be one big continuous piece on each side. I used a bunch of smaller pieces of scrap 1x1 I had, which worked the same.
- Next, screw the plywood sheets into both the 1x1s and the bottom 1x12s, as shown from the side view in the picture. It should be at a bit of a slant towards the middle, which allows the water to drain properly. As with the 1x1s, you can use a few different sheets of plywood, like I did, so long as there are no gaps between them. You can see the picture from my own build for reference.
- Lastly, measure out and cut a piece of the gardening fabric big enough to cover the entire open surface of the top of the bed. Once cut, attach it to the bed with a stapler. A normal one should work if you hit it hard enough, just try not to damage the stapler.
You Did It!
That's it! You have successfully completed the Accessible Raised Gardening Bed build. All that's left to do is fill it with some soil and your favorite plants, and share it with your community, your friends, or your family. Happy gardening!
Also, this is my first ever Instructable, so if you find something missing or something isn't done quite right, feel free to leave a comment with your questions or suggestions. Thank you!
Impact My Build Had
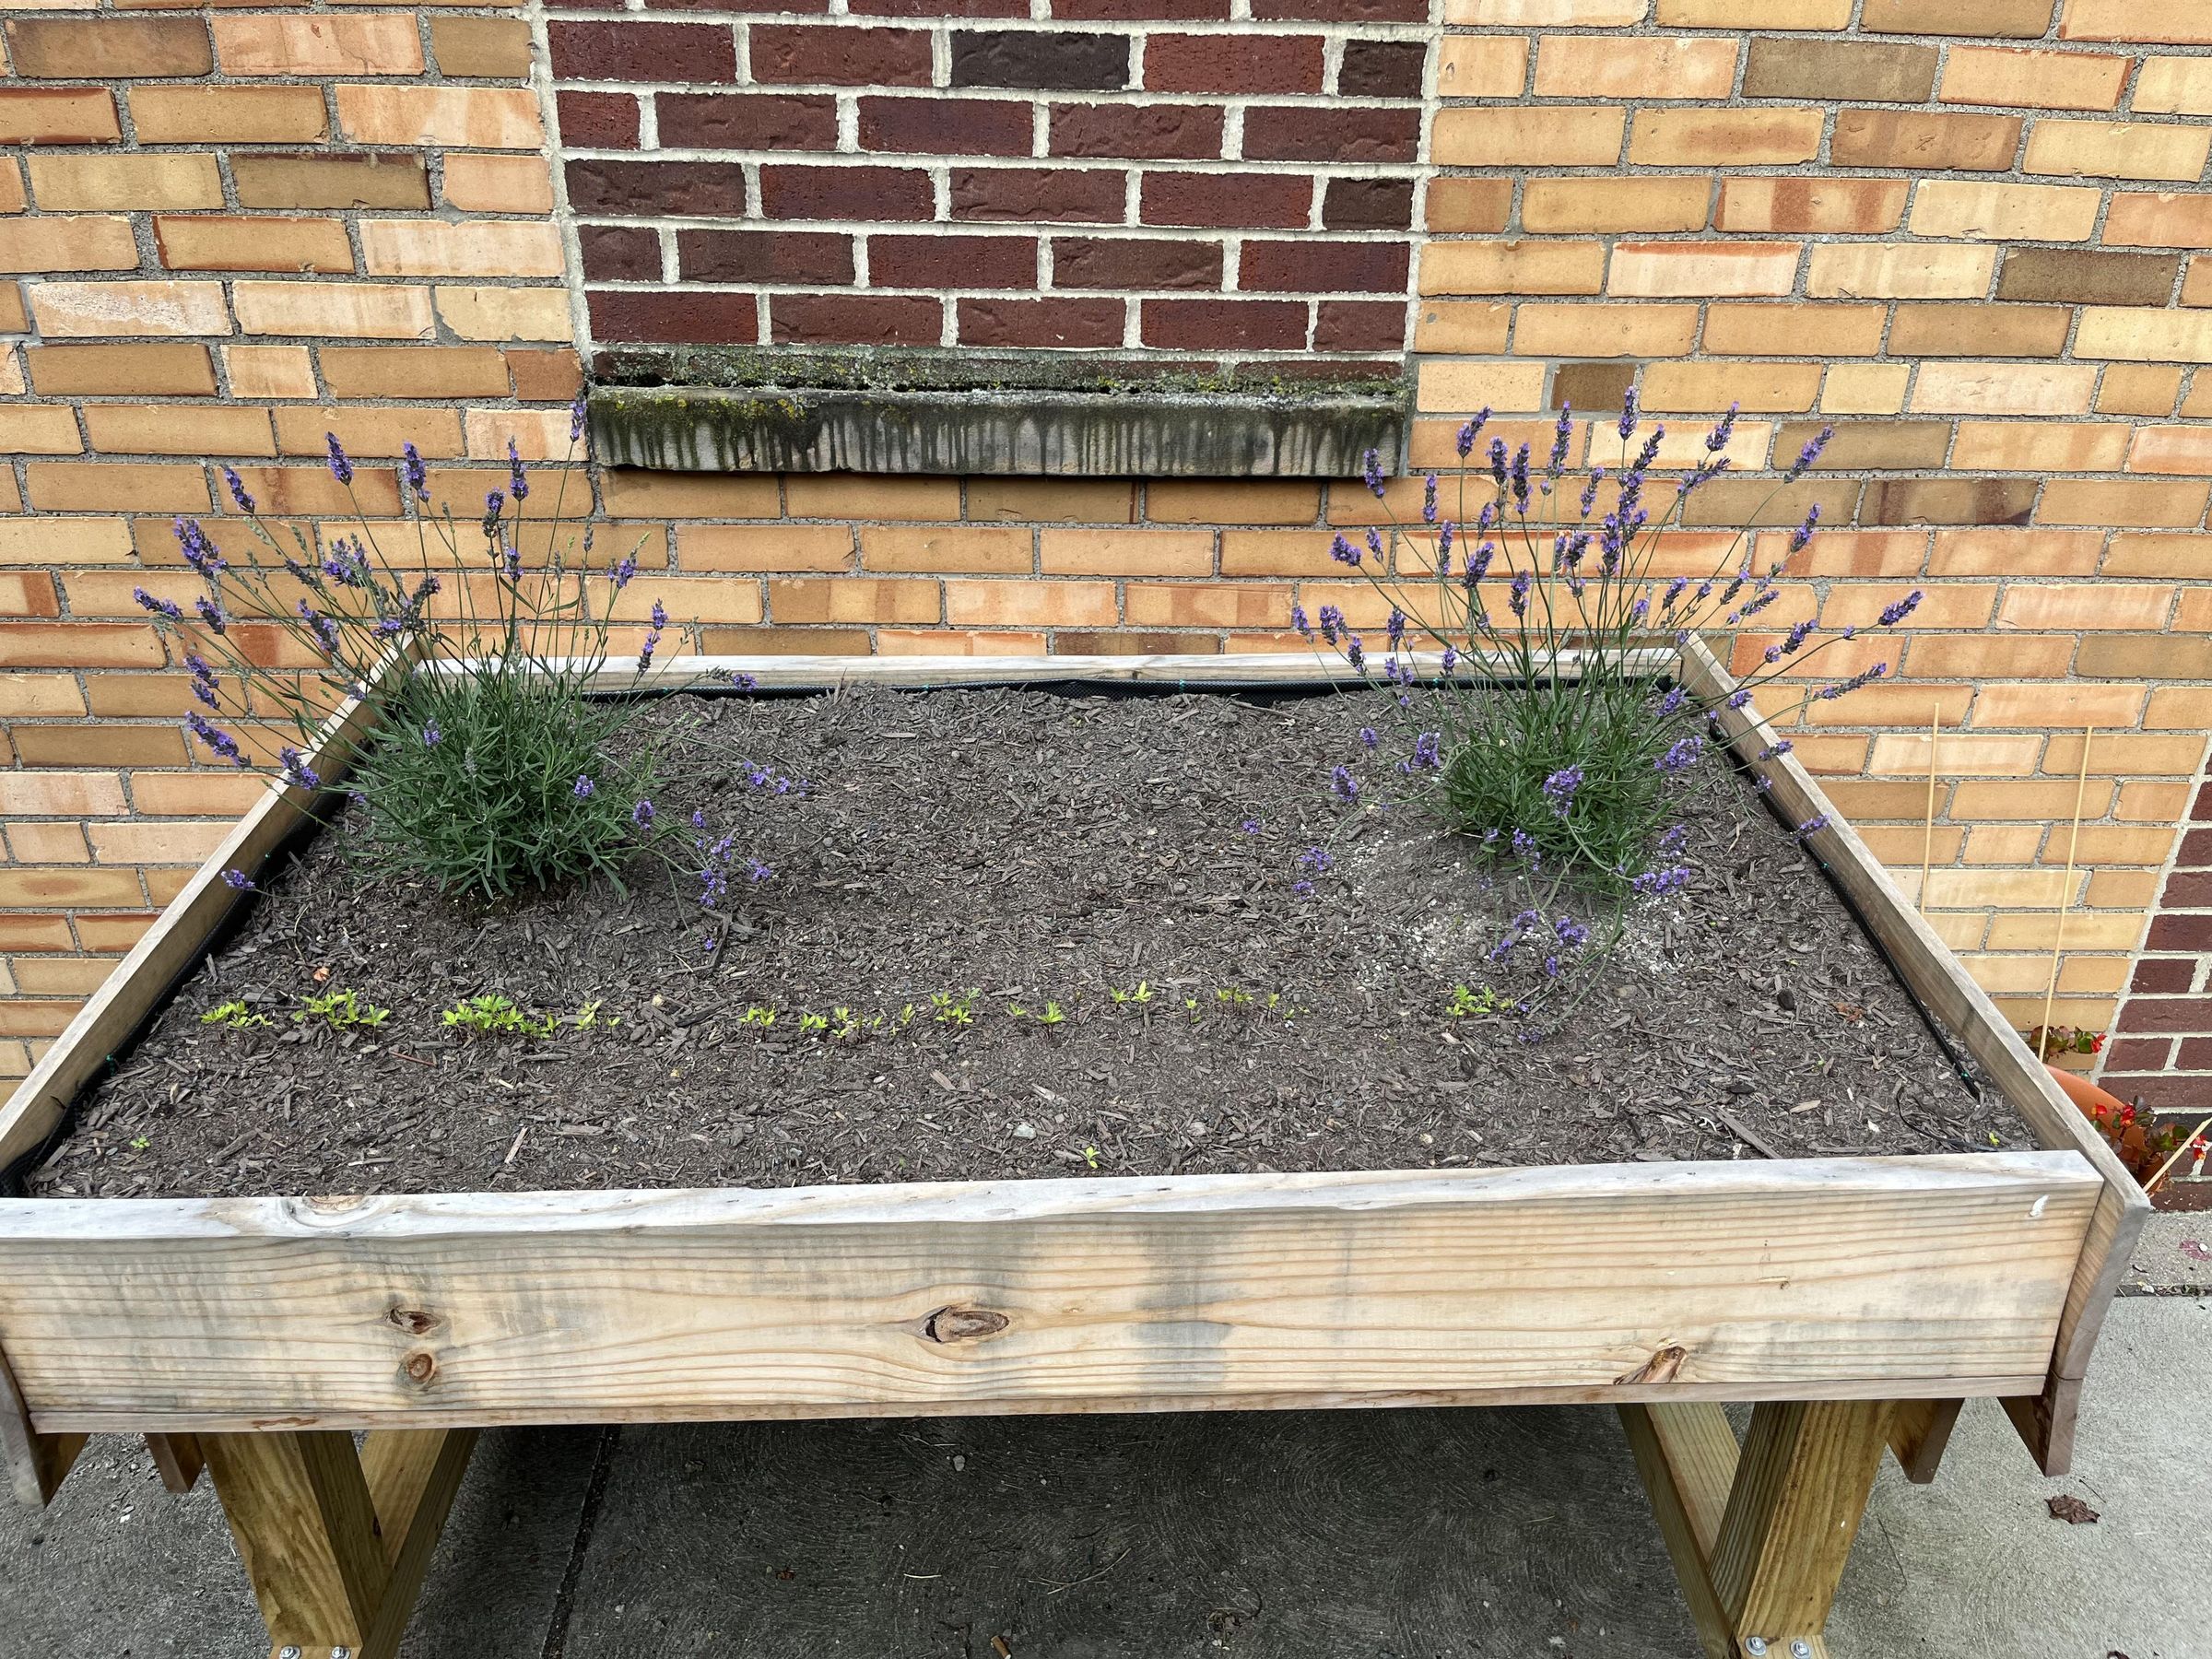
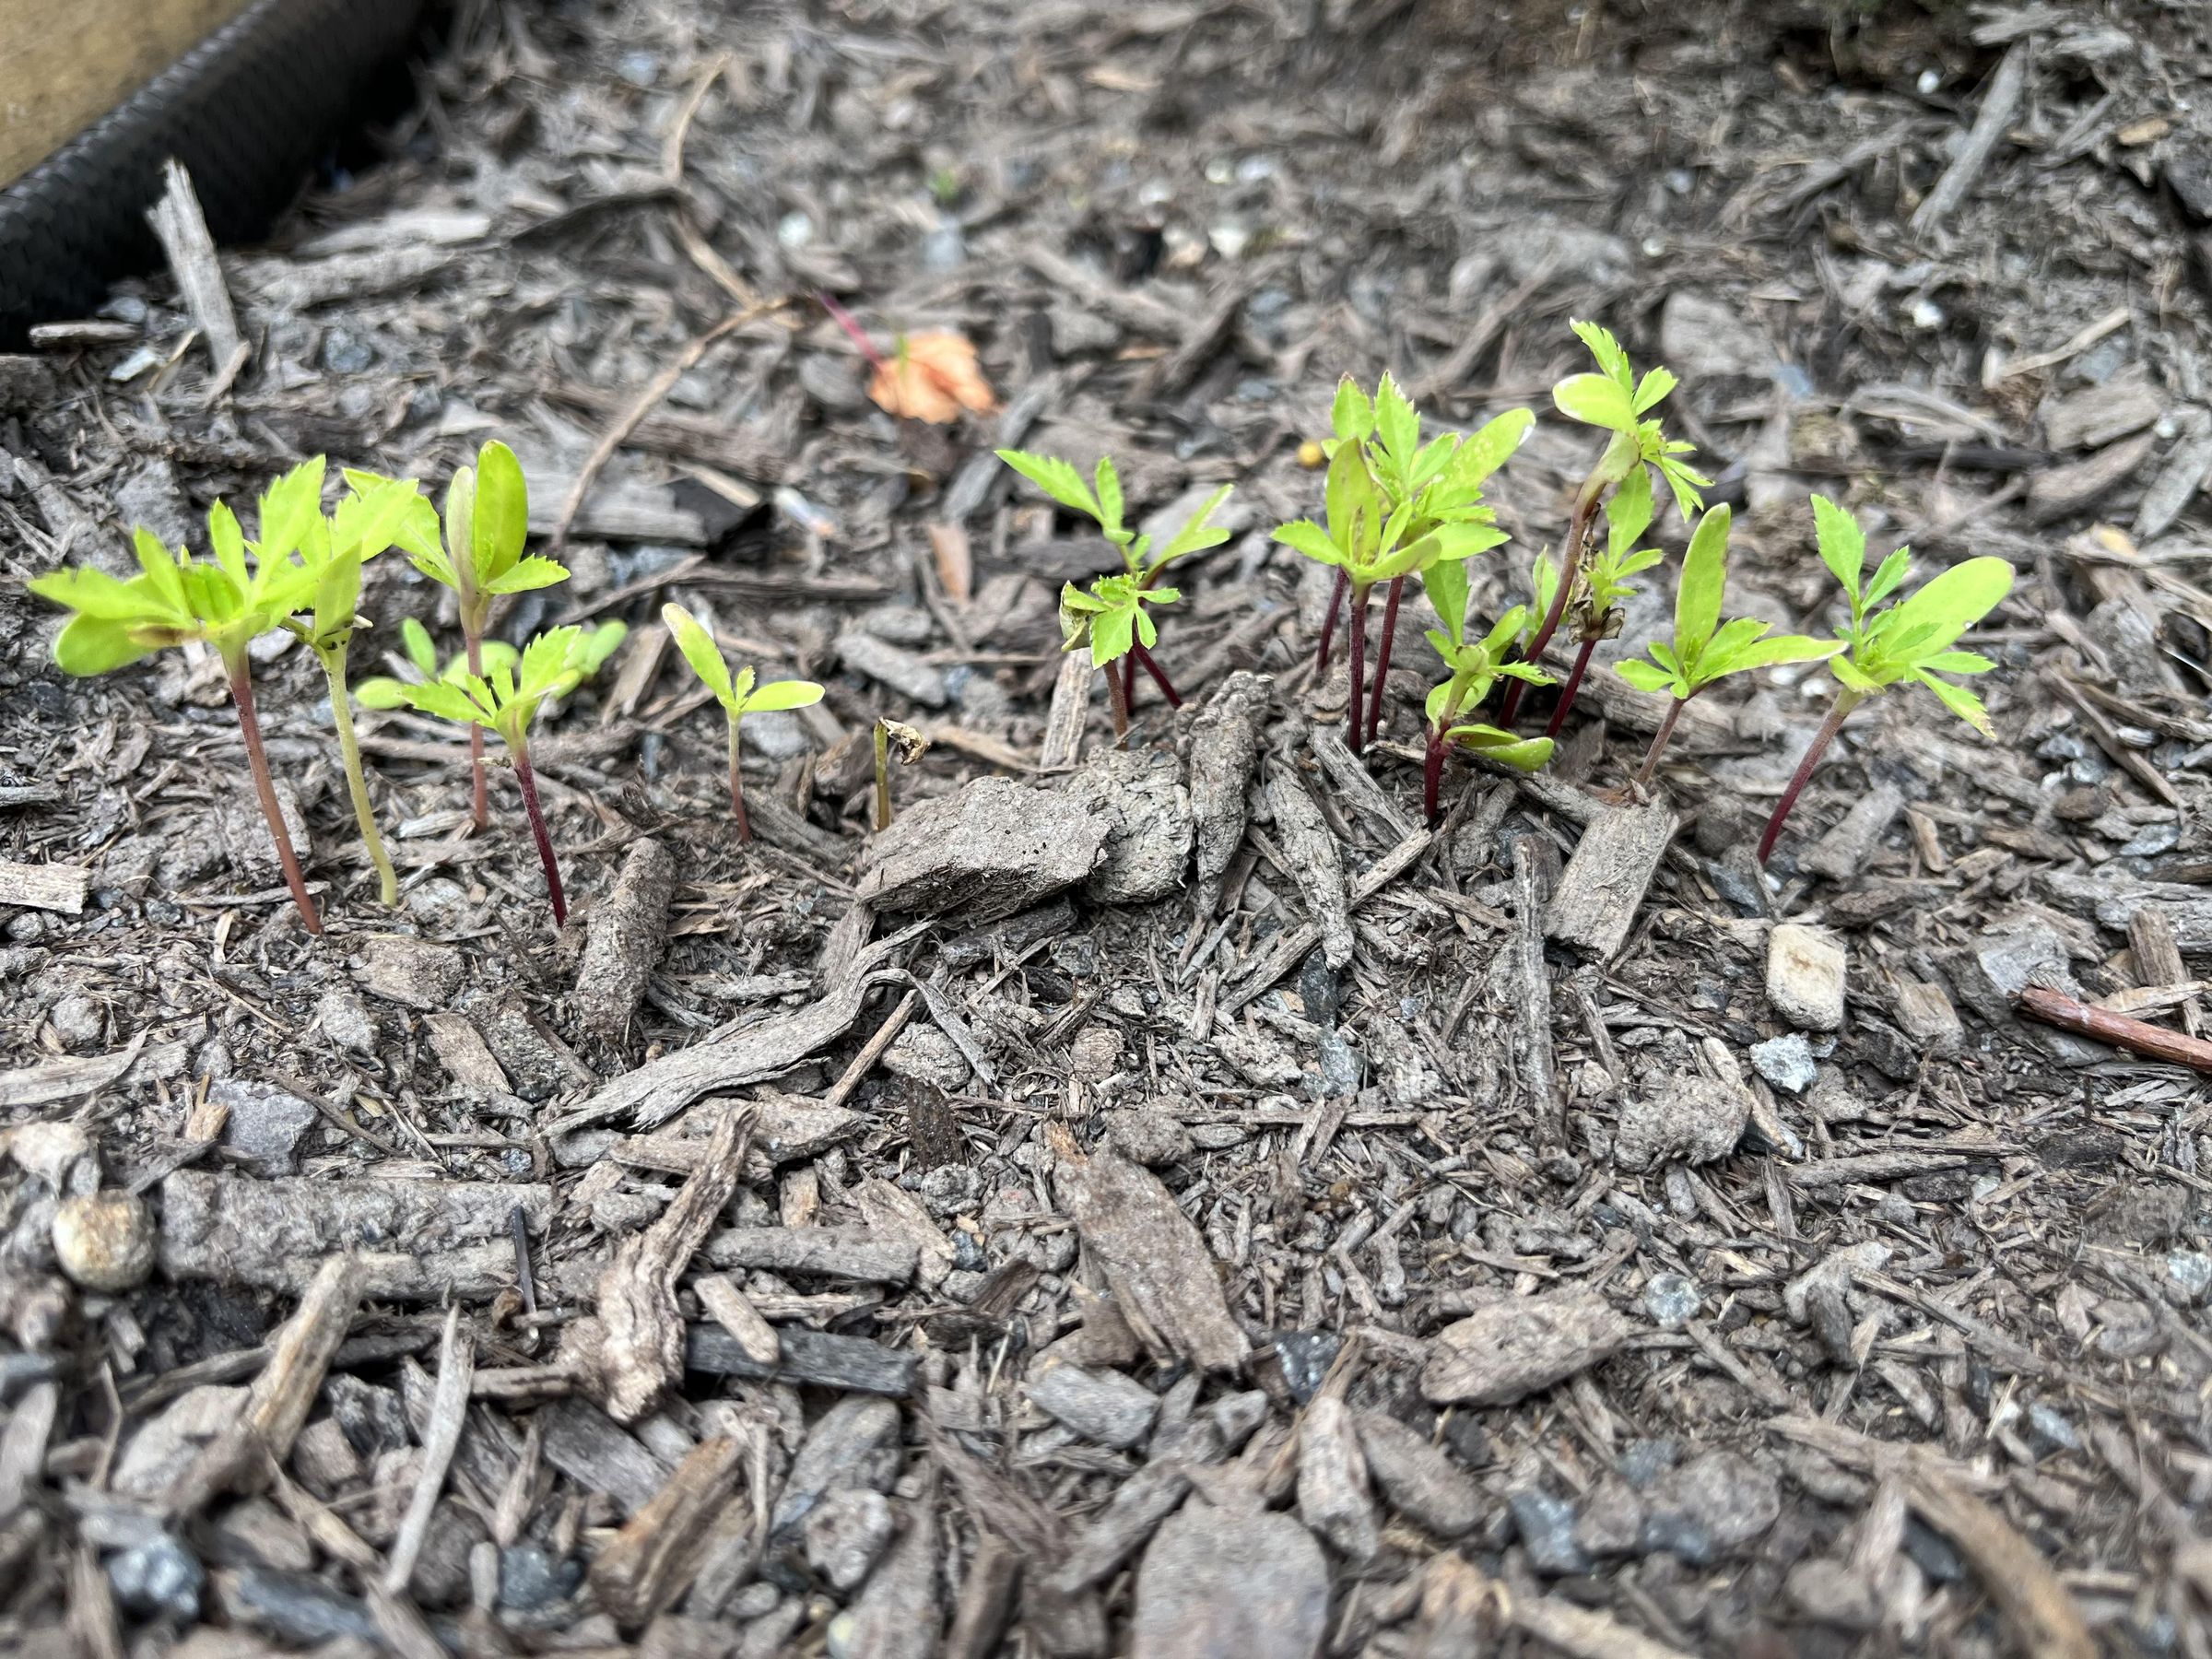
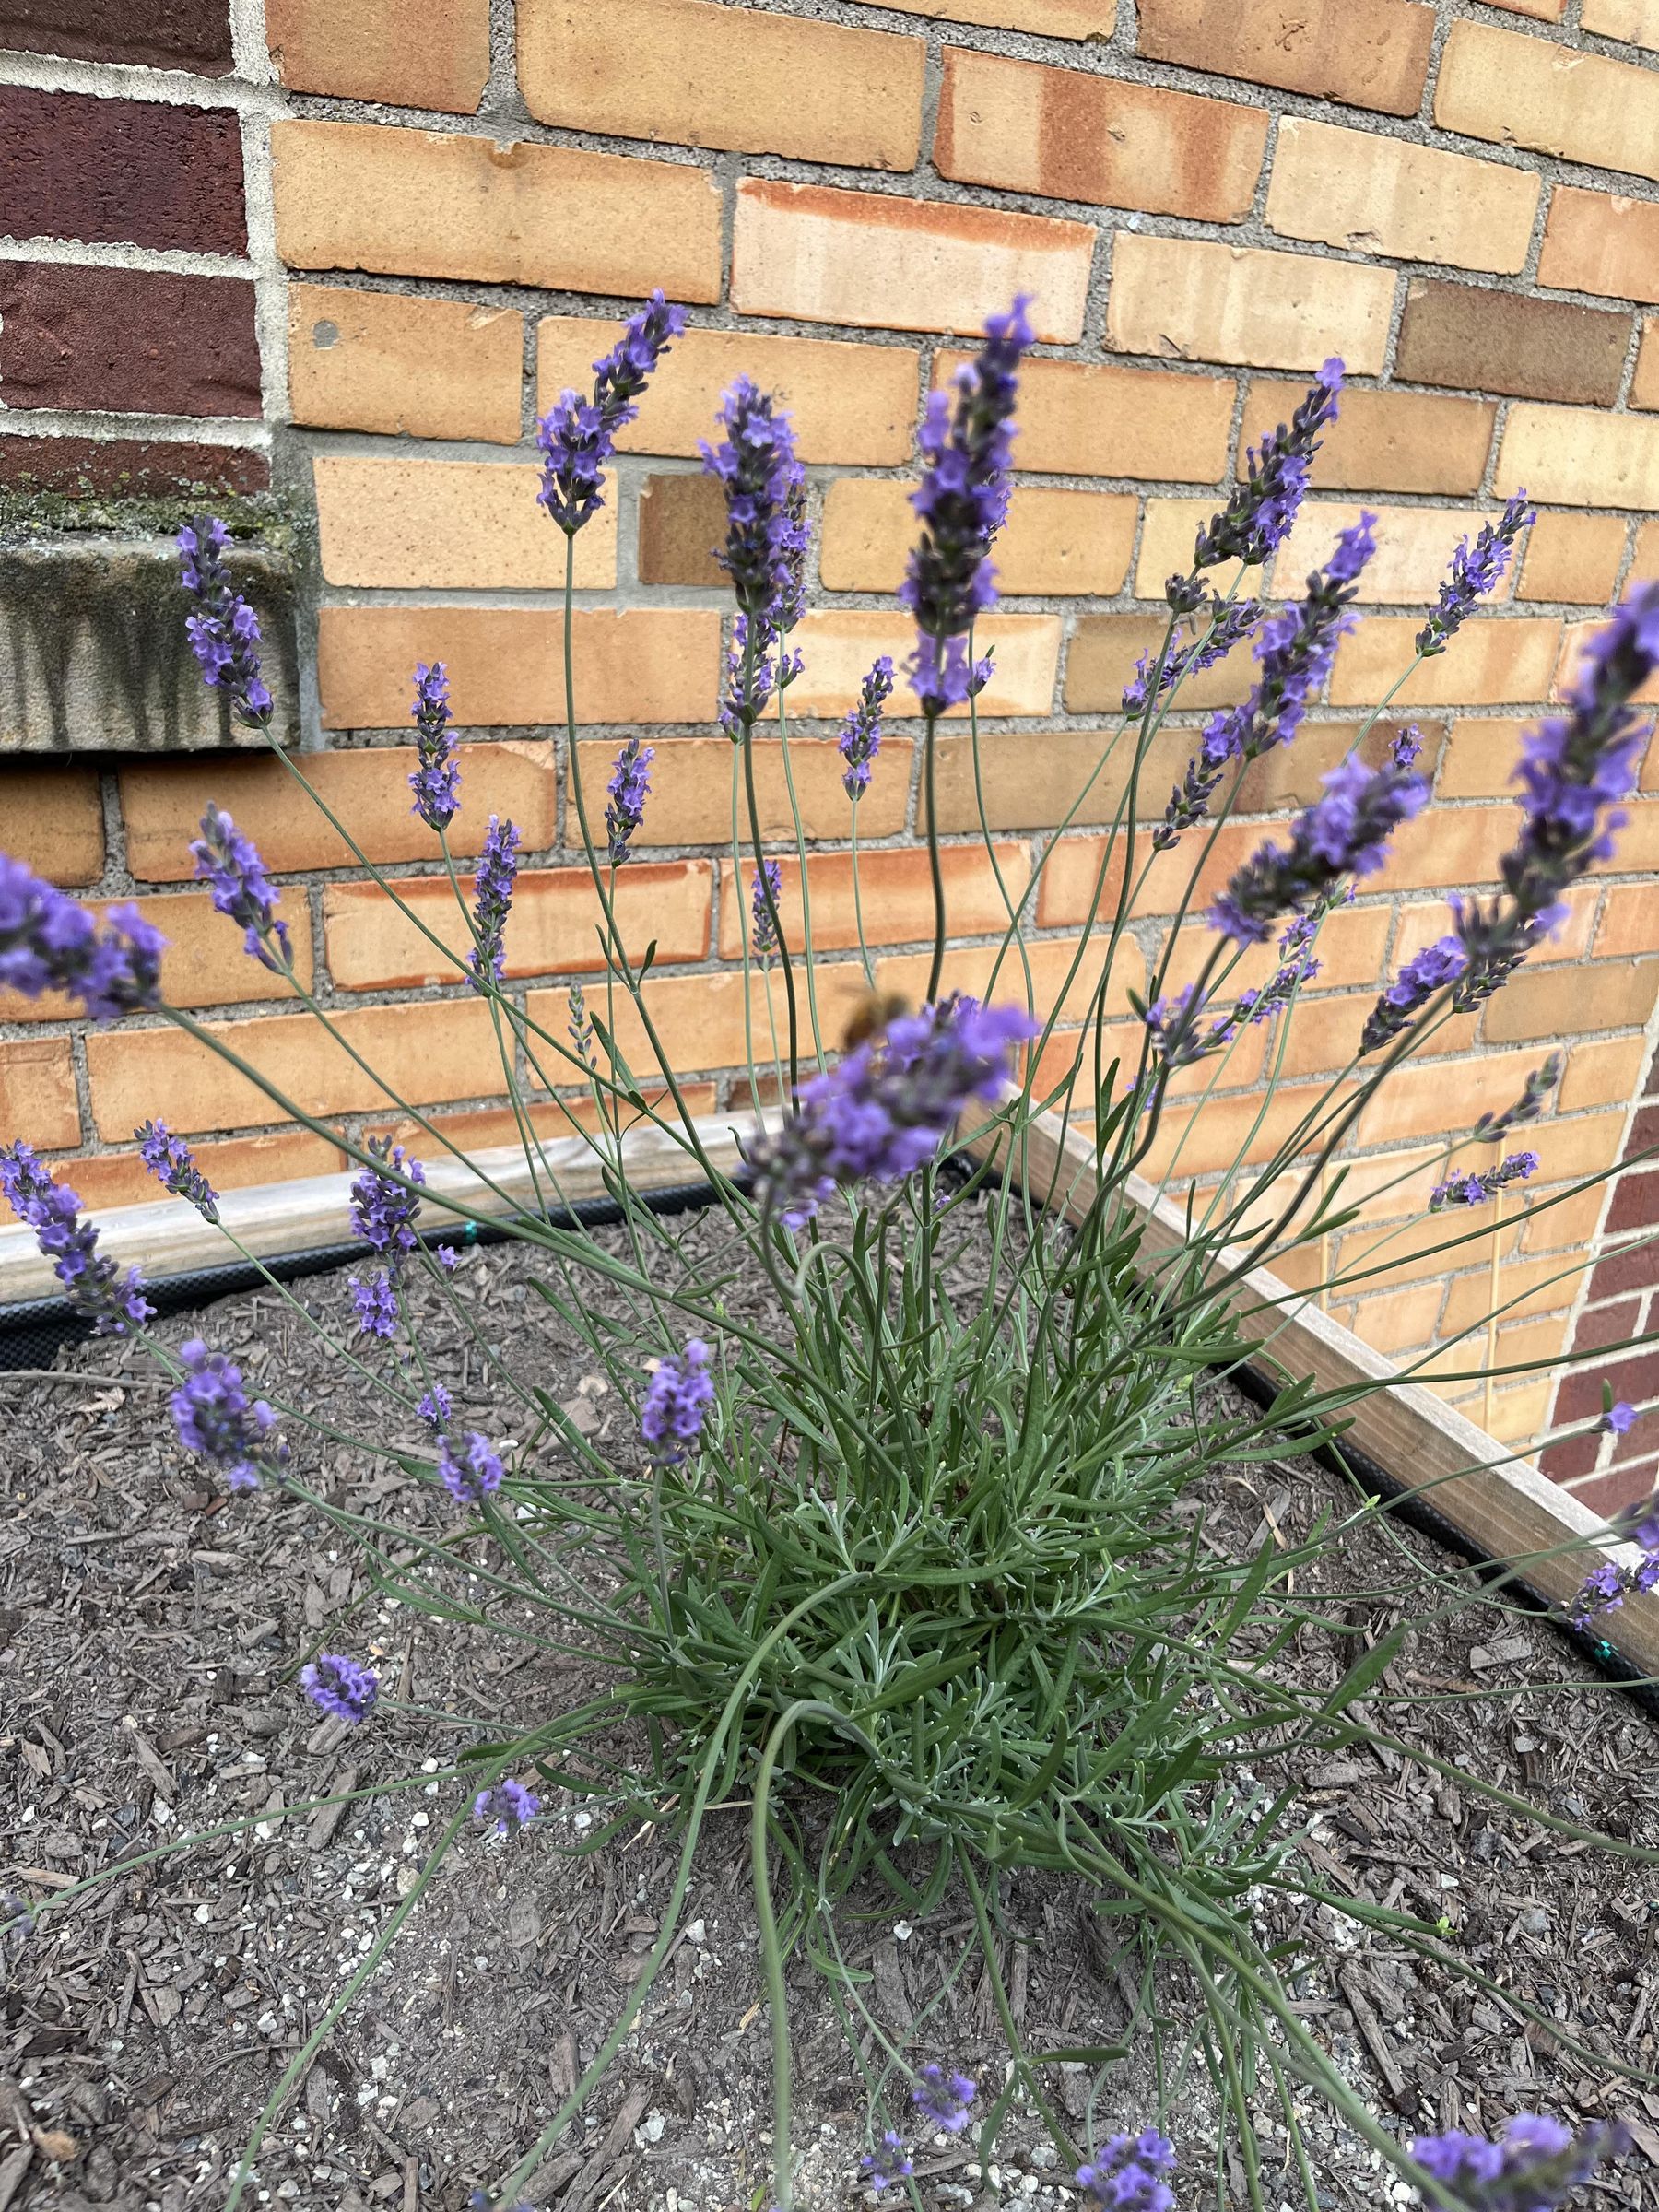
As I mentioned, I built my project specifically for the Mount Washington HAL Senior Center, and because I did so, got to see the impact of my own work first-hand. The pictures included with this step were sent to me by Mr. Thomas, the center's director, who also explained the depth of the positive impact my garden bed had on the seniors at the Mount Washington HAL. He explained that the center hadn't had an operating garden in years, largely because of the physical barrier most of the seniors faced when trying to garden. He told me how the seniors absolutely loved the ability they got back by using the garden, and how they had already planted two lavender plants and a bunch of marigolds, which are now starting to sprout! Additionally, the gardening love spilled over into other parts of the center. Mr. Thomas explained that the seniors had gotten so excited about with all the gardening and planting that some of them had even gone beyond the bed and planted new flowers in the planters outside the center, facing the street. I couldn't be prouder of what I was able to accomplish with this build, and am beyond inspired to keep doing more work like this in the future.
Thank You's
I want to say a huge Thank You! to my TA, Jay Leinhauser for helping me so much with getting this project off the ground. Jay provided crucial support with redesigning and real-world logistics that helped me get this project started. He also helped to source all of the materials used in the build, making the process as straightforward for me as possible. I truly could not have done it without him. Thank you Jay!
I would also like to thank Mr. Thomas, director of the Mount Washington HAL Center, and Lisa Wilson, Rec Lead at Mount Washington for being such amazing partners for this project. Their positive feedback and requests were crucial in making this build everything it turned out to be. They made it such a pleasure to work with the Mount Washington HAL. Thank you guys!
Lastly, but definitely not least, I would like to thank my Foundations of Engineering Design professor, Dr. Sanchez, for all of his help and support with this project. I can say without a doubt that I've never completed a more unique school assignment, but it was also undoubtedly one of my favorites. Dr. Sanchez also provided me a very generous amount of extra time to work on the project, which helped transform it from a completed assignment to an impactful project. Thank you Dr. Sanchez!
Troubleshooting
As I mentioned before, I encountered a lot of challenges during my build, and unless you're some sort of master woodworker (which would be awesome) you'll likely encounter a few of your own. That's why I'm going to share the main two challenges I faced and what I did to overcome them here now, so if you happen to run into the same ones, you can at least have a little headstart.
- Warped wood
- The wood I used for this project was pretty badly warped. This is because I stored it in a warm, somewhat damp environment (I know, very avoidable, but I am still learning). This problem was very annoying, as it meant that all of the measurements would be slightly off, and if I didn't properly account for all of them, it wasn't going to fit right in the end.
- To counteract this issue, I did two main things. The first was a lot of measuring. Even though you should already do this with each step, just to make sure, I measured each cut and connection at least 2 or 3 times to make sure I was properly accounting for the specific instance. I also never inferred a measurement, and took the extra time to measure every single thing, which did end up paying off in the end. I also did a ton of sanding with this project. This was mainly to make sure that everything connected with little to no gaps, and that everything could sit flush together. This was one of the sneaky most annoying parts of the build, as I would have to sand, then measure, then sand, then measure, for hours. I now understand that this is a staple in most woodworking builds, and that I will have to learn to love it, but just be prepared for it going in, and find some good music to listen to while sanding.
- Poor planning
- Being my first major woodworking build, I failed a lot in the planning department. First, I never really established a good model to work off of. The model that I included with this Instructable was done after I finished the build, both as a good reference for these instructions, and also for some good Fusion practice. While I essentially took care of this issue for you, make sure that you are comfortable with every part of the model and read through all of the instructions before beginning. The second part of this was the time management part. I drastically underestimated how long it would take for me to physically complete all the construction for this build. Due to the fact that I had only a few weeks left in the semester to get it done and was balancing finals on top of that, it was pretty stressful for me. Projects like these are meant to be enjoyed, not rushed, so make sure you plan a good chunk of time for you to build this project so that you don't get stressed out trying to fit it around the other parts of your schedule.
- Adaptation
- This one wasn't so much of a problem, and more of an ongoing theme. With a project like this that has a good amount of parts to it, there are no doubt going to be issues and small inaccuracies with your build that aren't covered by this Instructable. When you face these, it is very important to work your way through it, no matter what. Often during my build I hit an obstacle that looked like it would completely derail the project. But, because I never gave up in solving these issues, the build persisted, and ended up turning out pretty nice, if I do say so myself. The bottom line is, don't get bogged down by the little, or even big problems. Just keep your sights set on the end goal, and use that clever, problem-solving brain of yours to figure something out.