Adaptive RGB Led Strip for TV
by roborobbiediy in Circuits > Arduino
333 Views, 1 Favorites, 0 Comments
Adaptive RGB Led Strip for TV

The idea of this project is to have an RGB strip on the back of a TV and changes color and brightness based on the image of the screen.
The main components of this project are an RGB LED strip, an Arduino and an APDS9960 sensor which has an RGB sensor.
Supplies


Materials and tools needed:
- 12V RGB LED strip
- Arduino NANO
- APDS9960 Sensor Module
- 3x BC-335 BJT NPN Transistors
- 2x B10K Potentiometers
- 2x 1K Resistors
- 2x 1000uF Electrolytic Capacitors
- 5V to 12V Step Up Converter (Optional)
- Screw Terminals
- Headers or other type of connectors
- Cables
- Prototyping Board (80x60 recommended)
- Soldering Iron
- Solder
- 3D printer (Optional)
Build the Circuit


Build your circuit based on the above schematic.
The two potentiometers are used by the user to specify:
- The delay of color change.
- The intensity/brightness of the LED strip.
These are explained more in Step 3.
It is recommended to solder it on a prototyping board but it can also be done on a breadboard.
It is also recommended to test out your main components before you build the project to avoid problems later on.
If you have a 3D printer, you can download the stand for the sensor which i designed. You can also place your circuit boeard (80x60) on it. I printed mine using PETG filament.
In my project, i am using an MT3608 Boost converter Module with a Micro USB port at the input. This allows me to power up the controller using a USB wall adapter or straight from the TV USB port.
In case you don't want to use a boost converter, you can power everything directly from a 12V Power Supply. To power up your circuit this way, connect the +12V to the Vin pin of the Arduino.
It is not strictly necessary to use the same components as in this project.
For example you can use a different BJT transistor or even a MOSFET.
In that case keep in mind the maximum current the transistor can drive. These LED strips, require ~300mA for each color per meter.
Downloads
Run Test Program to Calibrate Sensor Values


In order for the strip to show the correct colors, it is recommended to run a testing Sketch and read the sensor values for each color displayed on the screen.
You can use a color test video from YouTube that will display a series of basic colors on the screen.
Upload the Sketch to the Arduino board.
You will need to install the APDS9960 sensor library by Sparkfun using the library manager. Alternatively, you can download it from their Github.
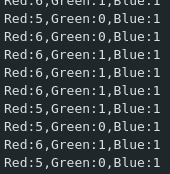
Write down the RGB sensor values for each color displayed on the screen.
Due to noise and imperfections, the sensor values will not be exactly as expected. For example for the red color, Green and Blue sensor values will be different from zero and the Red sensor values are not constant but fluctuating. What is important here is to see that the sensor data shows that there are dominant colors with higher values that correspond to the colors displayed on the screen.
After analyzing the values for each color, you should be able to find a line that separates dominant colors from not dominant ones. This line is what we will call the Threshold value. This value will be used in the main program to properly change colors based on whats shown on the screen.
Downloads
Upload and Test Final Program


In the Sketch, edit the COLOR_THRESHOLD constant according to the values recorded in the previous step. In my case a value of 4 is ideal. It might take some trial and error to get it right.
Upload the Sketch with the main code to the arduino.
It is recommended to try it with the color test video from the previous step and make sure that the LED strip changes colors based on the color shown on the screen.
If the LED colors don't change according to the screen color, try lowering the COLOR_THRESHOLD value.
The sketch contains an algorithm that allows the LED colors to change smoothly. The speed of this color change can be controller by the delay potentiometer depending on your preferences. the Max and Min time it takes for the color to change is determined by the DELAY_MIN and DELAY_MAX constants accordingly. The values i provided can be changed to your liking if you want faster or slower changes of the color.
I hope you found this project usefull to you. Feel free to ask any questions you may have.