Agriculture Irrigation Remote Control for Wheel Lines or Hand Lines
by TGit-Tech in Outside > Water
2112 Views, 15 Favorites, 0 Comments
Agriculture Irrigation Remote Control for Wheel Lines or Hand Lines

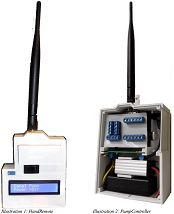
This setup uses the Arduino UNO with an LCD Keypad shield and XBEE S3B RF Radio Modules which advertise a 28-mile range; but for general usage, I wouldn't expect much over 2-miles ( I have tested with good results at 2-miles ). We have been using this device for the last week with good results so far.
A 3d printer is required to make the cases
The Total Materials Cost ( Most other solutions only come with 1/2 what is needed ) is;
$186 per Pump-Controller Unit
$55 per Hand-Held Remote
Attached is the complete building instructions, material list and operating instructions in a PDF document.
To get the most recent updates see;
https://github.com/tgit23/AgIrrigationRemoteContro...
Pump-Control = $186.26 / Per-Pump-Controller
- (1) 480V 3-Phase to 12VDC Power Supply = $ 66.99 - $59.00 (RHINO) + $7.99 (FULREE)
- (1) 600VAC Solid State Relay = $24.50
- (1) DIN Rail = $ 8.00
- (1) Arduino UNO R3 w/Male Headers = $ 3.80
- (1) Zigbee Shield = $ 4.83
- (1) Xbee 900hp Pro Module = $36.11
- (1) High Gain Antenna = $ 4.33
- (15) Screw Terminal Blocks = $ 2.15
- (4) Female DuPont Pin Headers = $ 0.79
- (1) 50x70cm Perfboard = $ 1.56
- (1) Right-Angle 9VDC Power Plug = $ 4.51
- (1) Computer Power Connector = $ 1.99
- (25-feet) 600V Wire 16AWG+ = $ 9.18
- (50-feet) Outdoor data cable = $11.50
- (Various) Solder-less Crimp Connectors = $ 6.02
Hand-Remote = $55.00 / Per-Hand-Remote
- (1) Arduino UNO R3 = $ 3.80
- (1) Keypad / LCD Shield = $ 2.19
- (1) Zigbee Shield = $ 4.83
- (1) ON/OFF Rocker Switch = $ 0.86
- (1) Active Buzzer = $ 0.60
- (2) Resistors = $ 2.28
- (1) Xbee 900hp Pro Module = $36.11
- (1) High Gain Antenna = $ 4.33
Downloads
Build the Hand-Remote


The HandRemote is the remote controller unit used to control and monitor an irrigation pump remotely.
The HandRemote uses the following electronic parts
- 1- Arduino UNO R3 Board
- 1- LCD Keypad Shield
- 1- Zigbee Shield
- 1- Xbee-Pro 900Hp S3B Module and High Gain Helical Antenna
- 1- 9Vdc Battery Connector
- 1- Active Buzzer
- 2- Resistors
A. Setup LCD Keypad Shield
Wire the Battery-Meter Voltage-Divider
- Select (2) Resistors; One-Value being 1/3 the other ( 10K-ohm up to 1M-ohm is recommended )
- Solder First Resistor ( Full Value ) on the top of the LCD Shield from VIN → A1
- Solder Other Resistor ( 1/3 Value ) from A1 → GND ( Solder hole just left of VIN )
- Snip off the excess back-side leads
The two resistors setup a voltage divider from the 9Vdc battery (which we will attach to VIN). Analog inputs on the Arduino should never exceed 5Vdc. The voltage divider will split the battery voltage to 1/3 its actual voltage. This will allow the hand-remote to monitor the battery level. The larger the resistor values the less drain on the battery; but too-large a value resistors may affect accuracy.
Plug the LCD Keypad Shield onto the Arduino UNO
B.Zigbee/Xbee Shield
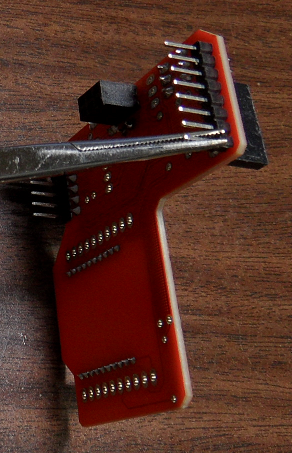
Remove Header Pin D7 From Zigbee Shield
- Using Needle Nose pliers clamp onto Pin D7 of the back of the Zigbee Shield
- Using Soldering Iron – Heat the top of the pins solder pad and pull the pin from the board
Solder Zigbee Shield to the LCD Keypad ( Flipped upside down )
- Insert pins D0 → D6 ( D7 removed in Step #1 ) into the Top Solder holes of the LCD Keypad Shield
- Position the Zigbee Shield flat with LCD Shield and Up against the LCD Shield – Requires bending the header pins a little ( with UNO Attached )
- Solder the Zigbee pins to the LCD Keypad Shield
C.Active Buzzer
Solder Active Buzzer to LCD Keypad Shield
- Either print a small piece of plastic or add Black tape to the Back-Side of the Active Buzzer to prevent shorting against the Zigbee Shield.
- Solder the 'S' pin on the Active Buzzer to D2 ( 3rd Left Pin – LCD Face Up ) on the LCD Shield
- Cut the (-) and center pins of the Active Buzzer leaving about 1/8” for connection but short enough not to touch D3 & D4.
Wire Power to the Active Buzzer and Zigbee Shield
- Bend the first and last pins closest to the edge of the LCD Keypad Shields ICSP pin header
- Solder one end of a Red wire → Left-Most Pin of the LCD Keypad Shields ICSP pin header ( 5V+) Pull wire to Active Buzzer (+) Pin ( Center Pin ), strip insulation and solder Pull wire to Lower-Right of the Zigbee ICSP ( 5V+ ) plug, strip insulation, cut to length and insert into plug
- Solder one end of a Black wire → Right-Most Pin of the LCD Keypad Shields ICSP pin header ( 5V+) Pull wire to Active Buzzer Left-Pin (-), strip insulation and solder Pull wire to Top-Right of the Zigbee ICSP ( GND ) plug, strip insulation, cut to length and insert into plug
- Cut the remaining ICSP pins as short as possible to allow the unit to fit inside the case
D.Communications
Remove the two green jumpers factory installed on the Zigbee shield
Connect Arduino UNO pins D11 & D12 to the Zigbee Communication Header
- From an upside-down view; left-top of Arduino UNO; Count the pin holes to the right D0,D1,D2.... to D11
- Solder a wire from Arduino UNO pin D11 to the top-jumper-header center-pin of the Zigbee shield
- Solder a second wire from Arduino UNO pin D12 to the bottom-jumper-header center-pin of the Zigbee shield
2.2Hardware Assembly
A.3D-Prints
Print the Following Models on a 3D-Printer
- /HandRemote/3D-Prints-STL/HandRemote-Case.stl
- /HandRemote/3D-Prints-STL/HandRemote-Buttons.stl
- /HandRemote/3D-Prints-STL/HandRemote-BackCover.stl
- /HandRemote/3D-Prints-STL/HandRemote-BatteryCover.stl
- /HandRemote/3D-Prints-STL/HandRemote-BatteryInsulatorPlate.stl
- /HandRemote/3D-Prints-STL/HandRemote-SideCover.stl
B.Install Electronics
- Insert the Power ON/OFF Rocker Switch into the front of the case
- Place the buttons in their proper place inside the case; using masking tape on the front-side to hold the buttons in their place
- Install the LCD, Buzzer, Zigbee Electronics Assembly ( from Step #2.1 ) into the Case ( Arduino UNO Removed ) Insert (4) 10mm or shorter screws – adjust tightness making sure the buttons still click ( too tight will pinch buttons down permanently )
- Plug the Arduino UNO back onto the LCD Keypad Shield
- Slide the Xbee into the Top-Hole and then plug into the Zigbee Shield
- Attach the Antenna to the Xbee RPSMA Connector
C.Wire in Battery Power
Install Plugs
- Insert the HandRemote-BatteryInsulatorPlate.stl 3D-Print inside the battery hole
- Route the 9Vdc Battery Power Plug from the front, around Zigbee shield, to the back
Wire in the Switch and Power to the Arduino UNO
- Solder the Black wire to the closest to UNO power-jack backside pin ( as pictured )
- Leaving an inch-or-so slack on the 9VDC plug; measure and cut the Red wire on the closest rocker-switch connector
- Strip the end and solder the wire to the rocker switch connector
- Strip the end of the cut left-over red wire and solder it into the “other” connector on the rocker-switch
- Solder the other end of the cut left-over red wire wire to the farther to UNO power-jack backside pin ( as pictured )
Check for Power
- Plug in a 9V-Battery into the 9V plug
- Flip the rocker-switch to power-on ( marked with a “-” ) and verify that the LCD display lights
Attach Covers to Case
- Insert the HandRemote-BatteryCover.stl 3D-Print into the cases battery-hole and snap down
- Slide the HandRemote-BackCover.stl 3D-Print in from the bottom then insert a screw in the bottom-center
- Slide the HandRemote-SideCover.stl 3D-Print in the USB side until it snaps into place
Build the Pump-Controller


3.1 Perfboard Assembly
Install Headers
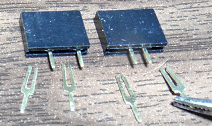
- Remove outer pins on one 4-PIN female header ( POWER )
- Remove every other pin on one 4-PIN female header ( RX/TX )
- Remove the (2) Green Jumpers on the Zigbee Shield and plug it onto the Arduino UNO
- Plug a 6-Pin Male Header into the Analog Header of the Zigbee Shield ( A5 → A0 )
- Plug a 6-Pin Male Header into the Digital Header of the Zigbee Shield ( D2 → D7 )
- Insert the POWER female header from step #a into the Zigbee Shield holes labeled 5V & GND ( next to the reset button )
- Plug a 4-Pin Male Header into the top of the POWER female header
- Insert the RX/TX female header from step #b ACROSS the two center male header (XBEE/USB) pins of the Zigbee Shield
Solder the header pins to a 5cmx7cm 2.54mm pitch Perfboard
- Align and place the Perfboard onto the header pins
- Solder the header pins to the Perfboard
Solder the Zigbee female POWER header pins
- Unplug the Arduino UNO from the Zigbee Shield leaving the Perfboard attached
- Solder the female POWER header pins to the holes of the Zigbee shield
Add wires to the header pins
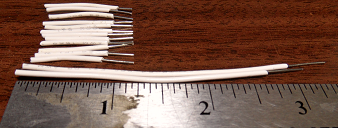
- Cut (12) wires approximately 1” long and strip one end.
- Cut (2) wires approximately 3” long and strip one end.
- Unplug the Perfboard from the Zigbee Shield
- Insert (6) 1” wires from the Zigbee-side of the Perfboard into the holes just below the analog male pin headers, bend and solder
- Insert (4) 1” wires from the Zigbee-side of the Perfboard into the 4-right (D4-D7) holes just above the digital male pin headers, bend and solder
- Insert (2) 3” wires from the Zigbee-side of the Perfboard into the right of the POWER male pin headers ( Center-2 ), bend and solder
- Attach (2) 1” wires from the Top-side of the Perfboard across RX/TX female pin headers and solder to D2, D3 Digital pins as shown and trim.
Install the Screw Terminals
- Place the HandRemote-PerfboardCover.stl 3D-Print on the top of the Perfboard lining up grooves with header pin solder joints
- Insert (3) 2x Screw Terminals along the Analog section starting at the Right and working left to allow sliding the blocks together at their edges
- Insert (2) 2x Screw Terminals along the Digital section with the same method above
- Insert (2) 2x Screw Terminals along the 5VDC section ( same as above )
- Insert (2) 2x Screw Terminals along the GND section ( same as above )
Solder the Screw Terminals to their corresponding header wires
- Turn the Perfboard over holding the screw terminals into place
- Sold each screw terminal pin to the Perfboard
- Pull the Insulation off the wires, bend them flat with the Perfboard and solder them to their corresponding pin ( See picture or Wiring Diagram )
3.2Hardware Assembly
A.Print Models (3D-Prints)
3D-Print the Following Models @ https://github.com/tgit23/AgIrrigationRemoteContr...
- PumpController-Case.stl
- PumpController-Cover.stl
- PumpController-USBCover.stl
- PumpController-AntennaCover.stl
B.Install Electronics
Install UNO and Zigbee connected into the Case
- Remove the Screw Terminal Perfboard if attached and connect the Arduino UNO & Zigbee Shield
- Plug in the Right-Angle 9Vdc Power Plug for Arduino Power Jack
- Insert the Uno/Zigbee assembly into the case letting the USB and power Jack sit on each side of the case stub.
Install the XBEE module
- First slide the XBEE RPSMA Connector into the case slot
- Then lift the XBEE module into to place and plug it into the Zigbee Shields Xbee plug-in
Install the Xbee Antenna Cover
- Slide the AntennaCover.stl 3D-Print onto the RPSMA connector from the outside of the case
- Attach the washer and nut and tighten
- Plug the Perfboard into the Zigbee shield
Install Pump-Controller


3.3.1Prepare for Installation
A.DIN Rail Components
Cut to Length a portion of DIN Rail
- A length that will comfortably fit the Power Supply, Solid State Relay, and Fulree DC/DC Converter
- A length that will fit comfortably somewhere inside the Pump Power Panel
- Recommending approximately 5-1/2” or 4-hole slots in length
Wire RHINO power supply to Fulree DC/DC Converter
- Attach the RED(+) IN wire of the Fulree DC/DC Converter to the RHINO power supply at the top labeled ( 24VDC+ )
- Attach the BLACK(-) IN wire of the Fulree DC/DC Converter to the RHINO power supply at the top labeled ( 24VDC- )
Wire GND to the Solid State Relay
- Attach a wire ( Recommend BLACK or GREEN ) from the “other” 24VDC- on top of the RHINO power supply to A1 of the Solid State Relay
B.Pump-Controller Power Cable
Select a place to mount the Pump-Controller on the Pole next to the Pumps electrical panel
- Measure and cut a length of Cat5e outdoor cable to reach from that spot to the bottom of the electrical panel
Create Cable to connect the Pump-Controller → Pump-Panel-Exit Plug which will be installed in 3.3.2-Section D-Step#3
- Separate the two connecting ends of a Computer power plug ( shown in the BOM ) by cutting the wires in the middle
- Wire up the MALE end of the cable and save the FEMALE end for the Pump-Panel-Exit Plug
- Yellow power plug → Orange twisted pair ( 9Vdc+ )
- Black next to Yellow power plug → Brown twisted pair ( 9Vdc GND )
- Black next to Red power plug → Green twisted pair ( Extra Accessory Wire )
- Red power plug → Blue twisted pair ( Pump Control )
Wire up the Pump-Controller end ( Other end of the same wire in step#a above )
- Strip the outer insulation from the Cat5e Cable approximately 4” from the end
- Strip and wire the twisted pairs as follows
- Orange twisted pair → Red wire of the angled 9Vdc UNO Power plug
- Brown twisted pair → Black wire of the angled 9Vdc UNO Power plug
- Green twisted pair → Perfboard screw terminal ( D6 )
- Blue twisted pair → Perfboard screw terminal ( D7 )
3.3.2Wiring Power & Control
This section is a guide to installing the required power supply and pump ON/OFF switching mechanisms inside the pumps electrical panel.
The following SUPPLIES will be needed
- DIN Rail cut to length ( Recommend 5-1/2” )
- The RHINO Power Supply
- The Fulree DC/DC Converter mounted to the PumpController-FulreeDINMount.stl 3D-Print
- The Solid State Relay
- 12-Gauge wire rated at 600V or more
The following TOOLS will be needed
- Voltmeter that reads up to or beyond 500VAC
- Cordless drill
- Center tap
- Bit ( #21 for #10-32 Machine Screw )
- Threading tap ( #10-32 for #10-32 Machine Screw )
- (2)-Machine Screws
- Protective insulated and flash protection personal gear
- Wire strippers and cutters
BE SURE THE MAIN BREAKER IS TURNED OFF AND CAREFULLY CHECK THAT THERE IS NO VOLTAGE ON THE OUTPUT OF THE MAIN BREAKER WITH A PROPER METER!!! 480VAC is deadly; and can cause severe flash burn and/or death. (e.g. A meter on the wrong setting can “flash” explode causing “flash” burns on you even at a distance away). I DISCLAIM ANY AND ALL RESPONSIBLITY FOR ANY RISK OR HARM OCCURED BY FOLLOWING ANY INSTRUCTION IN THIS MANUAL.
See https://www.youtube.com/watch?v=6hpE5LYj-CY
B.DIN-Rail Components
Drill two holes in desired location, punch, tap-thread, and mount the DIN rail horizontally
- Recommend using a #10-32 x 1/2” Machine Screw
- Drill bit size for #10-32 is #21 – 5/32” - 0.1590”
Snap on the RHINO power supply to the DIN rail in the center
Snap on the Solid State Relay to the DIN rail on the right of the RHINO power supply
Snap on the Fulree DC/DC Converter to the DIN rail to the left of the RHINO power supply
C.Pump Panel wiring
NOTICE: All wiring in this section should be done with 600V rated wire
- Wire the RHINO Power Supply Connect RHINO terminal L1, L2, L3 to the top terminals of the Contactor ( i.e. Starter / Hammer ) L1, L2, L3 terminals
- Connect RHINO GRND terminal to a bold on the panels back-plane
Wire the Solid State Relay
- Connect Solid State Relay (15) → AUTO Terminal of the HAND-OFF-AUTO switch
- Connect Solid State Relay (16) → Contactor Activation Coil side connected to the Auxiliary Contact & Start Button ( Grey in diagram above ) -- Follow the HAND-OFF-AUTO wire to the start button Wire Solid State Relay (16) on the OPPOSITE side of the start button - as the wire from HAND-OFF-AUTO to the Start Button
Wire in the female Exit Plug
- With the Female end of the Computer power plug from 3.3.1.A Exit Plug insert wires through a bottom hole in the Pumps Electrical Panel
- Connect the Yellow & Black wires from the Fulree DC/DC converter to the Yellow/Black wires of the female end of the Computer power plug
- Connect the Solid State Relay (A2) to the RED wire of the female end of the Computer power plug
- Tape off the Black wire next to the Red wire ( Can be used as with an “optional” auxiliary contact to verify pumps power status )
Firmware Setup
Install Arduino Sketch IDE ( If NOT installed already ) https://www.arduino.cc/en/Main/Software
Install the PeerIOSerialControl Library ( If NOT installed already )
- In a web-browser; go to https://github.com/tgit23/PeerIOSerialControl
- On Green Clone or download Choose Download Zip
- Save to a place you'll remember – like Documents or Desktop
- Run the Arduino Sketch IDE
- Choose Menu Item Sketch → Include Library → Add .zip Library
- Select the PeerIOSerialControl Library file saved in step 'b' above
Download the Firmware
- In a web-browser; go to https://github.com/tgit23/AgIrrigationRemoteContr...
- On Green Clone or download Choose Download Zip
- Save to a place you'll remember – like Documents or Desktop
- Unzip the Folder
- In Arduino Sketch IDE choose File → Open and Select
- File HandRemote.ino for the HandRemote Firmware Location Example: \Downloads\AgIrrigationRemoteControl-master\AgIrrigationRemoteControl-master\HandRemote
- File PumpController.ino for the PumpController Firmware Location Example: \Downloads\AgIrrigationRemoteControl-master\AgIrrigationRemoteControl-master\PumpController\PumpRemote
Compile and Upload the Firmware
- Setup the unit to “Upload-Mode” by removing both Zigbee Shield jumpers
- Plug in a USB cable from the Computer to the unit
- Select the Port the units USB is connected to; in Sketch menu Tools → Port
- To determine Port; Open Windows Device Manager → Ports ( COM & LPT ) a new COM?? port appears right after plugging in the cable
- Select the Board; Sketch menu Tools → Board → Arduino/Genuino UNO
- In Arduino Sketch IDE; Press the Right-Arrow next to the Check mark in the Top-Left Corner to upload the firmware onto the unit