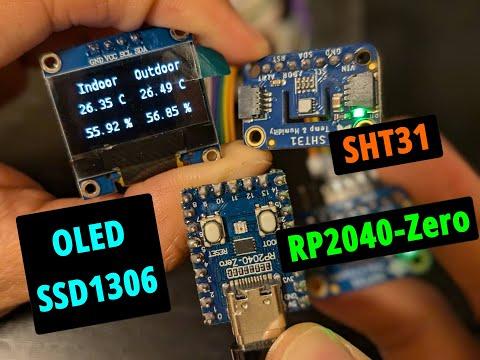
Air Monitor With RP2040-Zero, SSD1306 Oled Screen and SHT31 Sensors (I2C)
by gubutek in Circuits > Raspberry Pi
2626 Views, 7 Favorites, 0 Comments
Air Monitor With RP2040-Zero, SSD1306 Oled Screen and SHT31 Sensors (I2C)
)
In this project, I used microcontroller to monitor the humidity and temperature of 2 different locations. The measured data is shown on SSD1306 oled screen
There are 2 main things I need to test with the RP2040-Zero
1. Multiple I2C devices connection (2 sensors and 1 screen)
2. Consistency of the SHT31 sensors
Supplies

This is a mini version of RP Pico. It fits small project better because you don't need to use all the GPIO anyway. You will have a compact design using this. More important is the price, this one is cheaper that the original Pico.
This Humidity and Temperature sensor is popular thanks to the accuracy and repeatablity. It is much better than DHT11 or DHT22 which are usually come with beginner kit. You can also get a cheaper version of SHT31 here. I used 2 of the sensors in this project for 2 different locations. Get 1 if you just need to learn how to use it.
I used the all white color screen. If you by chance has the 2-colors yellow and blue, you should update the address of the screen in the ssd1306.py (line 105) to 0x3D instead of 0x3C (I will have a more details instructables later)
Circuit


Let's talk about the micro controller. There are many kinds of them for you to choose from Arduino to ESP32...I chose this RP2040 because it is the first of it kind from Raspberry Pi manufacture. It is coded in Python which is very intuitive for beginner. The RP2040-Zero format is very compact. It fits the small project like this one (and it's cheap :)
It's very simple circuit. I have two SHT31 sensors from adafruit that connected to the RP2040-Zero. To display the measured humidity and temperature, I added the oled screen SSD1306. They all work with the I2C communication. I will not go into details. It is just a communication standard that electronics can talk to each other.
As you can see in the pinout photo, the RP2040-Zero has 2 I2C buses: I2C0 and I2C1. I used I2C0 (Pin GP0 and GP1) for the 2 sensors and the I2C1 (Pin GP14 and GP15) for the screens. The wiring depends on the selection of the I2C buses so make sure that you connect them correctly. You will need to supply power using the usb port or directly connect to the 5V or 3.3V power pins.
That's will be all the circuit.
Code

You can download all the code from my Github
There are some libraries that we need to import
- ssd1306.py for the oled screen
- oled.py to change the font size
- sth31.py for the sht31 sensor
The main code for RP2040-zero is oled2SensorBigText.py. The most important part is the setting for the I2C buses. I2C0 is shared between 2 SHT31 sensors (line 14). One of them has the ADR pin connected to Vcc to set the I2C address to 0x45 (line 16). The other one will have 0x44 (line 15) instead (default). I2C1 is used for oled screen SSD1306 (line 19).
Test

Run the oled2SensorBigText.py with the RP2040-Zero and you will get the measurement of the 2 sensors. This project is good for when you need to compare the air at different locations. I am working on packing the whole unit with battery as well as adding more sensors. You can follow my Youtube channel to get update about it.