AirFlame — a Solar/Battery-Powered Wood Stove
by forevercraft in Outside > Camping
68 Views, 0 Favorites, 0 Comments
AirFlame — a Solar/Battery-Powered Wood Stove
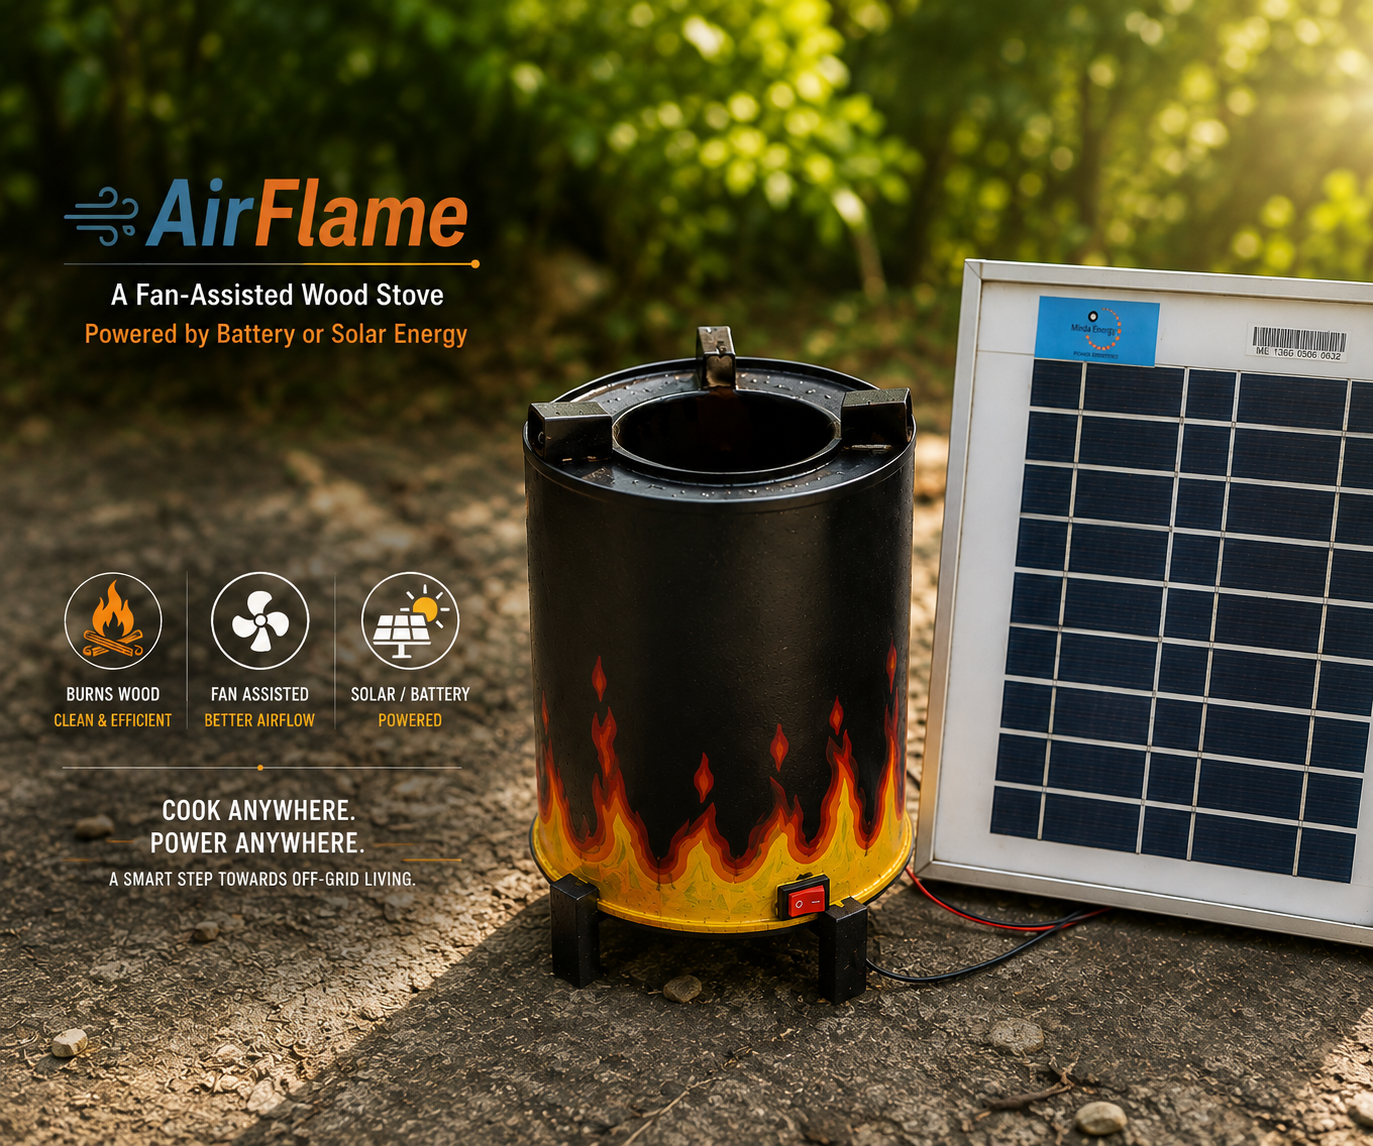
What happens when you need to cook somewhere there is no electricity, no conventional kitchen and no access to a gas stove?
Wood is one of the simplest sources of heat available almost everywhere, but simply burning a few pieces of wood in an open container can be inefficient and difficult to control.
I wanted to experiment with a different approach: a compact wood-burning stove that uses a small fan to supply air to the fire, while the fan itself can be powered independently by either a battery or a solar panel.
So I built this small working prototype using a metal container, scrap metal, a small DC motor, a fan blade, a battery and a solar panel.
The prototype is intentionally small. The purpose was to demonstrate the working principle, rather than build a full-sized cooking stove.
The same basic concept can be adapted to a larger body and cooking surface depending on the required capacity.
Supplies
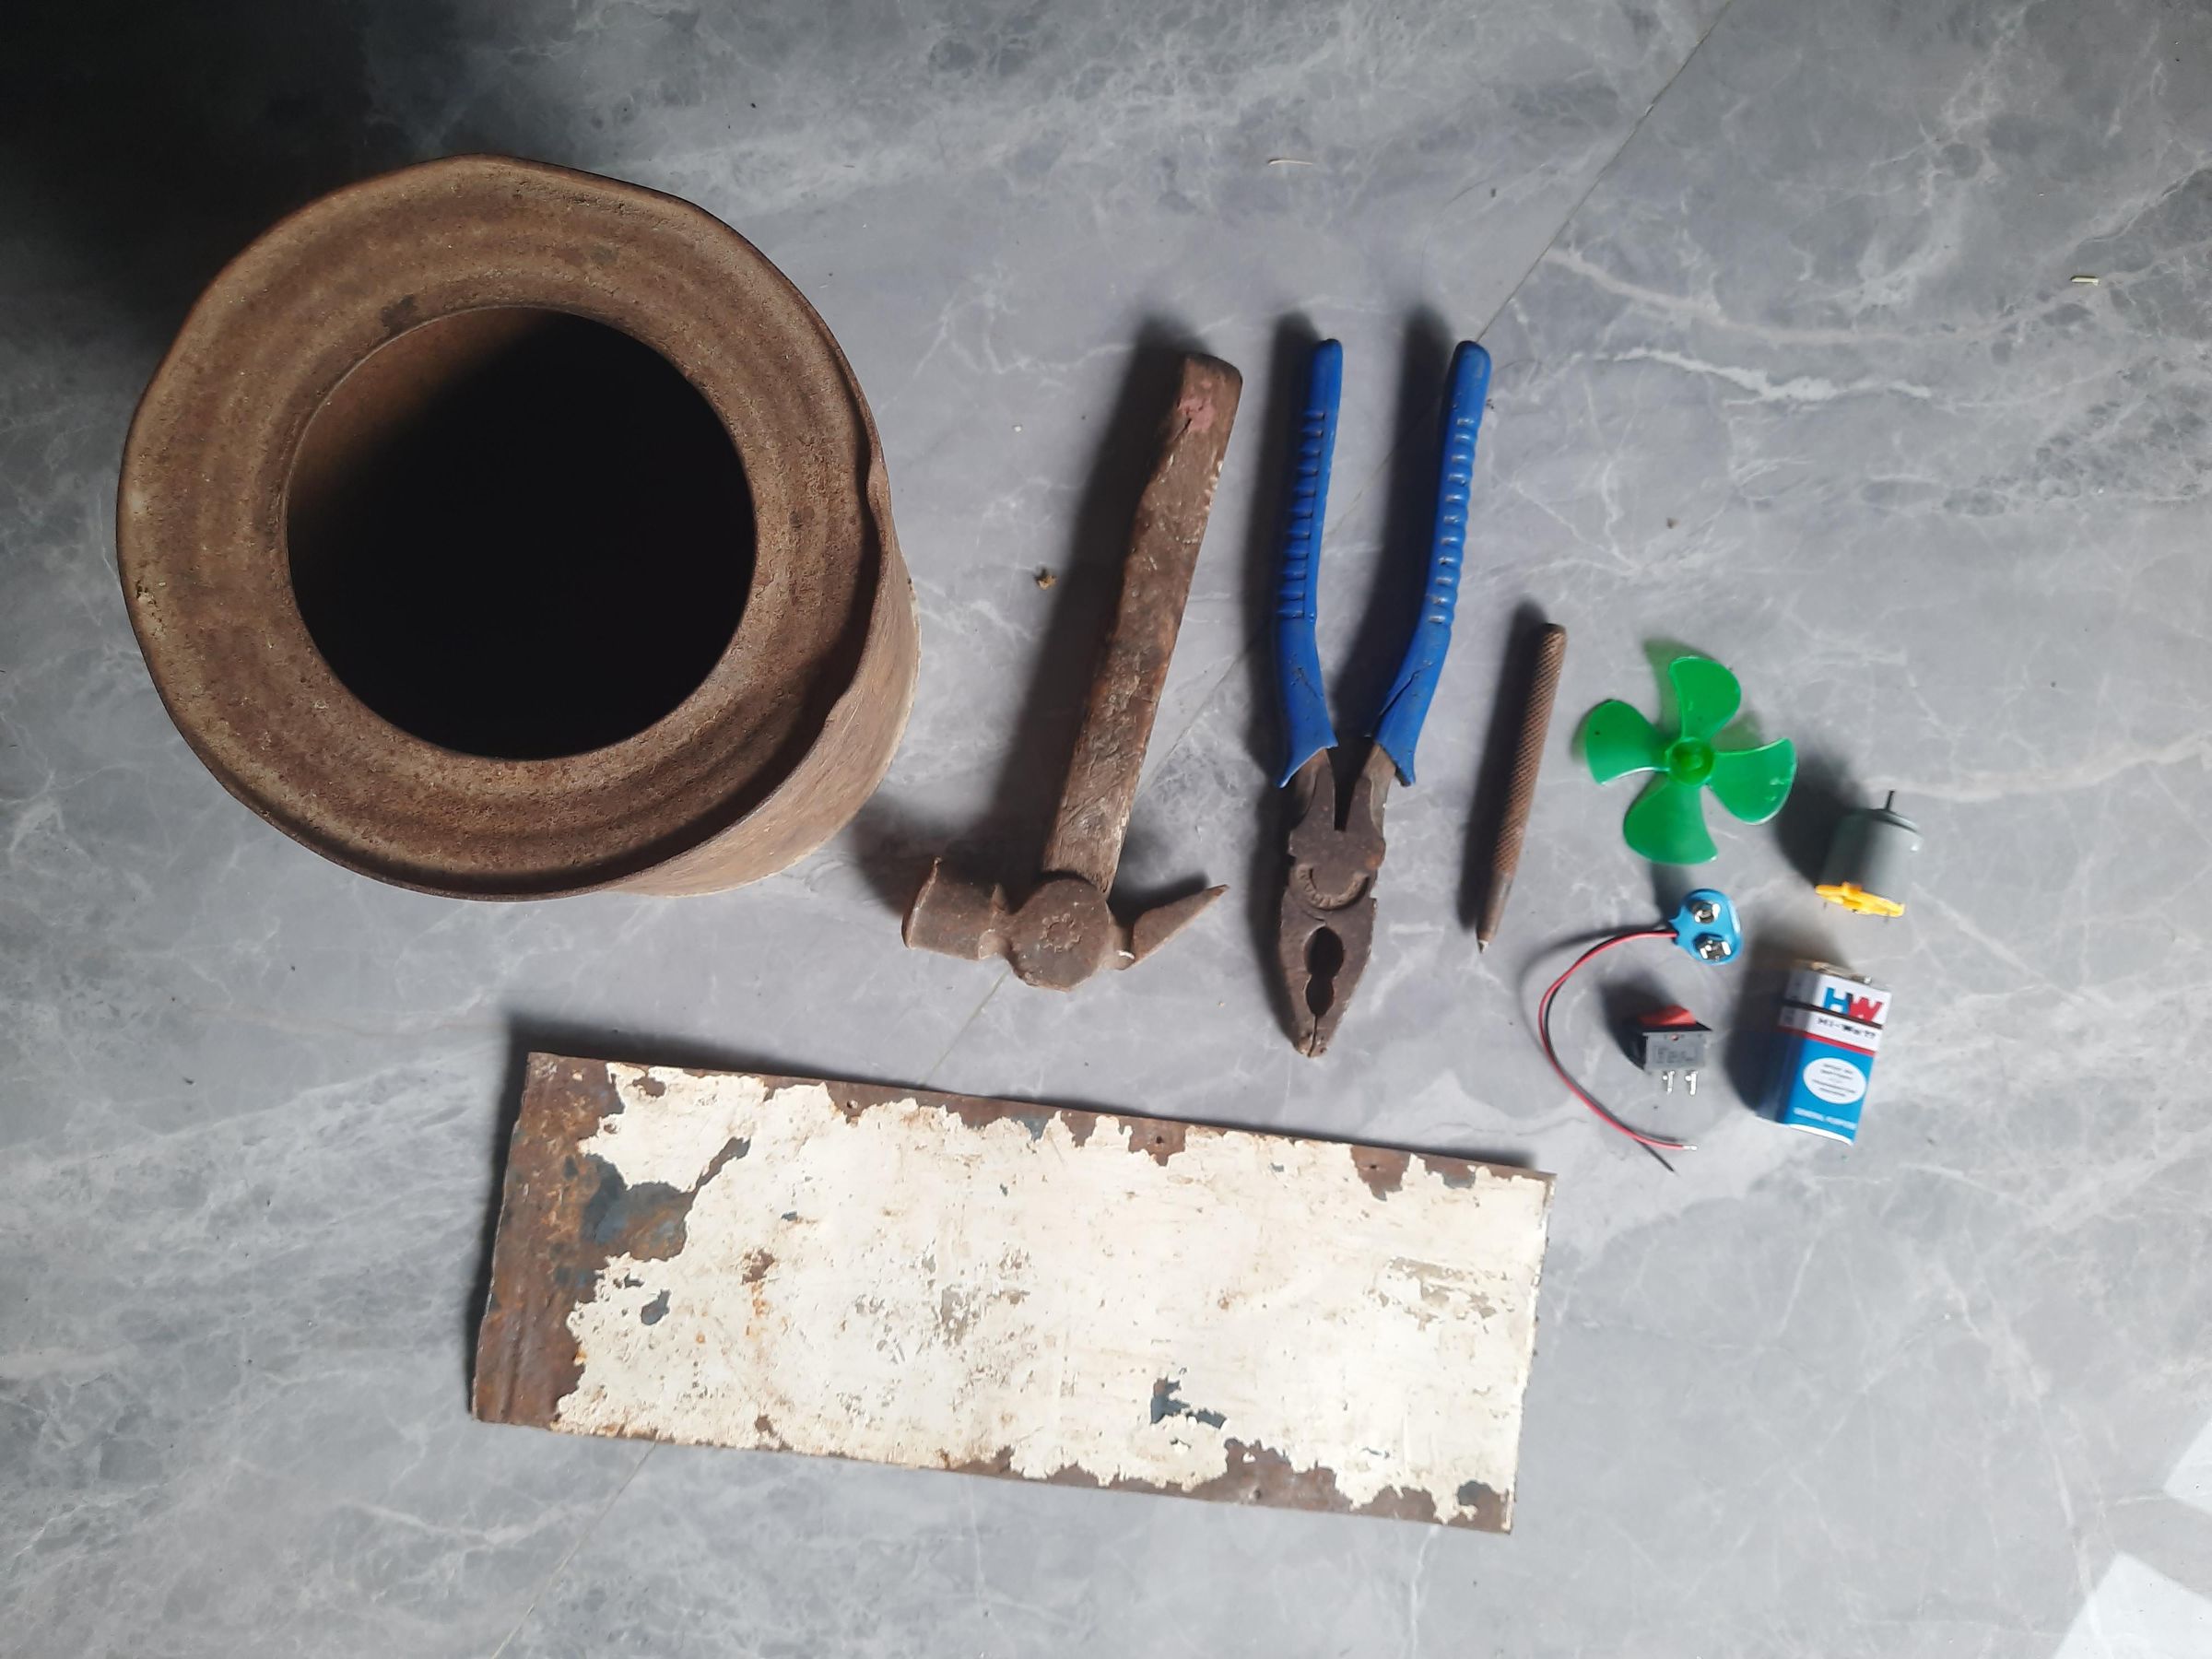
Main body
- Metal cylindrical container
- Scrap metal sheet
- Small pieces of scrap metal for supports/legs
- Metal fasteners or suitable joining method
Electrical components
- Small DC motor
- Small fan blade
- Battery — I used a small 9 V battery in this prototype
- Battery connector/wires
- Small ON/OFF switch
- Solar panel
- Connecting wires
Tools
- Hammer
- Pliers
- Metal punch/nail
- Drill or suitable metal-punching tool
- Cutting tools suitable for the metal being used
- Measuring scale/marker
- Basic hand tools
Note: The exact dimensions aren't critical for this prototype. They can be changed according to the size of the container and the intended application.
How It Works
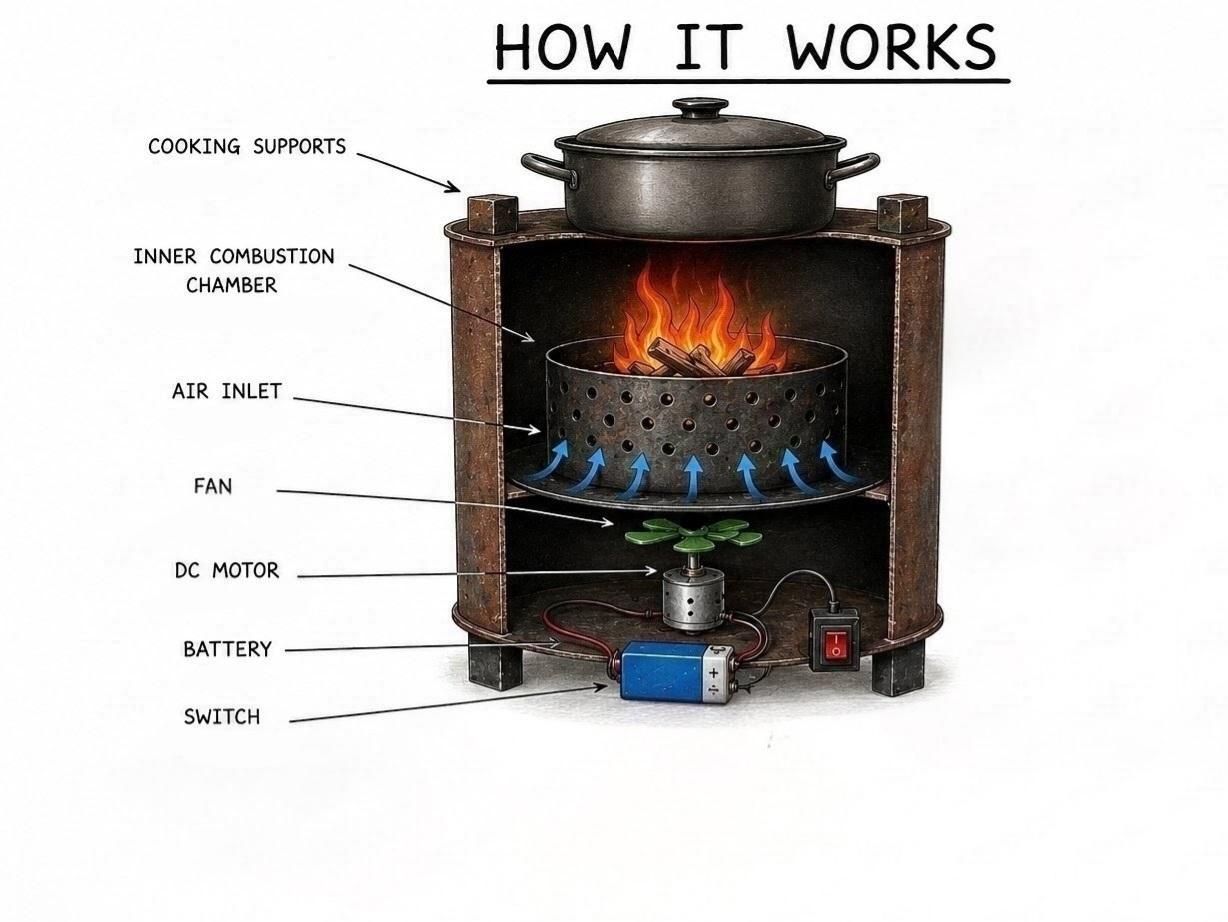
The stove has two basic systems:
🔥 Heat system
Small pieces of wood are placed inside the combustion chamber and burned to produce heat.
💨 Airflow system
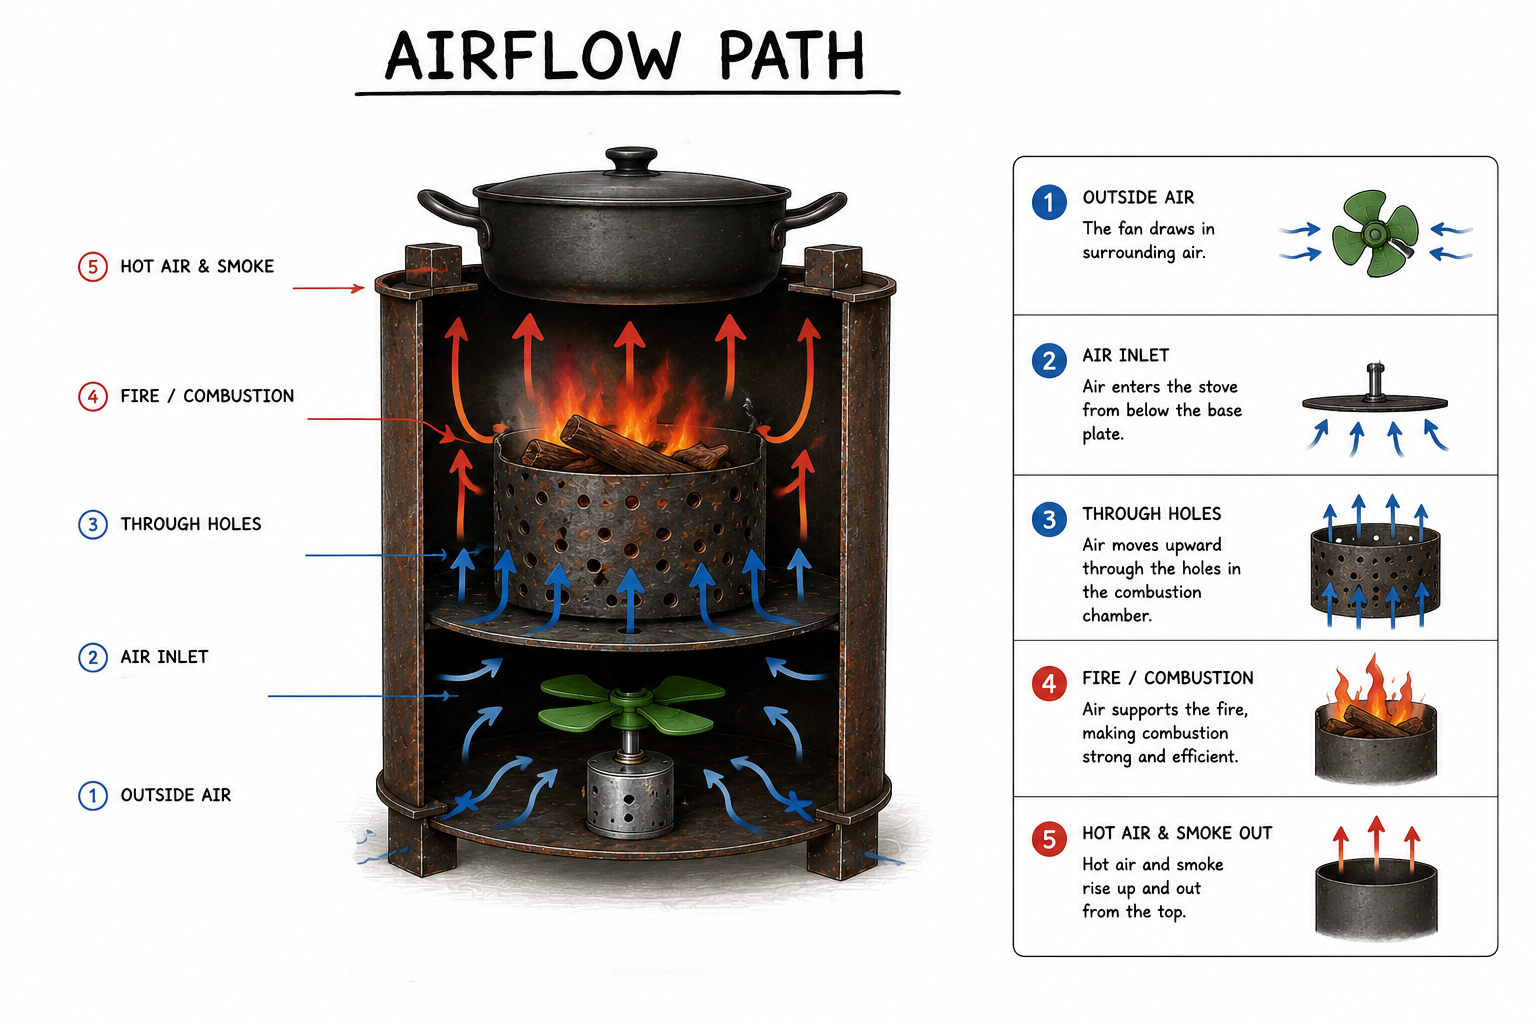
A small DC motor drives a fan positioned underneath the combustion area. The fan supplies additional air to the fire.
⚡ Power system
The fan can be powered using:
- A small battery
- A solar panel
The electrical components are positioned underneath and away from the hottest combustion area.
In simple terms:
Wood → Fire → Heat
while:
Solar/Battery → Motor → Fan → Airflow → Fire
The electrical system does not create the heat. It simply provides the airflow needed by the combustion system.
Prepare the Metal Sheet
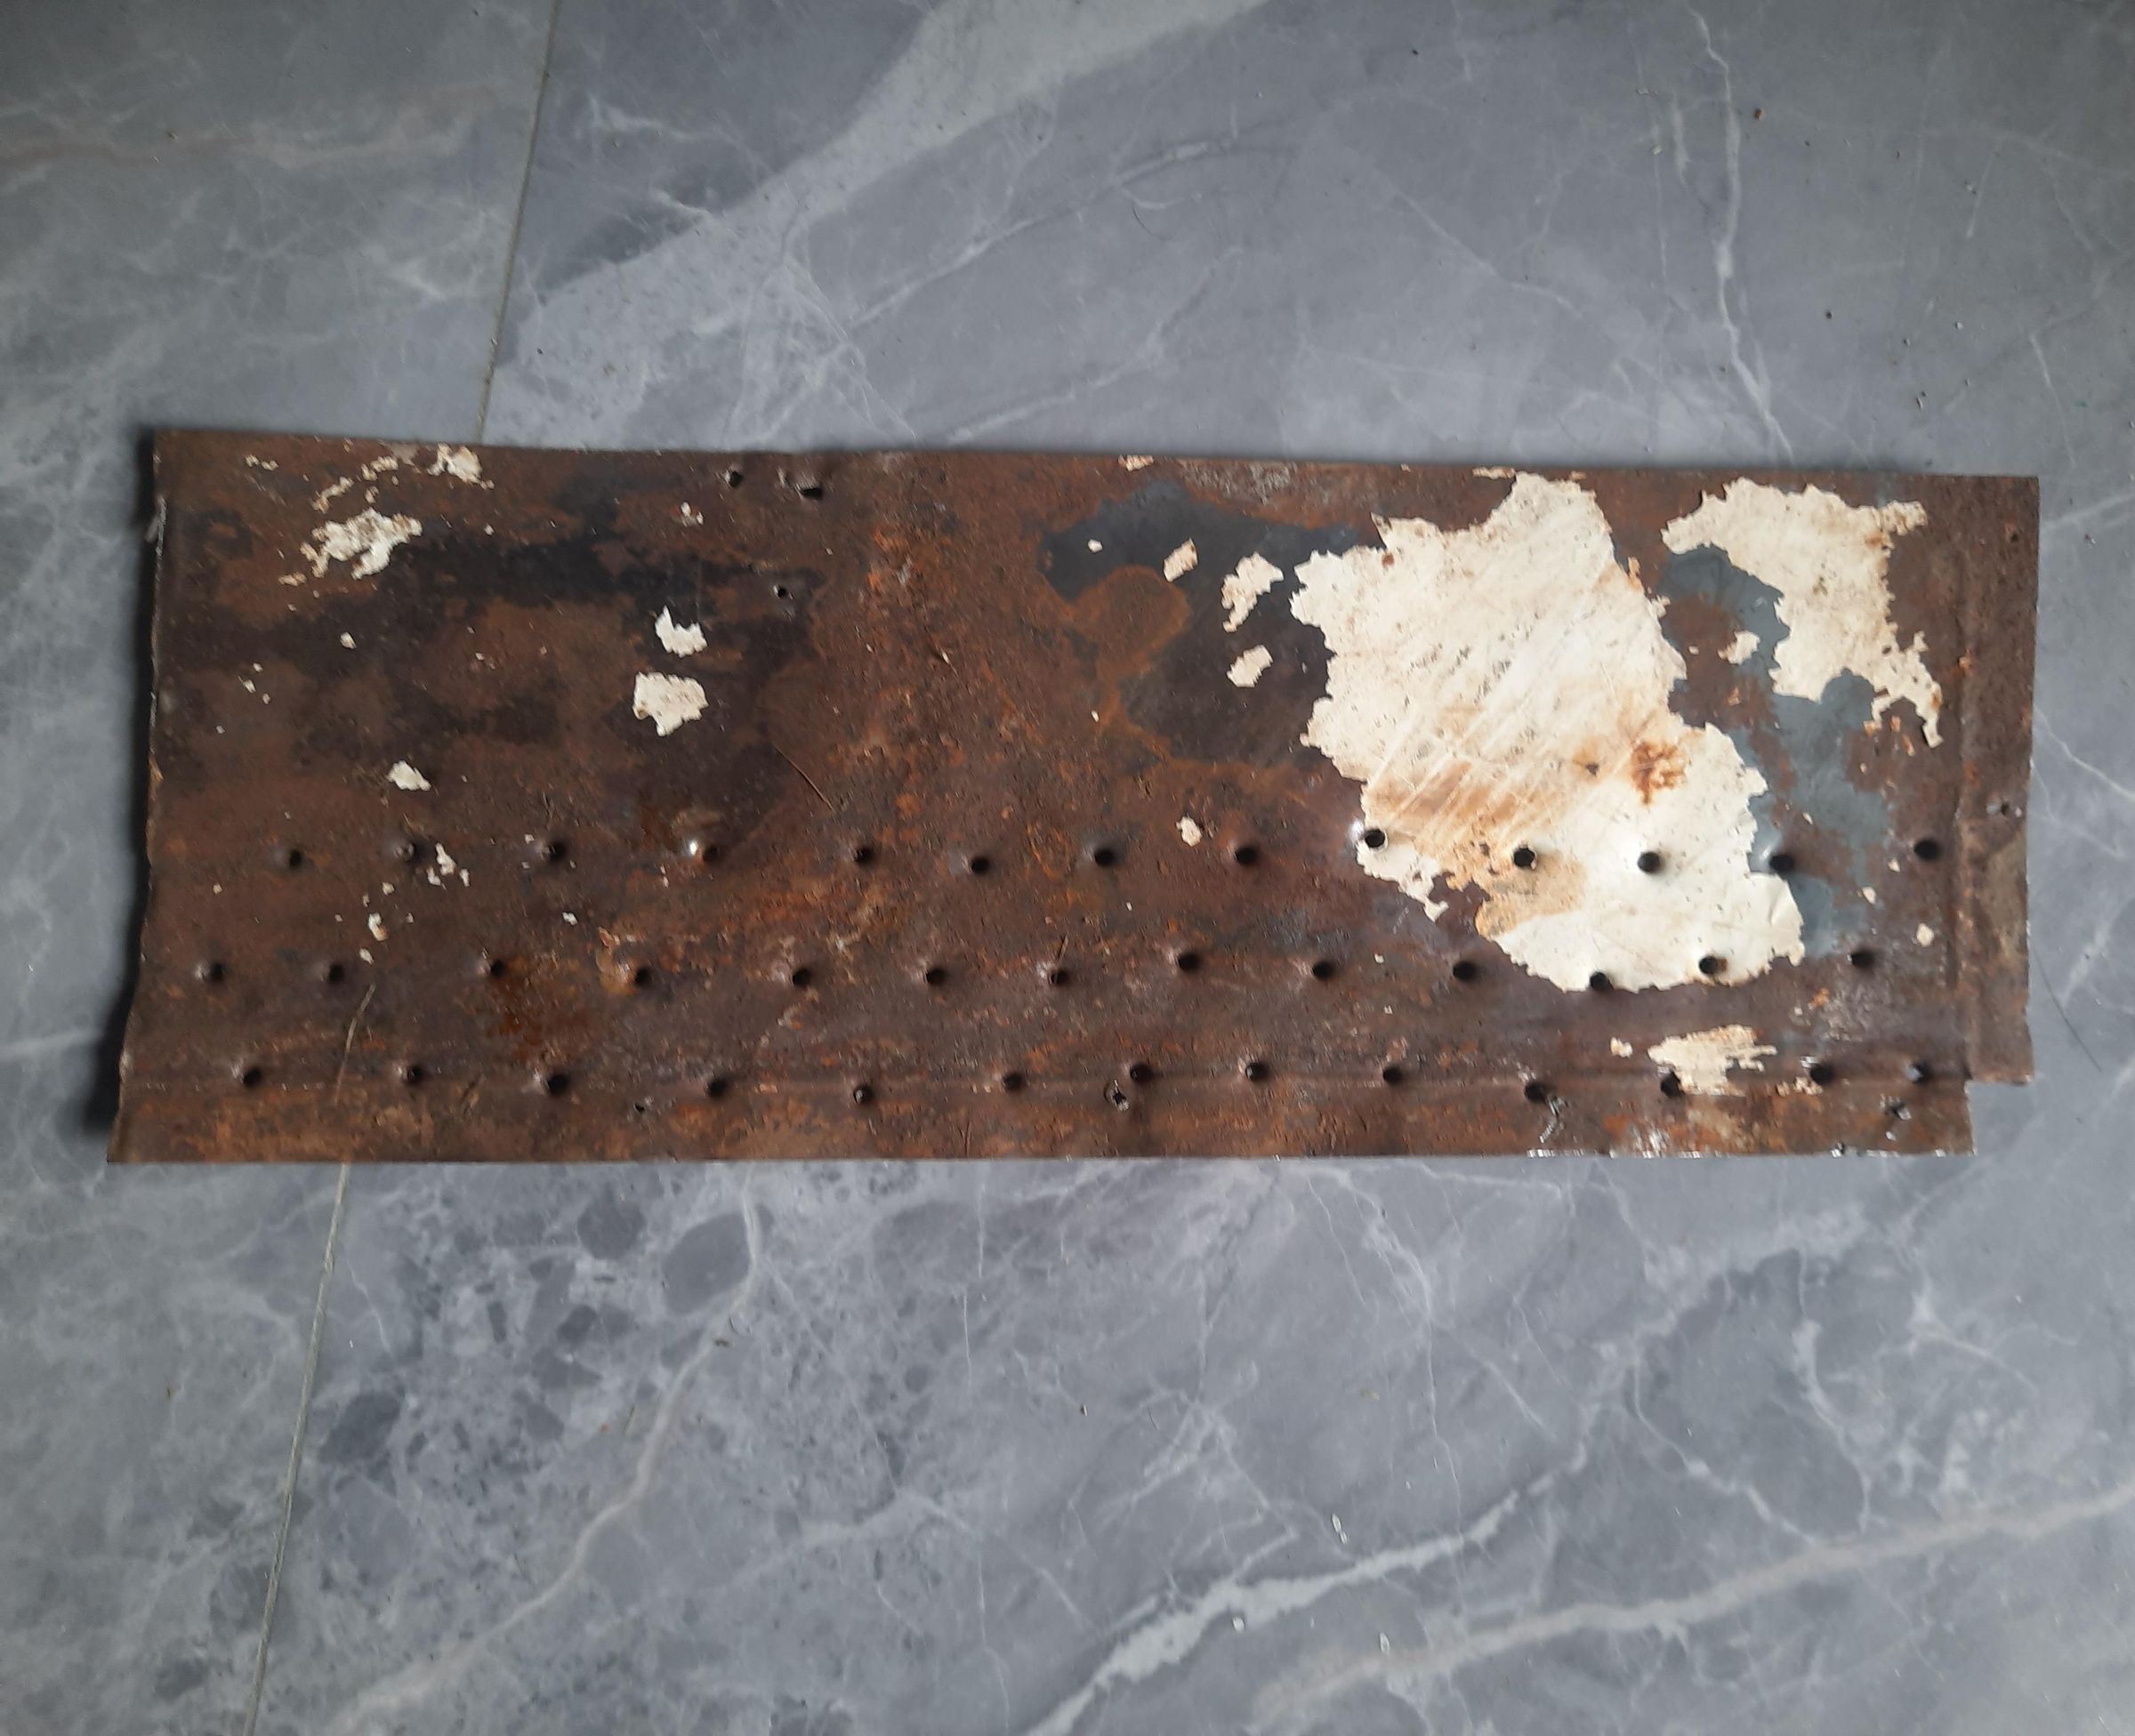
I started with a piece of scrap metal sheet. The sheet was cleaned and marked before making the ventilation holes. I made a series of small holes through the metal.
These openings are important because the combustion system needs access to air.
For the prototype, I made the holes manually using a metal punch and hammer. The number and arrangement of holes can be modified depending on the size of the stove and the airflow required.
Form the Inner Combustion Chamber
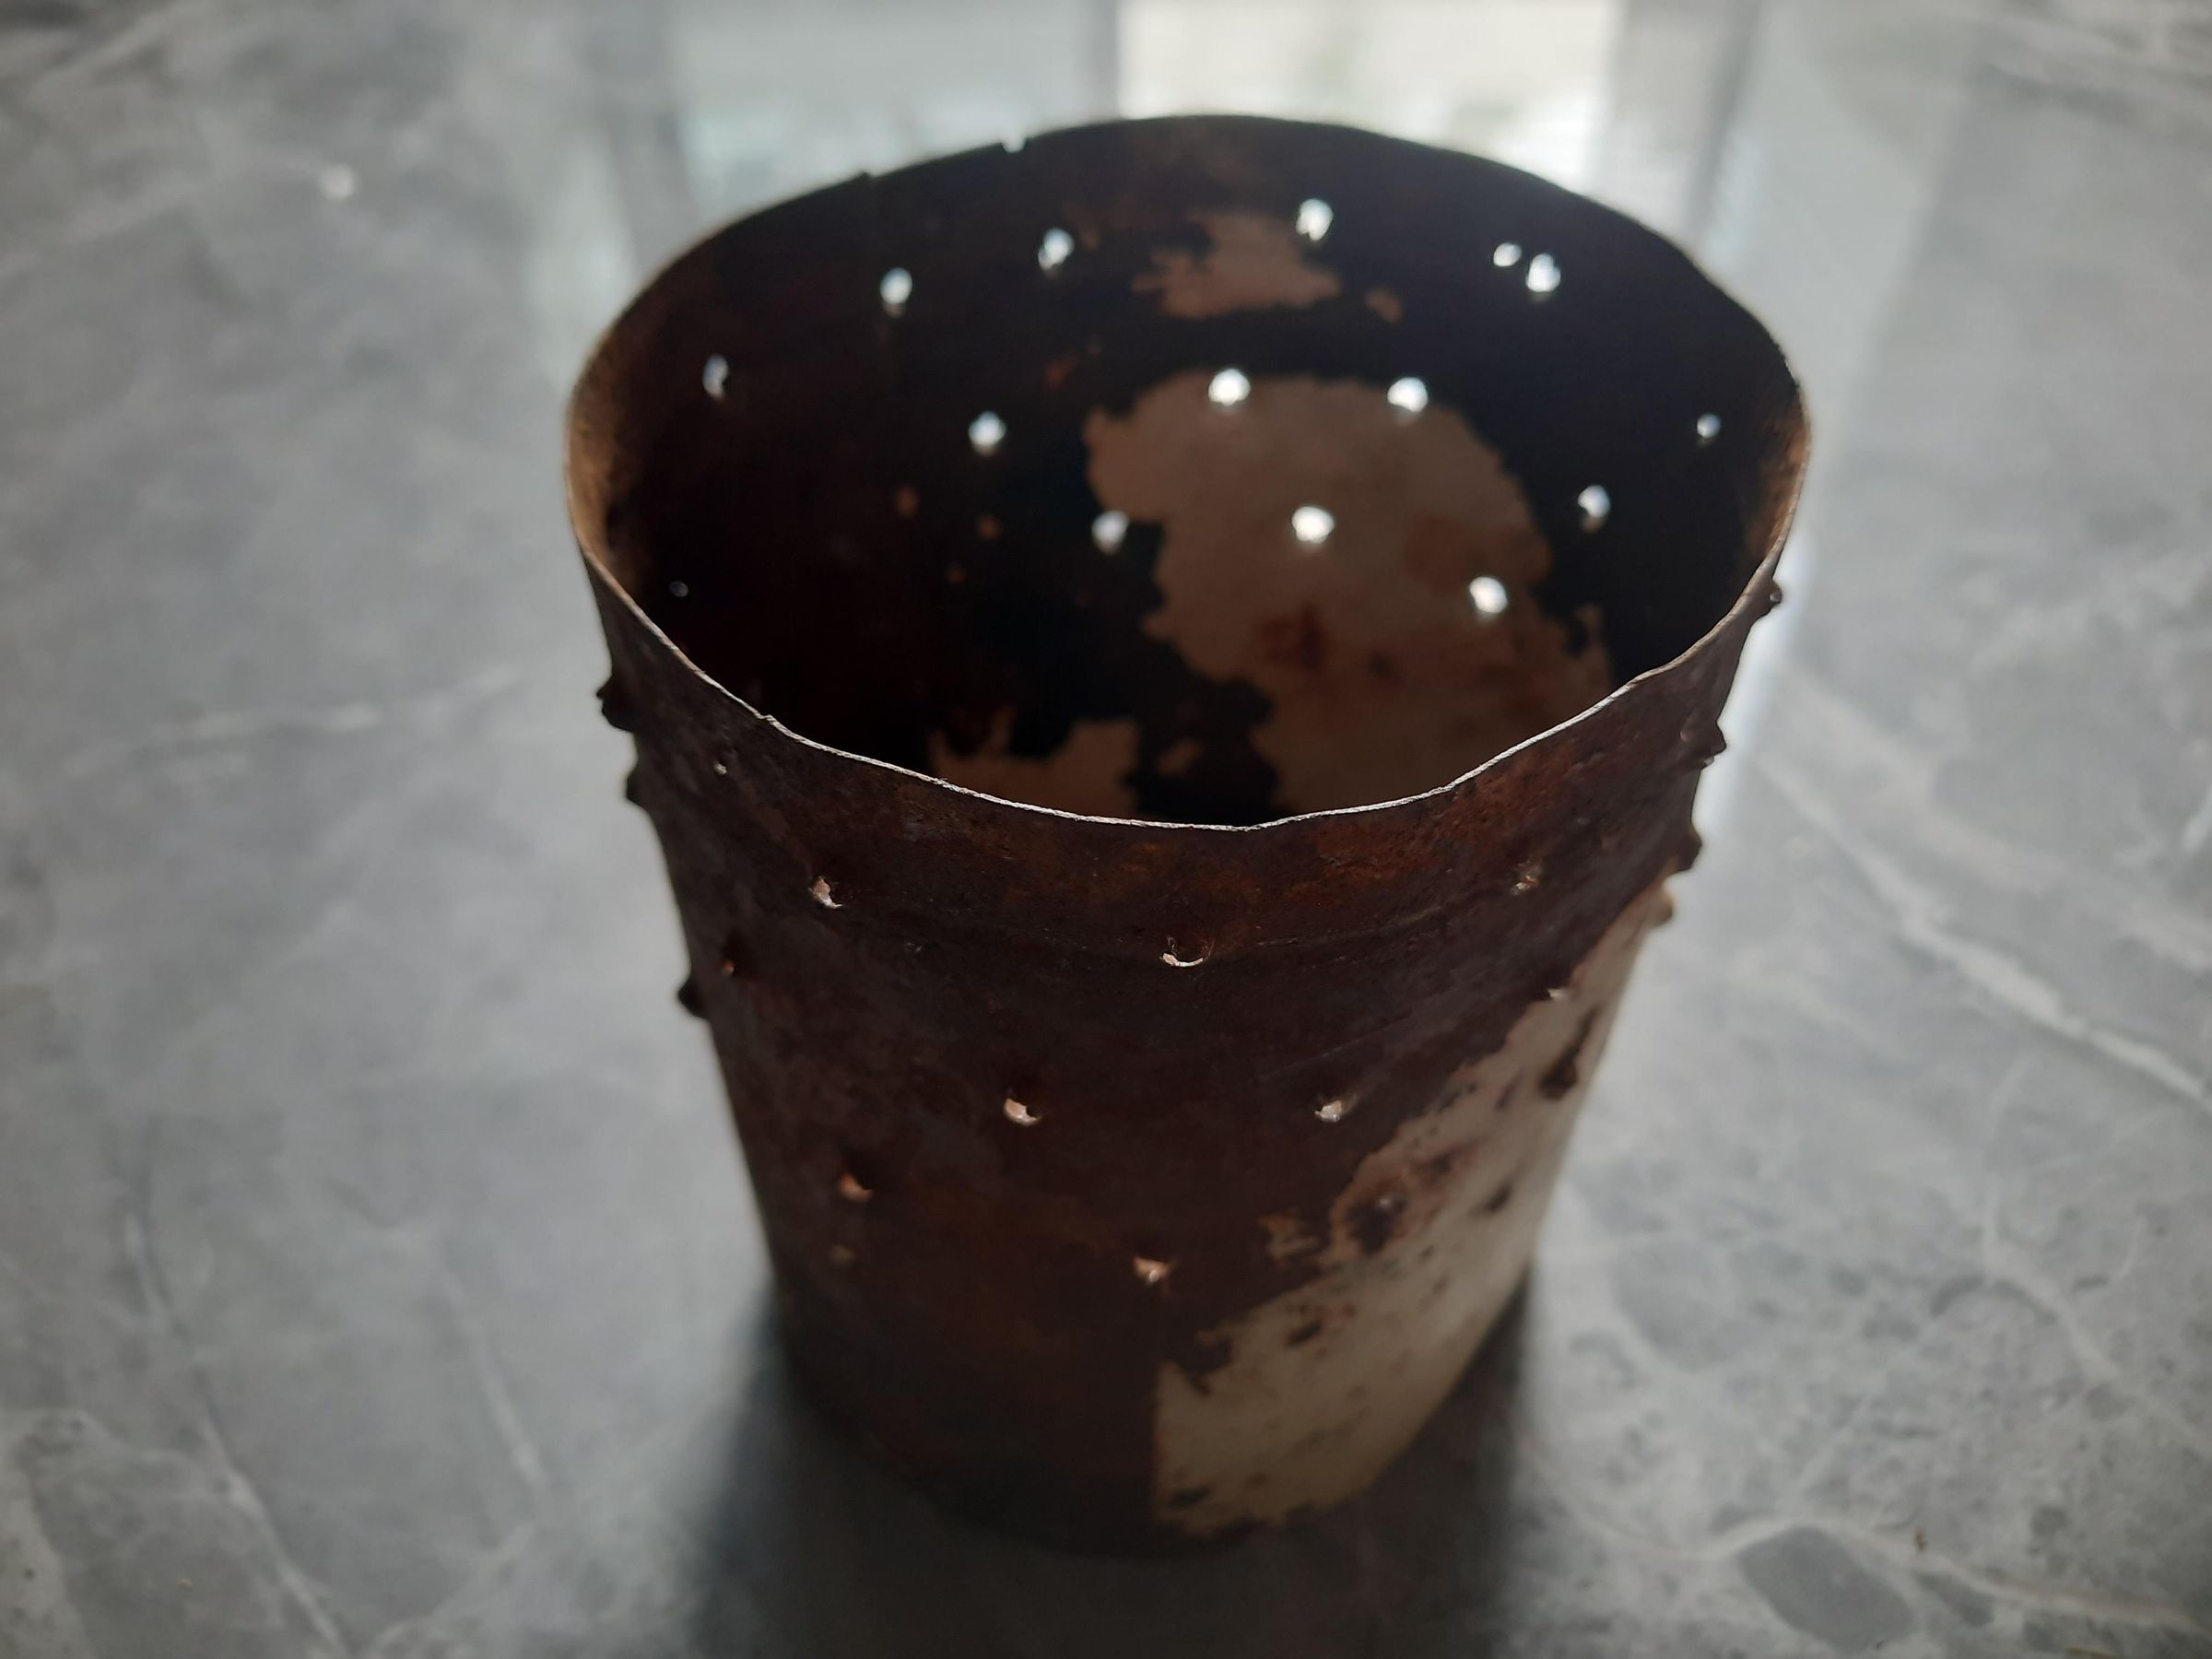
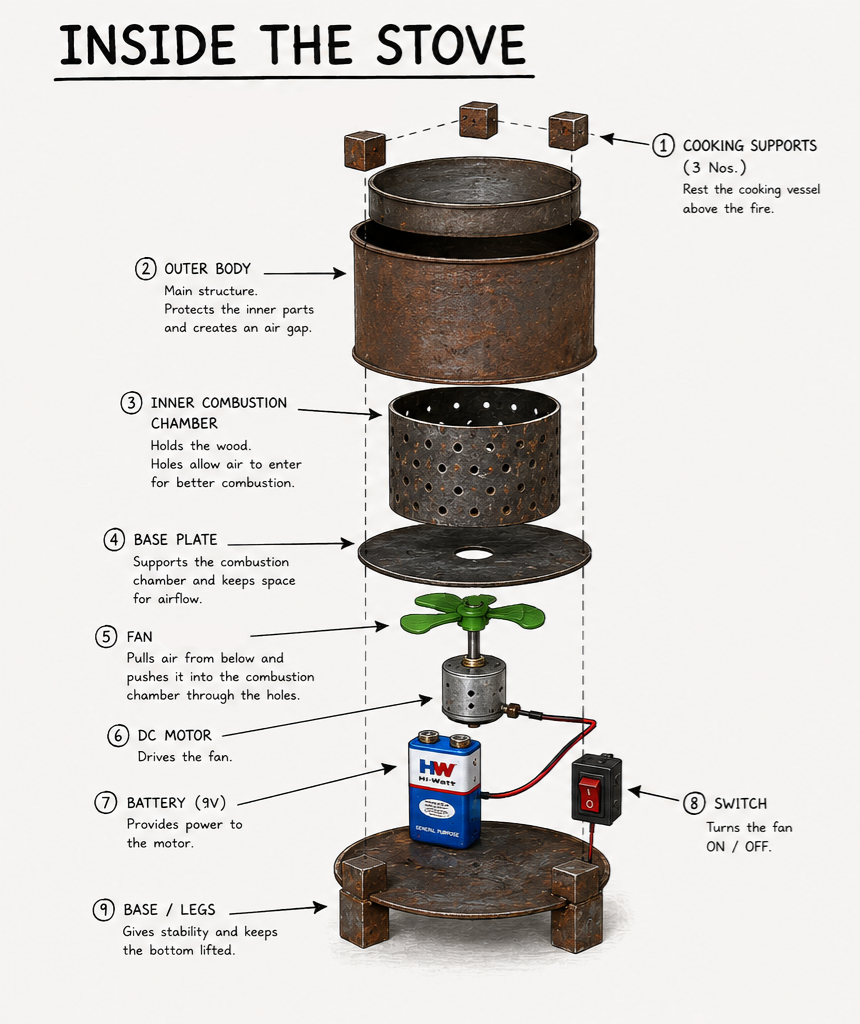
The perforated metal sheet was then shaped into a cylindrical form. This creates the inner chamber where the wood is burned. The holes around the chamber allow air to enter the combustion area.
I kept this chamber separate from the outer body rather than putting the fire directly against the outer wall. This also creates space between the combustion area and the external body.
Prepare the Outer Body
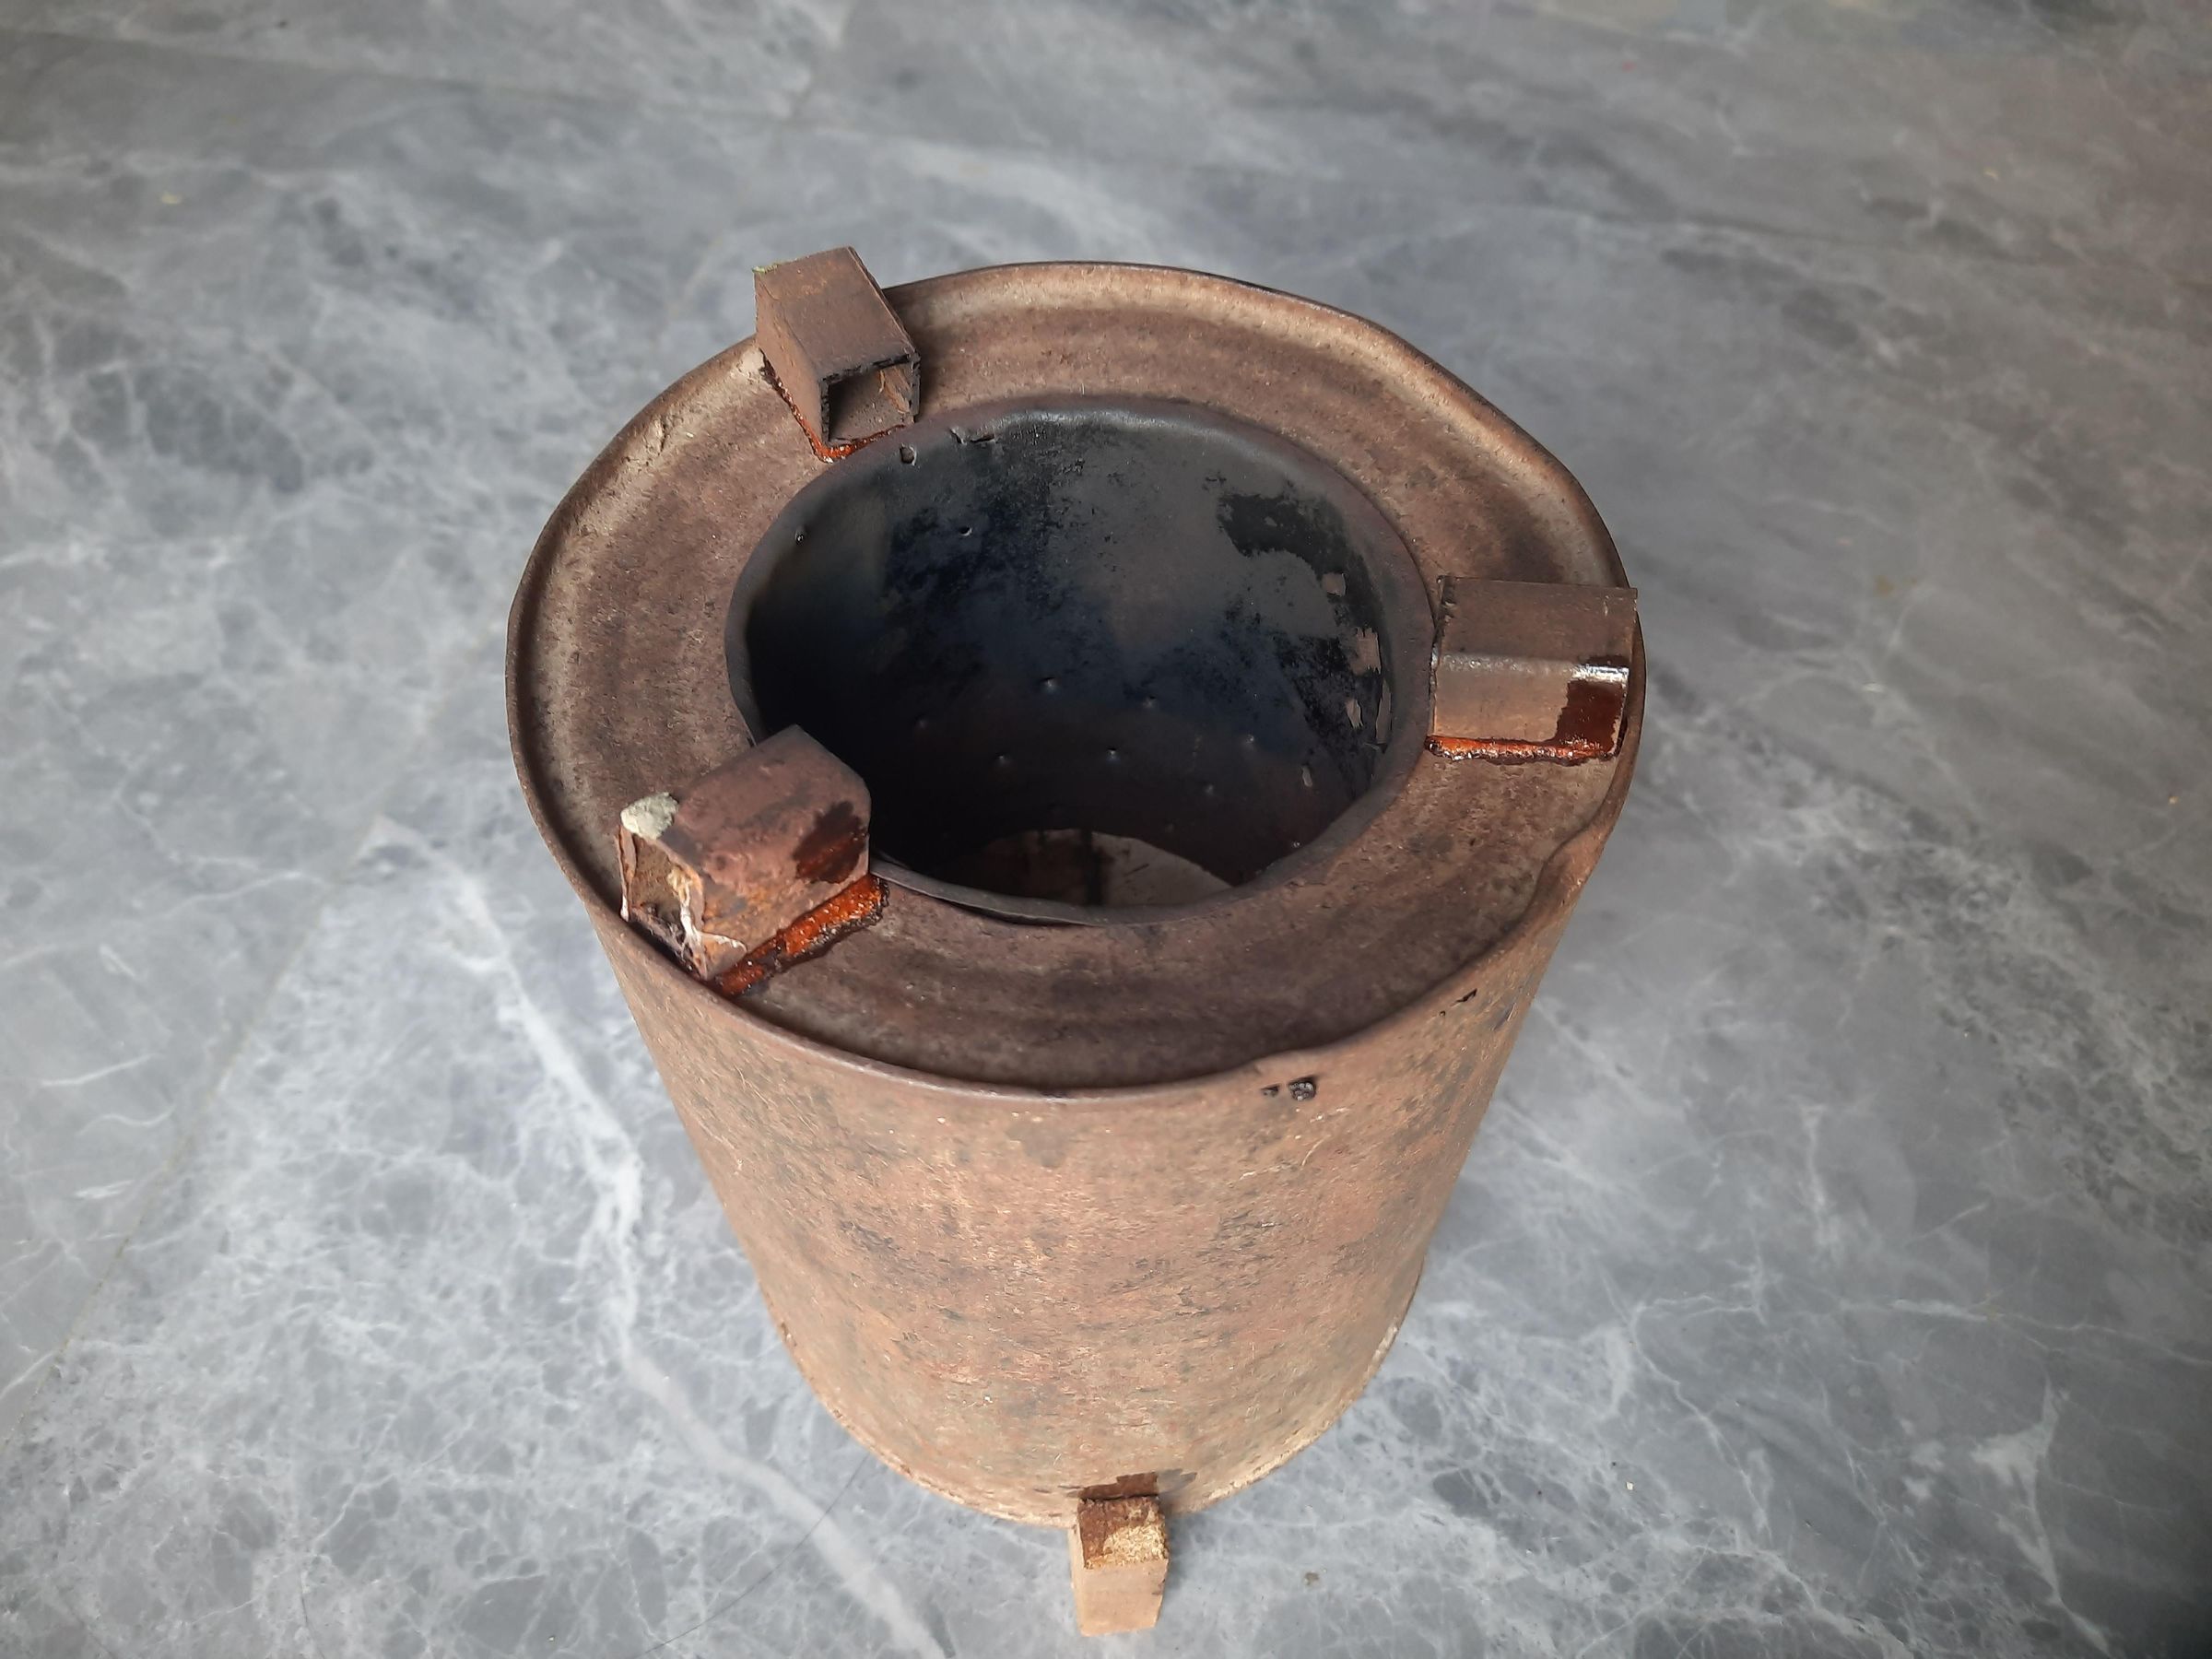
For the outer body, I used a larger cylindrical metal container. The container provides the main structure of the stove. The inner combustion chamber sits inside this outer body.
The basic arrangement is therefore:
Outer body
↓
Air space
↓
Inner perforated combustion chamber
↓
Wood/fire
This separation is an important part of the prototype because it keeps the combustion area distinct from the electrical compartment underneath.
Prepare the Top Support
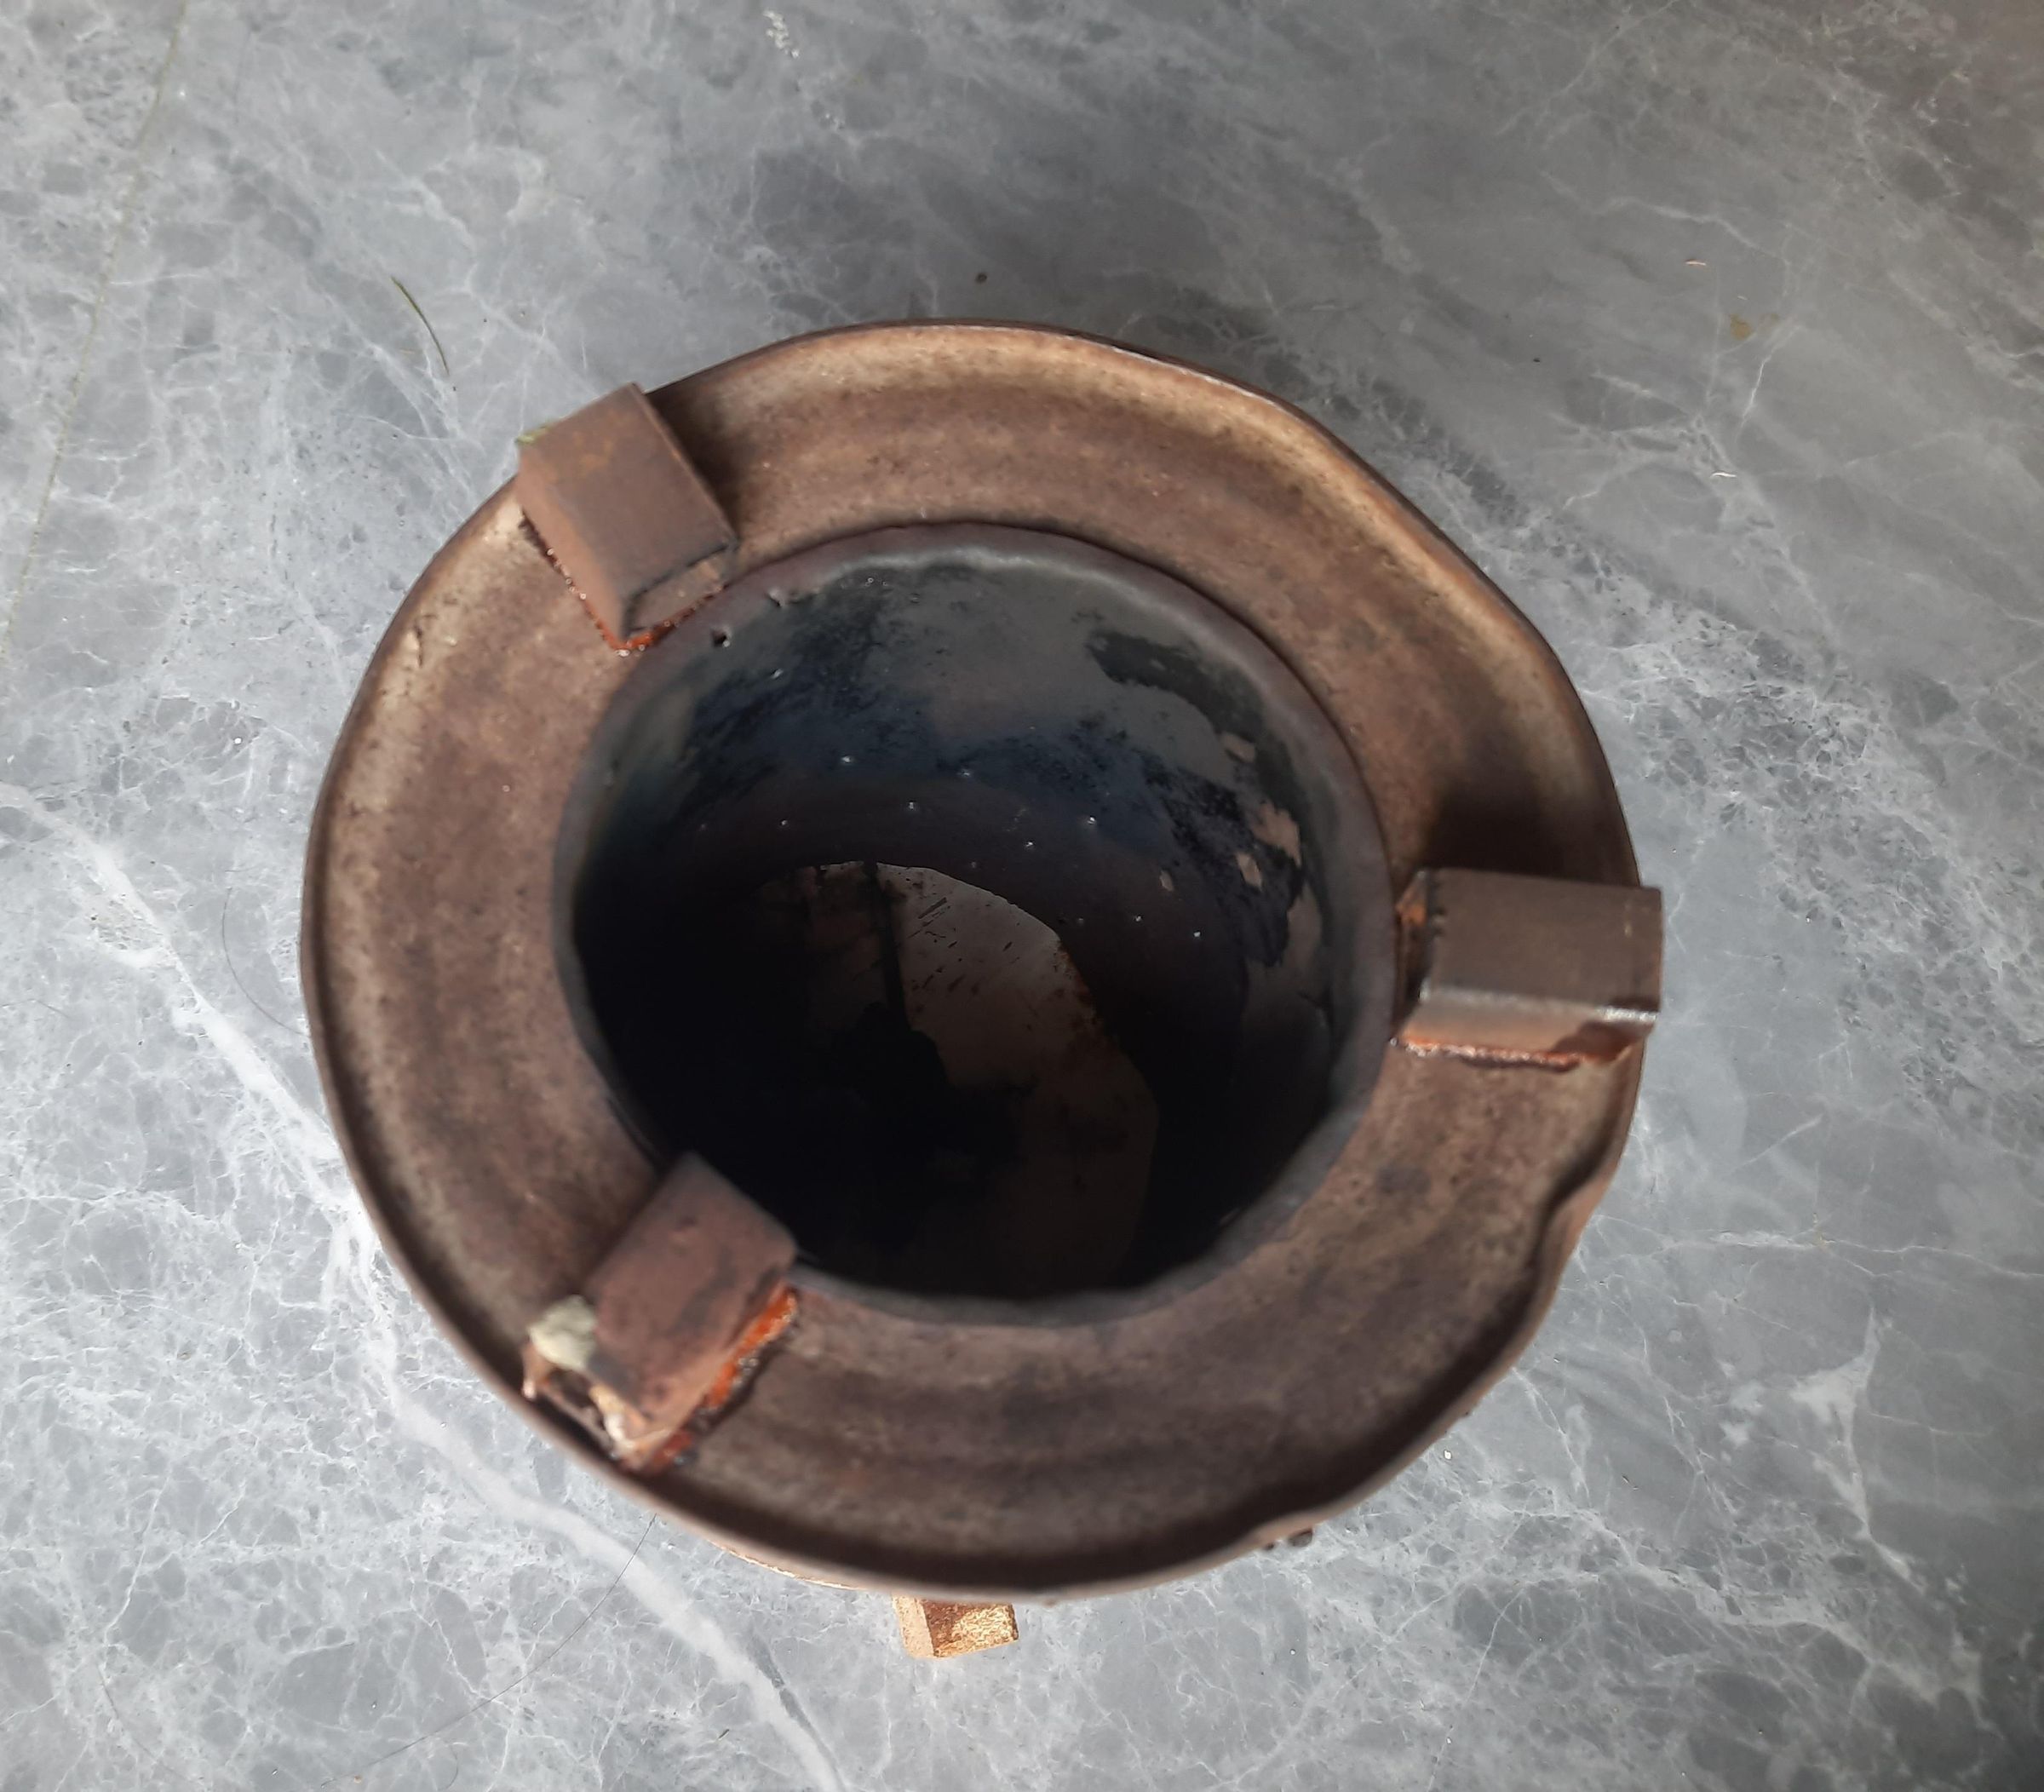
The stove needs to support a cooking vessel above the combustion chamber.
For this, I made three small metal supports from scrap metal. The supports were positioned around the top opening. They create a stable platform while leaving space for heat and combustion gases to move upward.
The exact support arrangement can be changed depending on the size and shape of the cooking vessel you intend to use.
Make the Airflow System
Now came the part that makes this different from a simple wood-burning container.
I used:
- A small DC motor
- A small fan blade
- Wires
- A battery
- An ON/OFF switch
The fan is positioned below the combustion chamber. When the motor rotates, the fan moves air toward the combustion area. This gives the fire an additional supply of air. The fan therefore acts as a small forced-air system for the stove.
Assemble the Fan and Motor
I attached the small fan blade to the DC motor. The motor was positioned underneath the stove so that it was not directly exposed to the fire. This is particularly important because the motor, battery and wiring are not intended to withstand the temperatures of the combustion chamber.
The objective is to keep the hot zone and electrical zone physically separated.
Install the Battery
The battery is placed in the lower section of the prototype.
In my model, I used a small 9 V battery. The battery is connected to the motor through the switch.
The basic circuit is:
Battery → Switch → Motor
When the switch is turned ON, the motor starts rotating the fan.
Important: The battery must remain sufficiently far from the combustion chamber and protected from direct heat. A larger practical version should have a deliberately designed, heat-isolated electronics compartment rather than simply placing the battery inside the body.
Connect the Switch
I added a small ON/OFF switch to control the fan. This makes the airflow easy to start and stop without disconnecting the battery. The switch was positioned on the outside of the stove so that it could be operated without opening the combustion chamber.
Assemble the Electrical Components
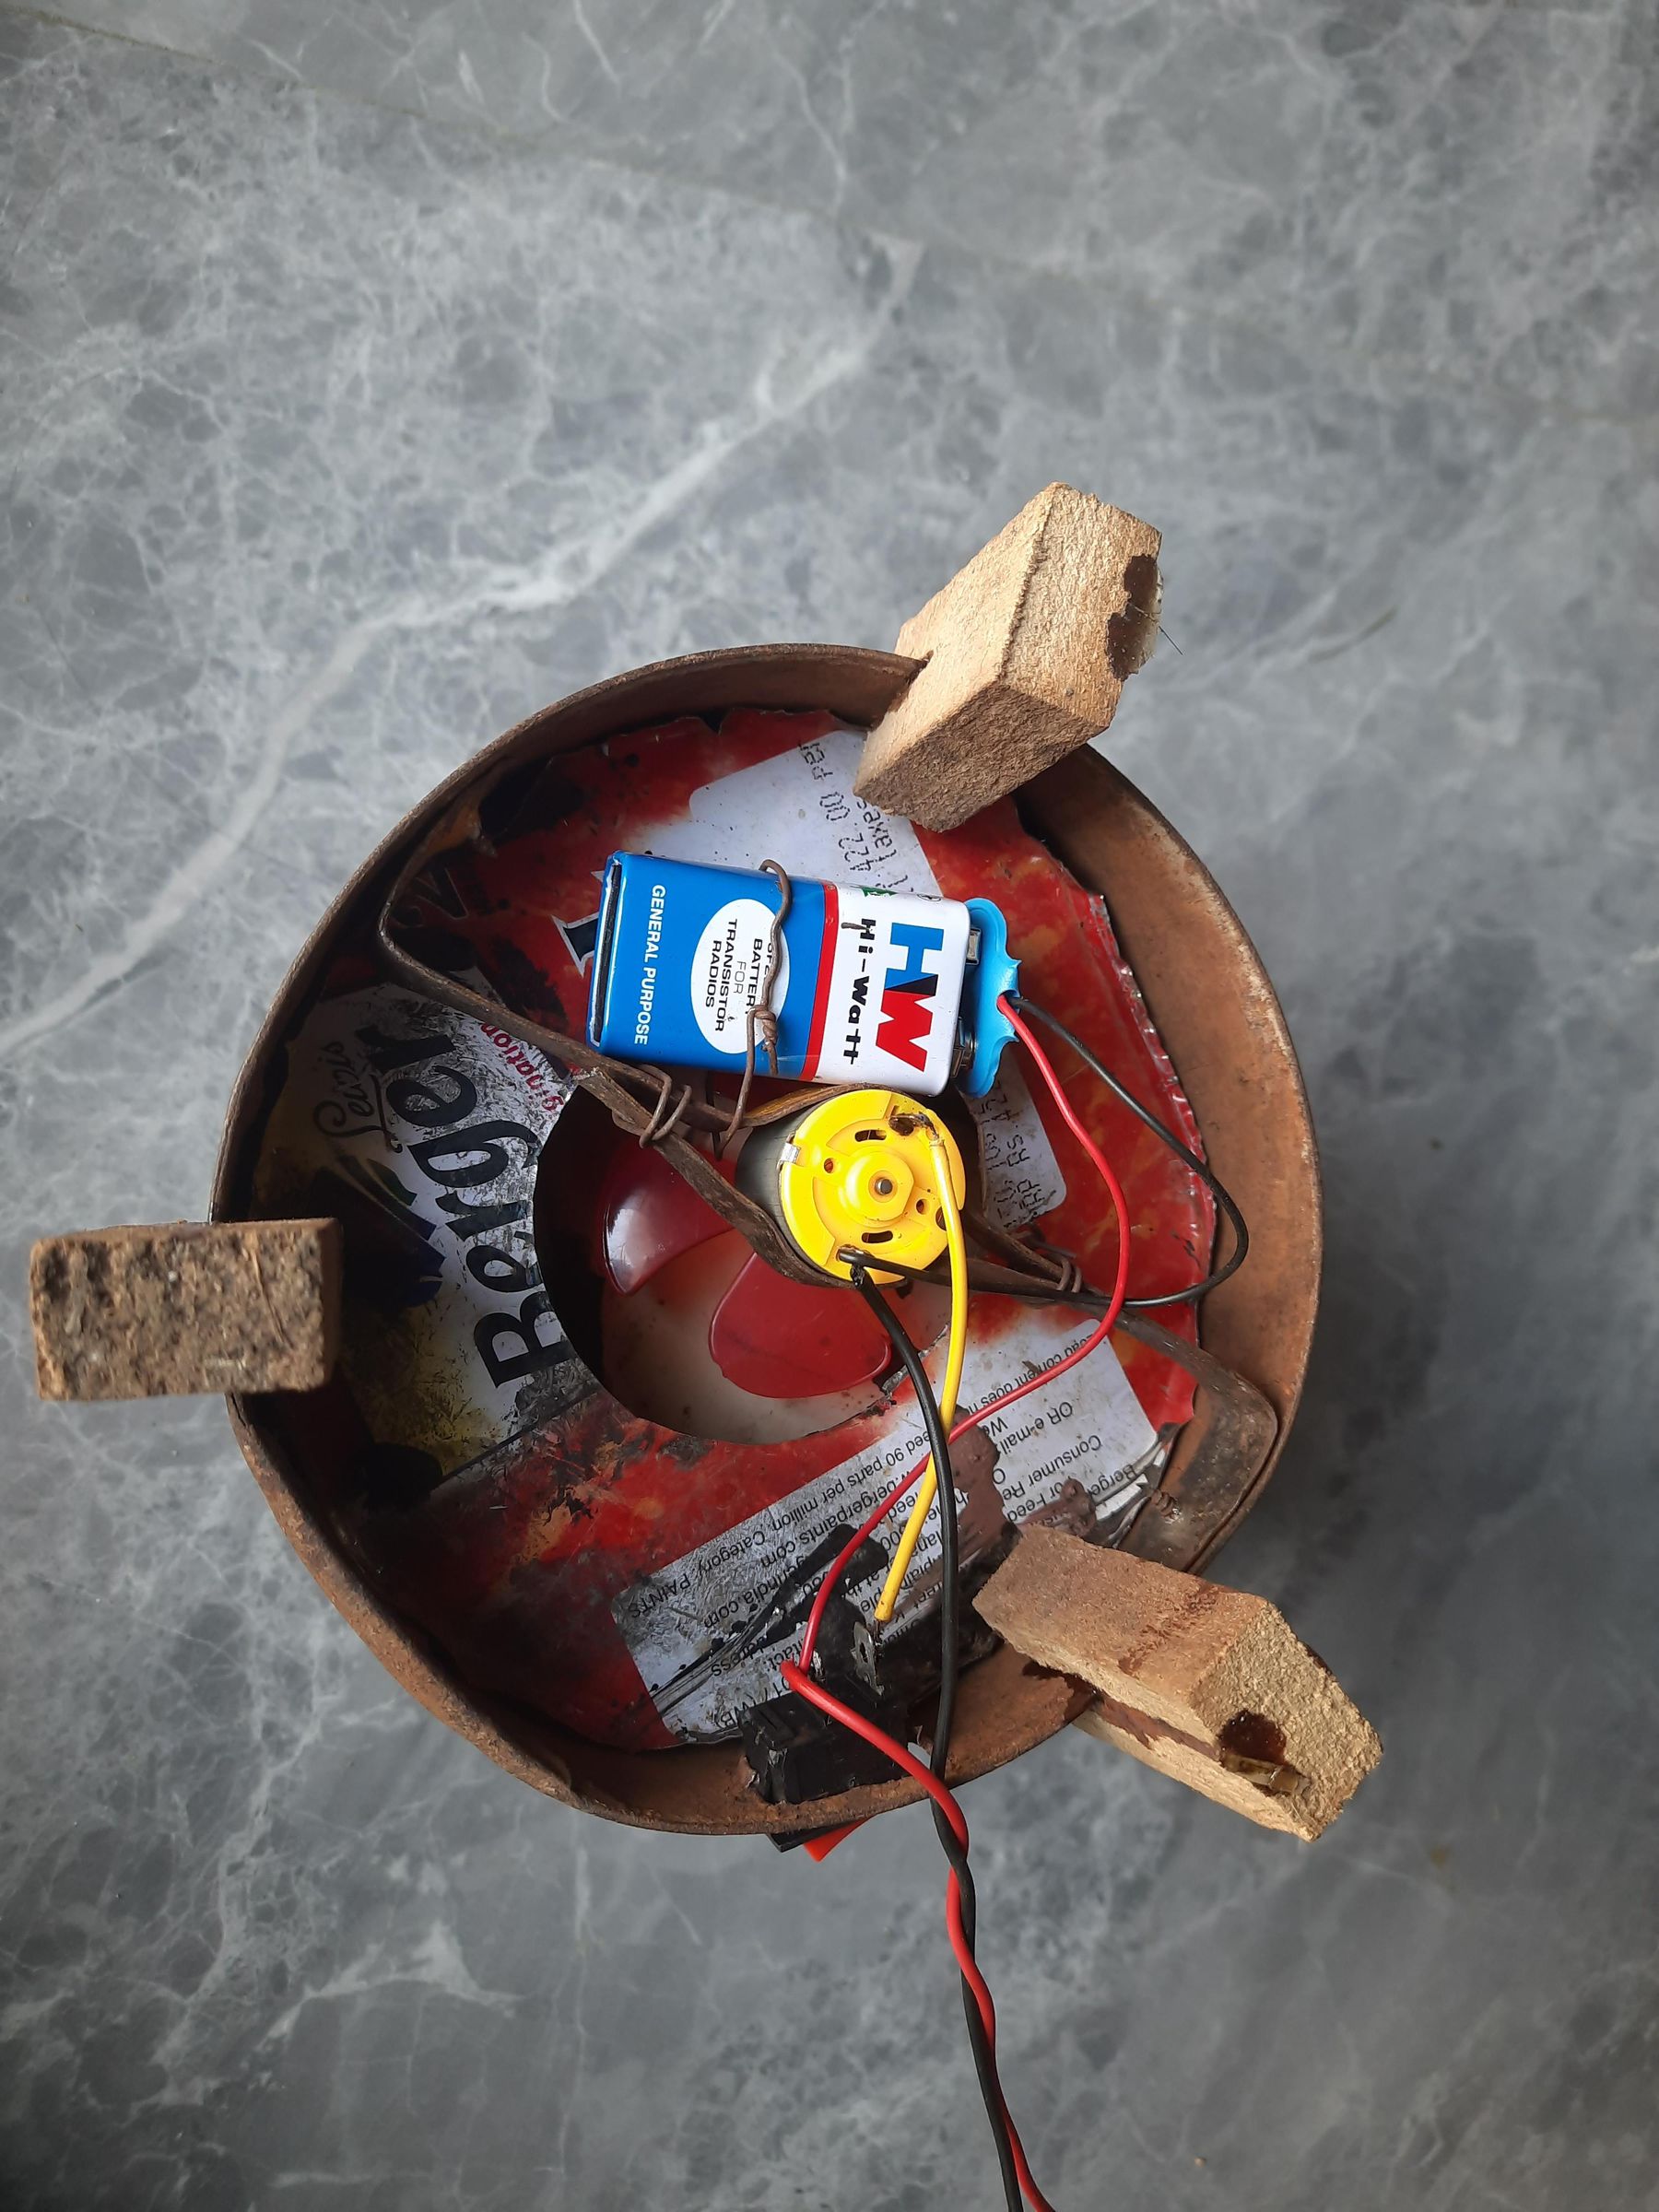
Once the motor, fan, battery and switch were ready, I connected them together.
The components were arranged in the lower portion of the prototype. The arrangement looks somewhat rough because this is a working prototype, not a finished commercial product.
For a larger version, I would place the electrical components inside a dedicated protected compartment with proper insulation and ventilation.
Connect the Solar Panel
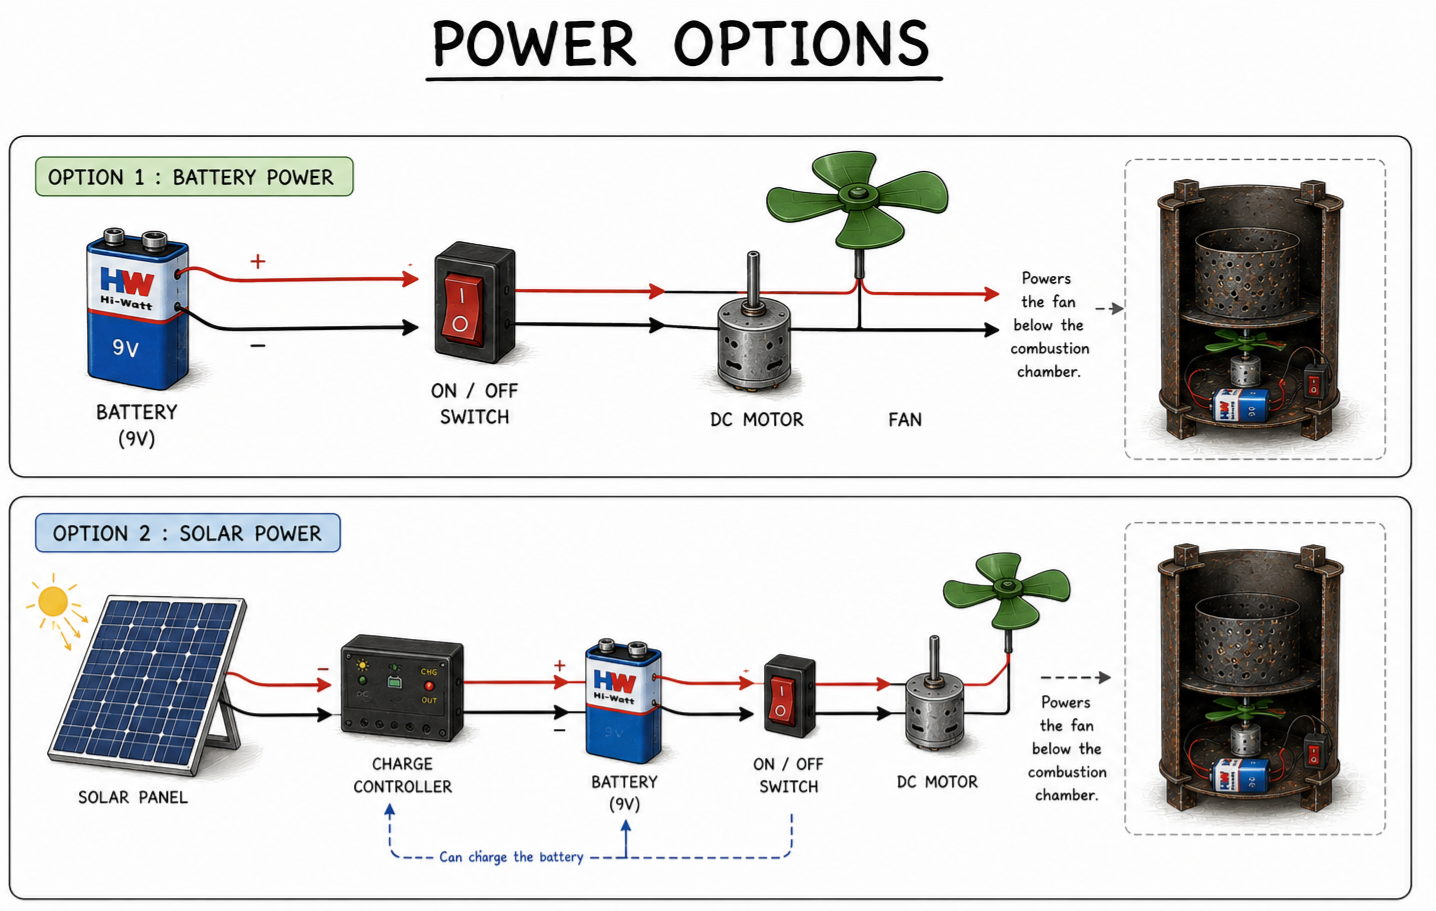
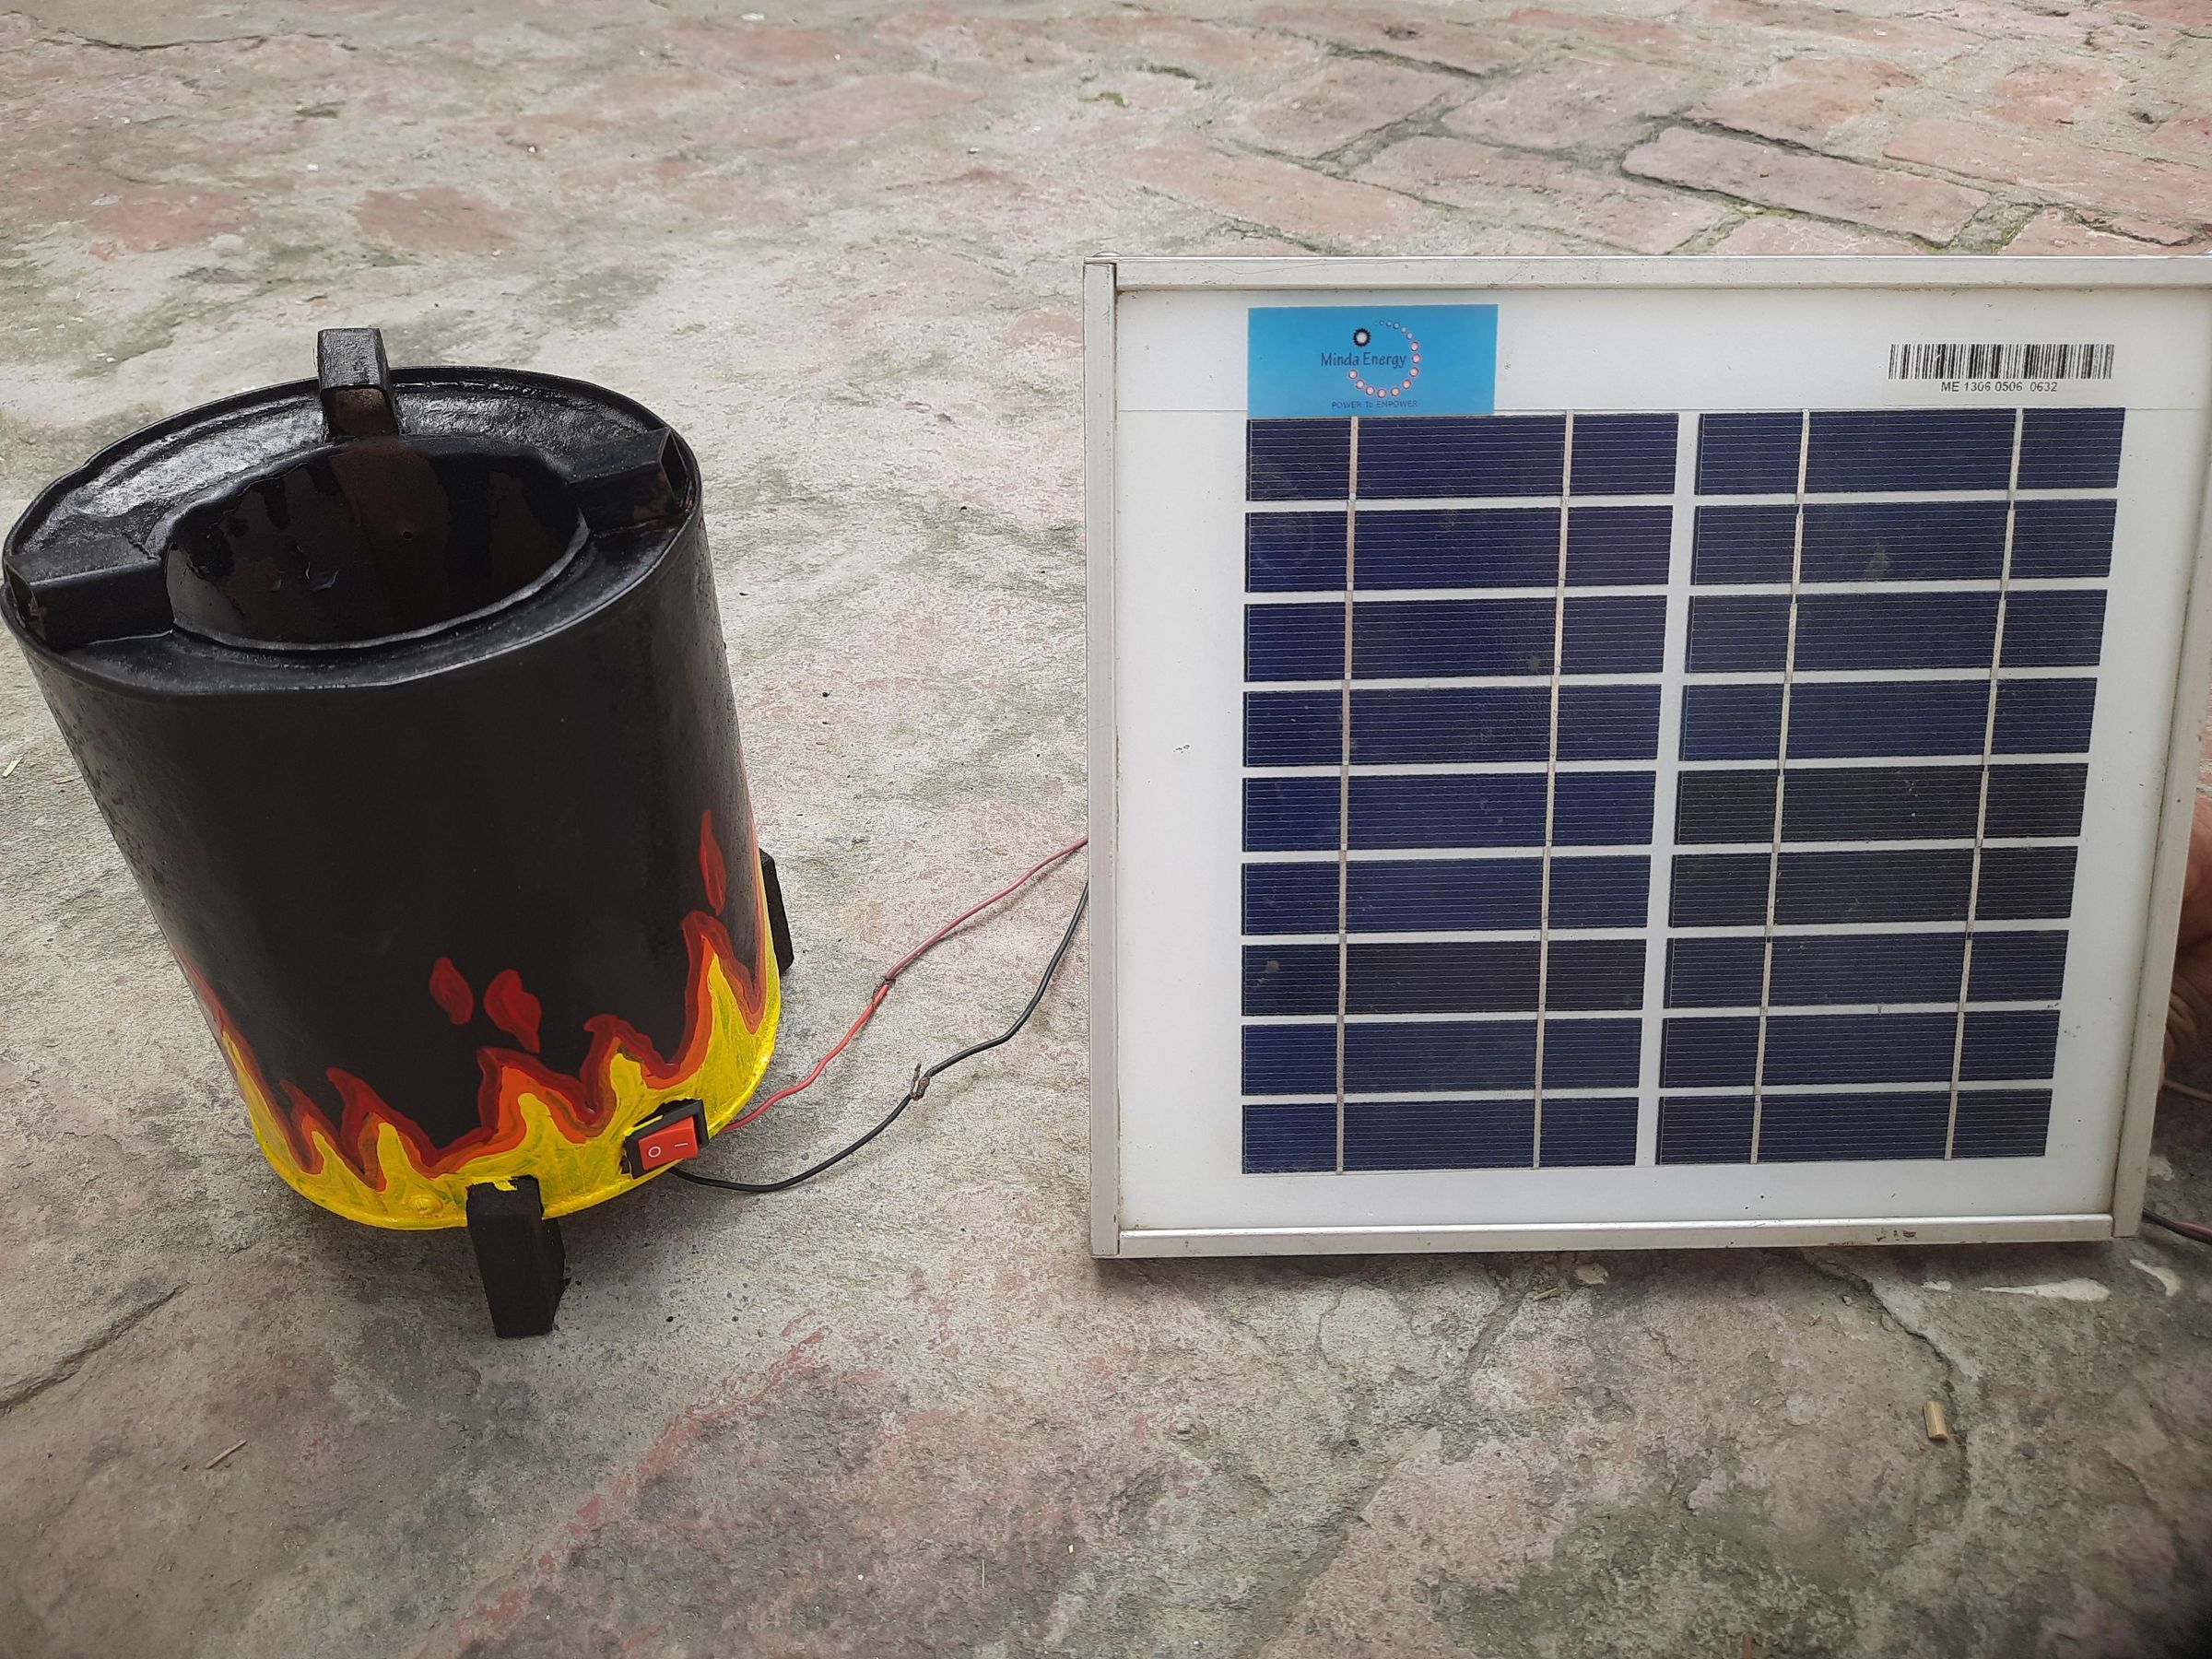
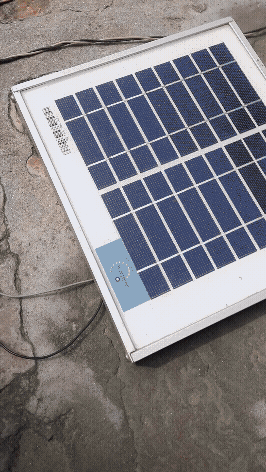
The second way to operate the fan is through solar power. I connected the stove's fan system to a small solar panel. This gives the project its off-grid capability.
Instead of depending entirely on mains electricity, the fan can be powered using energy available from the sun.
The concept is:
☀️ Solar panel → ⚡ electrical power → 💨 fan → 🔥 combustion
For a practical larger version, the solar system would need to be appropriately matched to the motor and would ideally include suitable charge/control electronics and a rechargeable battery.
Assemble the Stove
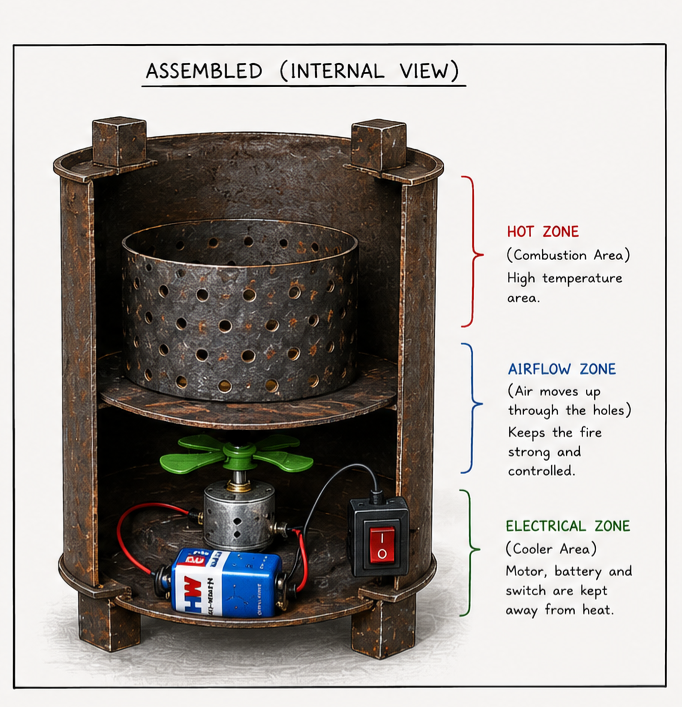
Now all the major components can be brought together.
The final arrangement consists of:
Outer metal body
→ Inner perforated combustion chamber
→ Fan underneath
→ Battery/electrical system below and away from the heat
→ Cooking supports on top
The wood goes into the inner combustion chamber. The fan supplies air from underneath. The cooking vessel sits on the supports above the combustion area.
Add the Fuel
For the prototype, I use small pieces of dry wood as fuel. The small size of the prototype means that only a small amount of fuel is required for demonstrating the principle.
In a larger version, the combustion chamber could be enlarged to accommodate more fuel and provide a larger cooking surface.
Test the Fan
Before introducing fire, I would first test the airflow system separately.
Turn the switch ON and verify that:
- The motor rotates freely.
- The fan is securely attached.
- The wiring remains clear of moving parts.
- The fan is not rubbing against the stove.
The battery and electrical connections remain away from the hot zone. Once the airflow system is working properly, the stove can be tested outdoors with a small amount of fuel.
Test the Stove
For the first test, I would use only a small amount of dry wood. The fan can then be switched on to provide airflow.
The objective of this prototype test is simply to demonstrate that the integrated system works:
Wood provides the heat.
The fan provides forced airflow.
The battery or solar panel powers the fan.
The top supports can hold a cooking vessel.
The Finished Prototype
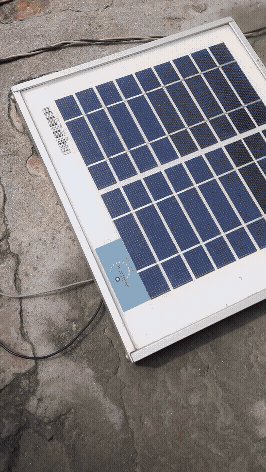
And this is the final working concept.
The small model demonstrates how a conventional wood-burning fire can be combined with a very small electrical airflow system. I deliberately kept the prototype compact because I wanted to test the fundamental concept first.
Why Make It Off-Grid?
The interesting part of this project isn't simply the fact that it burns wood.
The fan is powered independently of the electrical grid.
That makes the concept potentially useful in situations such as:
- 🏕️ Camping
- 🏠 Power outages
- 🌲 Remote locations
- 🚜 Rural/off-grid environments
- 🔥 Emergency cooking situations
- ☀️ Locations with access to sunlight but limited electricity
The solar panel provides one possible source of power, while the battery provides another.
Scaling the Design
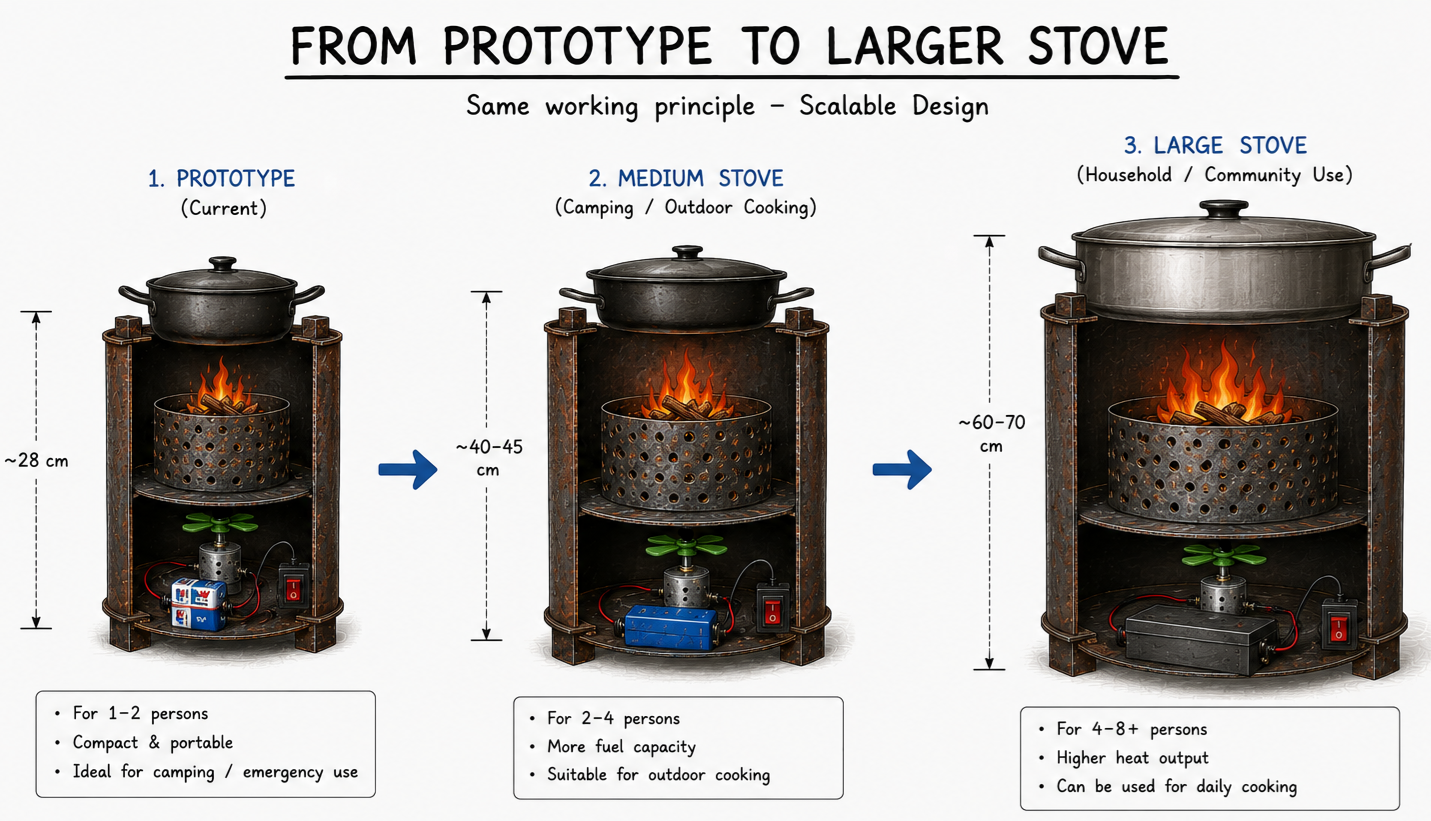
One of the main reasons I built a small prototype first was to make experimentation easier.
The principle does not depend on this particular size.
- A larger version could have:
- A larger combustion chamber
- A larger cooking surface
- A stronger airflow system
- A larger rechargeable battery
- A suitably sized solar panel
- A dedicated heat shield/electronics compartment
- A more robust fuel-loading system
- Improved stability and portability
The dimensions would depend on the amount of heat and cooking capacity required.
So I see this prototype less as the final stove and more as a proof of concept for a scalable off-grid cooking system.
What I Learned
Building this prototype made one thing particularly clear to me:
An off-grid system doesn't necessarily have to eliminate electricity completely. Instead, electricity can be used very selectively for the part that benefits from it — in this case, controlling airflow — while the primary cooking energy comes from biomass. The prototype also allowed me to experiment with the physical separation between the high-temperature combustion zone and the low-voltage electrical system.
Future Improvements
If I build a larger and more refined version, I would improve several things:
- Better heat isolation between the combustion chamber and electronics.
- A proper rechargeable battery rather than the small prototype battery.
- Solar charging circuitry for the battery.
- A stronger and better-protected fan system.
- A more durable cooking platform.
- A cleaner fuel-loading mechanism.
- More controlled airflow.
- A more finished exterior design.
- Testing of fuel consumption and cooking performance.
- A larger version designed specifically for camping or household emergency use.
⚠️ Safety
This prototype involves open fire, hot metal, combustion gases and electrical components, so it should be treated as an experimental outdoor prototype.
- Operate it outdoors or in a properly designed, well-ventilated area, never inside a tent or enclosed room.
- Keep combustible materials away from the stove.
- Never leave a burning stove unattended.
- Allow the metal to cool completely before handling.
- Keep the battery, motor, wiring and solar/electrical connections away from direct heat.
- Do not use damaged batteries or damaged wiring.
- Make sure the stove is stable before placing a cooking vessel on it.
- A larger version should be redesigned with appropriate heat shielding, structural support and combustion/exhaust considerations rather than simply enlarging this prototype.
Conclusion
This project started with a simple question:
Can we make a useful cooking system when the electrical grid isn't available?
My small prototype combines three simple things:
🌲 Biomass for heat
💨 A small fan for controlled airflow
☀️ Solar/battery power for the fan
The result is a compact off-grid, fan-assisted wood-burning stove concept.
It is only a small model at this stage, but that's intentional. It demonstrates the core mechanism and provides a starting point for developing a larger, more practical version.
This isn't meant to be the final stove. It's the first working version of the idea.