Aluminium Butterfly Fidget

I decided to create an unsharpened butterfly knife to replace the one that I had lost. This project was a fun way to take something I enjoy and use it to help me learn CAD and operate CNC machines, both things that didn't appeal to me or seemed far off.
Supplies
6¨ by 1¨ .25¨ alluminum stock
hardware can vary
.125¨ sheet of wood or plastic
The CAD Model
For me, at the time a severely inexperienced Fusion user, the CAD model of the handles was the most challenging and time consuming aspect of the project. I spent probably around 5 hours at home and at school tackling basic problems and functions. For a more experienced Fusion user the process would probably be quite simple. I took the easy approach of inserting an image of some handles that I liked, tracing it, then extruding. Once I had my base down I sized it up to scale, for which I referenced the dimensions of my friends knife. I then cut out quadrilateral-like pieces out of the stock using the extrusion tool to eventually reduce the weight of the finished project, Making sure to leave room for the connection hardware. I finished things up by chamfering all of the edges to my liking.
Acquiring Hardware
.jpg)
The hardware (or method of handle connection) Is probably the most jankey or rough part of the project. I wasn't that happy with the route I took to do it but it still got the job done. I used a series of screws and spacers to connect and function my knife. The screws would drill through one handle and thread into the other lined up beneath it on both ends of the handles. On the higher skinnier side of the handles spacers will keep the handles a distance apart eventually making space for the blade and allowing the handles to rotate. I picked up all of my hardware at Miners and bacicly just looked for the smallest pieces I could find.
- Make sure that your screws can fit through your spacers
- I would suggest stainless steel hardware but it is expensive
Assembly of Prototype
.jpg)
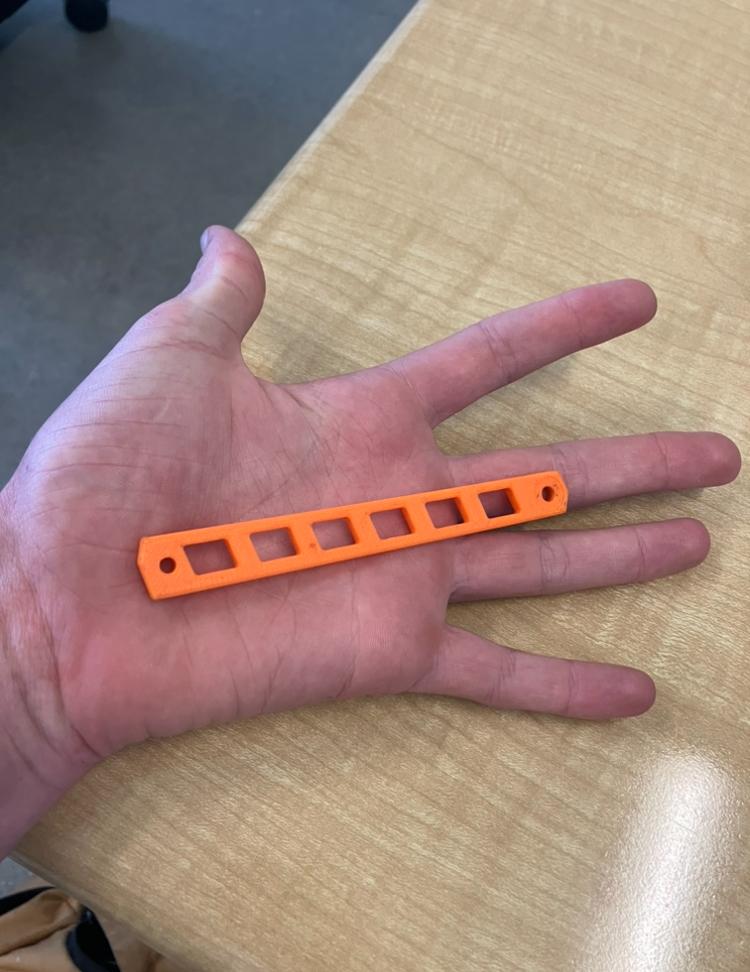
To prototype my design I wanted to 3d print the handles and test the function of my hardware. To do this I would need to add holes to my CAD model to fit the screws. I looked up my screws and found a bore hole size then extruded it from my model. Since the whole project requires four handles, once my two base models were finished I copied both of them one more time. Before you print make sure that the scale of the model is correct using the measure tool in Fusion or other tolls in the printing software. I messed up on this multiple times before I got the correct size. Keep in mind that they may look smaller than they should be even though they are correctly scaled, for mine looked that way but yours could be different. To fully assemble the prototype I bought nuts to fasten the top screws on as I could not thread them yet. The prototype should fully function and you could just stop the project there if you wanted to.
- When selecting a bore hole size use the tight fit option if any as it will perfectly fit the screw, you may not even need to use a nut.
- I WOULD STRICTLY ADVISE that you would not add points to your design on the rotating mechanism side of your handles so that they will be much easier to rotate close together without getting stuck.
CAM and CNC
Get syked your about to do some gnarly Cam. I don't have many tips for this step you kinda just do the CAM using contours, drilling and whatnot. Making the handles out of aluminium on the CNC is going to be hard for a first timer like I was but It gets easier as you go.
- Make sure that your CAM functions are in order, for example boring before outlining the whole piece with a 2d contour.
The ¨Blade¨
I created a sketch roughly the size of the blade in the image I first overlayed to sketch the handles, printed it out, then glued it to a sheet of recycled plastic. Drilling the hole for the spacers to fit into is the hardest part, you can use a hole punch to guide the drill bit of which is a bit smaller in diameter to the spacer. Then I cut the rest out on a band saw and filed the spacer holes down until the spacers fit snug as a bug. I finished by rounding the edges of the blade to make it look nice.