An Almost Reliable, High Precision, 3D Printer: Son of MegaMax (SoM)
by Mark Rehorst in Workshop > 3D Printing
150317 Views, 1147 Favorites, 0 Comments
An Almost Reliable, High Precision, 3D Printer: Son of MegaMax (SoM)


If you're looking for a how-to article on building a 3D printer for $300, you can find all sorts of them with a quick web search. This Instructable is definitely NOT for you.
If you're looking for a how-to on building a machine that prints at 1000 mm/sec, this Instructable is NOT for you. SoM, like MegaMax before him, was built with an emphasis on print quality, not speed. I haven't tested maximum print speed, but SoM was designed to print at about 50 mm/sec and does so beautifully.
If you need a complete bill of materials with prices and suppliers listed, and illustrated, step by step assembly instructions, this Instructable is NOT for you. There will be plenty of pictures showing how I built my machine, and I’ll describe some things in detail, but you’ll have to get a lot of info from the photos, by reading the references I’ll link, and by asking questions.
This Instructable IS for people who don't want “cheap” to be the only positive (?) thing they can say about their printer. It's about how to build a printer the right way. It definitely isn't the ONLY right way, and it definitely isn't the cheapest way. SoM cost me about $1100 to build, and included a lot of used and free parts.
Here’s how things usually go when I want to make a print: I put the gcode file on an SD card, plug it into the machine, wipe the bed with acetone, and print. There’s no bed leveling, zeroing, no tweaking settings or other baby-sitting during the print. I come back when it’s done and remove the finished print from the bed. I can do that over and over, and I can put the machine in my car, laying on its side, drive it across town, take it out, stand it up, and do it all again without making any adjustments.
If that sort of reliability sounds like what you want, and you're willing to pay a little more and expend some effort to get it, this Instructable IS for you. Almost reliable? Of course, there are still plenty of things that can and do go wrong, so I still have occasional print failures. That's why I call it an "almost reliable" printer.
I built my first 3D printer, MegaMax, using surplus machine parts over a period of about 2 years. I built it myself because when I started the project, the biggest build envelope you could get in a reasonably priced machine was about 5" x 5" x 5" or so and I wanted to make bigger prints- full sized human skulls using data extracted from CT scans, for example. I decided to build for a 12" x 12" x 12" print envelope. MegaMax produced high quality prints, but as I worked on him and solved many problems problems over a couple years I got some ideas for improvements and decided it was time for a rebuild using everything I had learned.
This Instructable is about the rebuild, and though you probably won't be able to duplicate my machine exactly, I hope it will provide some ideas you can use in your machine. I wanted the new machine to be self-contained, smaller, and the electronics isolated from the warm print chamber. I also wanted the print quality and reliability pushed to maximum. SoM is the result. I already had a large investment in time, effort, money, and materials in MegaMax, so SoM was built in the same configuration (bed moving in the Y-axis, X-axis lifted by Z-axis screws), reusing many of the parts. If I were building a machine with the same print envelope from scratch today, I would probably use a coreXY design so that the relatively heavy print bed moves only in the Z axis.
SoM is a cartesian printer with the print bed moving in the Y axis, but most of the ideas presented will apply to other architectures.
SoM basic specs:
- Size: 30" high x 22" wide x 39" long
- Weight: about 60 kg, I think.
- Build Envelope: 305 x 317 x 270 mm
- X axis: belt drive, fully supported linear guide, 100 oz-in stepper with DSP driver and 32V power supply
- Y axis: ball screw drive, fully supported linear guides, 425 oz-in stepper with DSP driver and 32V power supply
- Z axis: dual 1/2" lead acme screws with 5/8" fully supported round guide rails, belt driven by a 150 oz-in stepper
- Extruder: BullDog XL
- Hot-end: E3D v6
- Print bed: 1/4" x 12" x 12.5" cast aluminum tooling plate covered with 5mil kapton tape, 450W heater
- Controller: SmoothieBoard with graphic LCD interface
- Typical print settings: Acceleration 1000 mm/sec^2, junction deviation 0.03, speed 50 mm/sec, layer thickness 200 um
Overall Design Philosophy


A lot of people have 3D printers that came as kits or were fully assembled and cost $300-1000. If you look at the user groups and internet forums you see the same problems reported over and over.
What causes prints to fail to finish?
- poor adhesion to the print bed
- extruder jamming
- host computer/connection failures
- running out of filament
- printer malfunctions
- filament tangling on the spool
What causes print quality problems?
- poor machine construction
- poor calibration
- inaccurate alignment of axes
- printing too fast
- poor use of slicing parameters
- poor temperature regulation
- printer electronic or mechanical problems
-
poor filament quality
A lot of these problems are related to each other. Most of these problems are a direct result of the primary design principle: how cheaply can a 3D printer be made?
If your printer's bed moves noticeably when removing a print, and/or requires re-leveling with almost every print, or comes with auto leveling (aka auto-tramming), or uses two or more motors to drive Z-axis screws, uses hardware store threaded rods in place of lead screws, or has any moving parts cantilevered more than a few cm, the machine is not built for precision, accuracy, and reliability.
That doesn’t mean you won’t be able to get good prints from it- obviously many people have such printers and use them every day, and many are able to get decent quality prints from them. But building the printer a little better goes a long way toward fixing most of the problems that plague the low to ultra low cost printers and reduces the effort required to get a decent print.
If you’re contemplating buying a $300 printer kit, you should know that every dollar the kit maker takes out of the price is going to add many hours of work that you’ll be doing to get that machine to produce an acceptable quality print, and it may never give you the quality you desire. Sometimes you get what you pay for, but you absolutely NEVER get what you don’t pay for, especially in the world of 3D printing.
If you've got one of those $300 printers and are dissatisfied with the quality of the prints it produces, or are tired of all the screwing around required to get it to produce an acceptable quality print, or you value your time more than the kit maker does, this Instructable is for you. Even if you choose to buy a printer instead of build one or upgrade the one you already have, this Instructable will help you know what to look for and what to avoid.
Some may say that building a printer like I did takes a lot of time, so what difference does it make whether you spend the time building a good machine or tweaking a cheap printer before every print? The difference is where you end up. Building a machine like I did is a learning experience. You acquire useful skills along the way, learn a lot, and end up with a high quality, almost reliable printer that produces good quality prints with a minimum of messing around. If you choose the other path, you will mostly learn how frustrating and difficult it can be to get a $300 printer to produce a good print and in the end you'll still have a $300 printer. On the brighter side, after you learn about all the things that are wrong you'll be more knowledgeable when it comes time to get your next printer.
My design philosophy is simple: learn from and avoid the mistakes/compromises made to minimize cost. If you want to build a high performance car, you don't emulate the Yugos. You learn what not to do from them. Then you look at the Ferraris and Porsches and emulate them. Likewise, when you want to build a high performance printer, study the $300 machines to understand the mistakes. Look at industrial machines to learn how to do things the right way.
You can build a 3D printer that is accurate, precise, and even almost reliable. Step 1 is adjusting your approach. Forget about searching for the cheapest possible way to do everything. How often is the cheapest way to do anything the best way? Instead, seek the best way and understand why it's better. Then start looking for the way to either get the parts needed for that best way, or come as close as you can with the funds available. Be prepared to spend some time looking for quality parts at bargain prices and don't be afraid to spend a little more money to get them.
Precision parts don’t have to be too expensive if you get creative when searching for them. Local scrap yards and eBay are full of scrapped machines and precision parts that can be purchased for a fraction of their brand new prices. You have to be persistent in your searches and patient enough to wait for the right parts at the right price. Find and join your local makerspace or hackerspace. Those places have a lot of tools, materials, and people who can help you find your way. I would not have been able to build my machine without all the help I received from the brilliant people, and access to tools and materials at the Milwaukee Makerspace.
What's Wrong With Cheap Printers and What's Right About Industrial Machines?
Industrial machines and our 3D printers are both intended to be accurate, precision mechanisms. Why do they look and perform so differently?
Industrial machines are typically big, heavy, and expensive, but they do what they're supposed to do accurately and precisely, each and every time. The fundamental difference between industrial machines and hobbyist-grade 3D printers can be summarized in one word: stability.
Most 3D printers are made to be lightweight (lower cost to ship), compact (lower cost to ship, higher wife acceptance factor), and as cheap (more profitable) as possible. The never ending race to the bottom of cost has driven quality and reliability out of 3D printers and turned them into something that requires constant fiddling and tweaking just to coax acceptable prints out of them once in a while. In standard marketing-driven fashion, deficiencies are touted as advantages, band-aids to remedy problems caused by poor construction are sold as “features”. More specifically, problems include:
- Flimsy frame construction. If you can push on the machine's frame and make it flex visibly, it's too flimsy. Motors, bed, and whole axes moving around will make the frame flex while printing and that will affect the position of the nozzle with respect to the print/bed and so affect the print quality. Some machines even go so far as to use the guide rails as structural components with bed and extruder cantilevered out into space! Here’s a rule of thumb: cantilevering anything in a precise mechanism is not good. MDF (aka cardboard), laser cut plywood, and acrylic sheet are not suitable materials for a precision machine.
- 3D printed parts in the structure of a machine ( such as joining aluminum extrusions to each other) are not optimal, either.
- Using cheap parts such as threaded rods where lead screws should be used. It is common to use M5 threaded rods in the Z axis in many designs. Threaded rods are never straight. Combine that with the next problem and you have a perfect recipe for finicky operation and poor print quality.
- Too thin, end-supported guide rails. 8mm rails are cheap so they are found in almost all the cheap machines and kits. They are too flexible for all but the smallest printers. The cheap bearings they use, often attached with nylon zip-ties, are likewise not going to be good to make a precision mechanism. Forget about securing mechanical parts with zip-ties. Zip-ties are the duct tape of the 3D printer world. They are great for holding cables in place, but if you see mechanical parts held together by zip-ties, run the other way!
- Multiple motors to raise/lower the X axis or print bed. Adding another motor is cheaper than using a single motor to drive a belt that moves all lifting screws in sync. If you use multiple motors to drive anything that needs to remain synchronized you're asking for problems. The axes of the machine have to be aligned at all times if you want to do precision work. Alignment should not depend on screws that a child can turn with their fingers and you'll never see such a thing in an industrial machine. The alignment should be locked down tight and it should take deliberate effort (and tools) to change it. Contrary to what the marketing dept will tell you, properly aligning an axis is NOT a quick, easy process.
- No enclosure -obviously cheaper than an enclosed printer. Without an enclosure you won’t be able to make large ABS prints because they will delaminate as they are printing. An enclosure is also useful if your machine will be operated in public places or you have kids or curious pets who might injured by the mechanism or heaters. Almost any enclosure, including a cardboard box, is better than none. If all you want to print with is PLA, and you don't have any kids around, you may be able to live without an enclosure.
- Poor alignment and calibration. You have to align and calibrate your printer to get high quality, accurately sized and shaped parts.
Here's a simple formula for making an almost reliable, precision printer:
- Start with solid, square frame construction that's easy to enclose
- Add solidly constructed axes that are built using precision components
- Use a reliable extruder/hot-end combo
- and a truly flat, heated print bed with the right surface covering
- all driven by quality electronics including the ability to print from SD cards
- align and calibrate!
You can't build a precision machine using imprecise parts. Money spent on precise parts will be wasted if the frame those parts are bolted to is wobbly and/or warped. A precise machine must be squarely and rigidly constructed, and must use precise positioners. All that generally adds weight, bulk, and cost to the machine and Son of MegaMax is no exception.
The Frame
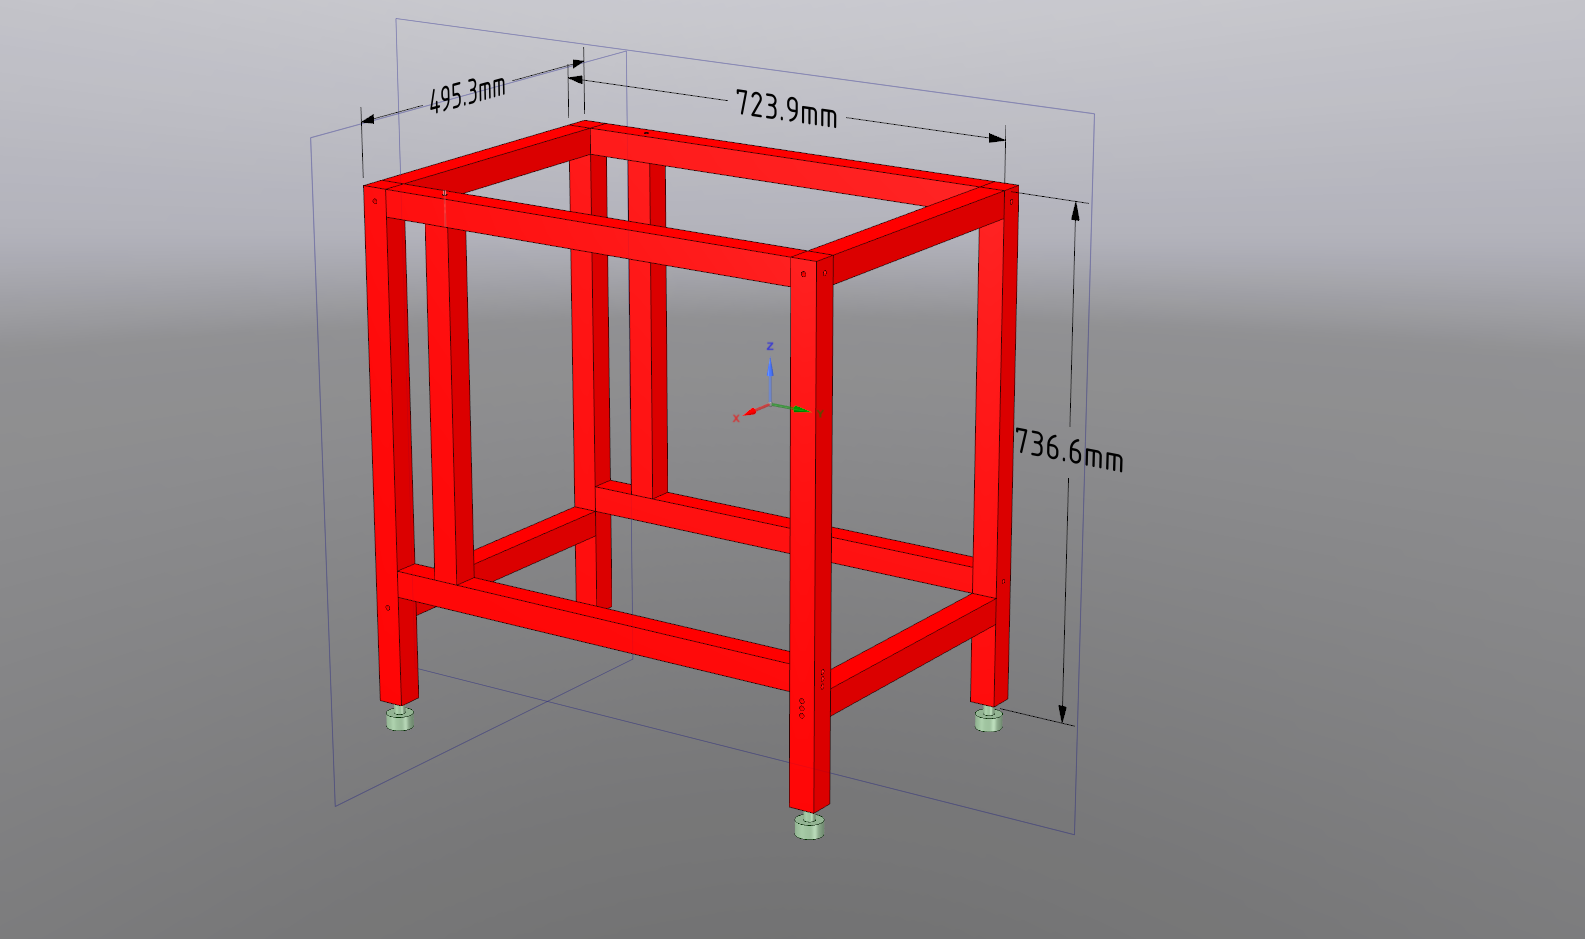


Every year there are more companies engaged in a "race to the bottom" of printer price, so you can now buy 3D printers for as little as $300. Those of you who have 3D printers, especially those of you with those $300 printers, know the frustration of starting prints only to find they won't stick to the print bed because the bed isn't leveled or zeroed before the print starts. Why do the level and zero point settings keep changing?
The frame is one of the higher cost parts of the machine and an easy target for cost reduction. That's why you'll see MDF (aka cardboard), plastics, etc. used. Some designs discard the frame completely and use the guide rails as structural components (what?!) with everything cantilevered out into space. It's also why you see machines that are not enclosed. They use undersized guide rails and cheap bearings, threaded rod instead of lead screws, etc., all in the pursuit of a lower price, without regard to print quality or reliability.
One result of taking money out of the frame of the machine is that it can't maintain a bed level or zero setting. When you apply force to the bed to remove a print, if the bed moves around noticeably, there's a good chance you'll be re-leveling and zeroing before the next print. What the printer maker has done is reduced the cost of the machine by trading a few $ less in the price of the machine for many hours of your time spent leveling and zeroing the bed before you can print.
Recently there's been a new twist added- auto-tramming (auto leveling). Adding an inductive or optical sensor to the extruder carriage allows the machine to automatically locate the plane of the bed and adjust the tilt of the print in software to match the tilt of the bed at the start of each print. An inductive sensor is a lot cheaper than building the machine rigidly.
While auto-tramming helps get the first layer of the print to stick to the bed, it doesn't fix the problem of a cheesy frame. Anything that allows the extruder nozzle to move relative to the bed will affect the quality and precision of the print. With parts moving back and forth in the printer during a print, the frame is going to be wobbling around and so will the extruder nozzle. They haven't figured out a cheap way to compensate for that yet, but I don't doubt someone is trying
If you want to build a printer that won't require re-leveling and zeroing the bed with almost every print, and can accurately and precisely position the extruder nozzle to deliver consistently high quality prints, you have to start with a rigid frame. Look at any industrial machine capable of precision work. You won't see MDF, acrylic sheet, threaded rods, or laser cut plywood frames.
I chose 1.5” square T-slot aluminum extrusions to build the frame for the same reasons industrial designers use the stuff- it's rigid and designed to have things attached to it easily. Brand new T-slot extrusions and associated hardware can be expensive. You can save a lot of money by buying used stuff from a scrap yard. My local scrapper sells it for $2/lb, so there's about $80 in SoM's frame.
Some printer designs use T-slot frame members joined together with printed plastic parts. Avoid the temptation to do that. If you want rigidity, you have to bolt/weld metal to metal. T-slot extrusions are designed to accommodate standard sized screws. All you have to do to join two pieces is drill one hole and tap the end hole to receive the screw. Likewise, attaching things to the T-slot can be done by using nuts designed to fit the slots (or by making your own).
1.5” square T-slot extrusions I used are designed for 5/16-18 button-head cap screws with washers. I bought a bag of them along with some washers and nuts to fit via amazon.com or ebay. Whatever size extrusions you use, find out what standard sized hardware it is designed for and use it - it will make your life easier.
Cutting frame pieces with a saw will not make the ends square enough to allow simple butt joints. I cut the frame pieces a little longer than needed using a band saw then milled the ends square and to final length. I then tapped the end holes that would be receiving the screws and drilled screw access holes in the mating pieces. If you don't have access to a mill, you can still use T-slot extrusions by joining the pieces with aluminum plates. You just drill holes in the plates to line up the slots at right angles.
If your frame piece's ends are milled square and equal length, the structure will end up square when you bolt it together. How do you verify that the frame is square? You measure opposite diagonals. If they are the same you know have a square structure.
Even a rigid frame will distort a bit if the surface it sits on is uneven. A little distortion can be enough to cause drive screws or bearings to bind. I added rubber leveling feet to the bottom of the frame to allow it to sit solidly on whatever surface presents itself.
I chose to put the electronics under the machine to keep it out of the warm build chamber. I mounted ball bearing drawer slides to the frame members and built a drawer to fit in the space and it has worked perfectly. The cabling to the controller was made long enough to accommodate the drawer when it is pulled out. A bendable cable guide is attached to the back of the drawer at one end and the printer's frame at the other end and keeps the cables from dragging on the table under the printer when the drawer is closed. When the drawer is pulled out, the guide straightens and when the drawer is closed it folds. A simpler alternative would be to mount the electronics on a hinged panel on one side of the frame and bring the cables to the panel at the hinge.
Once you have a solid, square frame, you can start adding all the other stuff that goes into a 3D printer.
X-Axis


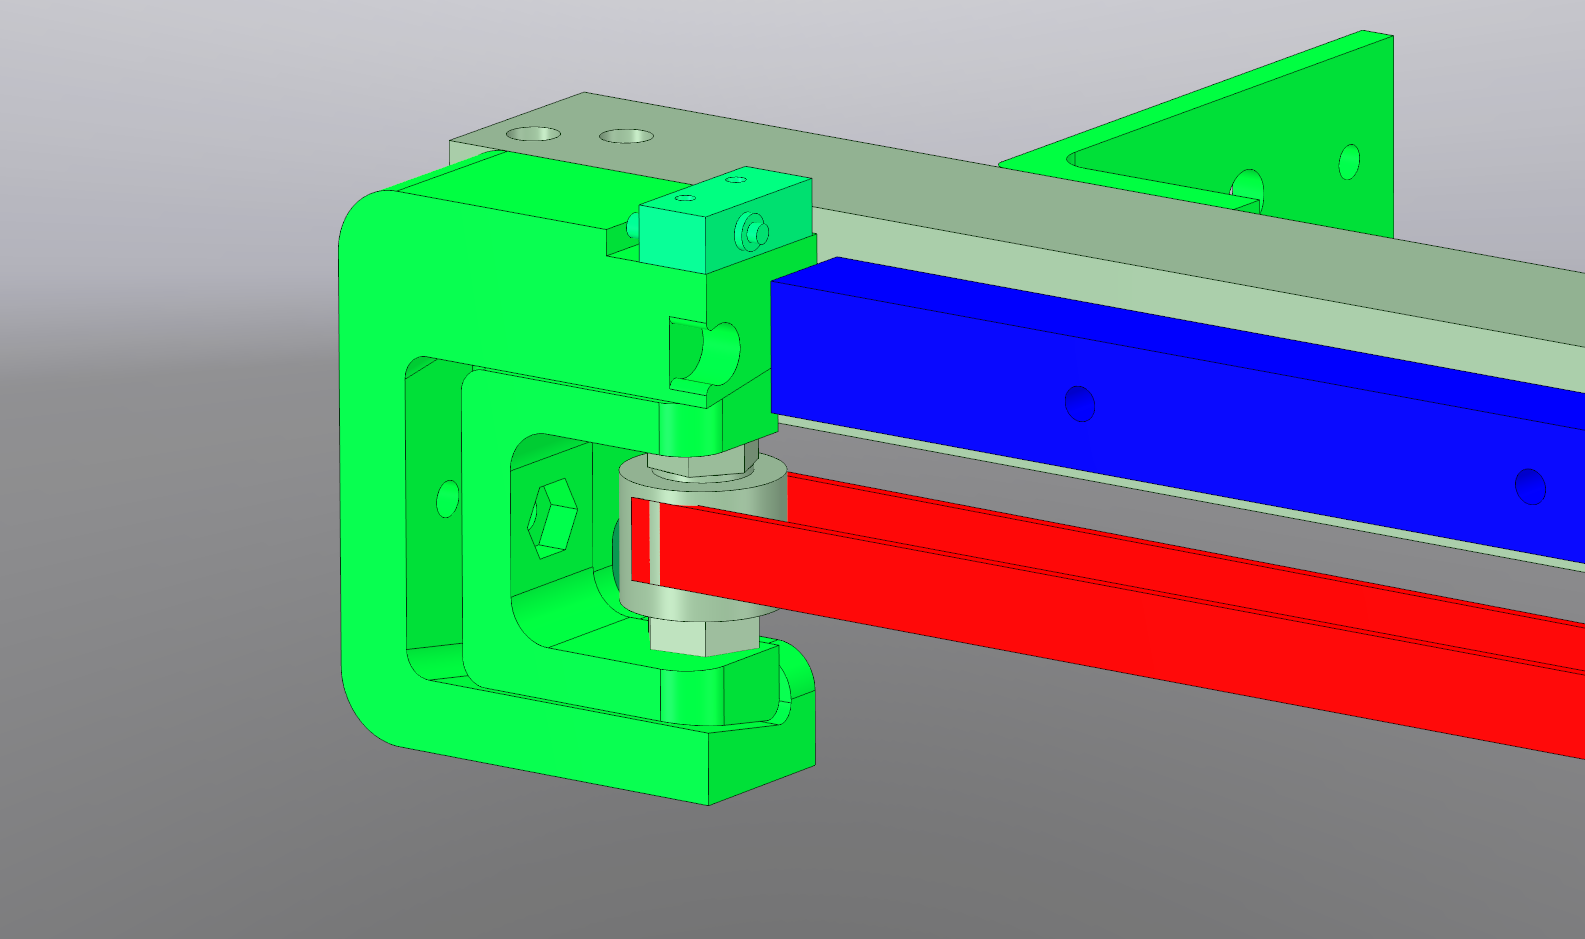
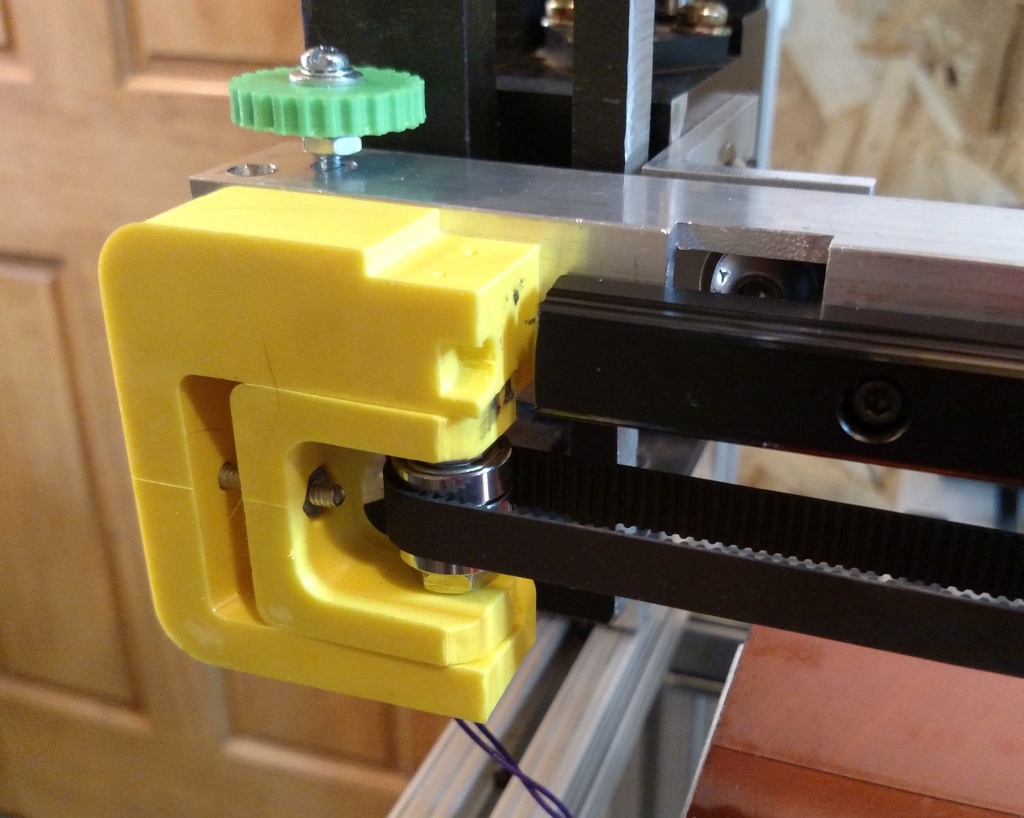


Most machines use end-supported 8 mm diameter guide rails because they are cheap. The problem is they flex. In a printer like mine, such rails would flex under the weight of the print bed and undercarriage. They would also flex under the weight of the extruder carriage. I started with ½” guide rails and replaced them because they were too flexible. Flexy parts don't make for reliable, quality printing. How will you get the first layer of the print to stick if all the rails are flexing (uncontrolled movement)? How much of your print bed will be usable?
Precision and accuracy require a rigid frame AND rigid axes. You ensure that by using fully supported guide rails (or better yet, linear guides) and quality bearings, firmly attached to their mounts (no zip-ties!).
The linear positioning mechanisms used have to accommodate the loads they will see and the motors and electronics likewise have to be up to the task. Precise linear positioning can be done using belt or screw drive, and in most machines, there are some of each. Usually X and Y are belt driven and the Z axis uses screws.
MegaMax had a large, heavy X axis assembly that used 1/2", end supported, round guide rails and linear bearings mounted on a 1.5" square 8020 boom. SoM uses a more compact, lighter weight, higher precision, fully supported, linear guide to position the extruder carriage. I added screw terminals on the motor mount to allow removal of the X axis by disconnecting the wires and taking out just two screws.
I used a 1" square aluminum tube as a boom for the X axis to support all the other parts. It provides easy attachment of the motor mount, belt tensioner, and linear guide. Over the short length of the X axis it might be possible to do without the aluminum tube and mount the linear guide directly to the Z axis screws, but then you'll have to figure out how to attach everything else.
The motor mount, belt tensioner, and belt clamp are all printed parts (which may one day get replaced by milled aluminum parts). The motor mount includes the X-minimum limit switch and there is room to mount an X-maximum limit switch on the belt tensioner. The cable for the motor and limit switch just hangs in a loop from above to minimize flexing.
My limit switch mounts are not ideal. The proper way to mount limit switches is with the switch actuator at right a right angle to the motion being monitored (see the Y-axis limit switch), that way if the moving part moves past the limit point due to its inertia, the switch doesn't get destroyed. I may one day redesign the motor mount and belt tensioner with the switches mounted the other way.
I am using a 100 oz-in NEMA-23 motor that was available from the hack-rack at the makerspace. I've never calculated the required torque because the motor has always been adequate (I was lucky). That said, it is better to rely on science than luck and calculate the torque required by your printer's axes so that you can get the right size motor. Oriental Motor has some very easy to use tools for calculating required motor torque. I suggest you calculate the torque requirements before shopping for motors and electronics.
The X axis is held on the machine using just two bolts that allows easy removal and allows the whole axis to tilt to accommodate alignment adjustments.
Extruder Carriage


The extruder carriage is bolted to the X axis linear guide and the printed belt clamp is bolted to the carriage. The most interesting thing about the extruder carriage is the electrical connections. Experience with MegaMax taught me that extruders/hot-ends often need to be serviced so I made it easy to remove both by connectorizing the wiring and using just two screws to mount the extruder to the carriage.
After experiencing a failure in MegaMax's extruder cable due to excess flexing (see step 12: Reliability) I decided to use a flexible ribbon cable of the type used to connect to print heads in ink jet printers to make all the connections. Those cables are designed to flex millions of times without failure. I used a cable taken out of an old tape library robot. It had more than enough conductors so I cut it length wise into a 16 conductor ribbon. One end of the ribbon plugs into the circuit board on the extruder carriage and the other into a circuit board at the top of the machine's frame. The ribbon has enough conductors and current capacity to connect some extras like LEDs, fans, and an inductive sensor for auto-tramming (completely unnecessary in SoM). The cable is a little longer than I would like, but it does the job and stays out of the way.
One of the early problems I had when I built my first printer was extruder jamming. It took months to figure out how to get the extruder to work with any reliability and I even tried my hand at designing my own. For SoM, I decided to find a reliable extruder and hot end combo. After reading a lot of reviews and examining a lot of designs with a critical eye, I settled on the BullDog XL extruder and the E3D v6 hot end. In the five months I've been using them I haven't had to clear a single filament jam. The extruder can handle 1.75 and 3 mm filament, and the hot end can be used with just about any type of 1.75 mm filament.
There were two minor problems with the extruder hot-end combo. First, they didn't fit together right out of the box. I had to do a few minutes work with a file to get them connected together. Second, the fan that comes with the hot-end is very fragile and the screws that are used to attach it require so much turning force that I ended up breaking the fan in the process of installing it. I fixed it temporarily with a few drops of super glue, then bought a better fan and installed it with 4-40 screws.
Y-Axis


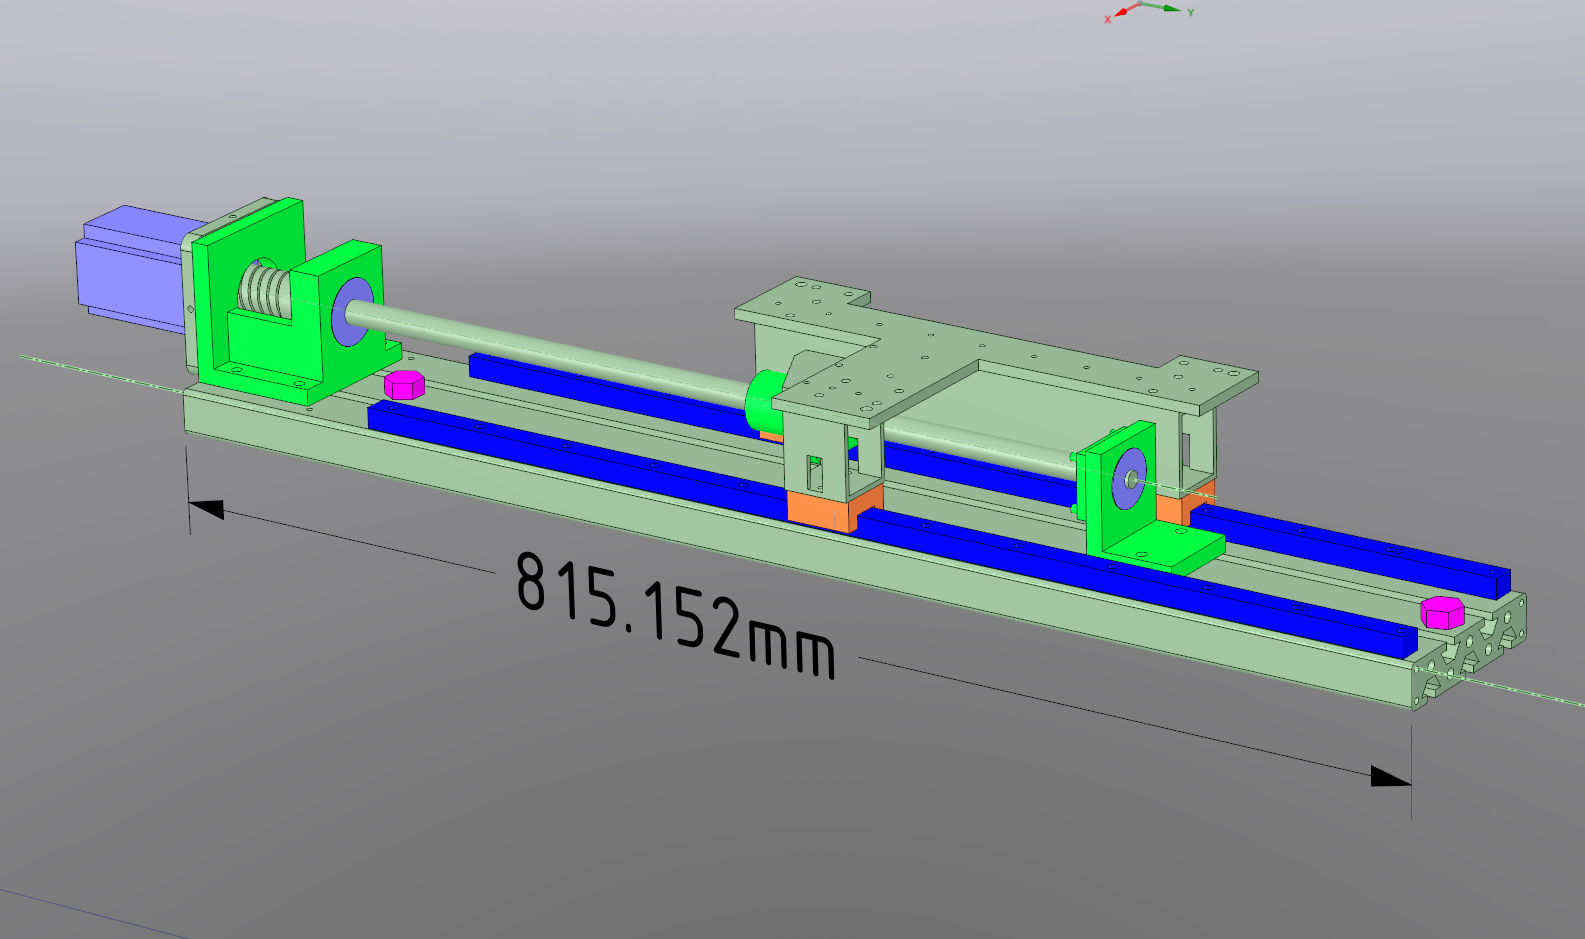



MegaMax was a scaled up RepRap Mendel type printer. One of the things I did not realize when I started construction was how big a problem controlling the large moving mass of the bed was going to be. Newton's laws apply! MegaMax had 1/2", end supported guide rails and linear bearings and a drive belt with a NEMA-23 motor. The poor little Pololu stepper stick on the RAMPS board was having a hard time controlling all that moving mass. I was seeing artifacts in prints that I attributed to a weak motor/driver and belt stretch. I was also getting a lot of vibration and noise that I didn't like.
I had a chance to grab a ball screw out of a scrapped machine and thought it would be a good way to eliminate any print artifacts caused by belt stretch. I also decided that I should replace the end-supported round guide rails with fully supported linear guides. I figured the combo of screw drive and linear guides would eliminate any artifacts due to imprecision in the guide and drive mechanisms. While I was at it, I beefed up the electronics.
Linear guides, especially the preloaded NSK LS-15 ones I used, require some force to move. That makes extra demands of the motor. The mass of the screw also adds to the work the motor has to do. I wasn't sure how big a motor to use so I used the excellent motor torque calculation tool at the Oriental Motor web site and determined that for the moving mass I was using, the high friction linear guides, and the print speed/acceleration and positioning accuracy target I set, I would need a 380 oz-in torque. I found that I was able to get a 425 oz-in NEMA-23 motor for $50 and it has proven to perform as expected. I typically print at 40-50 mm/sec with acceleration set to 1000 mm/sec^2.
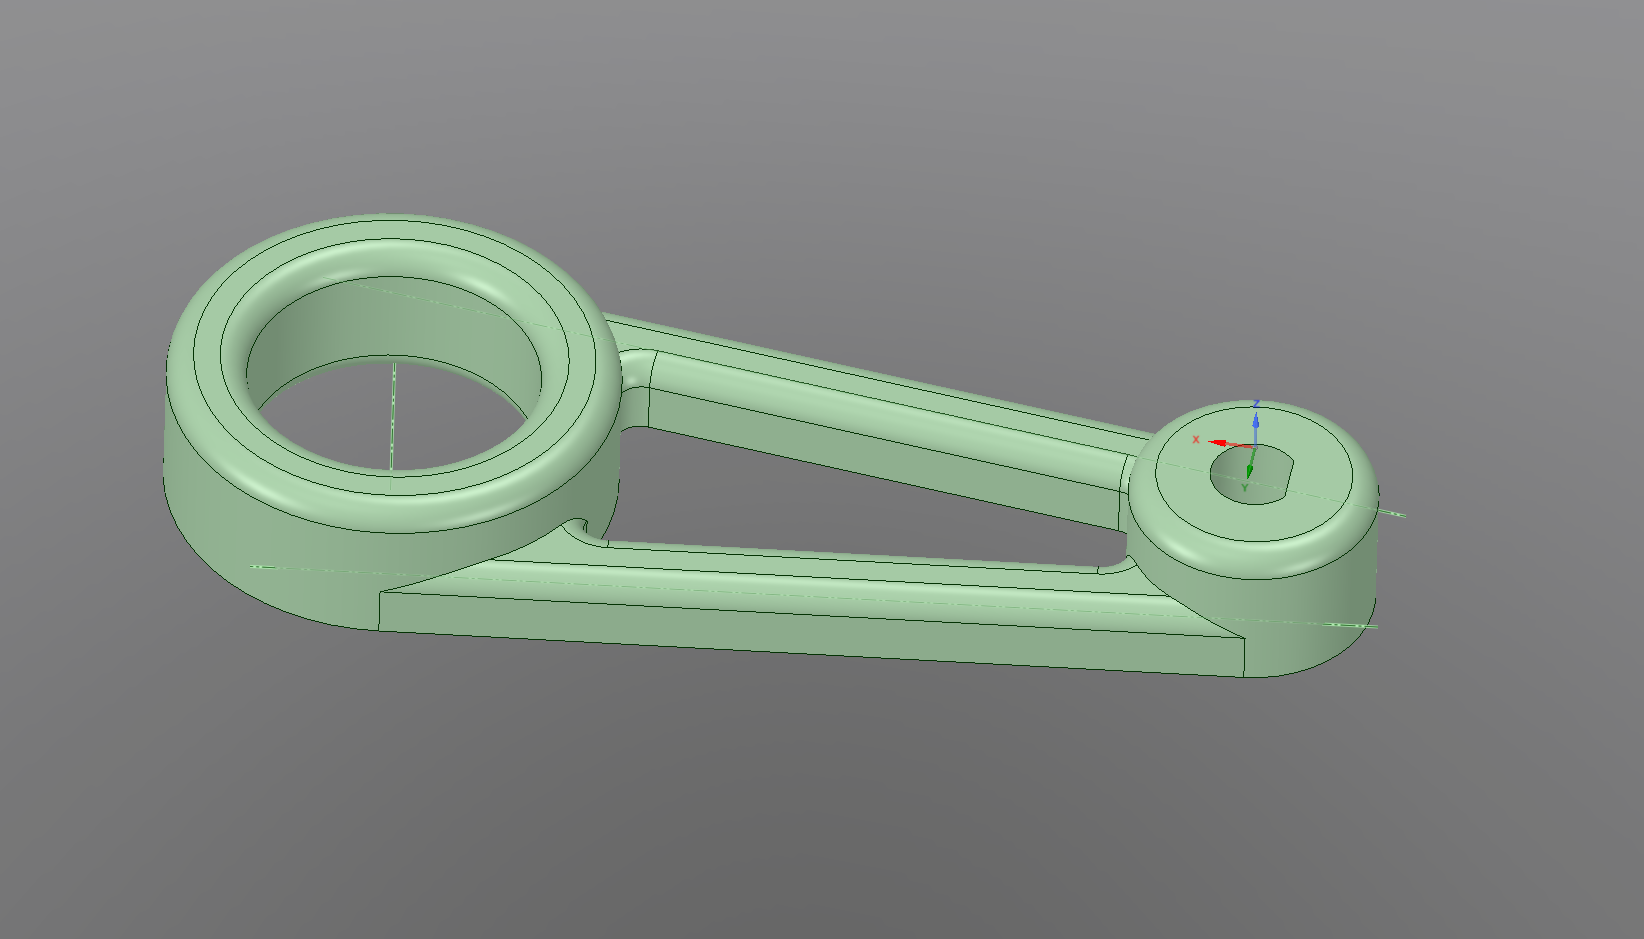
The original screw mechanism had a NEMA-34 servo motor, so I designed and printed an adapter plate to allow the NEMA-23 motor to fit the screw's motor mount. While I was at it I printed a flexible coupler but replaced it with a rigid coupler.
The Y axis is completely modular and is held onto the machine's frame with just two big bolts that lock it down so it can't move. Wires are connected with a terminal block. I designed the Y axis to keep the hard-working motor out of the build chamber so that I wouldn't have to worry about it overheating. I then designed and printed a cover to keep curious fingers out of the motor mount. I also designed and printed a finger crank tool to fit on the shaft at the back of the motor to allow rapid manual positioning of the bed.
One side effect of going to screw drive is the noise level of the machine has gone up, instead of down as I was hoping. Vibrations from the motor transfer very efficiently through the screw to the bed plate which resonates and rings. I've tried everything from anti-vibration motor mounts to harmonic dampers and it's still noisy. I'm looking into alternative bed designs to solve that problem.
The Print Bed


One of the most common problems with 3D printing is getting prints to stick to the bed reliably. In order to stick, the bed must be flat, level, adequately heated, covered with the right surface material, and clean. The leveling mechanism is important, too.
Cheap printers come with all sorts of stuff that attempt to achieve flatness while staying as cheap as possible. Most of the beds have a thin metal sheet with a heater attached and then put a not so flat glass plate on top of it because the thin metal isn't very flat. They try all sort of messy stuff to get prints to stick including slathering the bed plate with hair spray, glue sticks, and "abs juice". The real problem is more complicated: the bed isn't flat, and the heat isn't evenly distributed, and the guide rails flex so the bed (and the extruder) doesn't move in a linear path but a curved one.
The only reasonably priced, readily available, thermally conductive, truly flat material is cast aluminum tooling plate, aka MIC6. It works. Put a layer of Kapton tape on one side and a heater on the other side and you're 80% of the way toward prints sticking reliably to the bed. There are other materials that work well, too. I've heard, but haven't tried, that PEI is great for getting prints to stick.
The rest depends on flex in the guide rails or other mechanism that supports the bed, the leveling mechanism used, and flex in the rails that support the extruder. Everything flexes, but minimizing flex in the guide rails that support the weight of the bed and undercarriage goes a long way in keeping prints stuck to the bed, and in being able to make use of the entire bed surface for printing.
The leveling mechanism design makes a big difference. A lot of machines have leveling adjusters at the four corners of the bed. Think about what happens when you turn one of those adjusters. The corner where you are making the adjustment moves up and down while the other three remain mostly where they are. If the plate were really stiff, the opposite corner would move in the opposite direction, but with the thin material usually supplied, the bed flexes instead. How can you level a plate by bending it?
If you recall high school geometry, you know that three points define a plane. There is no reason to ever have more than three leveling adjusters. If they are arranged properly, leveling the bed becomes trivial. The first screw is not adjusted- it is the reference for the other two. The second screw adjusts the pitch of the bed in one axis, and the third adjusts the roll around the first axis. That's all you need.
SoM's print bed plate is a piece of 12" x 12.5" x 1/4" cast aluminum tooling plate (about $40 from Speedy Metals) that comes milled flat. It is supported on three screws and springs positioned for easy leveling. It's covered with 5 mil thick Kapton tape that is applied in 2" wide strips. The tape is very tough but after months of use it gets damaged and I can replace just the damaged strips as needed. I routinely move the machine, laying on its side in my car, to other places, then take it out, set it upright, and start printing without re-leveling or re-zeroing the bed. When I remove parts from the bed it doesn't move - it is rock-solid, and I can print nearly edge to edge on the plate.
The underside of the bed plate has a 450W Kapton heater that gets the bed to 105C ABS print temperature in about 5 minutes. It is powered by a 24V transformer. Power is switched into the transformer by a solid state relay. The transformer is pretty heavy so I may look into replacing it with a lighter weight solution.
Here's how the leveling mechanism works:
The mechanism has to allow the bed to tilt (which means the bed can move up and down at the leveling screws) yet not have any lateral play which will affect the precision and so the print quality. The bed plate "floats" on three compressed springs. The springs push the bed plate up from the undercarriage plate until it can't go up any more because the leveling screw heads stop it. The bed is prevented from moving laterally by countersinking the holes in the bed plate. The screw heads and countersunk holes are conical and will prevent lateral motion- if the bed plate tries to move laterally, the springs will have to compress. If you use strong springs and compress them with the leveling screws, the lateral motion of the bed will be almost zero, yet the bed will be able to tilt freely when you make leveling adjustments.
The three screws for the leveling mechanism can't be allowed to move laterally or the bed will too- they have to be rigidly coupled to the undercarriage plate. I did that in my printer by screwing them into heat resistant Teflon blocks that are screwed to the undercarriage. When you push on the leveling screws from the side, they should not move- remember, the bed is going to move back and forth along the Y axis. Each time the bed reverses direction, accelerates, or decelerates, there will be lateral force on the leveling screws because of the momentum of the bed. The screws have to be rigid or the bed will flop around whenever it moves and that will adversely affect print quality. I drilled slightly undersized holes in the Teflon blocks and let the screws cut their own threads into the Teflon.
Leveling and zeroing:
- Heat both the bed and the extruder to print temperatures.
- Adjust Y axis pitch first: move the bed/extruder nozzle so the nozzle is very near the reference screw. Move the Z axis setting to just grab a piece of paper, then move the bed only to a point where the nozzle is near the Y-axis pitch adjustment screw. Adjust the pitch screw to grab the paper. You can verify that the pitch is set correctly by moving the bed back and forth- the nozzle should grab the paper evenly, everywhere along the length of the Y-axis movement. Don't be alarmed if it only grabs the paper near the the two screws.
- Adjust Y-axis roll: move the nozzle and bed plate so the nozzle is near the Y-axis roll adjustment screw. Adjust the roll until the nozzle grabs the paper. Now the bed should be as level (which means aligned with the true XY plane) as it can possibly be. Note that adjusting the roll does not affect the pitch, but will affect the Z=0 point.
- Set z=0: move the extruder and bed to position the nozzle over the center of the bed. Adjust the Z axis position until the nozzle grabs the paper and set the Z=0 point. The reason for setting Z=0 at the center of the bed is that the X and Y axis guide rails will flex and the bed and extruder won't actually be moving in perfectly linear paths- they'll be moving in curved paths (thanks to gravity) that both hit bottom when the nozzle is at the center of the bed. Since you will normally be printing at the center of the bed because that's where the temperature is likely to be most even and because slicer software usually puts the object at the center of the bed, that is where you're going to set the Z=0 point.
If your machine uses flexy, end supported guide rails that are not aligned parallel to each other, and/or the frame flexes a lot, you may not be able to print edge to edge on the bed plate. You will probably have to relevel and zero the bed frequently. If you use fully supported guide rails or linear guides and they are accurately aligned, and the printer's frame is stiff, you'll be able to print edge to edge because the bed and extruder nozzle will move in a path that is very nearly planar. You probably won't have to relevel or zero the bed for a long time. I haven't had to touch either adjustment in my printer for two months in spite of daily use and a few trips back and forth between home and the makerspace.
Some older Stratasys industrial FDM printers use an unheated sacrificial foam bed. I have done some experiments with PIR foam and had good results printing with ABS. In the future I may get rid of the heated bed plate and associated electronics and start printing on PIR foam. It will lower the moving mass and the overall weight of the machine. With a foam bed, no leveling is necessary- you just bury the nozzle about 1mm into the foam for the first layer, and always print on a raft. You won't get the glass smooth bottom surface, but that isn't usually needed anyway.
The Z Axis





Another place where the low cost printer kits save money is in the Z-axis. The typical assembly has an M5 threaded rod with a flexible shaft coupler connected to a stepper motor. The X axis boom will have anti backlash nuts made from two normal nuts with a spring between them. The design relies on the bearings in the motor to support the weight of the X axis and typically leaves the opposite end of the threaded rod to wobble around in the air. This type of structure is so common and leads to so may common print quality problems there is a article here that describes them and how to compensate (see page 29). One often repeated 3D printism says that you have to leave one end of the screw free to wobble in the air or it will cause print quality problems. This is because threaded rod is never straight, and the frames and guide rails of the machine are so flimsy that restraining the lateral motion of the end of the screw with a bearing will cause the frame to flex as the screw rotates shifting the whole X axis around and taking the extruder nozzle with it. The only logic that leads to putting a "never straight" threaded rod into a precision mechanism is shaving cost by any means available. Combine cheap threaded rod with cheap, flexy, end-supported guide rails, and a cheap, flexy frame and you have a perfect recipe for a $300 printer and all its headaches.
You'd be hard pressed to find an industrial linear positioner that doesn't have bearings at both ends of the drive screw. They use proper lead screws that are made round and straight so that they can't cause problems with the precision of the positioning. They also typically use larger diameter, fully supported guide rails or even better, linear guides, to restrict motion to the axis of the positioner.
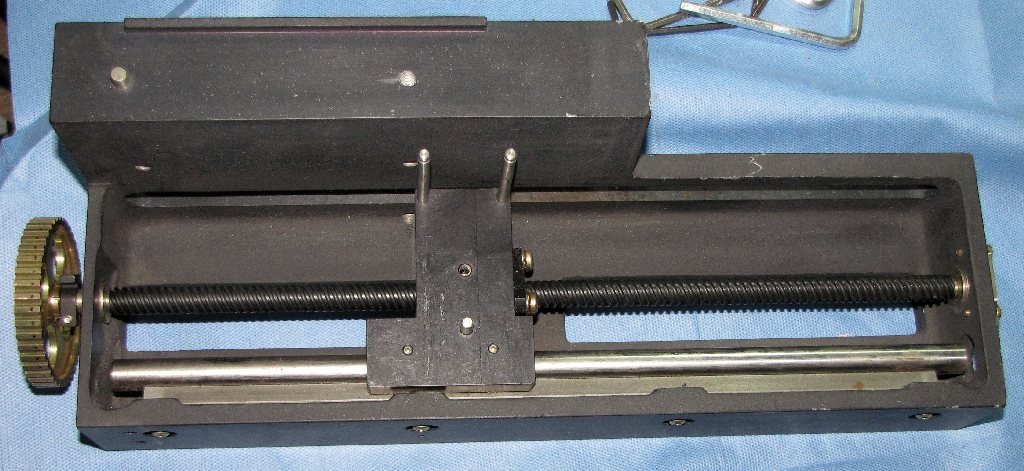
I found a couple linear positioner assemblies on the hack-rack at the Milwaukee Makerspace and immediately realized I had a difficult part of the machine almost ready to go! I cleaned them up, made a few modifications to suit my purposes, and bolted them to the printer's frame. You can find similar assemblies at scrap yards, or buy them new. There are plenty of alternatives, too. It isn't that hard to make you own assemblies using lead screws, bearing blocks, and large diameter guide rails or linear guides. Almost anything you make from proper parts (or any cheap assemblies you find on eBay) will outperform the M5 threaded rods and flexible, end-supported 8mm guide rails that are typically used.
My Z axis screws are Teflon coated acme screws with 1/2" lead. The imperial units are rumored to be a problem for Z axis accuracy (not precision) because the printer firmware uses metric units for all calculations, but I have had none of the problems attributed to imperial threads. Z axis accuracy is limited by first layer thickness and by designs that generally don't assume any specific print layer thickness to start with. The errors due to imperial threads are masked by those errors.
Once I had my positioner assemblies I had to decide whether to use two motors to drive them or one motor with a belt. After a lot of thinking about it, I decided it would be better to use a single motor with a drive belt. Here's why...
If you want to print gears that mesh without binding, or boxes with tight fitting lids, or assemblies that snap together, or any other precision work, your X, Y, and Z axes must be orthogonal (at 90 degrees relative to each other). If any of them are off, circles won't be circular, squares won't be square, and you won't be able to do precision work.
Alignment of the X, Y , and Z axes is a fundamental part of the machine. You should only have to set them into alignment once and they should stay aligned. If the alignment depends on electronics, sooner or later you're going to have a problem. I am referring to the common practice of using two motors to turn the Z-axis screws that lift the X axis (or multiple motors to lift the bed). This technique is common because it is dirt cheap. It is cheaper to add a second motor than to use a single motor and belt because pulleys, bearings, and a closed loop belt cost more than a motor. As is common practice in marketing, a flaw is turned into a feature: "it's super easy to align the X axis!".
That is what is commonly known as "marketing bulls**t". It does the exact opposite- it makes it super easy for the X axis to get out of alignment. If you have a kid, or demonstrate your machine in a public place, or it is going to get used by multiple people with varying understanding of how 3D printers work, someone is going to turn one of the Z screws manually and throw the alignment off. Sooner or later you're going to have controller, wiring, mechanical, or driver problem and one motor will get out of sync with the other. Or you'll want to work on the extruder and you're going to be impatient and won't wait for the machine to power up and your computer to boot up so you can move the X axis up electronically and you'll give in to temptation and try to turn the screws manually. If you want to do precision work with your printer, you can't afford to have the alignment of the axes dependent on screws that a child can turn with their fingers.
Aligning the axes properly involves printing a rectangular solid and measuring the opposite diagonals. If the angles are 90 degrees, the diagonals will have equal lengths. If the diagonals don't match, the angle is not 90 degrees and the axes need to be aligned. But which ones and by how much? You enter the lengths of your axes and the measurements of the diagonals into the attached spreadsheet and it will calculate the error and required correction for any two axes.
Auto-tramming levels the bed in software by tilting the print to compensate for a bed that does not lie in the XY plane. In machines that are so unstable they require re-leveling with almost every print, auto-tramming can be very useful. You should know that auto-tramming assumes two things- that the bed plate is flat, and that the axes are truly orthogonal. If either of those are not true, auto-tramming can't make them true. Do you think machines that need auto-tramming are going to come with flat beds and accurately aligned axes? A quick look at on-line forums finds that auto-tramming causes as many problems as it solves.
One recent flavor of firmware includes something called "orthogonal axis compensation" that is intended to correct for misaligned axes in software. Like auto-tramming, it may work when you set it up today, but it assumes that the angles between the axes are stable. If one axis can move out of alignment due to a screw binding or any of the other reasons previously stated, it won't help.
The print bed is supposed to be flat and aligned with the XY plane as defined by the guide rails. The purpose of that alignment is to ensure that the first layer of the print sticks to the bed. Most printers require frequent re-leveling /zeroing of the print bed because they are not very solidly built. The folks who talk about how easy it is to align the X axis if one of the Z screws gets out of whack will "align" the X-axis to that unstable print bed. What do you think the result will be?
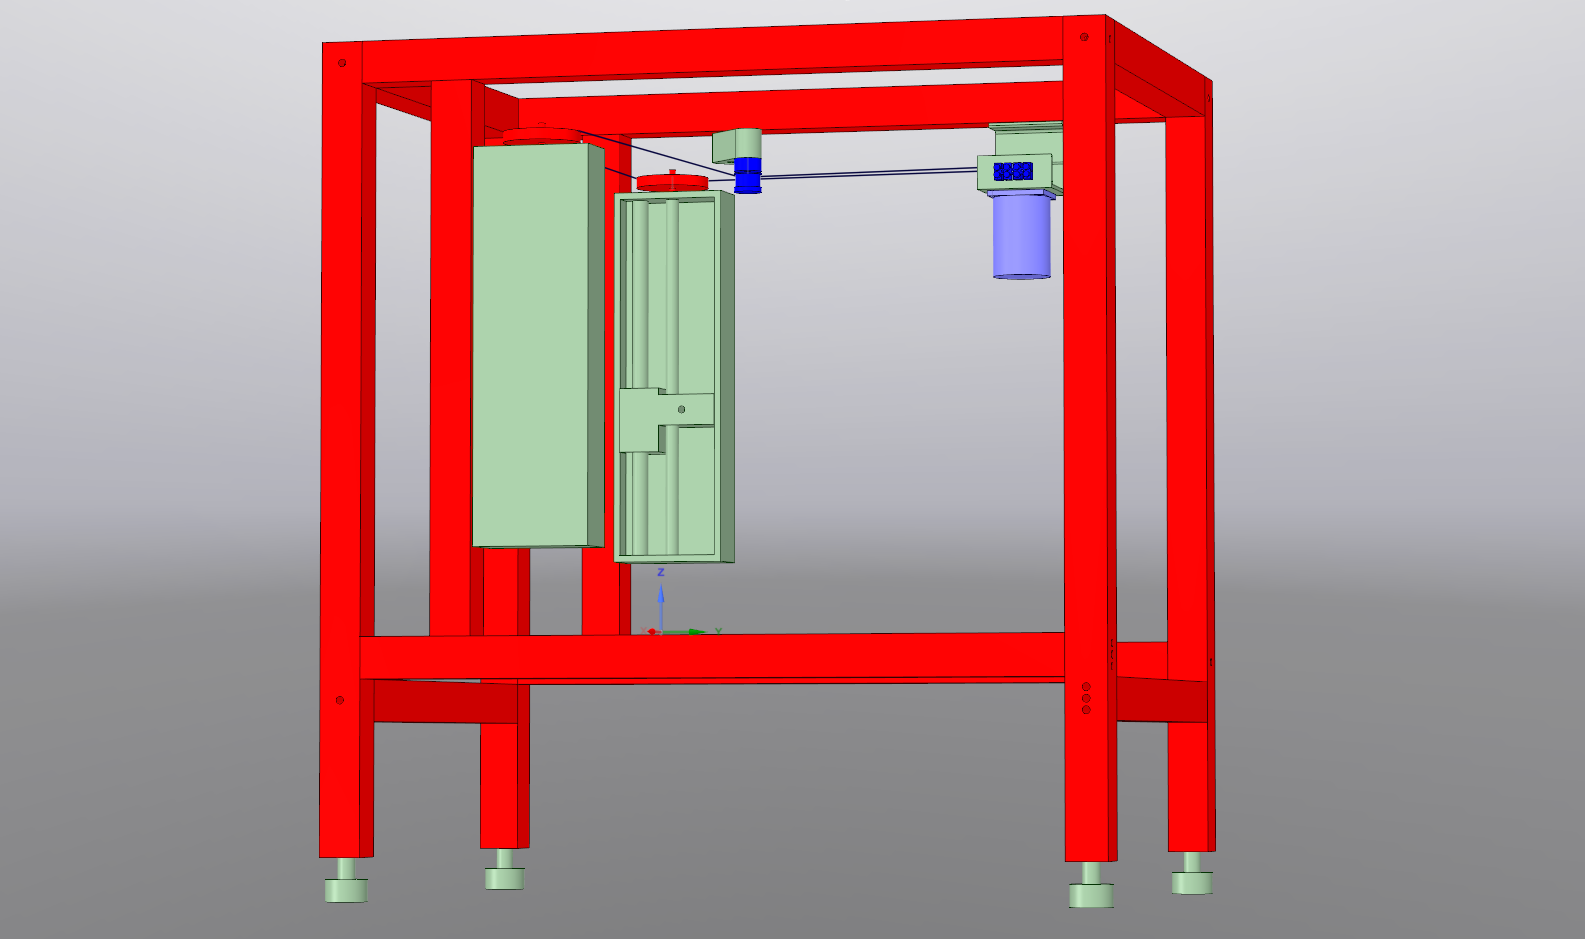
Once you have a sturdy frame, using a single motor with a belt to drive the Z axis screws ensures that the screws always stay synchronized. Once you align the X axis orthogonal to the Y and Z axes you won't have to align it again. If you want to raise the X axis so you can do some work on the extruder, there's no need to power up the printer and/or a computer and then step through multiple menus to get to the jog axis position. All you have to do is pull the belt and the axis will go up without messing up its alignment with the Y and Z axes.
When I built my original printer, and since I rebuilt it as SoM, I aligned the X axis to the Y and Z axes once and never had to realign them.
More on axis alignment in the Assembly section...
Downloads
Electronics


MegaMax used the common Arduino Mega 2560 / RAMPS board with an LCD controller. The stepper drivers were pushed about to their limits with the NEMA-23 motors I was using for the axes, so I looked into upgrading the electronics and found the SmoothieBoard.
The SmoothieBoard has a much faster, more capable processor, and a much smarter/easier way of updating firmware and making changes to the machine configuration (no more compiling firmware for every configuration change!). It also has a network interface and web server as well as on-board uSD card. Most connections are brought out to the edges of the board, and the on-board stepper drivers are a bit better than the drivers on the RAMPS board.
I added an LCD control panel with SD card slot as soon as it was available because I prefer to print from SD cards as I have found it is the most reliable way to print.
The new screw-drive Y axis motor required more current than RAMPS or SmoothieBoard's drivers could handle. Also, stepper motors behave better when you drive them using power supplies rated for 8-10X the voltage rating of the motor. NEMA-23 motors tend to vibrate more than NEMA-17 motors, a big source of the noise my printer has always made, so I decided to get a DSP based driver for the Y axis. DSP drivers can use finer micro-stepping and sense resonance and damp it by modifying the current supplied to the motor. You can read more about that sort of thing here: Gecko Drives and here: Oriental Motor
I ordered an M542 stepper driver from China via eBay and while I waited for delivery I built a 32V power supply for it. Stepper motors and drivers don't need regulated power supplies, and can even be hazardous to them. The 32V supply I built uses a transformer, bridge rectifier, and output filter capacitor. That's all that is needed.
There was a screw-up in shipping of the driver I originally ordered so I gave up waiting for it and ordered a second one and then both of them were delivered. I built a second 32V supply, identical to the first, and set up both the X and Y axes with DSP drivers and 32V supplies. The Y axis is still noisy, but the driver does a good job of extracting every last bit of torque the motor can deliver.
The bed has a 450W 24V heater that is powered by a 24VAC transformer with power switched to it by an SSR under PID control from the SmoothieBoard. I had to turn the PID frequency down to about 8Hz to keep the heater from blowing circuit breakers. The PID control keeps the bed within about 0.5C of the target value.
The SmoothieBoard and some LEDs are powered by a 12V 10A switching power supply.
I wanted to keep the electronics out of the build chamber so put it all in a drawer under the printer, including the power switch and LCD control panel. That keeps them from getting broken off when transporting the machine and keeps curious fingers from doing things they shouldn't when the machine is publicly displayed. The blower keeps things from getting hot inside the drawer.
Enclosure
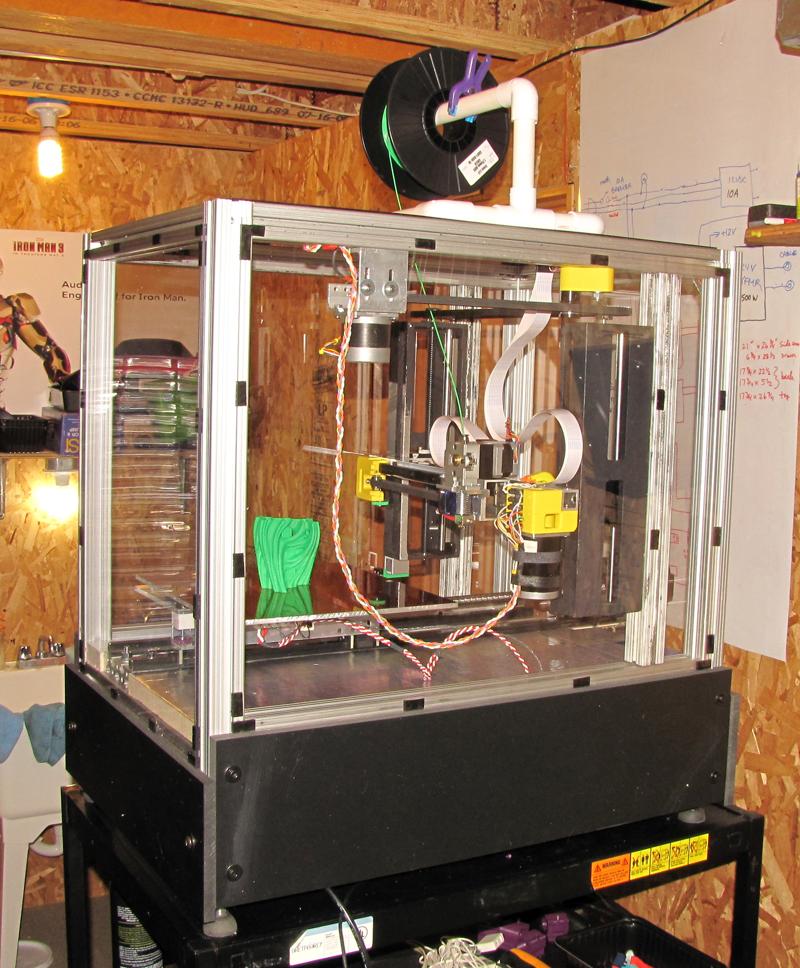


At the makerspace we have a couple industrial Stratasys printers that print with ABS filament inside ovens at 70C to prevent warping and delamination. Following their example, I built a huge enclosure for MegaMax and found that even getting to 45C helps with delamination. I designed SoM's frame to make enclosing it easy.
I closed off the bottom of the build chamber with PIR foam pieces cut to jam-fit between the frame and the base of the Y-axis. It keeps the heat from the build chamber away from the electronics in the drawer. The Y axis motor, the only one that gets hot, is also kept outside the build chamber. The sides and top are made of 1/8" clear polycarbonate sheet held on with Velcro type tape that allows easy removal for access to the machine yet keeps curious fingers out while providing a clear view of what the machine is doing. It also helps contain some of the heat from the bed but is not adequate for making really large ABS prints because the temperature inside the chamber never gets above about 40C.
The clear panels are great for public demos where I typically print smaller objects. I'll be making a set of side and top panels from PIR foam insulation board (using the material from MegaMax's enclosure) that should get the temperature inside the build chamber up to a more useful 50-60C or so.
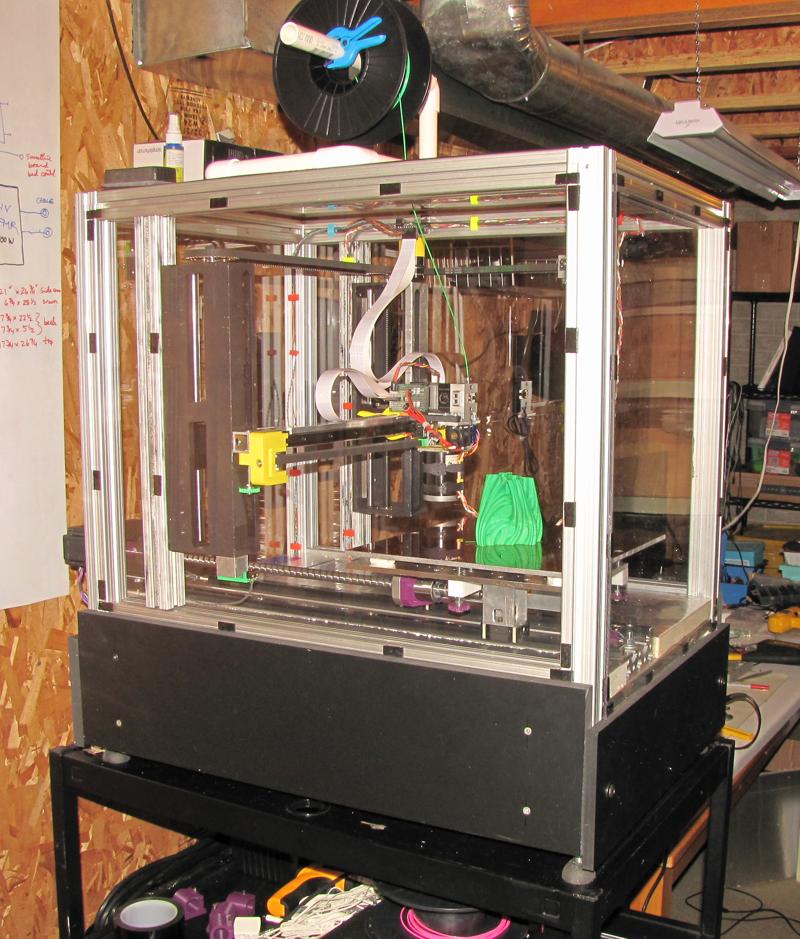
Update 1/2016: The velcro tape that was used to hold the polycarbonate panels on the machine's frame didn't like to stick to the aluminum for long. I also found they allowed too much air leakage that prevented the enclosure temperature from rising to the 45C+ needed to prevent delamination. I fixed the problem by using "match pole" magnetic tape (search ebay) applied to the printer's frame and the polycarbonate panels. Once again, the adhesive on the tape didn't like to stick to the aluminum for long so I applied some contact cement. It has been working perfectly for months. The magnetic tape strips seal the build chamber almost air tight and I no longer smell the typical ABS fumes when the machine is printing. I can easily remove and replace the polycarbonate panels if I need to do anything to the machine. I updated the photo of the printer on the front page of this Instructable that shows the magnetic tape.
Assembly


You have to pay careful attention to how you assemble your printer if you want it to work reliably and give good quality prints. It all starts with the frame.
The frame should be rigid and square. Rigidity comes through sturdy materials, squareness comes through proper cutting and joining of those materials. I used 8020 type aluminum extrusions because they are stiff, strong, and easy to machine. If you're lucky you can find used 8020 type extrusions at your local scrap yards for reasonable cost.
Once you've design the frame of your machine, you cut the pieces a little longer than you need, then mill the ends square and to final length. You can mill to equal lengths by putting a stop on the mill table and using it as a reference. If you do a good job of squaring and matching lengths, the frame will be square when you bolt it together. You can check that by measuring opposite diagonals- if they are the same length the angles are square. If not, you can make shims out of soda cans to correct any errors.
Use leveling feet and adjust the frame for stability on whatever surface it sits on. Even a rigid frame will flex a bit if it is set on an uneven surface without any way to adjust the level. If the frame flexes, screws and bearings may bind.
The X, Y, and Z axes are defined by the positioning of their guide rails. The guide rails of any axis should be parallel. In my original printer I used individual guide rails and to ensure they were parallel, I made mounting brackets using a milling machine to drill holes precisely, then bolted the brackets to 8020 "spines". In the new printer, I replaced the individual guide rails with linear guides that are much more precise and compact. They are also fully supported which contributes to the overall solid assembly, and ultimately to high print quality.
The axes have to be aligned to each other- there should be exactly 90 degrees between X, Y, and Z axes. If they are off, your printed gears will not mesh properly, squares will not be square, and you'll have a hard time printing parts for precision assemblies. You start getting the axes orthogonal to each other by aligning them to your frame which is already square. You align the axes to the frame by using metal spacers (just stack square pieces of scrap you may have handy) to set the guide rails/linear guides parallel to the frame members. Remember, it is the guide rails/linear guides that define the axes, not their supporting structures. If the frame is square and the guide rails/linear guides are aligned to the frame, the axes defined by the guide rails/linear guides will be orthogonal to each other.
SoM has modular X and Y axes, both of which are mounted using just two screws/bolts, making them easy to reposition for alignment. The Z axis is relatively hard to adjust, so X and Y axes are adjusted relative to the Z axis and each other. The Y axis is aligned to the frame by placing a metal spacer between the frame and the Y-axis linear guide at one end of the Y-axis, then tightening down the bolt, then moving the spacer to the other end of the Y-axis, and tightening down that bolt.
The X-axis attaches to the Z-axis screws which are aligned with the frame, so it will be close to 90 degrees with the Y-axis. It needs to be adjusted to be at 90 degrees relative to the Z-axis. I did the initial alignment using an electronic protractor that is spec'd to be accurate to 0.2 degrees. First I measured the vertical angle of the Z axis guide rails then the angle of the X-axis linear guide. I loosened one Z screw pulley and turned the screw to lift the low end of the X axis until it was 90 degrees from the Z axis guide rail, then tightened the pulley on the screw. Finally, I ran the X-axis up and down the Z screws to make sure it didn't bind anywhere.
The final alignment of the axes was done when the printer was operational. I printed a rectangular solid, measured its diagonals, and adjusted the positions of the X and Y axes until all three axes were orthogonal within the limits of my ability to measure. I have uploaded a calibration cube and spreadsheet to Youmagine. The spreadsheet uses the diagonal measurements to calculate the angular error and then tells you how much to adjust the axes to correct it. The physical length of the axis that it asks for is the distance between the attachment points of the axis to the frame, not the length of the guide rails or the boom. For example, in SoM the physical length of the Y axis would be the distance between the two bolts that hold it to the frame. In the spreadsheet, everything is labeled X and Y, but it can be used for any two axes by substitution.
A Few Comments About Reliability


Each compromise, no matter how small, impacts the overall reliability of the machine. It's a simple probability calculation. Let's say the Z screws use threaded rods which work "most of the time" and only occasionally cause binding that ruins a print. Maybe 95% of the time they work OK. Now let's say your bed is flat enough and the leveling scheme works (i.e. you successfully get prints to stick through completion) 95% of the time. Now let's include the "reliability" of a computer connection between a host computer and the printer- let's say it works right 95% of the time. Now factor in the reliability of the filament supply and call it 95% (you may run out or the filament may tangle on the spool). Now include the reliability of the extruder- call it 95% (it jams once in a while). All these seem like great numbers. The machine is going to deliver a good print 95% of the time, right? Wrong. If any one of these factors fails, the print fails. You have to multiply the reliability of each factor to get to the overall reliability (probability of success). 0.95 x 0.95 x 0.95 x 0.95 x 0.95 x 0.95 = 0.735
Every single thing that can affect print success/failure has a <100% reliability and therefore lowers the overall probability of success. When you start factoring in all the other compromises you see why cheap printers require so much attention. The extra attention is required to try to eliminate the uncertainties and push the probability of a successful print up. You weigh the filament spool before you start a print- that will push probability of the filament supply up from 95% to maybe 99.9% (<1 because the filament can still tangle on the spool), you carefully clean, level, and zero the bed before each print, etc.
Of course these numbers are not entirely realistic. I use them merely as examples to demonstrate how even apparently high reliability of individual components can quickly turn into low overall reliability in a complex system/process like 3D printing. That is why attention to detail matters. If you can raise the probability of success in a few factors, you can dramatically increase the overall probability of printing success. You may do that each time you run a print, or you can try to increase the probability of success at the hardware level so that you don't have to do so much tweaking at the start of each print. Print from SD cards instead of host software and reliability goes up. Use rigid construction and lead screws driven by a single motor in the Z axis and reliability goes up. Use a quality extruder/hot end and reliability goes up.
A print that runs to completion but looks bad isn't really a successful print (if it was intended to look nice). If you include print quality in your definition of success, there are a lot of additional factors to include in the calculation of overall print reliability. I can't think of anything you could do to improve reliability that would have a negative impact on print quality, but many of the things that improve reliability also improve print quality. Rigid frame construction, fully supported rails, quality bearings, all contribute to the probability of completion and quality of prints.
The Bed
I've addressed the print sticking problem in step 7. To summarize, you need a flat, level, adequately and evenly heated, clean, right-material surface, that moves in a linear (not curved) path. If you have all these things, you won't have much trouble with prints sticking to the bed. For maximum reliability, always clean the print bed before starting a print. If you use Kapton tape on the bed, wipe it with acetone while the bed is at room temperature before starting a print.
Filament
Filament is one of those topics that few agree on and many will argue about for hours. Just like any discussion of HDD quality among brands, there are rabid, foaming-at-the-mouth fans of some filament brands and equally rabid h8ers of the same brands. My experience with ABS filament has been mostly good. I suspect that a lot of the problems people seem to have with some brands of filament are related to poor printer quality/reliability/inadequate calibration, and/or slicing errors made by the operator. I've always had great results with Octave ABS filament, one of the commonly derided brands. These days I mostly use Coex3D ABS and find it to be of consistently high quality. When I want fluorescent colors, I go to Octave. For everything else, I use Coex3D.
Your print can't finish if you don't have enough filament on the spool. Most slicing software will estimate how many grams of filament will be needed to complete a print. Now all you need to know is how much filament you have left on a spool. That's easy. Weigh the spool. If you buy a 1 kg spool of filament and it weigh 1260 grams, it's a safe bet that the spool weighs about 260 grams. Mark the empty spool weight on the spool. When you're getting ready to start a big, long print, weigh the spool again and subtract the empty spool weight. Now you know if there's enough filament on the spool to complete the print.
Mechanical Failures
Mechanical failures occur when vibrations loosen screws, when mechanisms bind, or when filament tangles on the spool. Making sure you tighten screws adequately and use lock washers or even thread-locking compounds will help prevent mechanical failures. Using quality parts such as bearing supported lead screws instead of threaded rods will reduce binding problems. Some machines route filament through long tubes from the spool to the extruder. Keeping that path as short and straight as possible will lessen the chances of under-extrusion or outright print failure. I put the spool holder on top of SoM and route the filament straight down to the extruder without any bends or tubes. Other than careful handling of filament spools, I don't know how to prevent tangling filament.
Electrical Failures
There are a lot of potential problems with the electronics. Wiring can fail- especially wiring to the extruder carriage- because of repeated flexing. A lot of people like to use cable chains on their printers for the "professional" look it imparts. Avoid using cable chains that require wires inside to flex in a small radius. Sooner or later wires inside a cable chain will fail. Failures of this type will show up intermittently and will depend on the XYZ coordinates of the extruder because the cable flex depends on the XYZ coordinates of the extruder. See the attached photos.
Switching power supplies most often fail when you try to overload them. Maybe your bed doesn't get warm enough so you try turning up the voltage to drive a little more current into it. That sort of thing will kill a switching supply very easily. It will also cause controller board failures if you try to pass too much current through the circuit board traces. If your bed doesn't get hot enough, fast enough, use a separate power supply for it and switch power to the bed heater using an SSR. It is trivial to connect an SSR to any controller board -see the bed heater schematic in step 9.
Computer / Software Failures
A lot of people use computers running some sort of host software to send gcode to their printers. About an hour into my very first attempt at a multi-hour print, I discovered the problem with host software. My laptop that was driving the printer went to sleep. That got me thinking about all the ways in which a computer driving the printer can fail so I bought an LCD/encoder/SD card interface for MegaMax, and is why I got one for SoM as soon as it was available. Since that first failure I have avoided using host software as much as possible and printed almost exclusively from SD cards. A computer running host software only makes printing more unreliable. Host software can be very useful when you're tuning and calibrating the machine for the first time or if you make some design modifications, but otherwise it should be avoided. Most of the common/useful tweaks during printing can be applied using the LCD controller without using a computer. If you have to do a lot of tweaking of parameters during your prints, you're probably not setting the slicing parameters well. Get to know your slicer's options and use SD cards!
Remote printing via a network is the new "thing". I question its value and reliability. Most printers require you to be at the machine to remove a print, change filament, clean the bed, level and zero the bed. What is the value in remotely starting a print if you have to go to the printer to do all the prep work before you go back to your computer to remotely start the print? What if you just plugged in an SD card while you were at the printer doing the prep work? If you're not doing the prep work, you're asking for failures. I can see the value in having networking if you're running a printer farm, but for a hobbyist with a single machine it just adds additional failure modes.
Print Quality







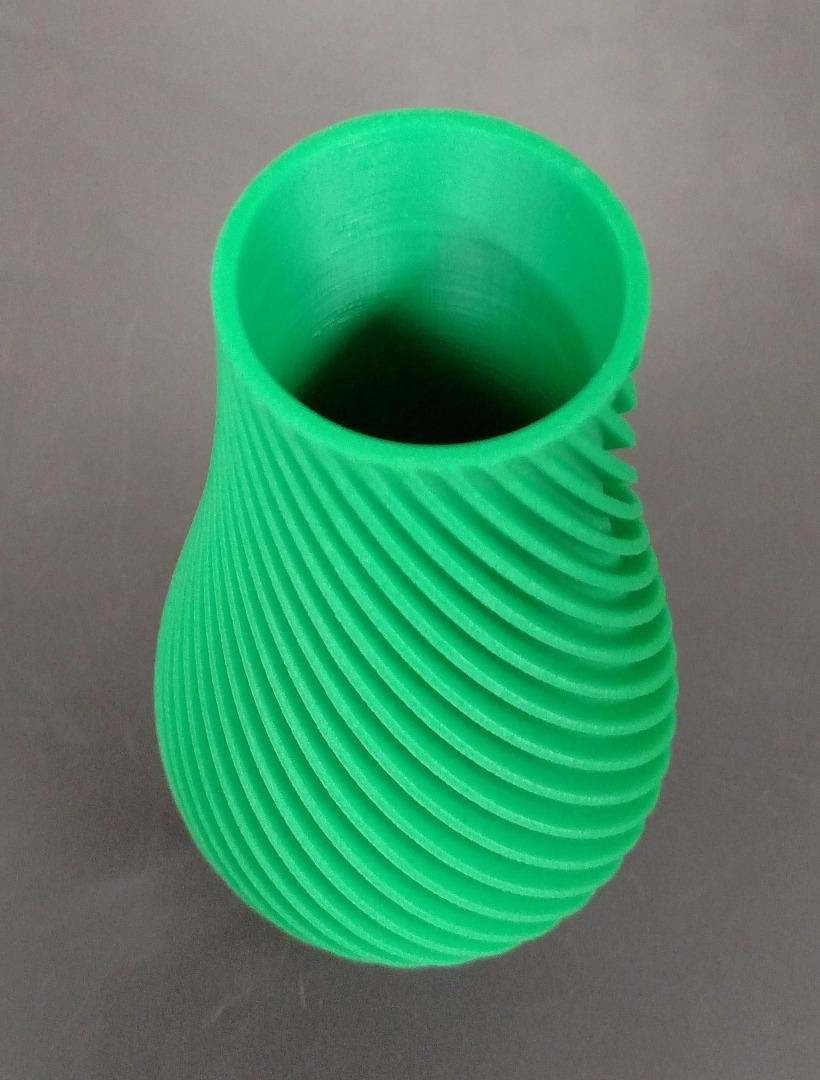


Even a lot of cheap printers can produce high quality prints- once in a while, after adequate messing around, and with some luck. If you want to take the messing around and luck out of the equation and get consistently high quality results, you start with a quality machine, and then align and calibrate the hell out of it. Finally, you have to design and/or slice parts with the right way.
I've already touched on aligning the axes.
Extruder calibration should be done before the steps/mm calibration and the final alignment of the axes. When you calibrate the extruder, I suggest that you do so using the thinnest layers you ever intend to print. If you get it right for the thin layers, it will be right for the thicker layers.
Calibration is very important for quality printing. I recommend you start where I did- here: Calibration Guide
Don't forget to turn on PID temperature control for both the bed and the hot-end. If the temperature is bouncing around, as happens with bang-bang temperature control, print quality will suffer. Use host software such a Pronterface to send PID auto-tune commands to the printer and then burn the resulting numbers into the printer's firmware.
Don't trust the printer's temperature readings until you actually measure temperatures yourself with a thermocouple plugged into a DMM or other electronic contact-type thermometer. Don't trust IR non contact thermometers to read temperatures accurately. The optimum extrusion temperature setting is best found by experimentation - too cool and you may have extruder jams, too hot and the print may get all hairy.
For slicing, I like Slic3r and Cura. Slic3r allows control over dozens of variables that affect print quality. Unfortunately, it seems to have problems working reliably. I've had best resits from Slic3r when I compile it from source code under Linux. Cura is more reliable and produces smarter support material, but doesn't quite give all the control that Slic3r does. Whichever slicer you use, study the options it provides in detail. This is also an excellent tutorial on precision work in Slic3r. This one has some good info on Cura settings for high quality printing.
I've recently started using volumetric extrusion for the convenience of it. It allows me to use the same gcode file regardless of the filament diameter. I used to have to re-slice every time I changed filament color (because the filament diameter varies from one spool to another) so I was having trouble managing all the filament profiles and gcode files. Now I slice once and can change colors without re-slicing. There is a good explanation near the end of the page here.
There are three things that you should mark on every filament spool:
- The type of material -ABS/PLA, etc.- which determines the bed and extruder temperatures needed to print with it among other things
- the weight of the empty spool - so you'll know you have enough to finish a print,
- the diameter of the filament.
Using the correct filament diameter is critical to print quality. If you don't slice or print with the correct filament diameter, your print will be over or under extruded, and may come out the wrong size. I always measure filament with a digital caliper than reads down to 0.01 mm. I measure in at least 20 places, spread out over several meters of filament, and at different orientations of the caliper on the filament, and enter the values into a spreadsheet or calculator to calculate the average filament diameter, and mark that value on the spool. I use that number for slicing/printing.
Finally...
SoM didn't solve all of MegaMax's problems- it's still too heavy to be easily transportable- but it successfully addressed most of them. Now all I have left are a few minor quibbles that I'll be addressing in the near future.
I feel like I've squeezed all the quality and reliability I'm going to be able to get from Son of MegaMax, so I'll be ramping down the improvement efforts and moving on to the next project- a 3D chocolate printer that I hope to debut at the Milwaukee Maker Faire in September. Son of MegaMax will be there whether the chocolate printer is working or not.
I hope this Instructable proves useful to you and wish everyone great success in 3D printing. Now go out and build yourself a great machine!
Credits:
A huge thanks to the Milwaukee Makerspace and Harrison Metals for making MegaMax and Son of MegaMax possible.
All CAD done by myself using DesignSpark Mechanical and SpacePilot Pro 3D mouse
The various 3D prints that appear in this Instructable are:
http://www.thingiverse.com/thing:104120
http://www.thingiverse.com/thing:570288
https://www.youmagine.com/designs/spiral-vase--2
http://www.thingiverse.com/thing:28050
http://www.thingiverse.com/thing:28052
Many of the 3D printed objects are my own designs, some of which you can find here:
https://www.youmagine.com/users/mark_rehorst
or here: