Arduino-Based Obstacle Avoiding Robot Using HC-SR04 Ultrasonic Sensor, Servo Motor, and L298N Motor Driver
by rishiljafer12 in Circuits > Arduino
24 Views, 0 Favorites, 0 Comments
Arduino-Based Obstacle Avoiding Robot Using HC-SR04 Ultrasonic Sensor, Servo Motor, and L298N Motor Driver
Introduction
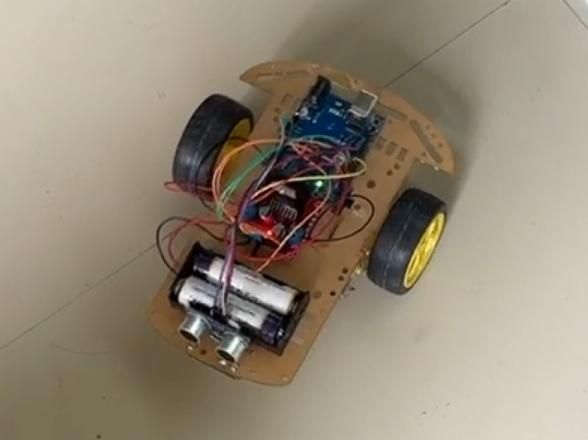
In this project, I built an autonomous obstacle-avoiding robot using an Arduino Uno, an HC-SR04 ultrasonic sensor, an SG90 servo motor, and an L298N motor driver. The robot is designed to move independently while detecting and avoiding obstacles in its path.
The ultrasonic sensor is mounted on a servo motor, allowing it to scan the left and right sides whenever an obstacle is detected. The Arduino processes the distance measurements and controls the motors to choose the direction with more free space. This enables the robot to navigate without any manual control.
This project is an excellent introduction to robotics, embedded systems, sensor interfacing, and motor control. It is suitable for students, beginners, and hobbyists who want to learn how autonomous robots work.
Features
- Autonomous navigation
- Obstacle detection using ultrasonic sensor
- Servo-based scanning mechanism
- Automatic left/right decision making
- Simple Arduino programming
- Low-cost components
- Beginner-friendly design
Supplies
Supplies
- Arduino Uno
- L298N Motor Driver Module
- HC-SR04 Ultrasonic Sensor
- SG90 Servo Motor
- 2 × TT DC Gear Motors
- Robot Chassis
- 2 Robot Wheels
- 1 Caster Wheel
- 7.4V Battery Pack (2×18650) or 6×AA Battery Pack
- Battery Holder
- Jumper Wires
- Breadboard (optional)
- Power Switch (optional)
- USB Cable
- Arduino IDE (Software)
Understanding the Working Principle
The robot continuously measures the distance in front using the HC-SR04 ultrasonic sensor.
- The robot starts by moving forward.
- The ultrasonic sensor continuously checks for obstacles.
- If no obstacle is detected within the preset distance, the robot continues moving forward.
- When an obstacle is detected, the robot stops and moves backward slightly.
- The servo rotates the ultrasonic sensor toward the left and measures the distance.
- The servo then rotates toward the right and measures the distance.
- The Arduino compares both measurements.
- The robot turns toward the side with more available space.
- After turning, it resumes moving forward.
This cycle repeats continuously, enabling the robot to navigate around obstacles automatically.
Circuit Connections
Connect all the components according to the following wiring:
Arduino to L298N Motor Driver
- ENA → D5
- IN1 → D2
- IN2 → D3
- ENB → D6
- IN3 → D4
- IN4 → D7
Arduino to HC-SR04 Ultrasonic Sensor
- VCC → 5V
- GND → GND
- TRIG → D9
- ECHO → D10
Arduino to Servo Motor
- Signal → D11
- VCC → 5V
- GND → GND
Power Connections
- Battery (+) → L298N 12V
- Battery (−) → L298N GND
- Arduino GND → L298N GND
Before powering the robot, verify all wiring and ensure that every component shares a common ground.
Assemble the Robot
Mount the two TT gear motors onto the robot chassis and attach the wheels. Install the caster wheel to provide balance and smooth movement.
Fix the ultrasonic sensor onto the servo motor so it can rotate freely for scanning. Secure the Arduino Uno, L298N motor driver, and battery pack to the chassis using screws, cable ties, or double-sided tape. Arrange the wires neatly to prevent them from interfering with the robot's movement.
Upload the Arduino Code and Test the Robot
Open the Arduino IDE and connect the Arduino Uno to your computer using a USB cable.
- Select Arduino Uno from the Tools → Board menu.
- Choose the correct COM port.
- Upload the obstacle-avoiding robot code.
- Disconnect the USB cable if required.
- Power the robot using the battery pack.
- Place an obstacle in front of the robot.
The robot should move forward, detect the obstacle, stop, scan both sides using the servo-mounted ultrasonic sensor, choose the direction with more free space, and continue moving.
Conclusion
This project demonstrates how an Arduino Uno, an HC-SR04 ultrasonic sensor, a servo motor, and an L298N motor driver can work together to create an autonomous obstacle-avoiding robot. It is an excellent project for beginners to understand robotics, embedded systems, and sensor interfacing.
Future Improvements
- Add IR sensors for line-following.
- Control the robot using Bluetooth or Wi-Fi.
- Add voice control.
- Integrate a camera for AI-based object detection.
- Improve navigation using advanced path-planning algorithms.
Thank you for reading! I hope this guide helps you build your own obstacle-avoiding robot. Feel free to customize and improve the design based on your own ideas.