Arduino Line Follower Color Sorter
by Taufiq_Sobari in Circuits > Arduino
7368 Views, 35 Favorites, 0 Comments
Arduino Line Follower Color Sorter

Arduino color sorter. The line follower robot moves along a line using 6 analog line sensors. If the robot detects red, it turns left, green goes straight and blue goes right. To reach the destination and return to the starting point, the robot counts the number of intersections.
Bill of Material


The parts required to build:
- 1 Arduino Nano
- 1 Nano I/O expansion shield
- 1 DIY Line sensor module (6 analog line sensor)
- 1 Servo
- 1 L298 driver motor
- 2 DC motor, bracket and wheel
- 1 Ball caster
- 1 TCS 3200 color sensor
- 1 Switch
- 1 Lippo 3S
- Jumper wire
DIY Line Sensor


Bill of material:
- 1 Double side prototype PCB
- 6 Super bright white Led
- 6 Phototransistor
- 6 Resistor 220 ohm
- 6 Resistor 10K ohm
- Pin header male
Testing DIY Line Sensor. Connect six sensors to the arduino nano as follow:
- All ground to Arduino ground and voltage inputs to the arduino +5V.
- Sensor 1 (left) modul sensor to Arduino pin A0.
- Sensor 2 to pin A1
- Sensor 3 to pin A2
- Sensor 4 to pin A3.
- Sensor 5 to pin A4.
- Sensor 6 (right) modul sensor to Arduinoi pin A5.
- Use electric black tape on white surface.
Connect the Arduino board to computer and upload the sketch. Open serial monitor, when sensor senses white surface then Arduino gets 0, and when senses black line arduino gets 1.
//Line Sensor Test
//https://www.instructables.com/Line-Follower-Robot-Arduino-Megauno-Very-Fast-Usin/

void setup()
{ Serial.begin(9600);
}
void loop()
{
Serial.print(digitalRead(A0));
Serial.print(' ');
Serial.print(digitalRead(A1));
Serial.print(' ');
Serial.print(digitalRead(A2));
Serial.print(' ');
Serial.print(digitalRead(A3));
Serial.print(' ');
Serial.print(digitalRead(A4));
Serial.print(' ');
Serial.print(digitalRead(A5));
Serial.println(' ');
delay(300);
 }
Downloads
PID


Once the line sensor is working properly, now install the motor driver. Connect the four pins on the motor driver to the the arduino nano as follow:
- IN1 to pin D7
- IN2 to pin D6
- IN3 to pin D5
- IN4 to pin D4
Connect the Arduino board to computer and upload the sketch. Try on a circular track, if the robot moves less well, reset Kp, Kd, Ts, maxPwm, motor speed.
//Line Follower sfeelectronics https://www.instructables.com/id/Line-Follower-Basic-Using-Arduino-Nano/

//Motor L298N
int mRight = 5;
int dirRight = 4;
int mLeft = 6;
int dirLeft = 7;


//Line sensor
int sensor[6] = {0,0,0,0,0,0};
int error, last_error, MV,pid_l,pid_r,D,D1,D2,D3,I,I1,I2,I3,P,Pd, bitSensor;
int Max_MV;
unsigned char Kp = 40;
unsigned char Kd = 0;
unsigned char Ts = 1;
unsigned char maxPwm = 75;


void setup(){
  Serial.begin(9600);


  //Motor L298N
  pinMode(mRight, OUTPUT);
  pinMode(dirRight, OUTPUT);
  pinMode(mLeft, OUTPUT);
  pinMode(dirLeft, OUTPUT);

  //Line sensor
  pinMode(A0, INPUT);
  pinMode(A1, INPUT);
  pinMode(A2, INPUT);
  pinMode(A3, INPUT);
  pinMode(A4, INPUT);
  pinMode(A5, INPUT);
}


void loop(){
    goDrive();
}


void readSensor(){
  sensor[0] = digitalRead(A0); sensor[1] = digitalRead(A1); sensor[2] = digitalRead(A2);
  sensor[3] = digitalRead(A3); sensor[4] = digitalRead(A4); sensor[5] = digitalRead(A5);
}


void goDrive(){
  readSensor();
  bitSensor = ((sensor[0]*1)+(sensor[1]*2)+(sensor[2]*4)+(sensor[3]*8)+(sensor[4]*16)+(sensor[5]*32));
  switch(bitSensor){
    case 0b100000: error = -5; break;
    case 0b110000: error = -4; break;
    case 0b010000: error = -3; break;
    case 0b011000: error = -2; break;
    case 0b001000: error = -1; break;
    case 0b001100: error = 0; break;
    case 0b000100: error = 1; break;
    case 0b000110: error = 2; break;
    case 0b000010: error = 3; break;
    case 0b000011: error = 4; break;
    case 0b000001: error = 5; break;
  }

  Max_MV = Kp*5;
  P = Kp * error;
  D1 = Kd*8;
  D2 = D1 / Ts;
  D3 = error - last_error;
  D = D2 * D3;

  last_error = error;
  MV = P + D;

  if(MV>=-Max_MV && MV<=Max_MV){
    pid_l = maxPwm + MV;
    pid_r = maxPwm - MV;
    if (pid_l < 0) pid_l = 0;
    if (pid_l > 150) pid_l = 150;
    if (pid_r < 0) pid_r = 0;
    if (pid_r > 150) pid_r = 150;
    forward(pid_r,pid_l);
  }
  else if(MV<-Max_MV){
    turnLeft(90,45);
  }
  else if(MV>Max_MV){
    turnRight(45,90);
  }
  else{
    forward(pid_r,pid_l);
  }
}


void forward(int valLeft, int valRight){
  digitalWrite(dirRight, HIGH);
  analogWrite(mRight, valRight);
  digitalWrite(dirLeft, HIGH);
  analogWrite(mLeft, valLeft);
}


void turnRight(int valLeft, int valRight){
  digitalWrite(dirRight, HIGH);
  analogWrite(mRight, valRight);
  digitalWrite(dirLeft, LOW);
  analogWrite(mLeft, valLeft);
}


void turnLeft(int valLeft, int valRight){
  digitalWrite(dirRight, LOW);
  analogWrite(mRight, valLeft);
  digitalWrite(dirLeft, HIGH);
  analogWrite(mLeft, valRight);
}
Downloads
TCS3200 Color Sensor


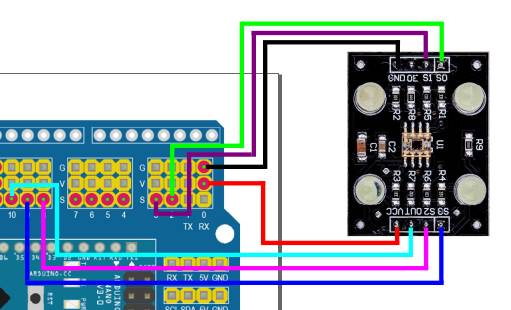
Connect pin TCS3200 to the arduino nano as follow:
- All ground to Arduino ground and voltage inputs to the arduino +5V.
- S0 TCS3200 to Arduino pin 2.
- S1 TCS3200 to Arduino pin 3
- S2 TCS3200 to Arduino pin 8
- S3 TCS3200 to Arduino pin 9.
- OUT TCS3200 to Arduino pin 10
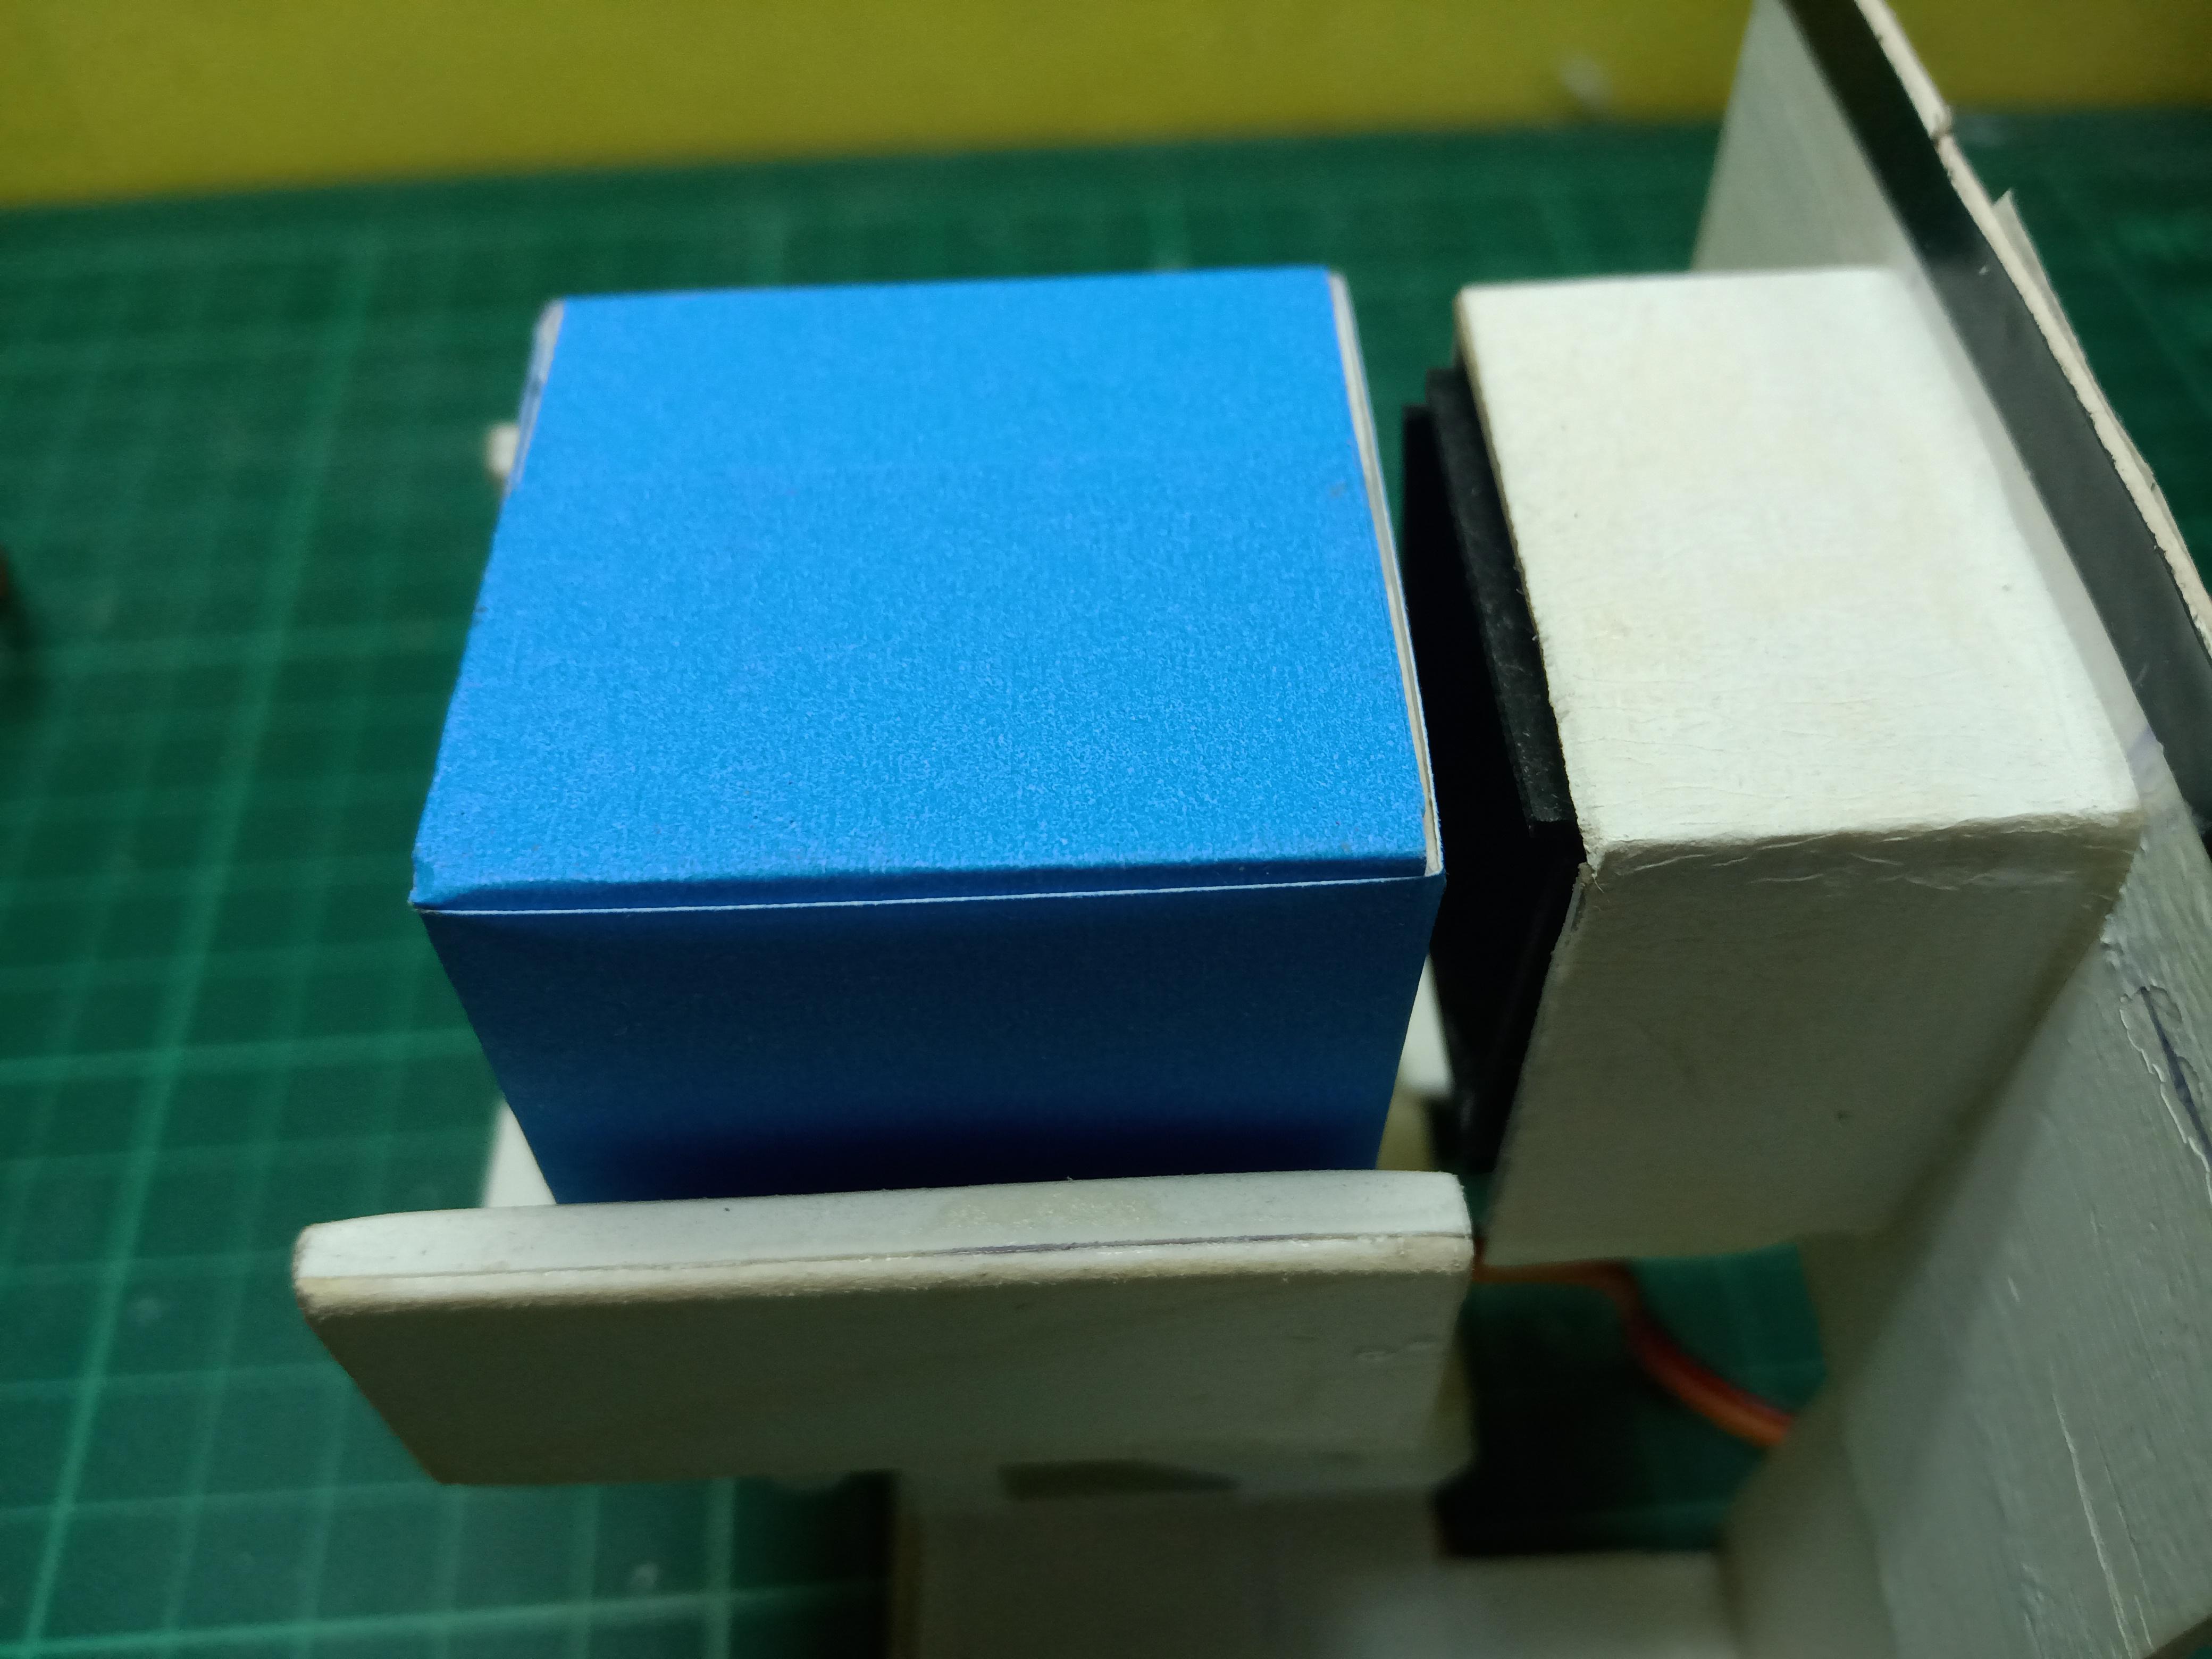
Connect the Arduino board to computer and upload the sketch by Dejan Nedelkovski. Open serial monitor, place the red, green and blue squares in front of the TC3200 sensor and record the values that appear on the serial monitor.
/*     Arduino Color Sensing Tutorial
 *
 *  by Dejan Nedelkovski, www.HowToMechatronics.com
 *
 */

#define S0 4
#define S1 5
#define S2 6
#define S3 7
#define sensorOut 8

int frequency = 0;

void setup() {
  pinMode(S0, OUTPUT);
  pinMode(S1, OUTPUT);
  pinMode(S2, OUTPUT);
  pinMode(S3, OUTPUT);
  pinMode(sensorOut, INPUT);

  // Setting frequency-scaling to 20%
  digitalWrite(S0,HIGH);
  digitalWrite(S1,LOW);

  Serial.begin(9600);
}

void loop() {
  // Setting red filtered photodiodes to be read
  digitalWrite(S2,LOW);
  digitalWrite(S3,LOW);
  // Reading the output frequency
  frequency = pulseIn(sensorOut, LOW);
  // Printing the value on the serial monitor
  Serial.print("R= ");//printing name
  Serial.print(frequency);//printing RED color frequency
  Serial.print("  ");
  delay(100);

  // Setting Green filtered photodiodes to be read
  digitalWrite(S2,HIGH);
  digitalWrite(S3,HIGH);
  // Reading the output frequency
  frequency = pulseIn(sensorOut, LOW);
  // Printing the value on the serial monitor
  Serial.print("G= ");//printing name
  Serial.print(frequency);//printing RED color frequency
  Serial.print("  ");
  delay(100);

  // Setting Blue filtered photodiodes to be read
  digitalWrite(S2,LOW);
  digitalWrite(S3,HIGH);
  // Reading the output frequency
  frequency = pulseIn(sensorOut, LOW);
  // Printing the value on the serial monitor
  Serial.print("B= ");//printing name
  Serial.print(frequency);//printing RED color frequency
  Serial.println("  ");
  delay(100);
}
Intersection

If the robot detects red, it turns left, green goes straight and blue goes right. To reach the destination and return to the starting point, the robot counts the number of intersections.
void mission(){
  robotRun();
  boxServo.write(10);
  if(sensorVal[5] == 1 && sensorVal[0] == 1){
  stopRun();
  color=readColor();


  switch(color){
    case 1: //Turn Left
      red();
      break;


    case 2: //Stright
      green();
      break;

    case 3: //Turn Right
      blue();
      break;


    case 0:
      stopRun();
      break;
    }
  }
}

void red(){
  intersection++;
  if(intersection == 1){
    turnBack(85, 85);
    }
    else if(intersection == 2){
      turnLeft(85, 85);
      }
    else if(intersection == 3){
      stopRun();
      boxServo.write(90);
      delay(1000);
      turnBack(85, 85);
      }
    else if(intersection == 4){
      turnRight(85, 85);
      }
    else if(intersection == 5){
      resetFunc();
    }
}


void green(){
  intersection++;
  if(intersection == 1){
    turnBack(85, 85);
    }
    else if(intersection == 2){
      stright(85, 85);
      }
    else if(intersection == 3){
      stopRun();
      boxServo.write(90);
      delay(1000);
      turnBack(85, 85);
      }
    else if(intersection == 4){
      stright(85, 85);
      }
    else if(intersection == 5){
      resetFunc();
    }
}


void blue(){
  intersection++;
  if(intersection == 1){
    turnBack(85, 85);
    }
    else if(intersection == 2){
      turnRight(85, 85);
      }
    else if(intersection == 3){
      stopRun();
      boxServo.write(90);
      delay(1000);
      turnBack(85, 85);
      }
    else if(intersection == 4){
      turnLeft(85, 85);
      }
    else if(intersection == 5){
      resetFunc();
    }
}
Motor movement when line sensor detects intersection.
void stright(int valLeft, int valRight){
 digitalWrite(dirRight, HIGH);
 analogWrite(mRight, valLeft);
 digitalWrite(dirLeft, HIGH);
 analogWrite(mLeft, valRight);
 while(sensorVal[0]==1){readSens();}
 while(sensorVal[5]==1){readSens();}
 while(sensorVal[2]==1){readSens(); robotRun();}
}

void turnRight(int valLeft, int valRight){
 digitalWrite(dirRight, HIGH);
 analogWrite(mRight, valRight);
 digitalWrite(dirLeft, LOW);
 analogWrite(mLeft, valLeft);
 while(sensorVal[5]==1){readSens();}
 while(sensorVal[4]==1){readSens();}
 while(sensorVal[3]==1){readSens();}
 while(sensorVal[2]==1){readSens();}
}

void turnLeft(int valLeft, int valRight){
 digitalWrite(dirRight, LOW);
 analogWrite(mRight, valLeft);
 digitalWrite(dirLeft, HIGH);
 analogWrite(mLeft, valRight);
 while(sensorVal[0]==1){readSens();}
 while(sensorVal[1]==1){readSens();}
 while(sensorVal[2]==1){readSens();}
 while(sensorVal[3]==1){readSens();}
}

void turnBack(int valLeft, int valRight){
 digitalWrite(dirRight, LOW);
 analogWrite(mRight, valRight);
 digitalWrite(dirLeft, HIGH);
 analogWrite(mLeft, valLeft);
 while(sensorVal[2]==1 && sensorVal[3]==1){readSens();}
 while(sensorVal[2]==0 && sensorVal[3]==0){readSens();}
 while(sensorVal[2]==1 && sensorVal[3]==1){readSens();}
 while(sensorVal[4]==0){readSens();}
}
Thanks you for:
- sfeelectronic
- LaHeEB
- Dejan Nedelkovski
- Educational Technologi