Arduino Uno and IR Sensor Integration: Unlocking Interactive Innovation
by ganesh_20203 in Circuits > Arduino
788 Views, 0 Favorites, 0 Comments
Arduino Uno and IR Sensor Integration: Unlocking Interactive Innovation


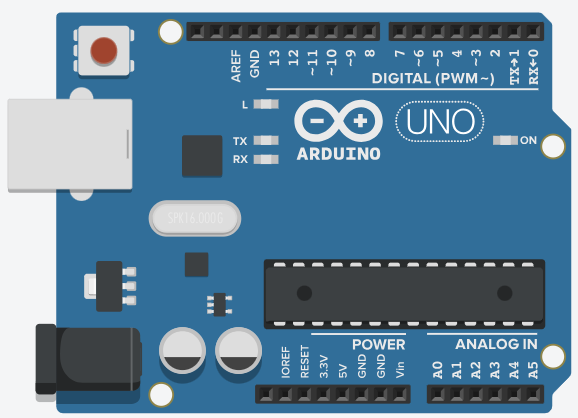
Arduino UNO Introduction:
The Arduino Uno is a popular open-source microcontroller board known for its ease of use and versatility. It has 14 digital I/O pins, 6 PWM outputs, and 6 analog inputs on the ATmega328P microcontroller. It runs at 16 MHz and can be powered by UART or an external source. The Arduino IDE makes it easier to program in a C/C++-based language. The platform is open source and known for its active community. Additional functionalities can be added using shields. The Arduino Uno is used in various projects ranging from robotics to home automation, making it appropriate for novice and experienced users.
IR sensor:
An infrared (IR) sensor detects objects by emitting and detecting IR light. It uses an IR LED as the emitter and an IR photodiode as the detector. When an object reflects IR light, the photodiode's resistances and output voltages change proportionally. The system includes an IR source, transmission medium, optical components, and detectors. IR sensors find applications in object detection and motion sensing.
Supplies
- Arduino UNO R3
- IR Sensor
- Jumper Cables
- UART cable
IR Sensor Working Principle

Working principle:
An IR sensor, comprised of an IR LED (transmitter) and an IR photodiode (receiver), operates based on the reflection of emitted IR radiation. When the IR LED sends out invisible infrared light, it reaches an object and reflects back to the IR photodiode. The photodiode's resistance and output voltage change in proportion to the received IR light, forming the basis for the sensor's working principle. This mechanism allows the IR sensor to detect objects and motion based on the intensity of reflected infrared radiation.
Arduino UNO R3 Pinout and IR Sensor Pinout


1. VCC: is the IR sensor's power supply pin, which we connect to the Arduino's 5V pin.
2. GND: A 5V TTL logic output is provided by this pin. LOW indicates that no motion is detected; HIGH indicates that motion is detected.
3.DAT: Should be connected to the Arduino's ground.
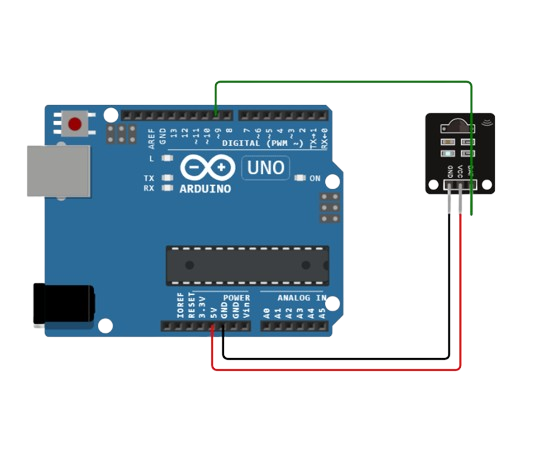
Arduino UNO With IR Sensor – Connection Diagram

- Connect 5V pin of Arduino Uno to VCC pin of IR sensor.
- Connect GND pin of Arduino Uno to GND pin of IR sensor.
- Connect digital pin 9 of Arduino Uno to DAT pin of IR sensor.
Arduino Code
int IRSensor = 9; // connect IR sensor to Arduino pin D9
int LED = 13; // connect LED to Arduino pin 13
void setup(){
Serial.begin(115200); //initialize serial at 115200 baud rate.
pinMode(IRSensor, INPUT); // IR sensor pin input
pinMode(LED, OUTPUT); LED pin output
}
void loop(){
int sensorStatus = digitalRead(IRSensor);
if (sensorStatus == 1) // check if the pin high or not
{
// if the pin is high turn off the onboard led
digitalWrite(LED, LOW); // led low
Serial.println("Motion Detected!");
}
else {
digitalWrite(LED, HIGH);
Serial.println("Motion Ended!");
}
}
Real Life Applications
1. Obstacle Avoidance Robot
2. Home Automation
3. Gesture Control
4. Automated Plant Watering
5. Digital Thermometer
6. Smart Doorbell
7. Line Following Robot
8. Object Counter
9. Remote Control Extender
Conclusion
The Arduino Uno and IR sensor integration unveils a realm of possibilities, fostering creativity in projects from home automation to robotics. The accessible programming and collaborative synergy empower enthusiasts, making this duo a cornerstone for innovative solutions. This exploration inspires future endeavors in the dynamic world of Arduino and sensor technologies.