Arduino+Servo+Potentiometer
by biomech75 in Circuits > Arduino
137985 Views, 159 Favorites, 0 Comments
Arduino+Servo+Potentiometer

In this tutorial I will show Arduino users how to control a continuous rotation servo or a normal servo.
This Instructurable cane be used in combination with my 4 Servos 2 Joysticks Instructurable to control a robotic arm.
It could be applied for example for the Claw Servo when needed to do the Open or Close action. And it will help you manage the amount of pressure applied to the Claw. Use your imagination! All the parts were bought @RadioShack except the micro servo.
NOTE: This Instructurable was made using other users ideas. And the main purpose is to help Arduino new users with their projects.
Materials

Simple materials.
Arduino UNO REV3
Bread Board
Jumper wires
Potentiometer
Micro servo
Standard Parallax servo (modified) [See my other Instructurable on how to mod this servo]
Arduino Software version 0023.(used in all my other Arduino Instructurables)
Arduino UNO REV3
Bread Board
Jumper wires
Potentiometer
Micro servo
Standard Parallax servo (modified) [See my other Instructurable on how to mod this servo]
Arduino Software version 0023.(used in all my other Arduino Instructurables)
Connection 1 Potentiometer


The connections are very simple.
Potentiometer: (Analog pin) It is the middle connection on the potentiometer
A0 to (Analog pin) Green on picture
Note: look at the picture diagram for a better detail of the connections.
Potentiometer: (Analog pin) It is the middle connection on the potentiometer
A0 to (Analog pin) Green on picture
Note: look at the picture diagram for a better detail of the connections.
Connection 2 Continuous Rotation Servo


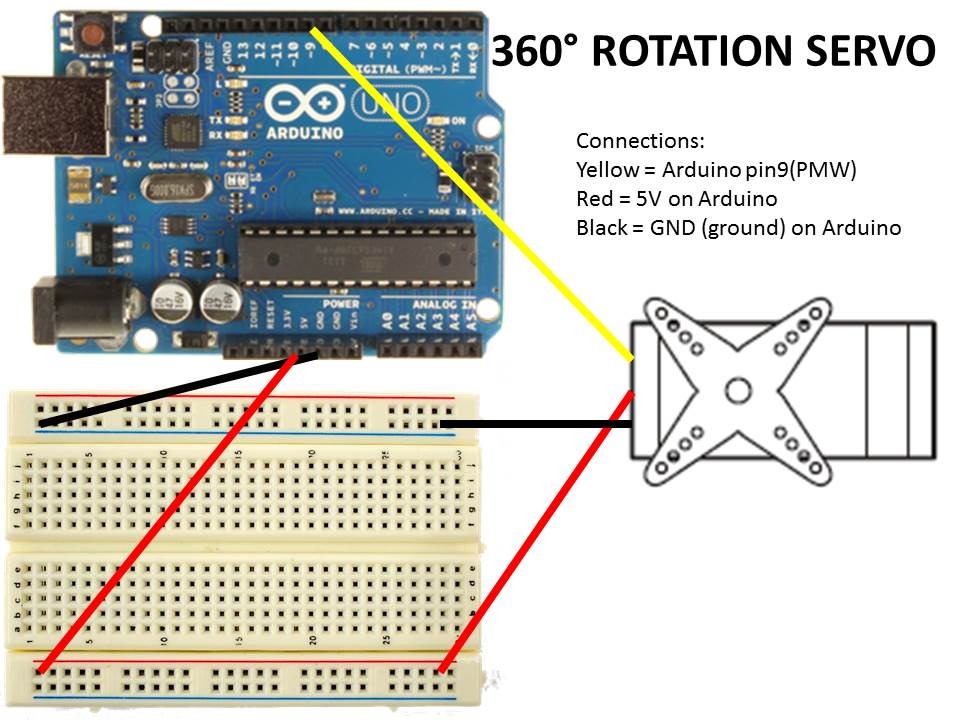
Continuous Servo
Servo Connections:
Red = Arduino 5V
Black = Arduino GND
White = Arduino (pin9)
Note: look at the picture diagram for a better detail of the connections.
Servo Connections:
Red = Arduino 5V
Black = Arduino GND
White = Arduino (pin9)
Note: look at the picture diagram for a better detail of the connections.
Connection 2 Normal Servo


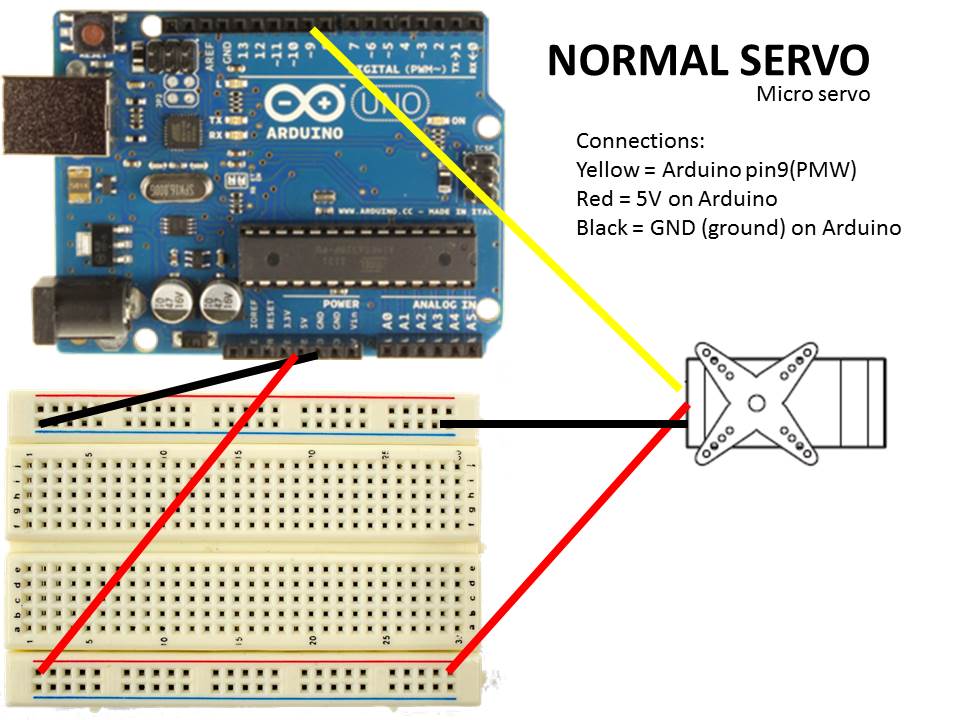
Micro servo
Servo Connections:
Red = Arduino 5V
Black = Arduino GND
White = Arduino (pin9)
Note: look at the picture diagram for a better detail of the connections.
Servo Connections:
Red = Arduino 5V
Black = Arduino GND
White = Arduino (pin9)
Note: look at the picture diagram for a better detail of the connections.
Code

Just copy and paste the code on your Arduino Sofware.
#include <Servo.h>
Servo myservo;
int potpin = 0;
int val;
void setup()
{
myservo.attach(9);
}
void loop()
{
val = analogRead(potpin);
val = map(val, 0, 1023, 0, 179);
myservo.write(val);
delay(15);
}
#include <Servo.h>
Servo myservo;
int potpin = 0;
int val;
void setup()
{
myservo.attach(9);
}
void loop()
{
val = analogRead(potpin);
val = map(val, 0, 1023, 0, 179);
myservo.write(val);
delay(15);
}
NEW CODE!!!

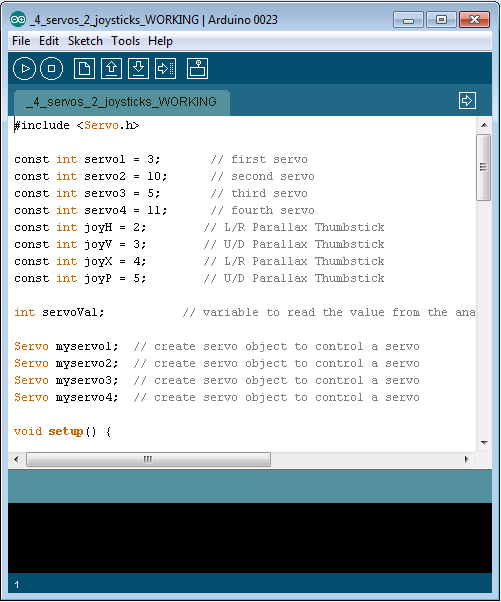
The following is the code I just modified for my other tutorial 4 servos + 2 joysticks Instructurable I have add the potetoimeter to control the open and close of the robotic claw. For more info go to my Arduino robotic arm Instructurable to learn more
CODE:
#include <Servo.h>
const int servo1 = 3; // first servo
const int servo2 = 10; // second servo
const int servo3 = 5; // third servo
const int servo4 = 11; // fourth servo
const int servo5 = 9; // fifth servo
const int joyH = 2; // L/R Parallax Thumbstick
const int joyV = 3; // U/D Parallax Thumbstick
const int joyX = 4; // L/R Parallax Thumbstick
const int joyP = 5; // U/D Parallax Thumbstick
const int potpin = 0; // O/C potentiometer
int servoVal; // variable to read the value from the analog pin
Servo myservo1; // create servo object to control a servo
Servo myservo2; // create servo object to control a servo
Servo myservo3; // create servo object to control a servo
Servo myservo4; // create servo object to control a servo
Servo myservo5; // create servo object to control a servo
void setup() {
// Servo
myservo1.attach(servo1); // attaches the servo
myservo2.attach(servo2); // attaches the servo
myservo3.attach(servo3); // attaches the servo
myservo4.attach(servo4); // attaches the servo
myservo5.attach(servo5); // attaches the servo
// Inizialize Serial
Serial.begin(9600);
}
void loop(){
servoVal = analogRead(potpin);
servoVal = map(servoVal, 0, 1023, 0, 179);
myservo5.write(servoVal);
delay(15);
// Display Joystick values using the serial monitor
outputJoystick();
// Read the horizontal joystick value (value between 0 and 1023)
servoVal = analogRead(joyH);
servoVal = map(servoVal, 0, 1023, 0, 180); // scale it to use it with the servo (result between 0 and 180)
myservo2.write(servoVal); // sets the servo position according to the scaled value
// Read the horizontal joystick value (value between 0 and 1023)
servoVal = analogRead(joyV);
servoVal = map(servoVal, 0, 1023, 70, 180); // scale it to use it with the servo (result between 70 and 180)
myservo1.write(servoVal); // sets the servo position according to the scaled value
delay(15); // waits for the servo to get there
// Read the horizontal joystick value (value between 0 and 1023)
servoVal = analogRead(joyP);
servoVal = map(servoVal, 0, 1023, 70, 180); // scale it to use it with the servo (result between 70 and 180)
myservo4.write(servoVal); // sets the servo position according to the scaled value
delay(15); // waits for the servo to get there
// Read the horizontal joystick value (value between 0 and 1023)
servoVal = analogRead(joyX);
servoVal = map(servoVal, 0, 1023, 70, 180); // scale it to use it with the servo (result between 70 and 180)
myservo3.write(servoVal); // sets the servo position according to the scaled value
delay(15); // waits for the servo to get there
}
/**
* Display joystick values
*/
void outputJoystick(){
Serial.print(analogRead(joyH));
Serial.print ("---");
Serial.print(analogRead(joyV));
Serial.println ("----------------");
Serial.print(analogRead(joyP));
Serial.println ("----------------");
Serial.print(analogRead(joyX));
Serial.println ("----------------");
}
Troubleshooting

The potentiometer does not do anything.
A: Make sure the middle connection of the potentiometer is connected to the Analog pin on the Arduino.
There is no power on the potentiometer.
A: Make sure you have not inverted the GND wire and the + wire (follow the diagram on step 2) If nothing happens then it is the faulty potentiometer.
The continuous rotation servo won't stop. Or it is vibrating when reach the middle position of the potentiometer.
That is normal for a continuous rotation servo and you should never try to keep it in the middle position or you will damage the servo.
( I already did this for testing purposes). You can only stop a continuous servo when using the script code (values) specifically, ex: pin-bot or an avoiding obstacles robot.