Automatic Window Closer

In our daily lives, the state of our windows is crucial for the comfort and safety of our indoor environment. However, simple human oversight can lead to significant issues that affect both property and convenience.
Rainwater Damage & Property Loss
Failing to close windows during unexpected rain leads to water seepage, damaging wooden floors, upholstered furniture, and electronic devices—resulting in expensive repairs and replacements.
Constant Vigilance & Inconvenience
Manually monitoring weather forecasts and remembering to close windows is a daily hassle. When away from home, this oversight creates unnecessary anxiety about potential indoor damage.
Our Arduino-Powered Solution:An intelligent system that uses a rain sensor module to detect precipitation in real-time. It automatically triggers window closure, eliminating human error and ensuring your home remains dry and secure—even when you’re not there.
Supplies


01
Arduino Nano Board
The "brain" of the project. It reads input from the rain sensor and processes data to send control signals to the servo motor.
02
NANO UNO Expansion Board
A convenient breakout board that simplifies wiring connections and provides additional power options for the Arduino Nano.
03
SG90 Micro Servo Motor
The "muscle" of the system. This compact motor converts electrical signals into precise physical motion to automatically close the window.
04
Rain Sensor Module (LM393)
This module acts as the system's "eyes", detecting the presence of water or rain and triggering the protective mechanism.
05
Jumper Wires & Battery Holder
Essential for establishing electrical connections between components and providing reliable, portable power to the circuit.
Software: Arduino IDE
A free, open-source integrated development environment used to write, compile, and upload code to the Arduino board
Hardware Assembly
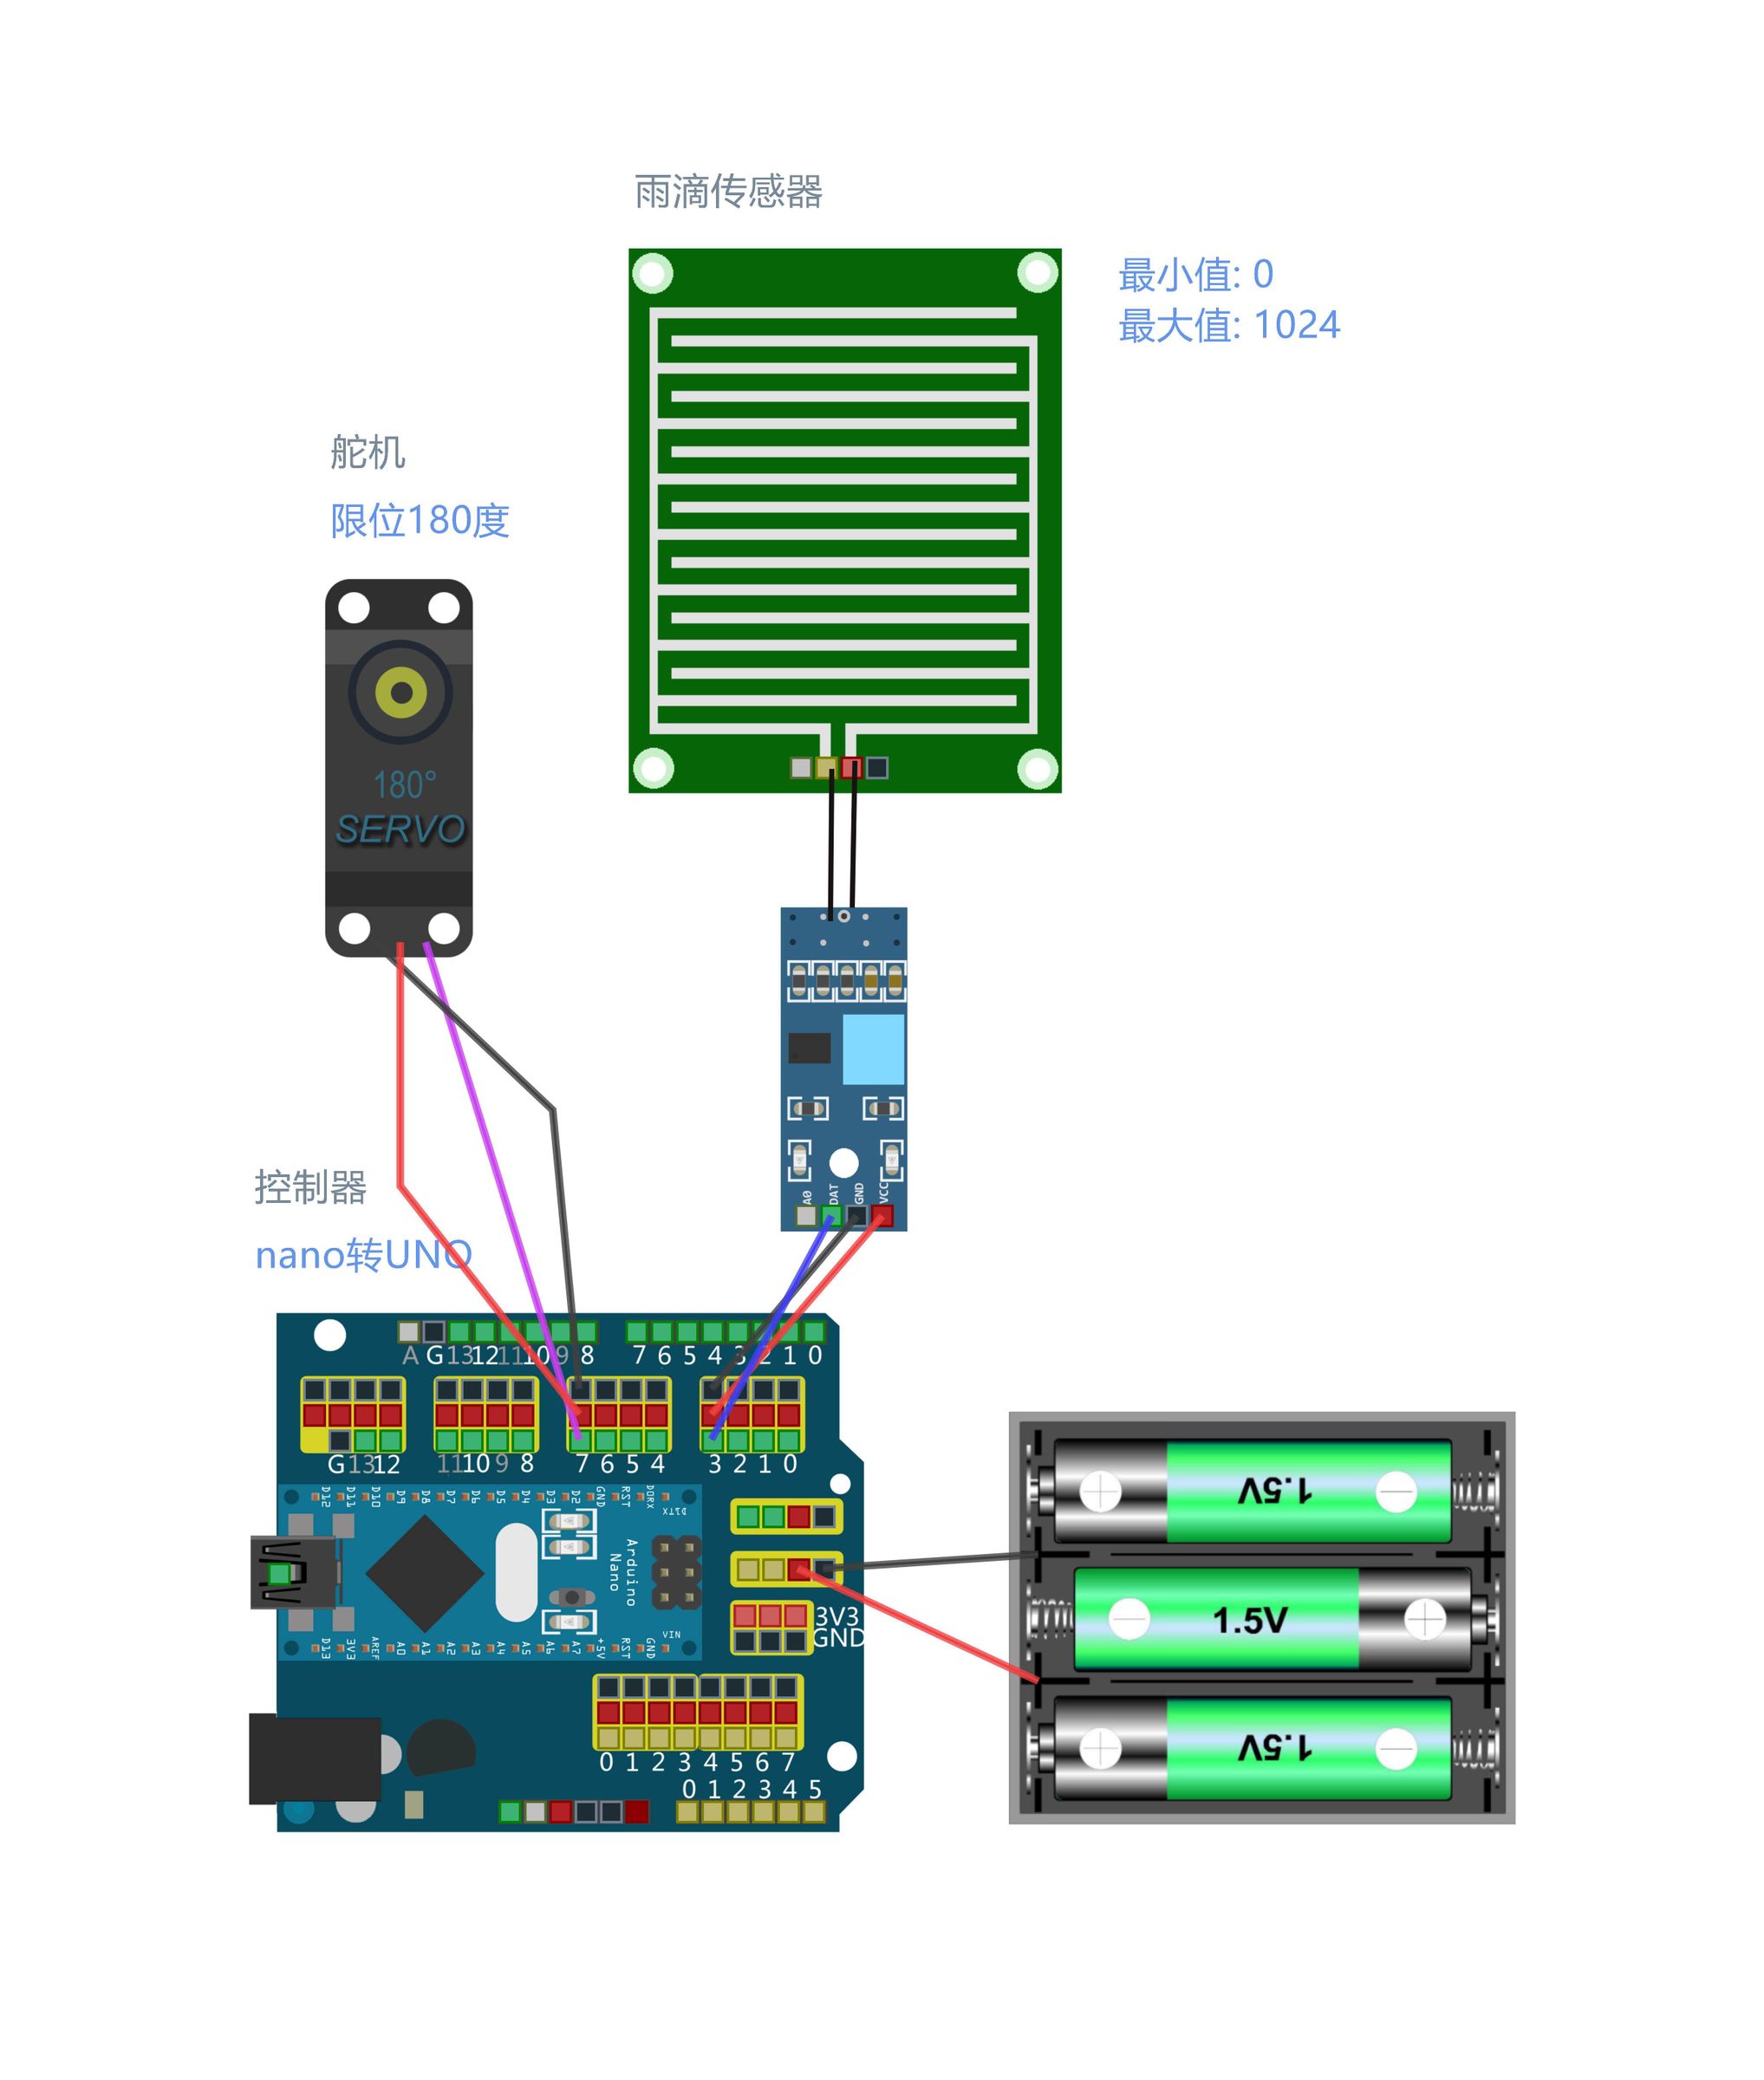
The assembly process is simple and involves securely mounting the core components and connecting the rain sensor and servo motor to the Arduino board following the specified pinouts.
01. Mount Components
Secure the Arduino, expansion board, and SG90 servo motor onto a stable base to prevent movement during operation.
02. Rain Sensor Wiring
VCC → 5V | GND → GND
Digital Out (DO) → Pin D3
Connect the sensor module to detect moisture levels accurately.
03. SG90 Servo Motor
Red(VCC)→5V |
Brown(GND)→GND
Orange(Signal) → Pin D7
Ensure the signal wire is connected to the correct digital PWM pin.
Critical Safety Check
Always double-check all wiring connections (polarity and pin numbers) before connecting the battery pack to avoid short circuits or component damage.
Hardware Assembly - Final Setup


Here is what the final setup looks like. The Arduino, sensor, and servo are all mounted on a wooden base, connected with jumper wires, and powered by a battery pack. This compact, integrated design is not only robust but also can be easily placed near any window for optimal sunlight exposure and seamless operation.
Compact Build
Neatly organized electronic components on a solid wooden base maximize space efficiency and structural stability.
Easy Installation
Designed for plug-and-play wiring, the unit can be quickly positioned near any window frame without complex tools.
Portable Power
Battery-powered operation ensures complete placement flexibility, with no dependency on nearby wall outlets.
Software Setup (Arduino IDE)
Before uploading the code, you need to set up the Arduino IDE on your computer. Follow these straightforward steps to ensure your environment is configured correctly for the project.
1. Install Arduino IDE
Download and install the latest version from the official Arduino website (arduino.cc). Ensure you get the version compatible with your operating system (Windows, macOS, or Linux).
2. Select the Correct Board
Open the IDE and navigate to the Tools menu. From the Board submenu, select "Arduino AVR Boards" and then choose "Arduino Nano" to match our hardware.
3. Choose the USB Port
Connect your Arduino Nano to your computer with a USB cable. In the Tools > Port menu, select the active COM port (Windows) or /dev/tty.usb (macOS/Linux) that your board is using.
4. Verify Built-in Libraries
For this servo motor project, the only required library is the 'Servo' library, which is pre-included with the Arduino IDE. No additional installations are necessary to proceed.
The Coding Part
Now it's time to bring the hardware to life with code. We'll initialize the servo motor and set up the rain sensor input to create the core logic for our automated system.
#include<Servo.h>
// Create a Servo object to control the motor on pin 7
ServowindowServo;
voidsetup(){ pinMode(3, INPUT); windowServo.attach(7); }
This code initializes the servo motor and configures pin 3 as an input to read data from the rain sensor. By attaching the servo to pin 7, we establish the control interface needed to actuate the window mechanism based on sensor feedback.
void loop() {
// Check the state of the rain sensor (LOW = water detected)
if (digitalRead(3) == LOW) { windowServo.write(70); delay(200); }// Close window
else { windowServo.write(180); delay(200); }// Open window
}
Key Configuration:Adjust the servo angles (70° for closed, 180° for open) to perfectly match your window's physical mechanism before uploading the final code to the board.
How It Works
.png)
Once the code is uploaded, your Automatic Window Closer is ready to go! The system operates in a simple, automated cycle triggered by environmental changes.
01. Rain Detection
The rain sensor module constantly monitors for moisture. When water touches the sensor's pads, it sends a LOW signal (0) to the Arduino's pin D3, acting as the trigger for action.
02. Automatic Closing
Upon reading the LOW signal, the Arduino immediately commands the servo motor on pin D7 to rotate to the 'closed' position (e.g., 70 degrees), sealing the window to prevent water ingress.
03. Automatic Reopening (Optional)
When dry, the sensor sends a HIGH signal (1), prompting the servo to rotate back to the open position (e.g., 180 degrees), restoring ventilation automatically.
How It Works - In Action
When water is applied to the sensor, the servo motor immediately activates, closing the window model. Once the water is removed, the window opens again. This simple yet effective logic ensures that your window is always protected from unexpected rain showers.
1. Water Sensing
Moisture sensors detect water contact instantly, triggering the core control logic to initiate the protective sequence.
2. Servo Motor Actuation
The motor rotates precisely to close the window model, creating a physical barrier that prevents rainwater from entering the structure.
3. Automatic Reset & Reopening
Once the moisture dissipates, the system reverses the action, reopening the window to restore ventilation and normal operation.