BABAI – DIY Interactive Desktop Robot Inspired by Dasai Mochi
by Gi_motion in Circuits > Electronics
1558 Views, 18 Favorites, 0 Comments
BABAI – DIY Interactive Desktop Robot Inspired by Dasai Mochi



BABAI – An Interactive Dashboard Companion
BABAI is a fully custom interactive companion that I designed and built from scratch in Ukraine. From the 3D modeling and electronics to the firmware, animations, and enclosure, every part of this project was created by me.
The name Babai comes from Ukrainian folklore. It is similar to the Boogeyman in English-speaking cultures—a mysterious creature often mentioned to children. My version, however, is not scary. Instead, it’s a funny, expressive, and interactive character that reacts to what happens around it.
The firmware includes around 35 hand-crafted animations. Every animation was created manually, frame by frame, using multiple software tools before being converted and programmed into the device. This process took a significant amount of time and allowed me to give BABAI its own unique personality.
BABAI is more than just a display. It reacts to movement while driving. Special animations are triggered when the vehicle turns left or right, or during hard braking, making the character feel alive. It also features a touch sensor—pet BABAI on the top of its head, and it will happily respond with a special animation.
This project combines 3D design, electronics, embedded programming, and animation into a single interactive gadget. I hope you enjoy building it as much as I enjoyed creating it.
Supplies

Parts I used for the project:
- Seeed Studio XIAO ESP32-S3
- 1.3 oled display SH1106 128*64 I2C
- MPU-6050 GY-521 gyro+axel
- DS18B20 temperatyre sensor
- ttp223 sensor button
- piezospeaker passive
- wire
Electrical Assembly
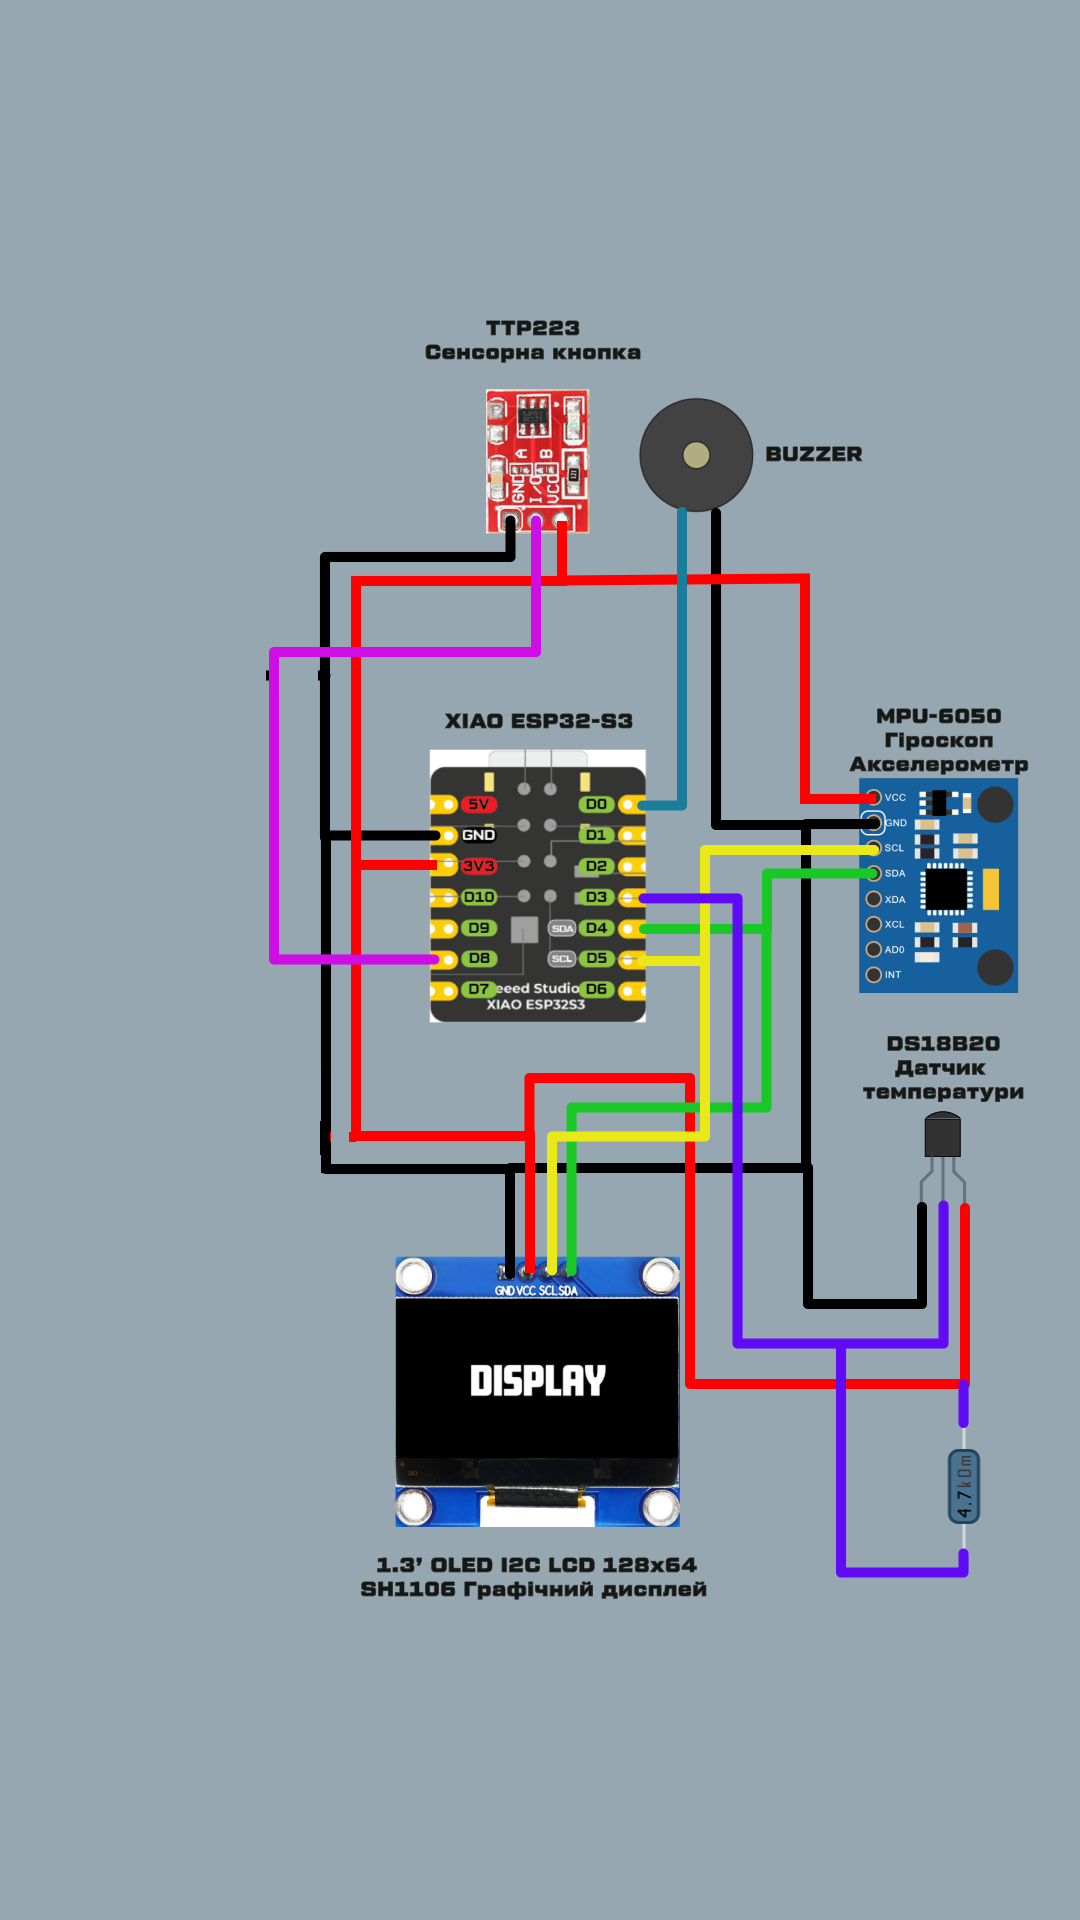


Assemble and solder the circuit according to the schematic, using short wires to ensure the entire assembly fits inside the enclosure.
Electrical Assembly


First, 3D print the parts. The required files are included with this project. Next, install the assembled electronics into the enclosure. Use small screws to secure the components in place. After installing the electronics onto the main frame, attach the main cover to close the enclosure.After that, glue the horns into place.
Downloads
Applying the Fur Covering


Next, prepare the fur covering. I used a soft plush fabric. Since I created the pattern by fitting it directly to the model, I don’t have exact dimensions to share. Trim the fabric as needed, then carefully fit it over the frame and glue it in place with cyanoacrylate adhesive (such as Loctite), adjusting it as you go. Finally, attach the bottom plate using screws.
Upload the Firmware


- Open the Arduino IDE and load the BABAI_2.2 sketch.
- Select the XIAO ESP32S3 board.
- Configure the board settings as shown in the screenshot below.
- Select the correct COM port.
- Click Upload to flash the firmware to the board.
The firmware is not included with this project because it represents nearly a month of development. Every animation was created frame by frame in several software applications before being converted and integrated into the code. If you’d like to use the complete firmware, you can purchase it using the link below. https://cults3d.com/en/3d-model/gadget/babai-diy-interactive-desktop-robot-inspired-by-dasai-mochi