Beginner’s Guide to Using Webhooks for Home Automation With Prota OS
by Naran in Circuits > Raspberry Pi
13210 Views, 28 Favorites, 0 Comments
Beginner’s Guide to Using Webhooks for Home Automation With Prota OS
.jpg)

TL:DR: webhooks are easy to use and set up with Prota OS. Use webhooks to hundreds of automation workflows.
Learn how to configure and use Prota OS for Raspberry Pi here.
Download Prota OS for Raspberry Pi here.
What are webhooks?
Google once called webhooks the programmable world of tomorrow. So what is a webhook?
Here’s how Wikipedia describes them: webhooks are user defined HTTP call-backs.
This description sounds complicated, but essentially it means that one web service can send instructions and notifications to another unrelated web service.
Webhooks have long been used to connect different parts of the Internet. One notable example is PayPal. If you are an e-commerce shop owner when a customer pays you, PayPal sends a notification to your server to a URL you specify, and (surprise, surprise!) that notification is a webhook.
How to use webhooks for home automation?
Since webhooks can be used to interconnect seemingly unrelated things offers many interesting and useful application in the realm of home automation. For example, you can set up your phone so send a webhook to your Raspberry Pi when your approach your home (based on iOS/ Android location). Then, when your Raspberry Pi receives this webhook, it can automatically initiate your welcome home workflow: turn on lights, cool down the indoor temperature and turn your favorite TV drama on.
It doesn’t take a computer genius to use webhooks.
Although it may sound complicated, creating using webhooks for home automation is incredibly easy. In this instructable we will show how to use webhooks for your home automation projects with 0 programming knowledge.
Install Prota OS on Your Raspberry Pi.
Prota is a complete operating system built from the ground up to manage the Internet of Things. Freely available for Raspberry Pi now.
Use Prota OS to remotely control light bulbs, power outlets, monitor security cameras, and operate MicroBots. Thanks to its unique web-based user interface, you can access and use Prota OS remotely from any smartphone, tablet or computer with an HTML5 compatible browser.
To install Prota OS on Raspberry Pi burn Prota OS image file into your SD card.
If you are a MAC user, type the following using the command line:
sudo diskutil unmountdisk {{location_of_yourSDcard}}
sudo dd bs=128k if={{location_of_prota_image}} of={{location_of_yourSDcard}}
Learn more about Prota OS here ( http://prota.info) or read this Instructable (https://www.instructables.com/id/Prota-OS-for-Raspberry-PiProta-Pi/).
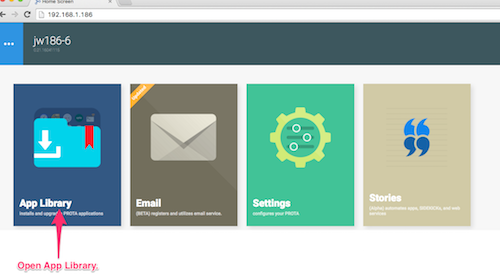
Access Your Prota and Install the Webhook App.


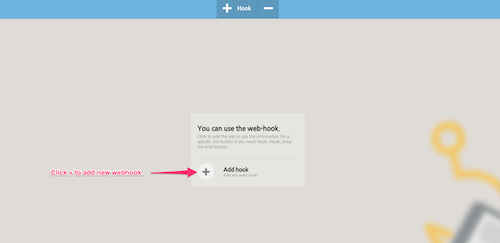
Open Webhook App and Add New Webhook

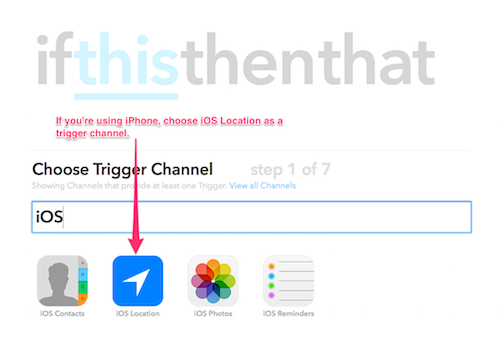
Now Let’s Setup the Same Webhook on Another Web Service. to Retrieve Phones Location, We’ll Use IFTTT.
To retrieve smartphone’s location, we will use IFTTT app.
Make sure that IFTTT app is installed on your smartphone. Then go to http://ifttt.com, log into your account and click to create a new recipe.
Choose IOS Location As the Trigger Channel.
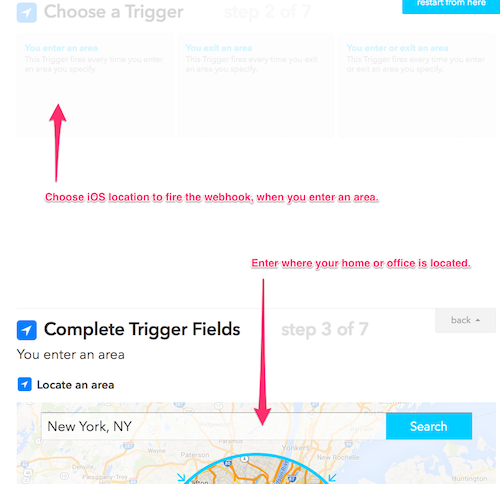
Complete trigger details and click create trigger to move to complete this step.
Choose Maker As Your Action Channel.

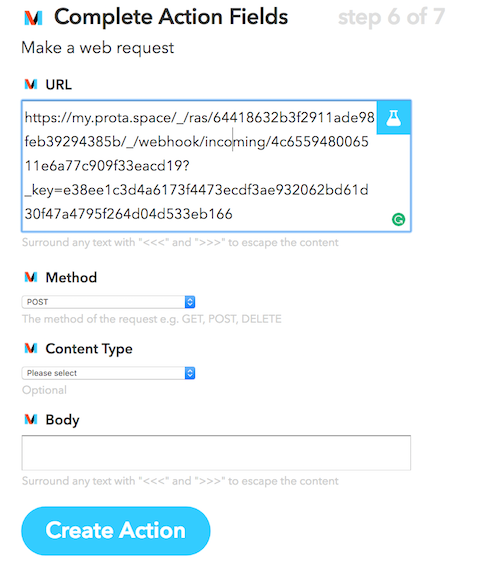
Complete Details and Add Prota URL Where to Send the Webhook.

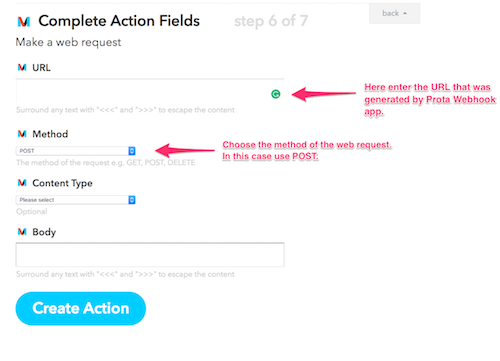
But wait! Where do you find the URL?!
Generate URL Where Prota Will Receive the Webhook From IFTTT.

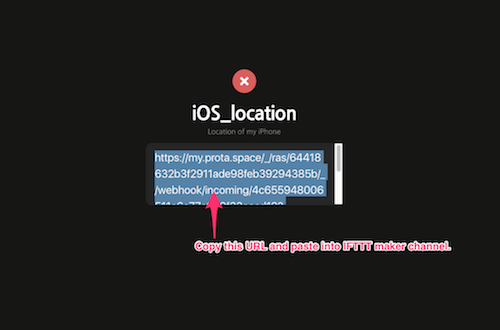
Go to Prota Webhook app and click on iOS_location and copy the URL.
Paste URL Into IFTTT and Click ‘Create Action’.
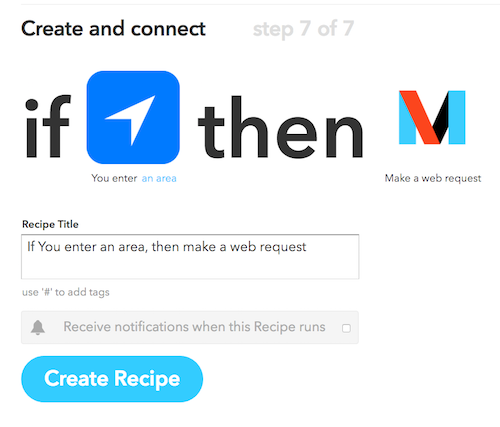
Name Your IFTTT Recipe and on IFTTT Side You Are Done!
Now Let’s Create Prota Home Automation Workflow When This Webhook Is Received.

Go back to Prota Home screen and open the Stories app.
Click on “ to Start Writing a New Automation Story.

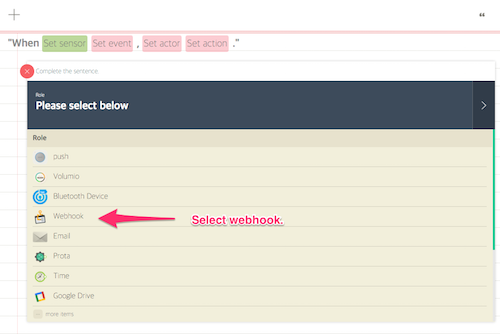
Set Webhook As the Event Sensor.


Now Let’s Choose What Happens When You Approach Your Home.
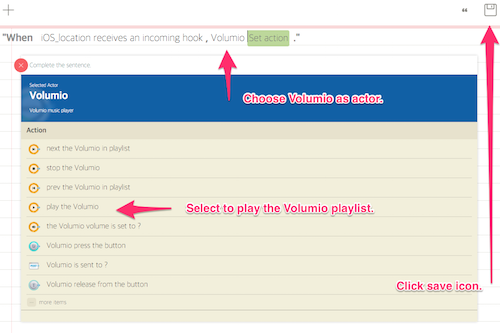
In this example lets make your Raspberry Pi to welcome you with music. Please keep in mind that Prota Volumio audio app has been installed already. Volumio can be found and freely installed from the App Library just like the Webhook app.
Congratulations, You’ve Just Successfully Used a Webhook to Connect to Connect Two Different Ends of the Internet.
.jpg)
Hope after reading this instructable you’ve learned something new! Keep in mind that you can use the same method to connect hundreds of different apps, services, and devices, not necessarily ones that we used in our example.
Download Prota OS for Raspberry Pi here: https://prota.info/pages/downloads
Install IFTTT app on your smartphone from here: http://ifttt.com
You like our projects? Make your own!
We are currently (and until July 30) running a maker contest. Show us the creative projects you can do with Prota OS and win awesome prizes!
More info here - https://support.prota.info/hc/en-us/community/top...
