Blinking Rudolph the Red Nose Reindeer Decorations
by olivialovan in Design > Art
122 Views, 1 Favorites, 0 Comments
Blinking Rudolph the Red Nose Reindeer Decorations

Create Your Own Rudolph the Red-Nosed Reindeer Decoration!
Bring the magic of Christmas to life with a custom, laser-cut Rudolph the Red-Nosed Reindeer sign that's sure to light up your home this season! Whether you're a crafting pro or just starting out, this easy-to-follow tutorial will guide you step-by-step to make your very own festive reindeer complete with a glowing red nose. Perfect for hanging around the house, or even adding to your Christmas tree, this adorable Rudolph will bring a smile to everyone who sees him. Gather your materials and let's get started on creating this charming holiday character!
Supplies
For this project, two main processes are using the Laser Cutter and using the Aurdino.
Laser Cutting:
- Glowforge Pro 3D Laser Printer
- Glowforge Proofgrade Medium Draft board
- Computer
- Online Website Glowforge
Aurdino:
(Please note all the Aurdino materials came from The Aurdino Uno 3 Ultimate Starter Kit )
- Aurdino
- Aurdino software
- Breadboard
- Jumper Wires
- Red LED
- 330 Ohm Carbon Film Resistor
- USB cable to connect the Arduino to your computer
How to Use a Laser Cutter: Step-by-Step Instructions

Laser cutters are powerful tools that use a focused laser beam to cut, etch, or engrave materials with precision. Below is a general guide on how to safely and effectively use a laser cutter.
If the laser cutter is set up, skip to Step 3: Preparing Material, but If you need to get the laser cutter set up follow the instructions below.
Set Up Laser

Set Up and Preparation
a. Unbox and Place the Glowforge:
- Remove the Glowforge from its packaging and place it on a sturdy, flat surface with good ventilation.
- Ensure the area has access to power and Wi-Fi for remote control.
b. Connect to Power and Wi-Fi:
- Plug in the Glowforge and turn it on.
- Follow the on-screen instructions or the manual to connect the Glowforge to your Wi-Fi network.
c. Set Up the Glowforge App:
- Go to the Glowforge App on your computer or mobile device and log in to your Glowforge account.
- You can create an account if you don’t have one already.
- The Glowforge works entirely through this web-based app, which allows you to upload designs, adjust settings, and start your projects.
Preparing Material


Prepare the Material
a. Select the Right Material:
- Glowforge works with a wide range of materials, including:
- Wood (plywood, MDF, hardwood)
- Acrylic
- Leather
- Cardboard
- Fabric (with some precautions)
- Avoid using materials that release harmful fumes (e.g., PVC) or that are too reflective (e.g., mirrors).
b. Place the Material in the Glowforge:
- Open the lid and place your material on the bed of the Glowforge.
- The material should be flat and free of wrinkles, so use masking tape if necessary to secure it.
- Ensure the material is aligned with the bottom-left corner of the bed, as the Glowforge uses this as the origin point for design placement.
Designing Your Project


Design Your Project
a. Create or Import Your Design:
- You can design directly in the Glowforge app or use a design created in external software like Adobe Illustrator, Inkscape, or CorelDRAW.
- Designs can be saved in .SVG, .PNG, .JPG, and .PDF formats. Vector files (like .SVG) are ideal for cutting, while raster images (like .PNG) are suitable for engraving.
- For this project, I was able to look up the image I wanted on Google and then paste it directly into the glowforge software. Image found here. Then I added a small circle on the nose for the lightbulb.
- Tip: Make sure your design is the correct size for your material and that you’re working within the Glowforge bed's dimensions (12" x 20").
b. Upload Your Design to the Glowforge App:
- Go to the Glowforge app and click on "Upload" to import your design file.
- Once uploaded, you can adjust the design’s position, size, and orientation on the bed.
c. Set the Cut/Engrave Settings:
- In the Glowforge app, select each part of your design (e.g., cut, engrave, or score). The app will automatically suggest default settings based on the material and type of operation.
- Common Settings Adjustments:
- Cut: Use high power and slow speed.
- Engrave: Use moderate power with a slower speed, depending on the material.
- Score: This is a lighter engraving that leaves a visible line but doesn’t cut all the way through.
- You can manually adjust the Power and Speed sliders to fine-tune your settings if necessary. Always run a small test cut or engraving first.
- I have the settings I used in the photos above.
Focus the Laser
Focus the Laser
Glowforge uses an automatic focus system, so you don’t need to adjust the focus manually. However, you should check the material thickness to ensure it’s flat and at the correct height for the laser to focus properly.
- Set the Thickness of the Material:
- The Glowforge uses a Camera to automatically scan the material and detect its thickness, but for more accurate results, you can manually set the material's thickness in the app.
Start the Laser
Start the Laser Cutting or Engraving
a. Check Everything Before Starting:
- Confirm that the design is placed correctly on the material and that the settings are appropriate.
- Ensure the material is properly aligned and secured.
b. Start the Job:
- Make sure the Machine is on
- Click on the "Print" button in the Glowforge app to start the process, and the button on the Glowforge machine.
- The Glowforge will perform a brief pre-scan of the material to confirm its size and adjust settings accordingly.
- Once the scan is complete, the Glowforge will begin cutting or engraving the material.
c. Monitor the Process:
- Glowforge has a live camera feed, so you can monitor the progress of your job through the app.
- If you need to stop the job for any reason, you can click "Pause" or "Cancel" in the app.
Clean Up
After the Job is Complete
a. Wait for the Glowforge to Finish:
- The Glowforge will notify you when the job is done, and you’ll hear the machine's cooling fans stop.
- Let the material cool down, as it might be hot after being cut or engraved.
b. Remove the Material:
- Once the job is finished and the bed has cooled down, open the Glowforge lid and carefully remove your material.
- Be cautious of any edges that may be sharp or hot after cutting.
c. Clean the Glowforge:
- Use a soft cloth to clean the glass, removing any smoke residue or debris that may have accumulated.
- Keep the lenses clean. You can use a lens cleaning wipe to gently clean the laser lens.
- Empty the exhaust fan filter or clean the vent if necessary (depending on your Glowforge model).
How to Use the Arduino


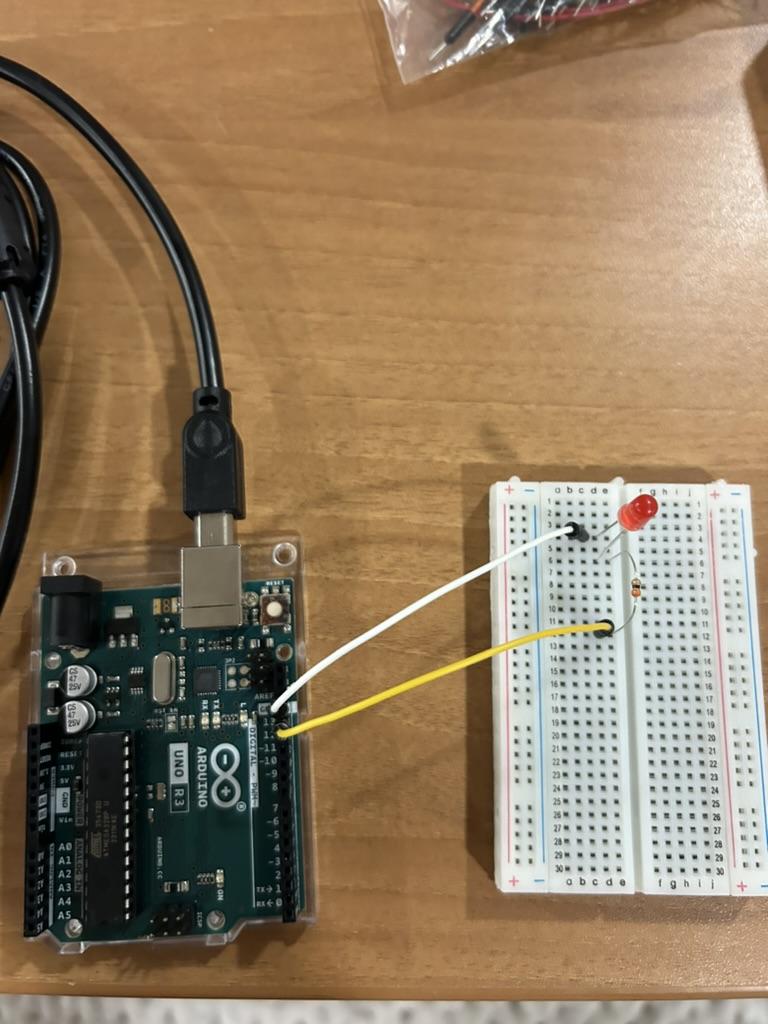
Wiring the LED
- Place the LED on the breadboard (optional, but helps keep things neat).
- The longer leg (anode) of the LED is the positive (+) side, and the shorter leg (cathode) is the negative (-) side.
- Connect the anode (positive leg) of the LED to a digital pin on the Arduino, typically pin 13 for simplicity.
- Use a jumper wire to connect the anode to pin 13 (or any other pin if you choose to modify the code later).
- Connect the cathode (negative leg) of the LED to one side of the 220Ω resistor.
- Connect the other side of the 220Ω resistor to the GND (ground) pin on the Arduino.
- This resistor protects the LED from drawing too much current and burning out.
Your LED should now be correctly connected to the Arduino.
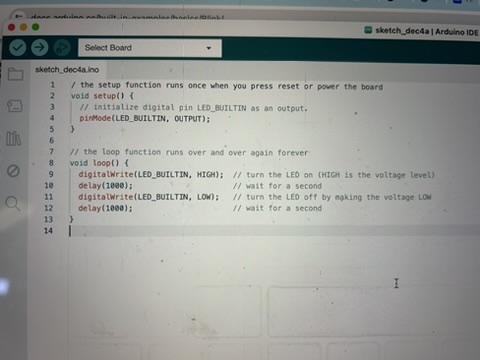
Code for LED
Open the Arduino IDE on your computer. If you don't have it, you can download it from the Arduino website as linked above.
Create a new sketch by going to File > New.
Copy and paste the following code into the Arduino IDE:
Upload and Running Code

Upload the Code to the Arduino
- Connect the Arduino to your computer using the USB cable.
- Select your Arduino board type (e.g., Arduino Uno) by going to Tools > Board.
- Select the correct COM port by going to Tools > Port.
- Click the Upload button (the arrow icon in the top left of the Arduino IDE) to send the code to your Arduino board.
Explanation of the Code:
- pinMode(ledPin, OUTPUT); sets the specified pin (in this case, pin 13) as an output so it can control the LED.
- digitalWrite(ledPin, HIGH); turns the LED on by applying a HIGH voltage (5V).
- digitalWrite(ledPin, LOW); turns the LED off by applying a LOW voltage (0V).
- delay(1000); pauses the program for 1 second before continuing with the next command.
Put Up Your Reindeer
Step you your Roudolph and Enjoy!! Below are some common troubleshooting fixes that you may run into!
Laser Cutter:
Burnt or Poor Quality Cuts:
- Check the power and speed settings. You may need to adjust them for thicker materials.
- Ensure the material is flat and properly focused.
- Clean the lens and the machine to ensure the laser is operating at full power.
Laser Not Cutting Through Material:
- If the laser is not cutting through the material, increase the power or decrease the speed.
- Check the material settings and make sure you’ve selected the correct material type in the app.
Design Alignment Issues:
- Double-check the material placement on the bed and ensure it’s properly aligned with the origin point (usually the bottom-left corner).
- Use the camera preview in the app to confirm the design’s position before cutting.
Tips:
Test Cuts: Always run a small test cut or engrave first to make sure your settings are correct.
Material Variations: Different materials (even within the same category) may react differently to the laser, so adjust settings accordingly.
Avoid Overlapping Cuts: When using multiple cuts or engravings, ensure they do not overlap or affect each other.
Use a Grid for Precision: The Glowforge app has a grid overlay feature to help you align your design more precisely.
Ardunio:
Check your wiring carefully, especially the polarity of the LED and the resistor.
Ensure the Arduino IDE is properly configured, including selecting the correct board and port.
Press the reset button on your Arduino if the upload fails.
Use appropriate delay times and avoid conflicts with other software (e.g., Serial Monitor).
Test your components (LED and resistor) to make sure they're functioning properly.