Archery Bow Stand for Recurve and Classical Bows
834 Views, 7 Favorites, 0 Comments
Archery Bow Stand for Recurve and Classical Bows


When I started archery as a hobby again, a couple of years ago, I learned that any person taking this sport seriously has a bow stand for her/his recurve bow. This does make sense in light that it is quite impractical carrying your bow to the target when you go to retrieve your arrows, because it’ll simply be in the way and you most certainly don’t want to lay your bow on the ground to get dirty.
Instead you take some branch to hang it on. Without a ready branch, it’s best to take something that is portable and ideally folds up when not needed.
Thus, bow stands were invented!
Bow stands come in a couple of flavors:
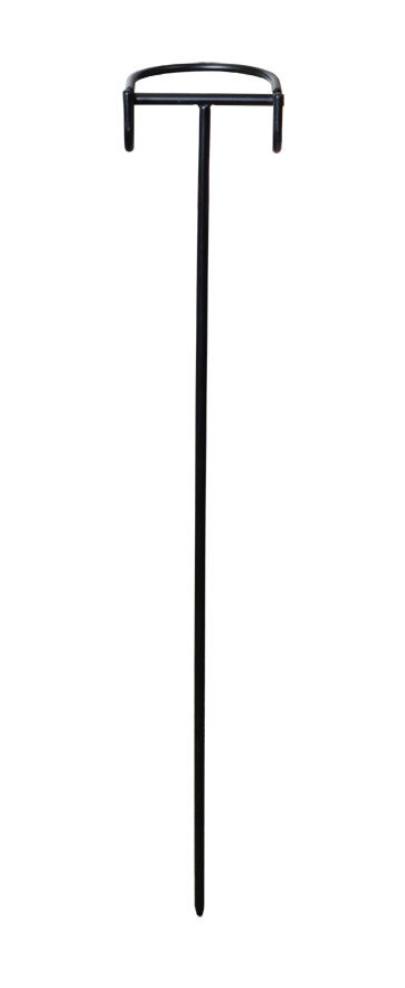
The simplest is a bent piece of metal rod that you stick in the ground with one end, while the other end is bent in some sensible way to allow the handle of our bow to be placed on top.
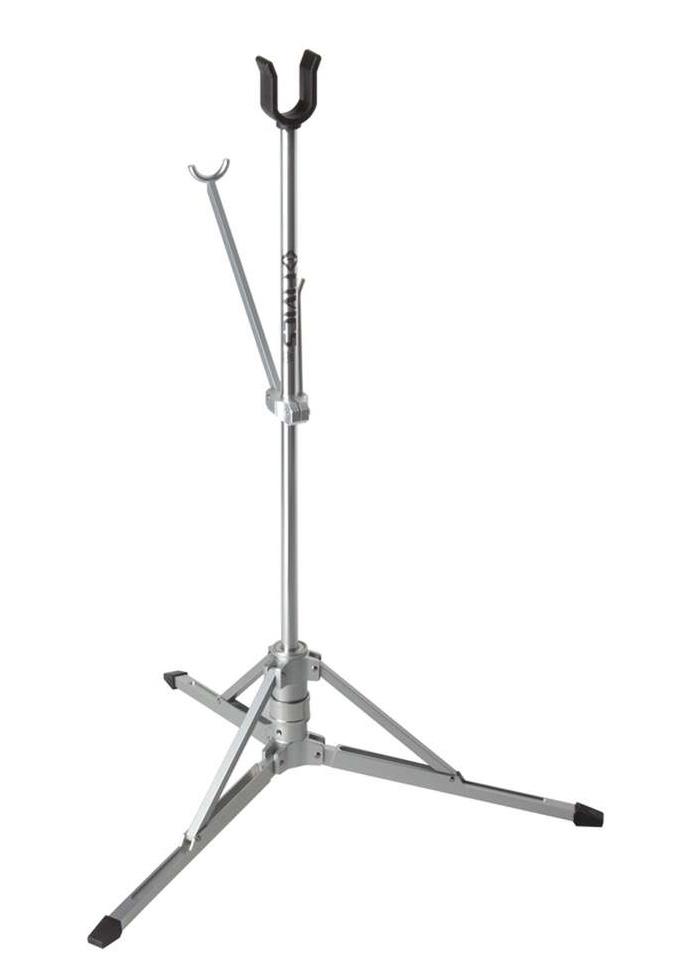
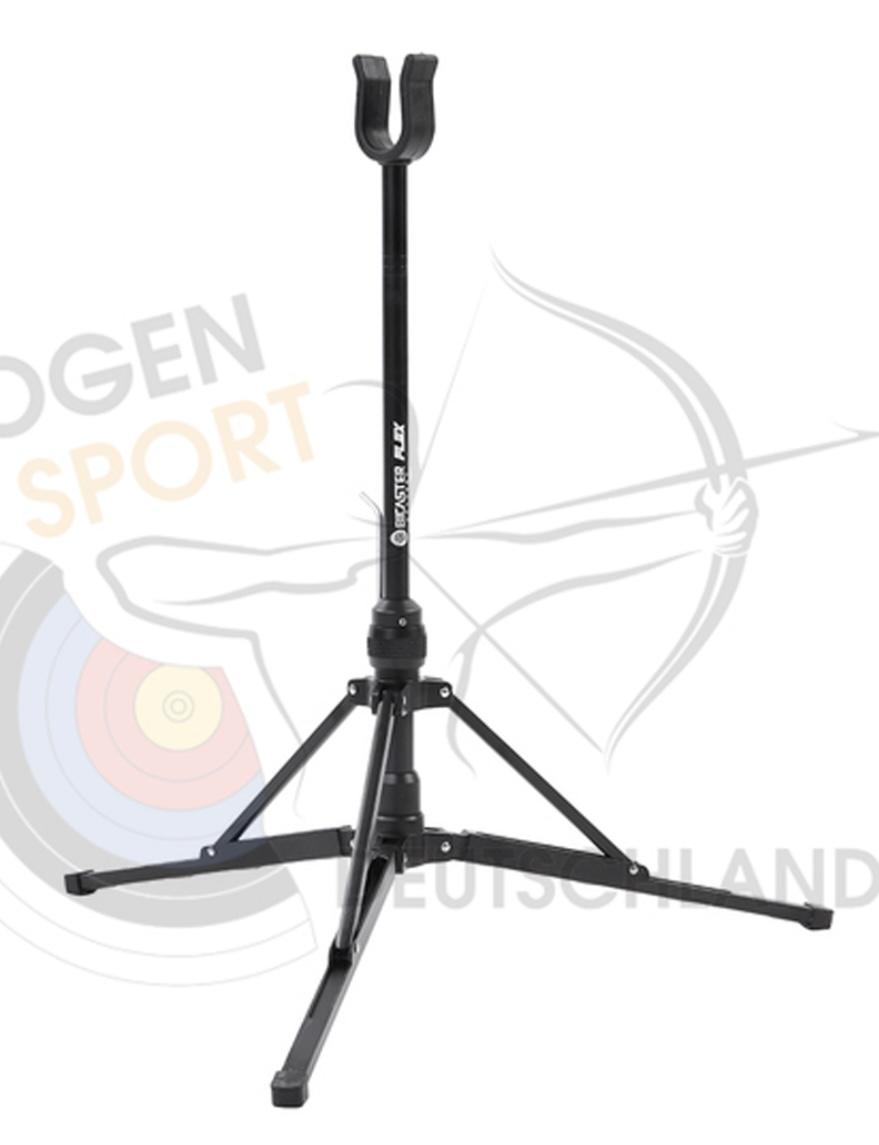
Since a tripod is always stable on semi-flat ground, that’s what the other designs normally adopted.
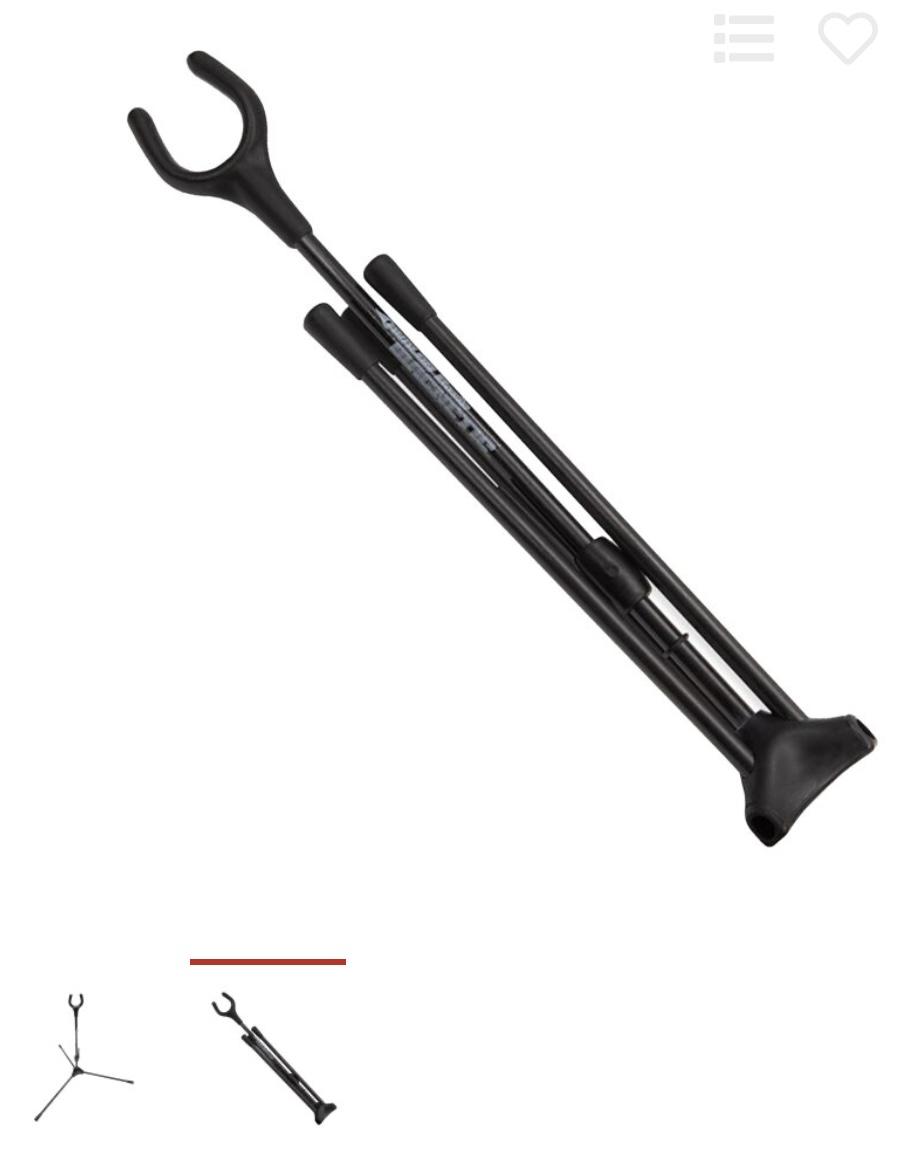
Here, things vary with different versions where removable legs are stuck into the bottom connector on a vertical shaft with a U at the top for the bow handle, to versions where the legs are permanently attached, but upward foldable for storage.
With starting costs of around 10 Euro, they are also quite affordable, so why not just get a cheap one?
Because you can build your own, of course!
Ok, there are many ways to waste time, but how do you define „wasting“ time?
I like to try to do things differently, to see if it can be done - like a “DaVinci Cryptex”: does it really have to be done like a boring bike lock? Actually, no, and maybe someday I will get around to posting my solution….
Anyway, back to the subject….
Supplies
A bow stand needs to be relatively tough, so people can step on its feet without breaking them.
It needs to be able to support a normal recurve bow.
So, wood is nice, but if you drill holes into dowels, they tend to break, or split near them. Square strips from ply are tougher, but not nice and wood would be a bit chunky anyway….
So, fiberglass or carbon fiber - too tedious to work with and expensive….
So, metal rods or thin pipes.
The ones I had lying around (in the box beneath my desk) from a previous project (Orrery) were brass, so it would look cool, but they didn‘t fit well inside each other.
Some time before this project, I had seen three sizes of Aluminum pipes at the local hardware store (Bauhaus) that fit perfectly inside each other, so I settled on them for a prototype and brass for the real thing.
As usual, I never got past the prototype stage, because it’s still working fine….
- Three aluminum pipes that fit inside each other (10, 8, 6 mm x 100 cm)
- A few nails were repurposed as metal rods for hinges
- Some quick setting epoxy to hold the pieces together
- A length of M4 threaded rod that fits inside the smallest pipe, matching long nuts, a couple of washers, a bolt, as well as a bit of plastic stopper
- The U at the top is made from the metal strip from a document hanger - why not repurpose things?
- A short piece of clear PVC-hose from the aquarium as padding for the holder.
- Small hack saw
- A drill bit the size of the smallest pipe
- A couple of nails (ca. 1 mm)
- A drill bit the size of the hinge nails
- A couple of files
Design


So let‘s do things differently:
What if the legs fold down, instead of up?
I don‘t want have things cluttering my backpack and getting lost, so as few lose parts as possible.
- The legs are permanently attached to the central rod hub, but can swing out and in.
- The central rod has to be always a few cm above ground when the legs are extended.
- Therefore, the legs must interlock, i.e. block each other in a central hub, when opened, so that they can never rest flat on the ground.
- Therefore, when the legs are extended, the central shaft is blocked by the legs, so that the shaft rests on the joined legs.
- When the shaft is removed from the central hub and the hub is picked up, the previously extended legs automatically swing inward, opening the central shaft-bore so that the shaft can be reinserted for storage, also blocking the legs against reopening
- Oh, and the height of the central shaft needs to be adjustable - I’m an old man….
Because I like to figure out three dimensional problems without a computer, I usually sit around with a vacant look when planning and end up making a couple of illegible sketches on paper to clarify things that my mind stumbles visualizing.
With three available Aluminum pipe sizes, it‘s a simple matter of stability and counting:
- Since I want a central pipe, that can be extended, the hub needs to be the largest diameter pipe. To make a tripod, it makes sense to use six more sections of the largest pipe around the central one, because it‘s the most stable arrangement.
- With three legs, three of the outer sections will remain empty. With the amount of material that will be removed for the legs to be able to be hinged, it makes sense to use the middle size pipe to fill the three hinge-pipe-sections and so double their wall thickness.
- That leaves the thinnest pipe for the legs - not ideal, but the central pipe section would have really thin strips left, after the planned cut-outs. So thin legs it is.
- For the central mast, that leaves the middle pipe size and the narrow one to telescope, with a central threaded rod to arrest settings.
- And some sort of metal strip at the top as holder.
Ok, that‘s easy!
The first desk I worked at war extremely cluttered, the second one less so, because I had finished most work at the first. Even with the extremely limited tools I had, I really enjoyed the whole thing!
As usual, I didn’t really have much time and I ended up winging many of my calculated measurements, but it worked out anyway.
The Tripod / Central Hub


First, I cut all the lengths of aluminum pipes and removed the burrs. I cut the leg pieces a little longer, so that you can remove the excess later.
Making the hinges for the legs in the hub is the hardest part.
The smaller diameter sections of pipes are glued into the larger ones with epoxy glue.
Holes need to be drilled into the combined larger pipe sections, so that the narrower pipes, i.e. the legs will fit through. Since the legs must not be able to achieve a 90 deg angle to the central shaft, the holes must be drilled at the desired angle.
This is a bit tedious without the right tools. I managed by drilling perpendicular holes half way into the hinge-pipes from opposite sides and then filing away with a small round jeweler’s file until things fit to my design. Because the legs are supposed to fold in towards the central shaft for storage, the part along the lengths of the larger pipe sections below the lower hole need to be removed. I did this using the saw and a file - not really elegant.
To make the hinges, small holes for the nail-hinge-pins need to be drilled through these pipe pieces, perpendicular to the removed parts, so that the legs will be able to move freely.
Now it is time to drill holes into the legs to be able to attach them into the hinges. For me it worked pretty well to drill the holes at roughly the distance from where the legs will meet in the middle of the central shaft, because the excess material is easily removed with a file later on.
With an uncut nail as axle, it’s easy to test the hinges and file the holes until everything moves freely.
Next, the three holes in the central (largest) pipe were drilled at 120 deg angles to each other. Then they were each enlarged as slots upwards along the pipe section to allow the legs to swivel in and out later on. Since the central pipe can be moved up and down until things are glued together, the distance of the slots from its bottom end is not so important, as long as all the holes are on the same level. The slots need to extend far enough up so that the legs can freely swing in and out though. By moving the central pipe up and down relative to the hinge-pipes before glueing, the final distance above ground can be adjusted.
The inner ends of the legs have to be pointed with 60 deg angles - a bit difficult, because it’s also to be raised ca. 30 deg above the ground and the ends have to meet in the exact center of the central pipe. This is the most tedious part, but also the most important, so a bit of patience helps.
I assembled the three hinges - semi-permanently - and arranged them together with the three empty pipe segments around the central pipe and held them in place with rubber bands. This way I could remove them again and again to file away at bit at a time until the legs met as perfectly as possible with the tools at hand.
This accomplished, the hinge-rods were cut to fit.
After all the cutting and filing, all the pieces were thoroughly cleaned with soap and water and acetone.
Then, the hinge-pins were glued into place.I actually Made longer than needed and had to drill some holes in the neighboring pipes to accommodate them - no problem.
The hinge assemblies were arranged together with the empty pipe segments around the central pipe. After arranging everything to fit according to plan, without much friction for the legs, the central pipe was adjusted to allow for the desired ground-clearance. The legs can be shortened later accordingly, but it’s more sensible to make sure the central pipe will be in a vertical position now.
Once everything was as exactly placed as possible and held in place with rubber bands and tape, the glueing started. Small amounts of quick setting epoxy glue were mixed and the the segments glued together step by step. It’s really important to do this carefully, because it’s virtually impossible to remove glue, if it gets into the hinges or pipes - so, patience….
I didn’t get things perfect, because I was impatient and didn’t know better and had to adjust things later, because the stand wouldn’t stand quite vertically, so it’s really best to take the time before glueing.
Ok, the hardest part is done and the tripod finished!
The Central Mast


This part is relatively easy, because there is no tedious geometry involved - it’s basically just a simple rod, or so.
Since everything is supposed to collapse to not much longer than the length of the legs plus the hub, using only a rod of that length would give the stand a total height of maybe 35 cm, which is a bit low. So therefore, it needs to be constructed to telescope up with and additional inner segment, that can be adjusted for different heights.
I decided to implement this with a section of pipe inside the other with a central threaded rod and a couple of nuts and a compressible plastic plug. When you tighten the nut on the rod at the upper end of the inner pipe, it compresses the plastic plug at the bottom, arresting the narrow pipe+rod inside the larger pipe.
The pieces were cut and put together in a cinch - compared to the hub part.
To be able to place the bow on top of the stand it needs a holder on top. The best I came up with at the time was to bend a strip of metal into a U-shape, with a hole in the middle and attach it to the central rod with nuts.
The most sturdy metal strip I had was from a document folder hanger, so I reappropriated it and used a short length of clear PVC hose from an aquarium, that just fit the strip, as padding to avoid scratching the bows.
Finished!


The stand looks quite flimsy, but it works great, though the tripod falls off the central rod quite easily when you carry it around.
The stand is extremely lightweight and collapses nicely. I stick it into my bow quiver with the arrows when not needed. Folded, the stand is just 30 cm long and about 4 cm wide. Extended, the bow‘s grip rests at 36 cm and it reaches 52 cm.
When you pull out the central rod, you can pick up the hub and the legs automatically fold in and then you can replace the rod - done.
It still doesn’t stand quite straight, but luckily the ground I put it on usually isn’t quite even either, so it doesn’t really bother.
It does look and feel a bit fragile, but so far it has survived more than two years of missteps, so it’s fine with me.
It’s just fun to have something that works differently than all the other stands around.
So it was definitely worth the exercise and effort!
I hope this will inspire you to think outside the box from time to time too - it‘s fun!
Stay fascinated!