Build Your Own Retro TV With Raspberry Pi (Offline Zapping Machine!)
by rsappiawf in Circuits > Raspberry Pi
6571 Views, 66 Favorites, 0 Comments
Build Your Own Retro TV With Raspberry Pi (Offline Zapping Machine!)


I was born and raised in Argentina, but I’ve been living in Germany for over 13 years now — my kids were born here, and they’ve grown up in a totally different world from the one I knew as a kid.
Back in the 90s, TV wasn’t on-demand. You’d flip through channels and stumble upon the most random ads, jingles, and moments that somehow stuck in your memory. I wanted to show my kids what that felt like — the fun of not choosing, of just discovering.
That’s how TVArgenta was born: a retro-style TV built with a Raspberry Pi and a 3D-printed case, designed to bring back that chaotic, charming world of old television — the ads included!
I filled it with nostalgic Argentine commercials (hence the name TVArgenta), but you can load any content you want — local commercials from your own country, vintage cartoons, or even your family videos.
And the best part? The same hardware setup can be reused for anything else you imagine — from a RetroPie gaming console to a digital art frame or a custom offline media player.
Everything runs 100% offline, giving you a self-contained, nostalgic experience powered by a Raspberry Pi — part retro memory, part maker project, and part storytelling machine.
What TVArgenta is (high level)
TVArgenta is a self-contained retro TV experience built around a Raspberry Pi. It is:
- Offline-first — all videos and metadata live locally on the device (no streaming required).
- Oldschool — a rotary encoder acts as the old-school dial for channel surfing.
- Nostalgic UI — CRT-style blue menus, static noise between channels and short intros to create the authentic feeling of zapping.
- Shareable — the enclosure and the backend were designed so other makers can adopt and adapt the system to their own content (commercials, family videos, short documentaries, regional clips, whatever defines “home”).
Backend — running on the Raspberry Pi 4 (what it does)
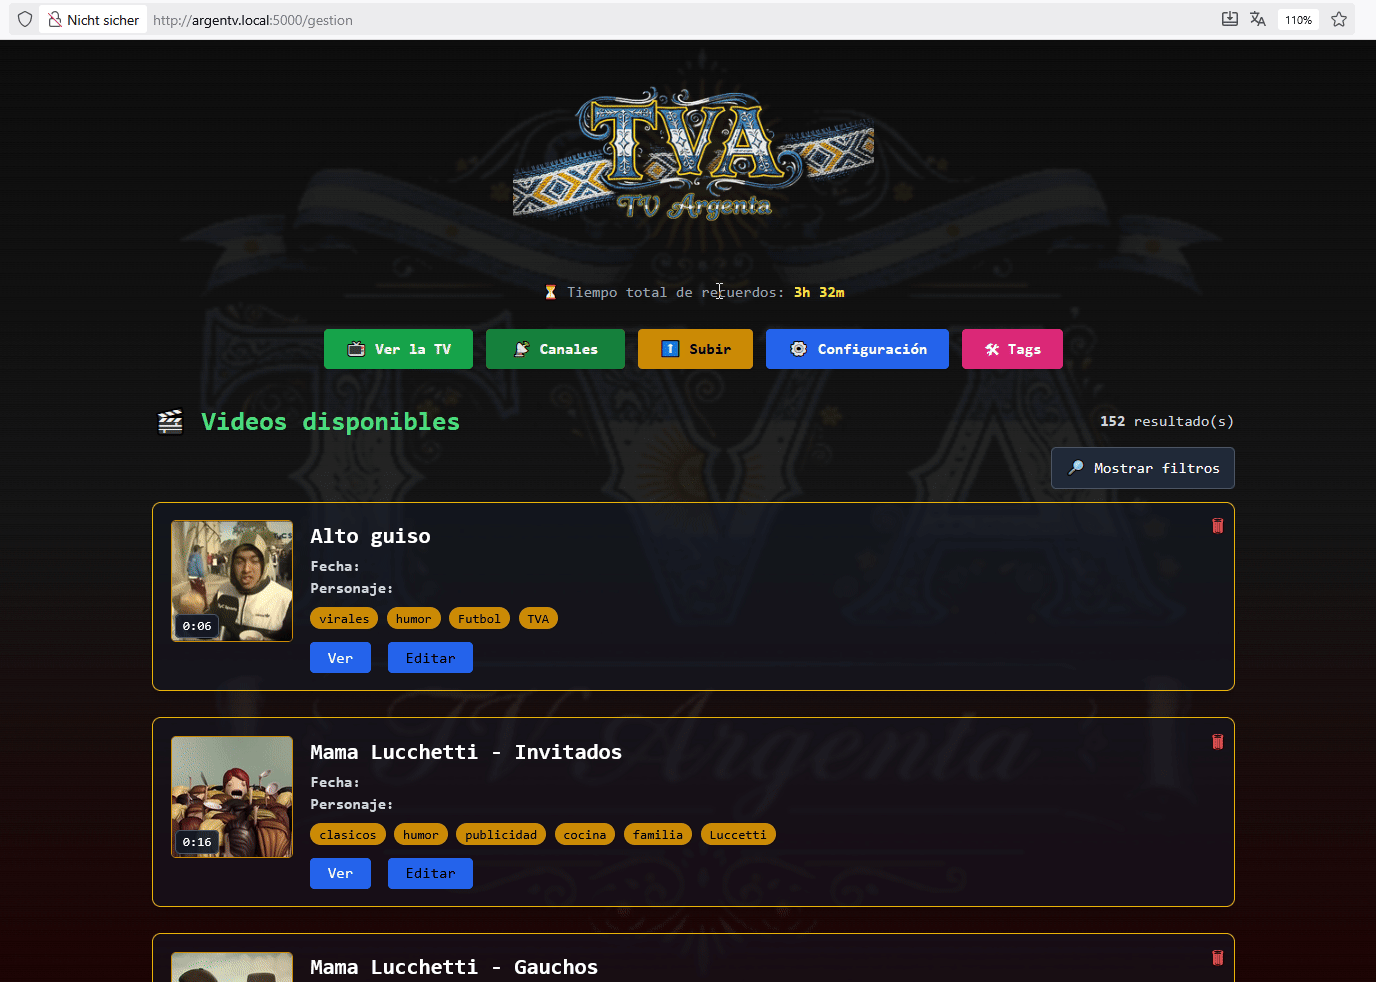
Behind the simple UI is a small but capable backend that runs on the Pi 4 and handles content and administration. Key features:
- Content management — store video files, thumbnails and metadata locally.
- Channel creation & tagging — create “channels” that group videos; tags make it easy to build themed channels (e.g., “jingles”, “sports ads”, “holiday spots”).
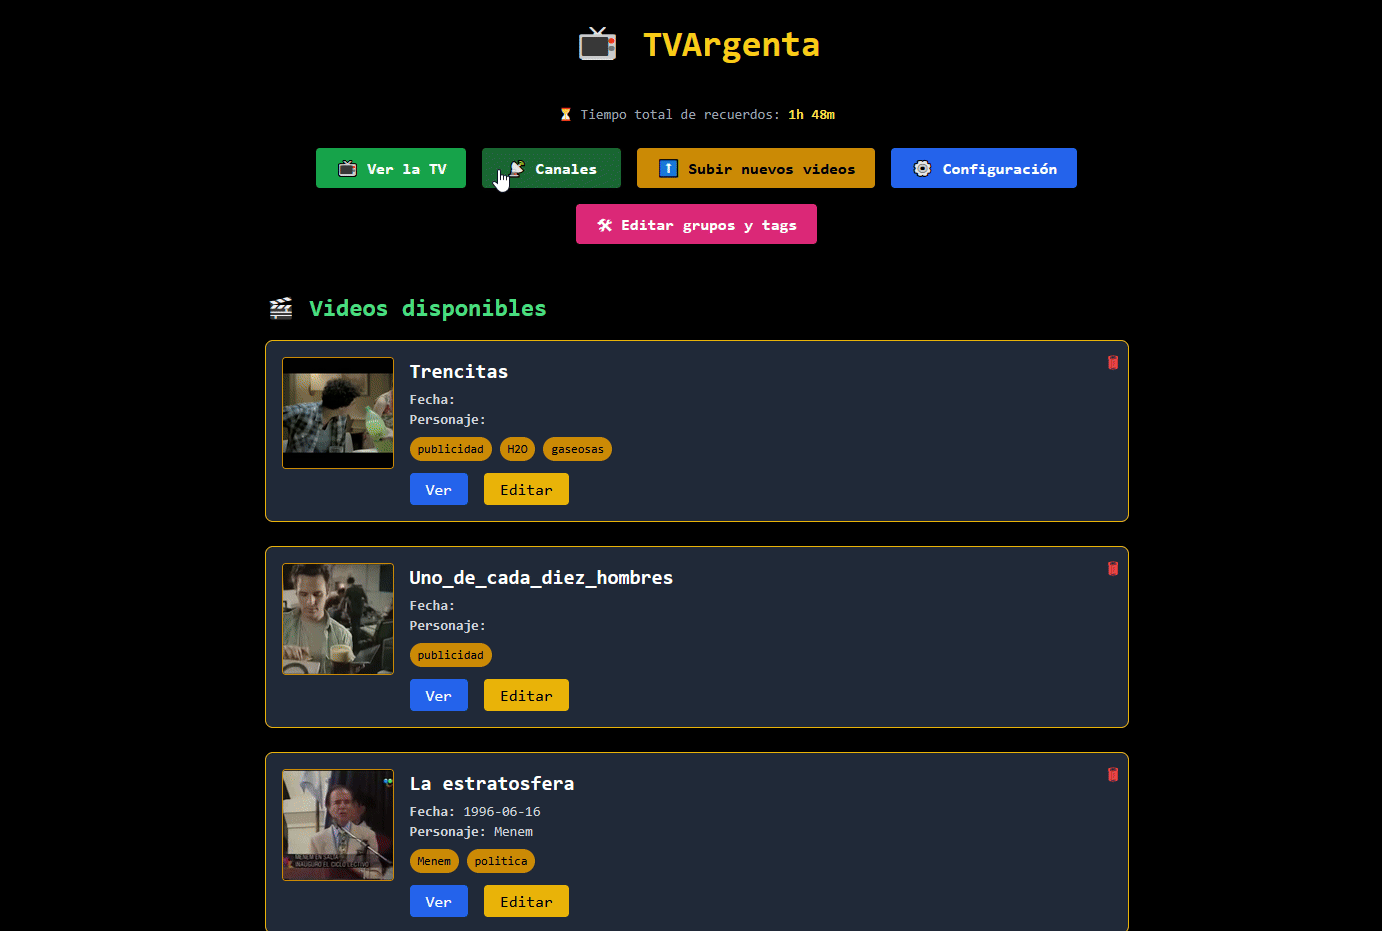
- Video synchronization & thumbnails — automatic thumbnail generation and a simple consistency check so the playback UI always has what it needs.
- Admin interface — a local web UI to upload content, manage channels, and configure playback order and intros. (Everything is served locally; no internet required.)
- Playback engine — lightweight service that the UI queries for the “next” item, supports intro videos, channel intros and scheduled playback modes.
I’m keeping the technical deep-dive off the article — the code, wiring diagrams, and step-by-step instructions will go on GitHub soon so you can reproduce or fork it.
Design & enclosure
The visual goal was to evoke the look and proportions of small 90s CRT TVs without being a bulky full-size set. The enclosure is 3D printed with snap-fit joins and uses M3 screws for the parts that need serviceability (screen, Pi, speaker, encoder). I designed internal mounting points for neat cable routing and easy removal of the Pi for maintenance.
I uploaded the 3D files to MakerWorld so other makers can print their own shells or adapt the design.
UX highlights
Zapping behavior — quick channel skips use the encoder for tactile satisfaction; brief static/noise transitions recreate the pre-digital feel.
Channel intros — each channel can have an intro clip (a short jingle or bumper) to enhance immersion.
Local admin — add videos from a phone or laptop by connecting to the Pi’s local admin page; no internet required.
Offline safety — content stays on the device; this project works well in offline, privacy-focused setups.
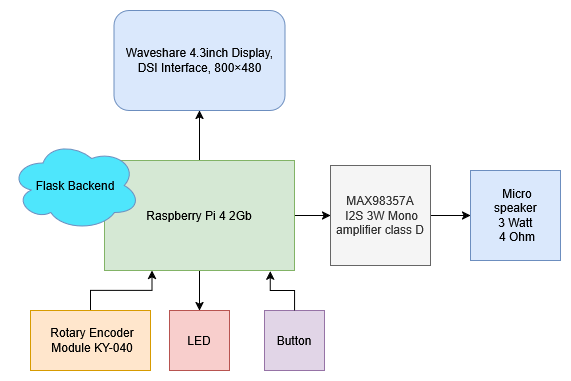
Block diagram
A simplified block diagram of the project can be seen below
Who is this for?
- Makers who love nostalgia and want a small, self-contained project.
- Families who want to preserve or share cultural memory with younger generations.
- Creators who want a platform to curate short-form content for an offline — or local — experience.
- Anyone who enjoys old school interaction (encoder dial) combined with a simple, charming UI.
- This might also be a nice enclosure for Retropie projects!
What I’ll publish next (and where)
- Released on 08.10.2025! Full source code (backend, admin UI, and playback engine) on GitHub — wiring diagrams, systemd/service guidance and configuration examples will follow.
- 3D files (3MF) on MakerWorld so you can print the enclosure and mounting parts.
- A detailed parts list with links and a couple of optional BOM choices (budget / nicer finish).
If you want to reproduce it, the GitHub repo will be the single source of truth — everything from the software to the CAD for the case will be available there.
Supplies


For this project I used the following components:
- Raspberry Pi 4 Computer Modell B, 2GB RAM
- 4.3inch Capacitive Touch Display for Raspberry Pi, DSI Interface, 800×480
- Rotary Encoder Module KY-040
- Micro speaker 3 Watt 4 Ohm closed audio and subwoofer speaker.
- MAX98357A I2S 3W Mono amplifier class D
- 180-degree angled USB-C adapter
- InLine 33441G USB 3.1 Adapterkabel
- 2 x 20 Pins 2,54 cm Pin female connector
- Perfboards PCB 2x8 cm, 3x7 cm, 4x6 cm, 5x7 cm prototype kit
- 3D printed enclosure
Basic Raspberry Pi Configuration
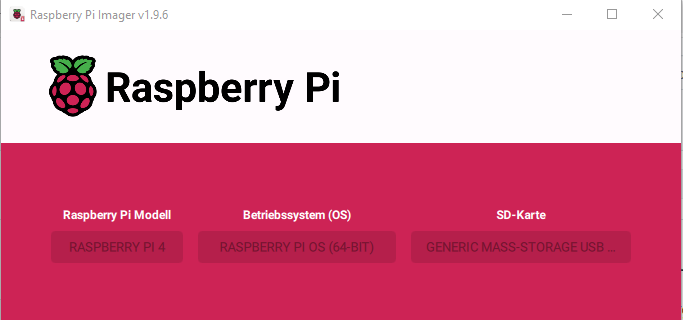
We prepare the SD card (in this case, I’m using a 64 GB one). For that, we use Raspberry Pi Imager. Make sure to select the following options:
In the hostname field, I make sure to set argentv.local (we’ll use it later, but you can choose any hostname you like).

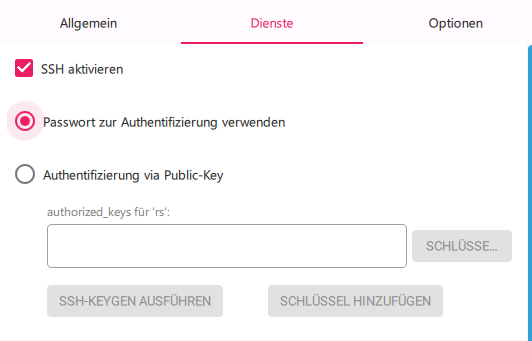
Make sure to configure the Wi-Fi credentials, language, and region. Leave SSH enabled so you can access the Raspberry Pi remotely later on:
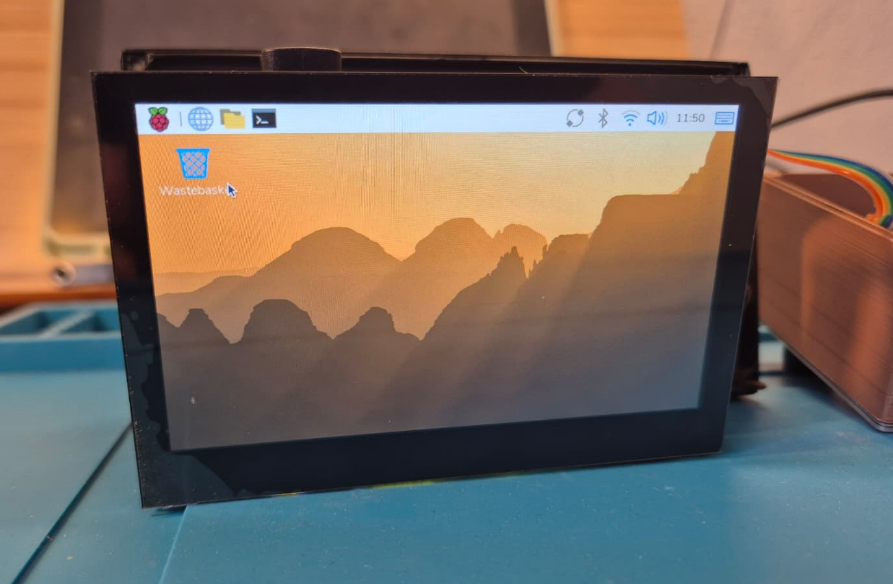
Click Install, and we’ll meet again in a few minutes 😉 […] Once the flashing process is done, insert the SD card into the Raspberry Pi. If you see the following screens, you’re on the right track:

Next, we’ll try to access the Raspberry Pi remotely. Open your command console and type:
ssh argentv.local
You might see the following message:
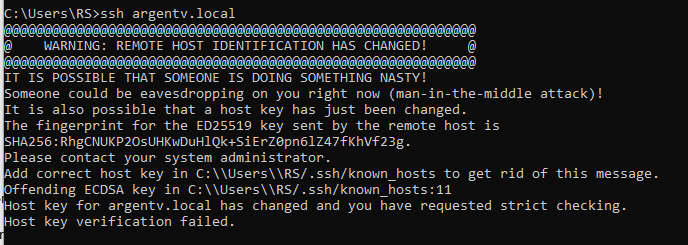
If that happens, try this:
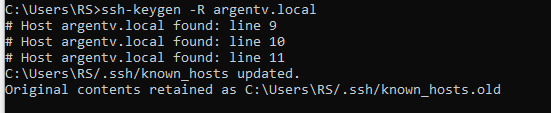
Once done, try again with ssh argentv.local, and this time you should see something like this:
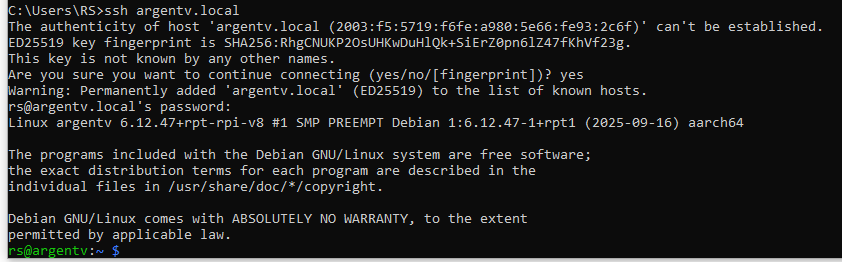
After typing yes, new certificates will be installed, and the SSH connection to the Raspberry Pi will be established.
During the setup, my username was “rs”. Yours might differ — keep that in mind for the next steps.
Since this is the very first boot after formatting the SD card, let’s run the following commands:
Now let’s clone the GitHub repository. Before that, we need to configure our SSH keys.
1) If you already have SSH keys, skip this step
2) Generate a new key (ED25519). Choose a helpful comment:
Press Enter to accept the default path (~/.ssh/id_ed25519). You can leave the passphrase empty (just press Enter) or add one for better security.
3) Show the public key (this one goes to GitHub)
4) (Optional) Load it into the SSH agent so you don’t have to enter your passphrase every time
Copy that public key and add it to your GitHub account: GitHub → your avatar → Settings → SSH and GPG keys → New SSH key → paste the key.
5) Test the connection with GitHub (it should greet you with your username)
If everything works, you’ll get a message like: "Hi [user]! You’ve successfully authenticated, but GitHub does not provide shell access."
Clone the GIT Hub Repo
Now let’s prepare the directory where we’ll clone the repository.
The folder /srv usually exists by default, but if it doesn’t, you can create it:
Next, give ownership of that folder to your current user (replace rs with your own username).
This allows you to write inside /srv without using sudo all the time:
Option A – Clone using HTTPS (easiest)
This is the recommended method if you haven’t set up SSH keys in GitHub.
Option B – Clone using SSH (for advanced users)
Use this if you already have an SSH key configured in your GitHub account.
Should look something like this:

Install System and Project Dependencies
Run:
Let’s also prepare what’s needed to compile the encoder .c file:
sudo apt install -y build-essential libgpiod-dev pkg-config
Change directory to compile the encoder .c file:
Once there, run the compiler:
If everything goes well, you should now see the compiled .bin file next to the .c one:
![]()
Now let’s set the proper permissions:
At this point, we can run a first test to make sure everything’s working. Go to:
and then run:
If everything’s fine, you should see an intro video, followed by the playback of channels — which for now will be empty and in their default state, meaning you’ll see a “black screen.”
Try turning or pressing the encoder knob to bring up the menu.
Adding the First Videos
Let’s add a few videos to make sure everything’s working properly. You can use the videos already included in:
/srv/tvargenta/software/app/assets/Splash/videos
These come by default in the GitHub repo.

With this, you’re already good to go and play around. In the next chapter, I’ll cover audio configuration, and in a third one, everything related to the hardware itself.
Hardware


On the hardware side, the only handmade element is a small connection board I built using a double-sided solderable protoboard. It handles the wiring for the audio interface, rotary encoder, and other peripherals, and brings everything together through JST XH 2.5 mm connectors. This makes the installation much cleaner, modular, and safer to maintain. I also assembled all the cables myself, cutting and crimping them to the exact lengths needed for a tidy internal layout.
Connecting the Enconder

.png)

For the encoder, the following connection shall be done:
CLK ➔GPIO 23, Pin 16
DT ➔GPIO 17, Pin 11
SW ➔ GPIO 27, Pin 13
GND ➔ pin 14
3V3 ➔ pin 17
Audio Setup


For the audio interface the following pinout applies:
DIN➔ GPIO 21 (pin 40)
BCLK➔GPIO 18 (pin 12)
LRC➔ GPIO 19 (pin 35)
GND➔ Pin 39
5V➔ Pin 2
Push Button

Connect the following pins to the push button
GPIO3, Pin 5
Ground, Pin 9
LED

Connect the following pins to the LED using a 4.7k resistor on one of the pins to lower the current and ensure the LED doesnt shine like a laser pointed at your ayes ;)
LED Anode ➔GPIO 25 , pin 22
LED Catode ➔GND, pin 20
Compile the GPIO Low Level Interface
Build the encoder helper with libgpiod 1.6.3. First install headers
From the project folder, default case:
compile with
This will generate the bin file (encoder_reader) that will manage the GPIOs and provide the relevant input to the python script.
Future Ideas & Roadmap
- Implementation of an LED on the front side
- Implementation of a power on button
- A plug-and-play content import utility to batch-add videos and metadata.
- Optional networked mode for those who want automatic updates or multi-device sync (kept strictly optional—offline is the default).
- Additional enclosure styles and sizes.
- I will be posting a blog in spanish for this project as well: TVArgenta: una tele retro para volver a casa
And in Case You Are Wondering...

Yes, it can also play the Simpsons ;)
Yes... It Can Play DOOM Now :)


I’ve recently added a new feature that takes this project even further: RetroPie integration!
Now the system can switch from the curated retro TV experience to a full retro gaming setup — two kinds of nostalgia in one box. With just a simple menu selection, you can jump into gaming mode, and a single button press brings you right back to the TV experience.
Both worlds are now fully integrated, and thanks to the updated 3D-printed design that exposes a USB port on the side, the possibilities have grown a lot — from plugging in controllers to experimenting with new peripherals and features.

The case has been redesigned so a USB port is accesible, openning new posibilities!
Project Major Update — TVArgenta Evolves Again!


It’s been a while since the last major update, and this one really pushes TVArgenta forward into a more complete, seamless, and user-friendly retro system.
What started as a nostalgic Raspberry Pi TV is now turning into a full-featured hybrid that bridges two eras — and makes setup easier than ever.
🆕 What’s New
- Ready-to-flash system image — everything comes pre-configured, no manual setup required.
- RetroPie integration — switch effortlessly between TV mode and gaming mode.
- Bluetooth controller pairing — connect your controller by cable or wirelessly for instant play.
- Wi-Fi management — new on-screen network setup lets you connect or change networks directly.
- Multi-language support — both the TV interface and the web management pages can now be displayed in multiple languages.
- Reworked web management pages — redesigned layout for smoother content editing and easier uploads.
- New on-screen overlays — refreshed menu system directly on the TV display for quicker navigation.
All these improvements aim to make TVArgenta feel more alive, flexible, and approachable — whether you’re using it as a nostalgic TV, a gaming console, or both.
Every function now feels more tightly integrated, and the experience more polished.
Detailed instructions on how to flash and use the new image are available on GitHub, along with the official download link.
Final Note
TVArgenta started as a very personal project: a way for me to give my kids a tiny piece of my childhood. But I built it so anyone can reuse the idea and the platform for their own cultural memories, short clips, or quirky installations. The heart of the experience isn’t the electronics — it’s the content.
If you’re interested in the build or want to collaborate, comment below. I’ll post the GitHub repo and MakerWorld files soon and I’ll be happy to share wiring diagrams, code snippets, and 3mf exports.
I’ll keep expanding this project step by step — the more interest and feedback it gets, the more details, setup instructions, and features I’ll add.
— Thanks for reading. If this resonates with you, I’d love to hear what small cultural things you’d put on a device like this. 🇦🇷📺