Build a Cyberpunk “Holographic” Terminal Clock — With Parts Sourced From 1688 Via PRIBUY
by Evan2000 in Workshop > 3D Printing
21 Views, 0 Favorites, 0 Comments
Build a Cyberpunk “Holographic” Terminal Clock — With Parts Sourced From 1688 Via PRIBUY
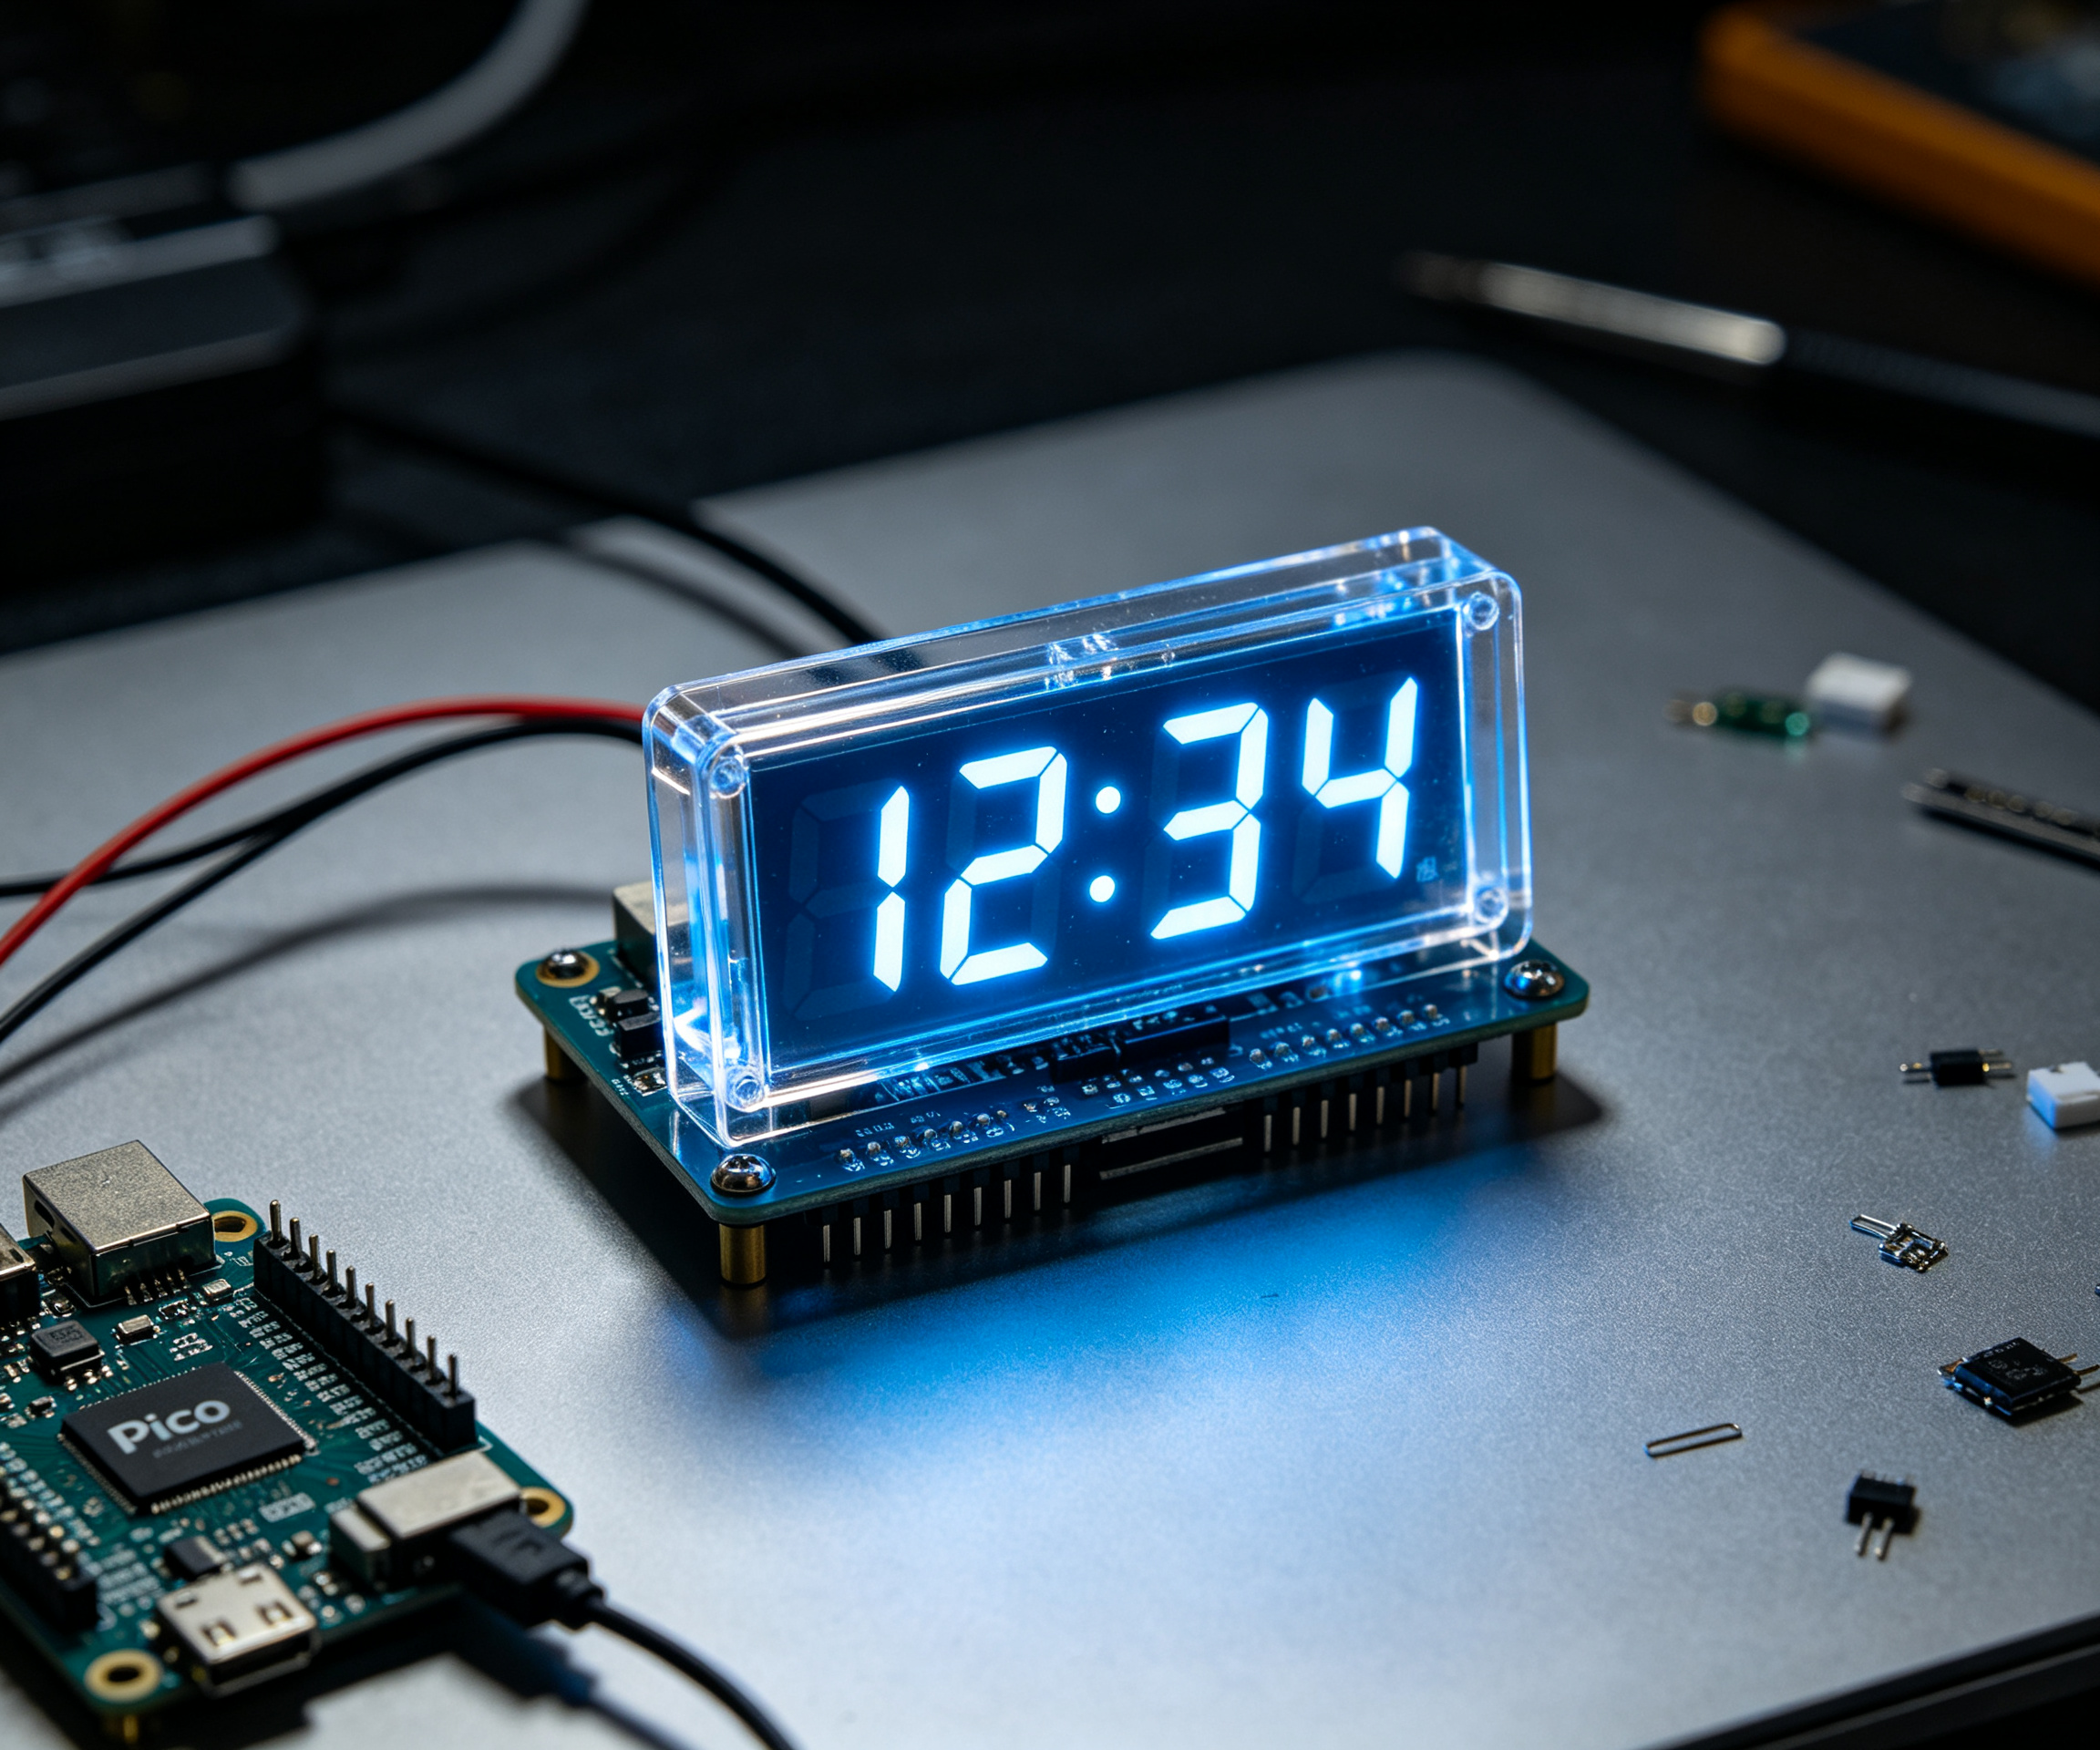
We’ve all seen desktop clocks before. A microcontroller board, a screen, some code that shows the time — done. Functionally fine, but visually? It often looks like a half-finished prototype sitting on your desk.
I wanted something different. Something that looks like it was pulled straight out of a sci-fi control room — a tiny terminal where time, date, scrolling text, and pixel animations appear to float in mid-air.
The secret? A transparent OLED display. Unlike regular screens with opaque back panels, a transparent OLED lets you see right through it. When you display bright blue text and animations on it, the graphics seem to hover above your desk like a hologram.
The challenge? Finding a transparent OLED
screen — and all the other components — at a price that doesn’t break the bank.
That’s where PRIBUY came in. I sourced almost all the electronics from 1688.com, China’s largest B2B platform, through PRIBUY’s one-stop proxy shopping service. And in this Instructable, I’ll show you exactly how I built this clock — and how you can do the same, no matter where in the world you are.
Total Build Cost: ~$30 USD Difficulty: Intermediate Time: ~4-6 hours
Supplies
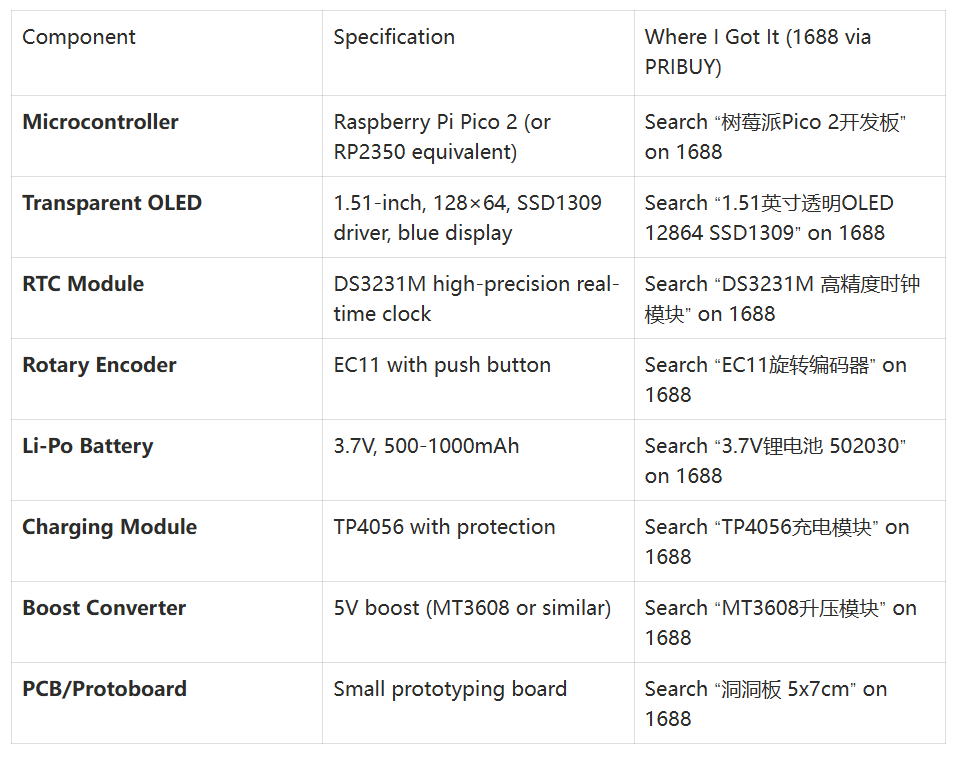
Here’s everything you need to build this cyberpunk terminal clock. I’ve listed the 1688 product links (which you can send to PRIBUY) alongside alternative sources.
Core Components
Tools & Materials
- Soldering iron and solder
- Wire strippers
- M2 or M3 screws (for mounting)
- 3D printer (for the base — or you can use a small wooden block)
- USB-C cable (for programming and charging)
3D Printed Parts
The base is a simple 3D-printed stand that holds the transparent OLED upright. You can find the STL files in the project repository:
**https://github.com/YakrooThai/Contests/tree/main/Instructables/Cyber_Holographic**
No 3D printer? No problem — you can carve a small wooden base or even use a Lego brick platform.
How PRIBUY Helped Me Source These Parts
Let me pause here and explain why I used PRIBUY — because this is relevant for any maker outside China.
1688.com is a goldmine for electronics components. The prices are often 50-80% lower than what you’d pay on Amazon or local electronics stores. For example, a transparent OLED that costs $15-20 on Western sites can be found on 1688 for as little as $3-5.
But there’s a catch:
- Language barrier — everything is in Chinese
- Payment — you need a Chinese bank account or Alipay
- Shipping — most sellers don’t ship internationally
- Quality — you can’t inspect the products before buying
This is exactly where PRIBUY comes in.
Here’s how it worked for me:
- I browsed 1688.com and found the components I needed, copying the product links.
- I sent the links to PRIBUY via their platform.
- PRIBUY handled everything — they placed the orders, communicated with the sellers in Chinese, and processed the payments.
- They inspected the goods at their warehouse in China to make sure everything was working.
- They consolidated all my items into one package and shipped it to my address in [your country].
The whole process took about 10-14 days from order to delivery. No language barriers, no payment headaches, no customs confusion. Just a box of components arriving at my door.
Pro Tip: When sending 1688 links to PRIBUY, include the quantity and any specific variant (e.g., “blue display, SPI interface”) to avoid misunderstandings.
Understand the Display — the Magic of Transparent OLED
Before we dive into wiring, let’s talk about the star of this project: the transparent OLED.
Most OLED screens have an opaque backing so you can’t see through them. But transparent OLEDs remove that backing, allowing light to pass through. When you display bright content on a dark background, the lit pixels appear to float in space — hence the “holographic” effect.
The specific display I used is:
- Size: 1.51 inches
- Resolution: 128×64 pixels
- Driver: SSD1309
- Interface: SPI (though some variants support I2C)
- Color: Light blue
⚠️ Important: Make sure your transparent OLED uses the SSD1309 driver and supports SPI communication. Some cheaper ones use SSD1306, which works but may require different wiring.
Circuit Diagram & Wiring

.png)
Step 2: Circuit Diagram & Wiring
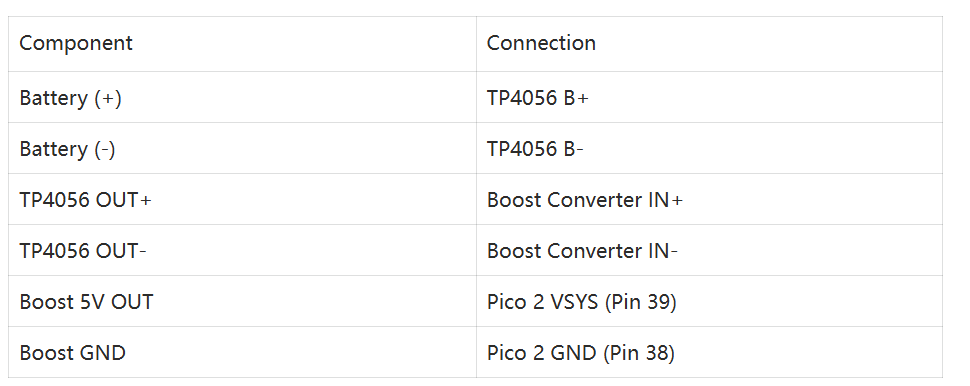
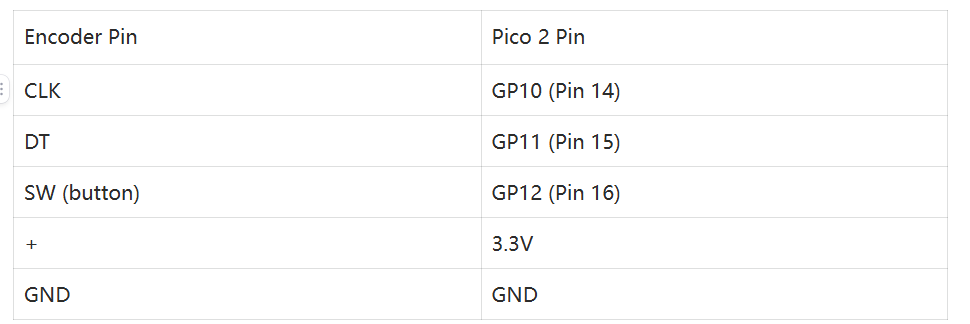
Here’s the wiring diagram for connecting everything to the Raspberry Pi Pico 2.
Pin Connections
Transparent OLED (SPI Mode)
Note: Some SSD1309 modules use slightly different pin labels. If yours has “SCLK” and “SDIN,” those are the same as SCL and SDA above.
RTC Module (DS3231M — I2C)
Rotary Encoder
Power System
💡 Power Tip: The Pico 2 can run from 1.8V to 5.5V on the VSYS pin. Using a 5V boost converter from the 3.7V battery ensures stable operation.
3D Print the Base
The transparent OLED needs to stand upright on your desk. The original design uses a simple 3D-printed base.
Download the STL files:
👉 **https://github.com/YakrooThai/Contests/tree/main/Instructables/Cyber_Holographic**
Print Settings:
- Material: PLA or PETG
- Layer height: 0.2mm
- Infill: 20%
- Supports: Not needed
The base has a slot that holds the OLED perfectly upright, with space underneath for the Pico 2, battery, and charging module.
No 3D printer? You can:
- Cut a slot into a small piece of wood
- Use a phone stand as a temporary holder
- Design your own base from cardboard or acrylic
Assemble the Hardware
Now it’s time to put everything together.
4.1 Solder the Headers
If your Pico 2 doesn’t come with pre-soldered headers, solder them on now. You’ll need male headers for the breadboard/protoboard.
4.2 Connect the OLED
Using jumper wires or soldered connections, wire up the transparent OLED to the Pico 2 according to the pin table in Step 2.
Double-check:
- VCC to 3.3V (not 5V — the OLED runs on 3.3V!)
- CS to GND (this selects the display)
4.3 Connect the RTC Module
The DS3231M is a high-precision real-time clock. Unlike cheaper RTCs that drift significantly, the DS3231M uses a MEMS oscillator and stays accurate to within ±5ppm.
Wire it via I2C (SDA to GP0, SCL to GP1).
4.4 Connect the Rotary Encoder
The encoder lets you:
- Rotate to scroll through menu options
- Press to select
Wire the CLK, DT, and SW pins to GP10, GP11, and GP12 respectively.
4.5 Power System Assembly
- Solder the battery leads to the TP4056 B+ and B- pads.
- Connect TP4056 OUT+ to Boost IN+ and OUT- to Boost IN-.
- Connect the Boost 5V output to Pico VSYS (Pin 39) and GND to Pico GND (Pin 38).
⚠️ Safety Note: Always double-check battery polarity. Reversing the connections can damage the battery and the charging module.
4.6 Test Before Final Assembly
Before you screw everything into the base, test the connections:
- Plug in a USB-C cable to the Pico — the power LED should light up.
- The OLED should show whatever the default demo is (if it came with one).
- If nothing appears, check your wiring — especially VCC, GND, and CS.
Install CircuitPython on the Pico 2
The project uses CircuitPython — a version of Python optimized for microcontrollers.
5.1 Download CircuitPython
- Go to circuitpython.org
- Select Raspberry Pi Pico 2 (or Pico if you’re using the original)
- Download the .uf2 file
5.2 Install the Firmware
- Press and hold the BOOTSEL button on the Pico
- Plug in the USB cable while holding BOOTSEL
- The Pico will appear as a removable drive (RPI-RP2)
- Drag the .uf2 file onto the drive
- The Pico will reboot and now run CircuitPython
5.3 Install Required Libraries
You’ll need several CircuitPython libraries:
- adafruit_ssd1306 (or a custom SSD1309 driver)
- adafruit_ds3231
- adafruit_imageload
Option A: Use the Bundled Library Download the CircuitPython Library Bundle from circuitpython.org and copy the necessary files to the lib folder on your Pico.
Option B: Use the Project’s Custom Driver The original project has custom code that includes display drivers. Download from the GitHub repository:
👉 **https://github.com/YakrooThai/Contests/tree/main/Instructables/Cyber_Holographic**
The Code — Making the “Hologram” Come Alive
The code does several things:
- Reads the current time from the RTC
- Displays time, date, and scrolling text on the transparent OLED
- Animates pixel art (like a little robot)
- Shows battery voltage
- Responds to the rotary encoder for settings
6.1 Main Code Structure
6.2 Full Code & Customization
The complete code — including the animated pixel art, scrolling text, and battery monitoring — is available in the GitHub repository:
👉 **https://github.com/YakrooThai/Contests/tree/main/Instructables/Cyber_Holographic**
What you can customize:
- Time format: 12-hour vs 24-hour
- Scrolling text: Add your name, a quote, or a status message
- Pixel art: Replace the robot with your own 128×64 monochrome animation
- Battery warning: Set a custom low-battery threshold
6.3 Upload the Code
- Connect the Pico to your computer via USB
- Copy the code.py file and the lib folder to the Pico’s drive
- The Pico will automatically run the code when powered on
First Boot & Testing
- Power on by connecting the USB cable or letting the battery run
- The OLED should light up with the time display
- Rotate the encoder — the display should respond (scroll through menus or adjust settings)
- Press the encoder button — select or confirm options
If nothing appears:
- Check the OLED is properly seated in the connector
- Verify the CS pin is connected to GND
- Check all power connections (3.3V and GND)
- Make sure the code is properly copied to the Pico
What Else Can You Do With This Hardware?
The beauty of this project is that the hardware is versatile. With the same transparent OLED and Pico 2, you can build:
- A system monitor — show CPU/RAM usage from your PC
- A weather station — fetch and display weather data via Wi-Fi (Pico W)
- A notification display — show incoming emails or messages
- A tiny game console — Pong or Snake on a transparent screen
- An art frame — cycle through pixel art animations
The transparent effect makes any content look like a holographic projection.
Why I Recommend PRIBUY for International Makers
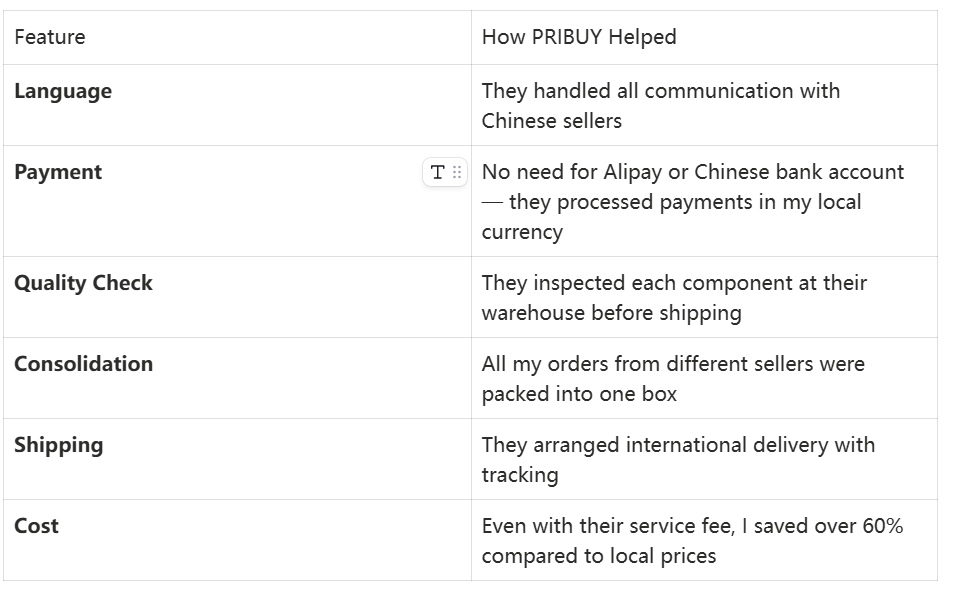
Let me wrap up by sharing why PRIBUY made this project possible for me — and why I’ll use them again.
The Problem: I live in Indonesia, and local electronics stores either don’t stock transparent OLEDs or charge 3-4x the price. Ordering from Chinese platforms directly is nearly impossible due to language and payment barriers.
The Solution: PRIBUY acts as your local agent in China.
Here’s what I appreciated most:
💡 My Tip: When you send 1688 links to PRIBUY, include screenshots of the product page. This helps them confirm the exact variant you want — especially important for displays with different interfaces (SPI vs I2C).
Conclusion
This cyberpunk “holographic” terminal clock is one of the most satisfying projects I’ve built. It looks like a movie prop, functions as a reliable desk clock, and cost me about $30 in parts — thanks to affordable components from 1688 and PRIBUY’s hassle-free proxy service.
Key Takeaways
- Transparent OLEDs create a stunning “floating display” effect that’s perfect for sci-fi themed projects
- Raspberry Pi Pico 2 + CircuitPython makes embedded projects accessible and fun
- PRIBUY removes the barriers to sourcing affordable electronics from China — no language, payment, or shipping headaches
What’s Next?
Now it’s your turn. Build this clock, customize it, and share your version in the comments below. I’d love to see:
- Your custom pixel art animations
- Different base designs
- Creative uses for the transparent display
- Your experience using PRIBUY to source parts
Happy making! 🚀