Call My Arduino

Twilio is a Web service that turns everything into a phone. It's a REST API for telephony, hosted in the cloud. In this case, Twilio asks the Arduino for a new voice.xml file whenever someone calls the Arduino's predefined phone number. The content of the response is read out to the caller by Alice, a voice of Twilio's text to speech engine.
Yaler.net enables Web access to embedded devices behind a firewall, NAT or a mobile network router. Here it enables Twilio to access the voice.xml file on the Arduino, which is located in a local network and therefore does not have its own public IP address (disclosure: I'm a founder of Yaler).
This demo uses a temperature sensor, but any other sensor would do as well. A real world product example would be the Canary (now Birdi) smoke detector that lets concerned home owners call it to ask wether the battery is still fine.
On a more abstract level, this Instructable tries to show how, in an open Internet of Things, modular cloud services can be freely combined to build novel, simple and reliable solutions. HTTP and Webhooks FTW! But let's get started...
(Here's a video explaining this project from IoTLive, part of IoTDay 2014)
Material
- Arduino Uno (e.g. https://www.adafruit.com/products/50)
- USB Cable Standard A-B (e.g. http://www.adafruit.com/products/62)
- Arduino Ethernet Shield (e.g. http://www.adafruit.com/products/201)
- Ethernet cable (e.g. http://www.adafruit.com/products/995)
- Analog temperature sensor (e.g. https://www.adafruit.com/products/165)
- Breadboarding wire bundle (e.g. http://www.adafruit.com/products/153)
- Breadboard (e.g. http://www.adafruit.com/products/64)
Wiring the Sensor

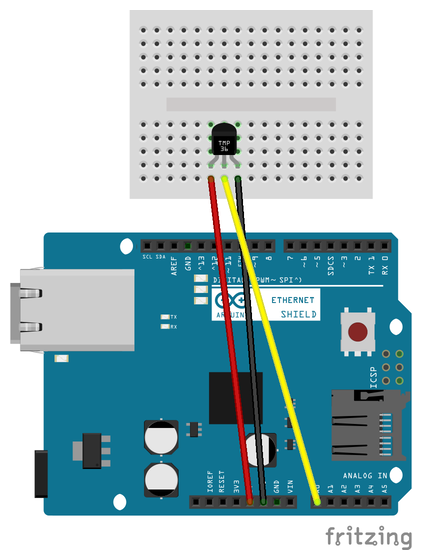
Add the Ethernet shield to the Arduino and connect the temperature sensor as shown. For details about temperature sensing with the TMP36 sensor, see e.g. http://learn.adafruit.com/tmp36-temperature-sensor/using-a-temp-sensor
In case you want to add other (digital) sensors keep in mind that some pins are used by the Ethernet shield.
Installing the Yaler Library

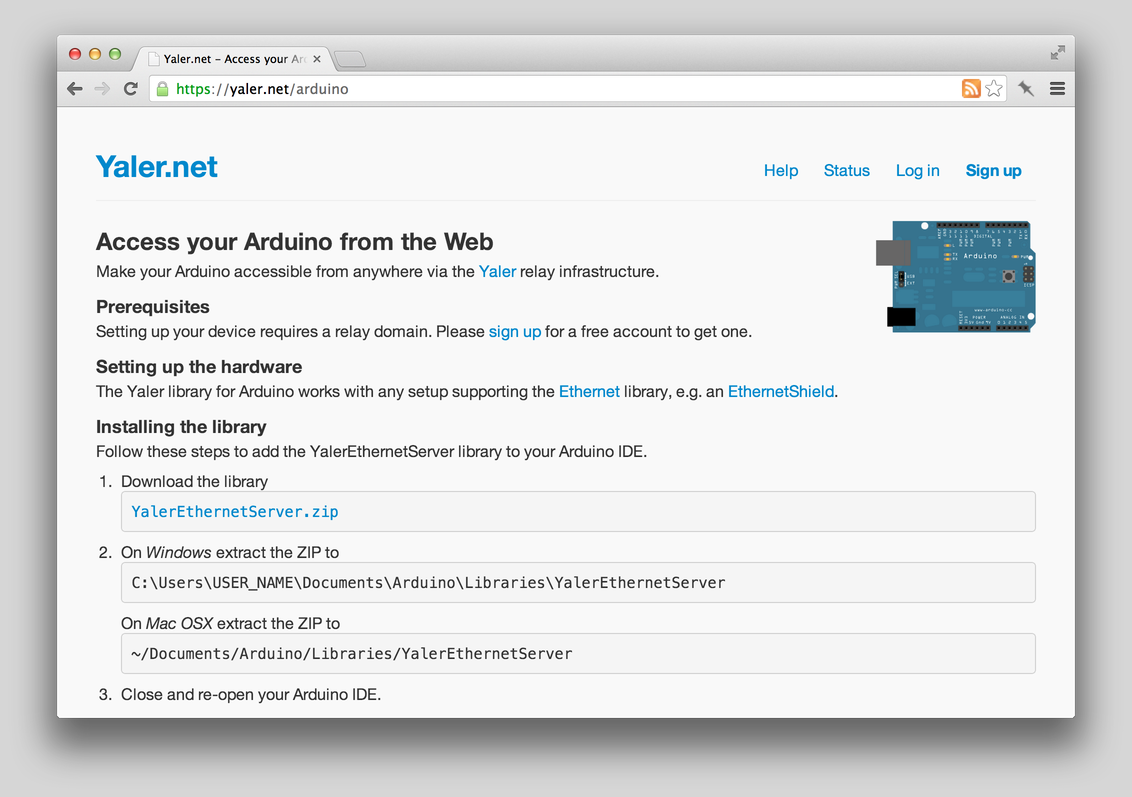
If you have not already done so, sign up at https://yaler.net/ for a free trial account and write down the relay domain (the secret key is not needed).
Programming the Arduino

Download the TwilioYalerWebService Arduino source code
https://bitbucket.org/tamberg/iotworkshop/raw/default/Arduino/TwilioYalerWebService/TwilioYalerWebService.ino?at=default
Open the Arduino code
The program implements a very simple Web server that listens for incoming HTTP requests. Once a request comes in, the program responds with an XML document. The server does not care wether the URL path is / or /voice.xml.
Change the MAC address
Make sure the MAC address in the Arduino code is unique. This is especially important if there are several Arduinos in the same local network. A simple way to get a (hopefully) unique address is to look up your computer's MAC and then add 1 to the last digit.
Enter your relay domain
Instead of creating a local server with EthernetServer server(80); we create one that is accessible via the Yaler relay try.yaler.io, in the following line:
YalerEthernetServer server("try.yaler.io", 80, "RELAY_DOMAIN");
Replace RELAY_DOMAIN with your relay domain, e.g. for gsiot-ffmq-ttd5 type:
YalerEthernetServer server("try.yaler.io", 80, "gsiot-ffmq-ttd5");
Note that you can as well use the local server, if you know how to configure port forwarding to open a hole for incoming HTTP requests in your local firewall. The important thing is that Twilio can access the Arduino from the cloud.
Save changes and upload
Save all changes and upload the program to your Arduino. Keep the USB cable connected to your development computer for now, and open the serial console to see debugging output.
Accessing the Arduino

Access your Arduino from any browser
The Yaler library makes your Arduino (and with it the XML document) accessible from the public Internet at http://RELAY_DOMAIN.try.yaler.io/, e.g. for the relay domain gsiot-ffmq-ttd5 the URL is http://gsiot-ffmq-ttd5.try.yaler.io/
Or, to make it look nicer for Twilio: http://gsiot-ffmq-ttd5.try.yaler.io/voice.xml
Check the XML document
The content of the XML document tells Twilio what to reply to an incoming phone call. You can even choose the text-to-speech voice. Here it's Alice. Twilio's XML format is called TwiML. See https://www.twilio.com/docs/api/twiml for details.
Note that the reply text contains the actual temperature. Heat up your sensor and refresh the document in your Web browser with F5 to see it change.
Troubleshooting
In case you get an empty page or an error, make sure your Ethernet cable is plugged in and check https://yaler.net/browser for browser specific debugging.
Setting Up a Twilio Number


Sign up
First, to get a Twilio account, you'll have to sign up at https://www.twilio.com/
Buy a phone number
In order to receive calls you'll need a number, which comes at a (small) cost.
Log in, navigate to Numbers and select the Twilio Numbers sub menu, to see the Manage Numbers tab. Click the Buy a number button, select the Voice checkbox and click Search, then chose a number and click Buy to buy it.
Configure the voice.xml Webhook URL
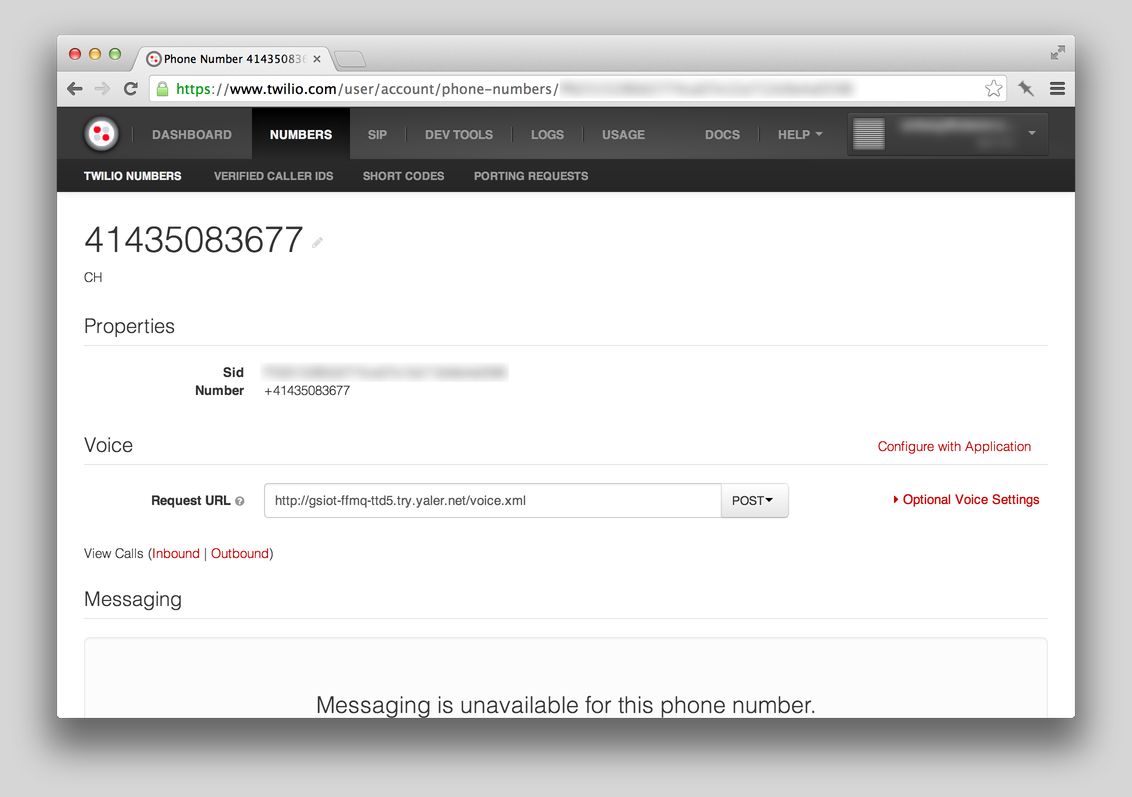
In the Manage Numbers tab, click on the number you just bought.
Set the Response URL to http://RELAY_DOMAIN.try.yaler.io/voice.xml and ensure that POST is selected, e.g. for the Yaler relay domain gsiot-ffmq-ttd5 set the Response URL to http://gsiot-ffmq-ttd5.try.yaler.io/voice.xml
Placing a Test Call

(Phone picture by flickr.com user William Gantz, licensed under CC BY-ND)
Once the Arduino is set up, you can call it from any phone - even your grandpa's.
That's it, thanks for reading.
@tamberg