Connected Bedside Clock for Kids

Following this instructions, you will be able to build a clock that is motion activated and will show date, time and the relevant event of the day.
It will show a night mode when it's time to sleep and when kids wake up they can quickly remember what will be the main activity for the day: school, holiday, friend's birthday party, rugby or volleyball match etc.
It will also automatically adjust for daylight saving time and collect information about holidays from a holiday calendar.
It's not an alarm clock (I was used to be woken up by my parents as a kid and will try to do the same for my kids, showing them that someone is caring about them since when they open their eyes in the morning).
The device will collect information from Google calendar (or any service that can provide calendars in ICS format) and will synchronize with internet time, removing the need for manual setup.
Schematic, software and 3D design for the enclosure are open and available in the links.
Feel free to contribute any idea or improvement here or on github.
The device is based on an ESP-32 module, it can be easily adapted to different ESP-23 based platforms and probably also to ESP8266 and other Arduino-compatible devices that can provide connectivity.
Components


My kids sleep on a bunk bed and they have no bedside table, so the clock is designed to be attached to the wooden structure of the bed. You may want to redesign it to better fit your needs (feel free to do that and share the results!), so I splitted the list between electronic parts (always needed) and mounting parts (specific of this design).
Electronic Components:
- ESP-32 based module. You can use Adafruit's Huzzah-32 or any ESP-32 module that supports the Arduino programming environment. I used a module from do-it that is available from Amazon.it at a very reasonable price (unfortunately Adafruit distribution in Italy is not very good).
- A PIR sensor ( here's the on e I used , but you can find them easily on the web or in local shops for makers). My sensor requires 5V power and generates a 3.3V output signal that is compatible also with 5V devices. Check that your own sensors has the same specs or adapt the design accordingly.
- An I2C oled display. I used a monochrome 128x64 pixel display and it's compatible with Adafruit's own model just requiring fewer connections to operate (being configured to I2C interface by default). If you use a different display you may need to change the software, but the graphic has been implemented using Adafruit's excellent GFX library , so porting to a compatible display shouldn't be too hard.
- Jumper cables (I am very bad at soldering, so I prefer to not solder directly on pins).
- A 5V power supply. Connector type it's not important since we are going to cut it and use the wires directly. If you want to just power the ESP-32 module, without the magnet-based mounting, you can use a USB-micro power adapter.
Mounting components:
- 3D printed case (you can find a link to the design in the tutorial, feel free to message me if you want a link to the original design on thinkercad to modify it)
- Magnets . They are used to keep the device attached to the mounting plate and also to provide power to it. I chose this solution to have something that I can easily remove for maintenance (and bugfixing) and that can be easily rebooted by detaching and reattaching it to the wall.
- Wood/wall screws
Tools:
- Soldering iron
- Screwdriver
- A PC with the Arduino IDE installed and the ESP-32 Arduino Core development environment configured as described on this page .
Setup Google Calendar
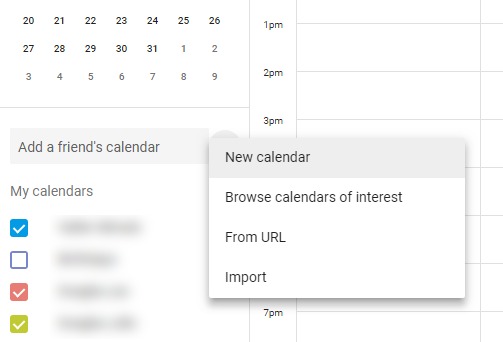


Here I am going to show how to use Google Calendar to create a calendar that will be used by your device, you can use any calendar service that allows you to access the calendar in iCal format. The field names and settings will be different, of course, but as long as you will be able to export your calendar in iCal format with a fixed https URL it should work with your clock.
To access Google Calendar you need a Google account.
Then you can visit calendar.google.com.
The instructions are meant to be followed using a browser on your PC/Mac. You should be able to perform the same operations also from Google's own mobile application.
In Google Calendar you will have to create a new calendar by selecting the "+" icon next to "Add a friend's calendar" (not so intuitive) and then select "New Calendar" from the popup menu (more intuitive).
You can assign a title to your calendar (useful when you'll have to add events to it to configure the clock) and in the description field, you can set-up default wake and "go to bed" times.
To configure the times you need to insert a letter: "W" for default wake-up time, "H" for week-end and holidays wake up time and "B" for bed time, then a semicolon and the time in 24HR format (I am sorry for my american friends). Multiple parameters must be added on separate lines.
For example:
W: 08:00
H: 08:30
B: 22:00
Means that wake-up time is normally 8AM and 8:30AM for WE/holidays and bed time is 10PM.
At this point you can click "create calendar" to add it to the list of calendars managed by Google Calendar.
You will need to get an URL that can be used to download it in iCal format. To do this you need to click on the vertical dots that appear on the right of the calendar name when you hover it with your mouse (not intuitive) and then click on "Settings and sharing".
You'll have to scroll down the setting page (at least if you don't have a 4k display) and search the "Secret address in iCal format" field.
Copy and save the text (it's blurred out in my screenshot) because you'll need it to configure your device.
If you don't have a holiday calendar connected to your account it's time to add one.
Select again the "+" icon next to "Add a friend's calendar" and this time select "browse calendars of interest".
This will show a list of multiple calendars, including local holiday calendars, select the one you want to use and it will appear in the list next to your current calendar.
Open the "settings" page, using the vertical dots menu as described before for the regular calendar and this time copy and save the URL under "Public address in iCal format".
If you can't find a suitable holiday calendar probably just searching on Google can help you find a website that provides an iCal calendar for your specific location.
At this point you'll have the information you need to let the device download your calendars:
- URL of your main clock calendar
- URL of the holiday calendar
Collect Time-zone Information

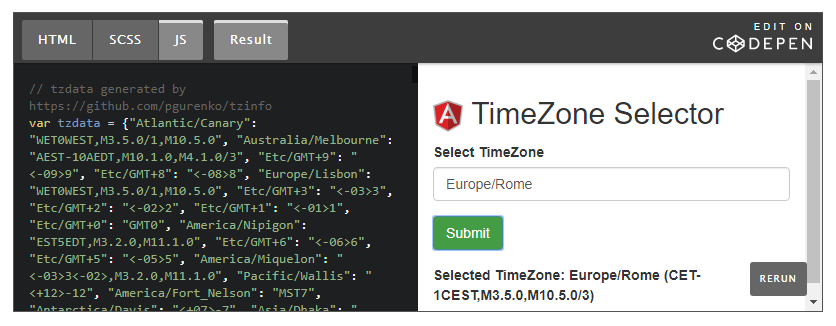
The clock is able to synchronize with internet-based services but it will need to know in which timezone you are located to be able to adjust its current time and event times to it.
Time zones can be expressed using a character string describing its offset from GMT (Greenwich time) and the rules that are use to switch between daylight saving time and normal time. Building that string is not very easy but luckily mr. Pavel Gurenko implemented a nice tool that allows us to generate that string by just providing the name of our timezoe that you can find at http://www.pavelgurenko.com/2017/05/getting-posix-tz-strings-from-olson.html
Timezone names depend on the continent/country/city where you are located. In Europe it's usually enough to specify Europe/<capital city of your country>, for countries with multiple time-zones things can be a bit more complicated but this wikipedia page https://en.wikipedia.org/wiki/List_of_tz_database_time_zones will help you finding the right one.
Once you have found the time zone name you can type it in the form on mr. Gurenko's blog and press submit to get the correct string (as you can see in the screenshots).
For example the string for my time zone (Europe/Rome) is: Europe/Rome (CET-1CEST,M3.5.0,M10.5.0/3)
Copy and save this information because you'll need to provide it when configuring your device.
Configure and Add Custom Images for Your Events


Since we will have a graphical display connected to our clock, we can add some graphics to our events, so the kids can immediately understand what is the main activity for the day. Standard icons for school days, WE/holidays and sleep time are embedded in the code (you can find instructions about how to customize them on the github repo), but you can add images for specific events.
Unfortunately, the display is quite small and monochromatic, so this will limit a bit the complexity of your images.
The device supports 48x48 pixel monochrome bitmaps. It's able to download them from google drive, but you will need to provide an index file to match them with words in your event description.
Create custom images
First of all, you have to create bitmaps, you can use any graphical app you want, as long as you save it as an uncompressed Windows Bitmap (BMP) file. The file size should be 446 bytes.
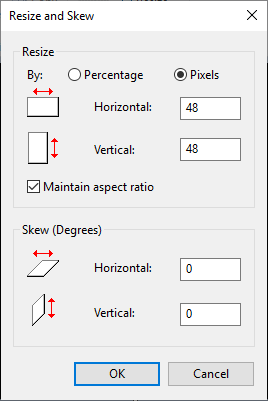
If you use MS-Paint you can create a new image and resize it to 48x48 pixels (see the first screenshot).
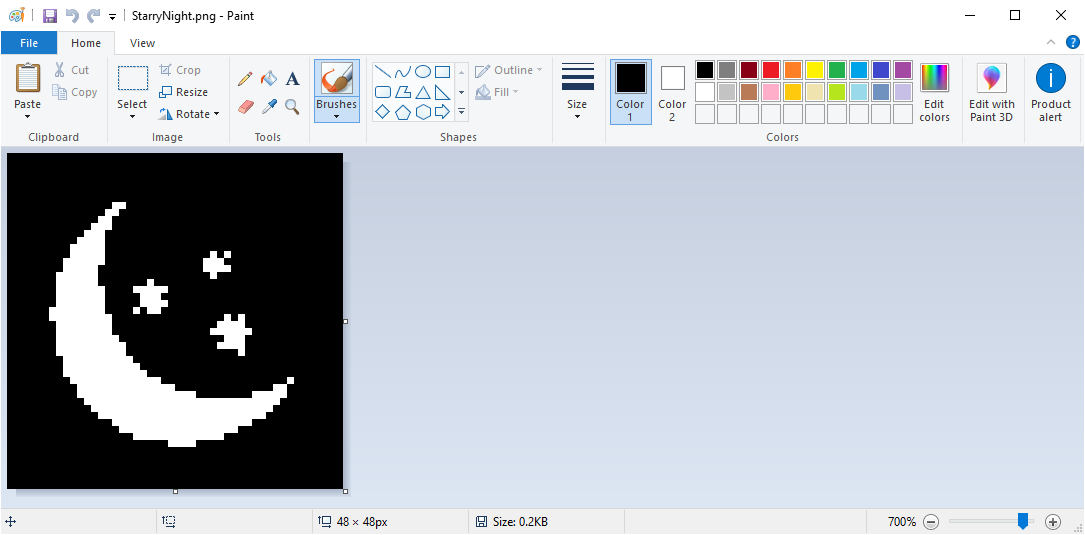
You can then draw the image, you can use only black and white and the pixel will be reversed on screen (white pixels will be white and vice-versa).
When you are happy with the results (second screenshot) you can select "save as..." and select the image format as monochrome Windows bitmap file (third screenshot).
Upload images to Google Drive and collect links
Once you have created all the images you need you can upload them to google drive. I suggest to create a folder for this purpose.
Once you uploaded your images you should get direct download links for them using this method:
https://www.labnol.org/internet/direct-links-for-g...
or this page to convert share links to direct download ones:
https://sites.google.com/site/gdocs2direct/
You need to associate each image link with a mnemonic name. To do this you should create a new text file (you can use notepad on a Windows machine) and add an image per row using the following format:
<mnemonic>:<url>
you should terminate the list with the keyword "end" on a new row (see screenshot four for an example).
Upload index file
Once you are finished you can upload the index file and collect its own download URL, you'll need to provide it to when configuring your device.
Unfortunately, Google drive will not allow you to download the file if you changed it using the Google Docs editor, so you need to edit the text file on your PC and upload it to google drive every time you want to add new pictures or change something.
Software Installation

To install software on your device you'll have to build it from source code.
Setup Arduino IDE and ESP-32 support
You need to install the Arduino IDE that you can download from the official Arduino website.
Then you need to install ESP-32 support following the instructions on github.
At this point, you should test that the samples can be built and downloaded to your device before building project-specific code.
Download libraries and code
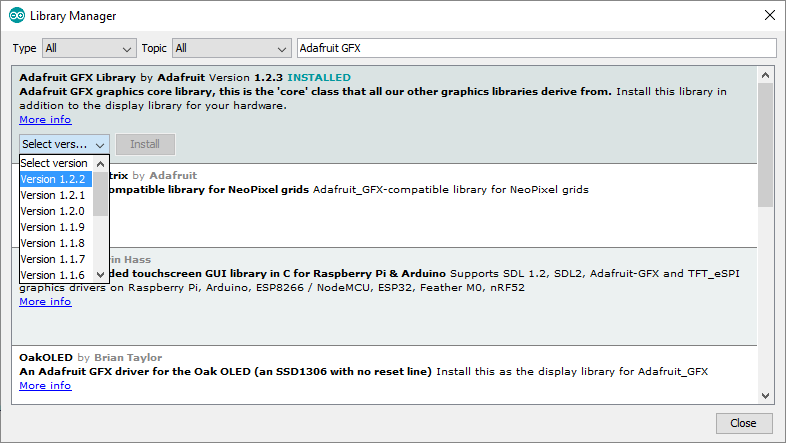
You need to add the libraries needed for the project using the Arduino Library manager.
Select "Sketch\Include Library\Manage Libraries..." from the Arduino IDE main menu (see the first screenshot).
To build the code you need to search and install:
- Adafruit GFX Library
- Adafruit SSD1306
- RootCertificates
To install a library simply type its name in the search box, press enter, select the right library from the list, the latest version from the list of versions and select "install" (see the second screenshot).
Download code
Once you have installed the required libraries you can download the source code from my github repository.
You can simply unzip or clone it in the folder where your Arduino sketches are saved.
Software is still a work in progress, so feel free to open issues on github if you experience problems and keep an eye on it for future updates.
Software Setup


To allow your clock to connect to his own calendar and collect the additional informations (holiday calendar, custom icons etc.) you need first to run the configuration sketch.
Run configuration sketch
In the Arduino IDE you can select "File\Open..." and navigate to the folder where you save the code you downloaded from github.
Then you can move the the "KidsClockConfig" folder and open the "KidsClockConfig.ino" sketch (see the first screenshot).
You have to connect your ESP-32 board using an USB cable, this will power it up too.
Your computer will assign a serial port to it, you need to select it in the right port in the "tools\ports" submenu of the Arduino IDE.
You can then select the "upload" button (arrow pointing to the right) from the Arduino toolbar to build and download the code on your module.
Last message on the output window (bottom of Arduino IDE) should be:
Hard resetting via RTS pin...
If the process completes successfully you can then open a terminal window to insert the configuration data.
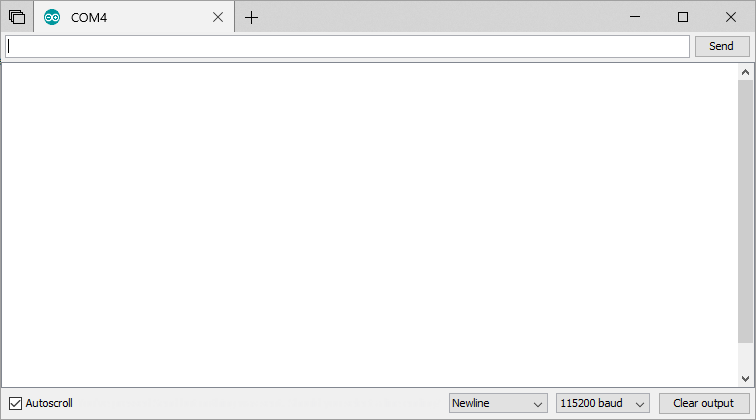
To open terminal select "tools\serial monitor..." in the Arduino IDE's main menu, this will open a new window that will allow you to communicate with the device over serial (using the same USB cable you used to download code).
Configure serial speed to 115200 baud (see attached screenshot) and press "send" button.
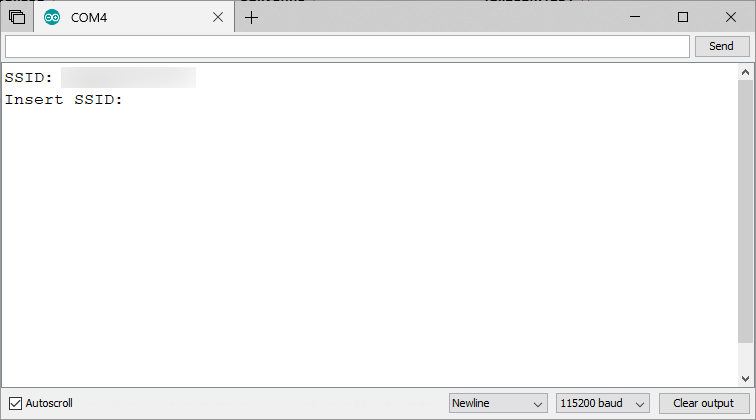
The device will ask you SSID (name of your wi-fi network). Settings are stored inside the device EEPROM (permanent storage), if something is already saved you just need to hit send to keep it as it is, otherwise just copy or type the information in the text box and hit send.
You will be asked for:
- SSID (see screenshot)
- wi-fi key (password)
- public URL of the calendar used for events (the one you created in step 2)
- URL of holiday calendar (for your country/location, collected in step 2)
- Timezone in the format obtained on step 3 (for example timezone for Italy is "CET-1CEST,M3.5.0,M10.5.0/3" inserted with no quotes)
- URL of the index file (created in step 4)
After inserting the last information you should see:
Settings saved.
Printed on the serial console.
Your device is now ready to run the final sketch and be used as a bedside clock.
Run final sketch
At this point, you can open the sketch named "KidsClock" and download it to the device.
It will load the configuration and output some information on serial port, downloading the information from the net.
Check that no errors are reported there and disconnect the device from your PC, you are ready to connect the other hardware components and use it.
Base Plate and Power Supply


My kids sleep on a bunk bed, so I needed to design a clock that could be attached to the wood structure of the bed. I also wanted to have easy access to the inside (to fix issues) and an easy way to power off and back on the clock if something went wrong on the software side.
I decided to use magnets to keep my clock attached to a small support plate attached to the bed. Since magnets also conduce electricity I decided to connect them to the power supply. In this way detaching and reattaching the clock to the plate will also reset it. You can find 3D design for the clock enclosure on thinkercad.
The first component you need to wire is the base plate. You should be able to fit the magnet in the holes. This will require some pressure, but having them secured in place is required to grant that they will not remain attached to the main case when you unplug the clock.
I soldered wires from a 5V power supply directly to the magnets. You can first place the magnets, then solder the wires from the back side. Heating the magnets will also melt a bit the PLA around them, ensuring that they will not be easily removed from the plate.
Power consumption of the device is quite low, so a 500mA power supply would do. Be careful about what magnet you connect to the positive and negative wire of the power supply (it's a good idea to write "+" and "-" with a marker to avoid swapping them).
Main Case


You need to connect two additional magnets and use them to transmit power to the board, to the display and to the movement sensor.
To simplify things I cut some jumper cables (board and other components have 2.54mm pins) and made two cables with multiple outputs (see first picture). One with 3 outputs for 5V supply and one with 4 for ground.
You should take the wire with no jumper connector and solder it to a magnet, but you have to do two things first:
- check what side of the magnet matches the polarity of the magnet you embedded in the base plate. You can simply attach the two magnets you plan to use on top of those already on the base plate.
- slide the wire inside the right hole in the case, in this step you'll have to solder the wire to the magnet first and then plug in it place, as shown in pictures.
Double check that red and black wires match polarities on the base, wiring them in the wrong way may damage your components.
Mounting Components Inside the Case


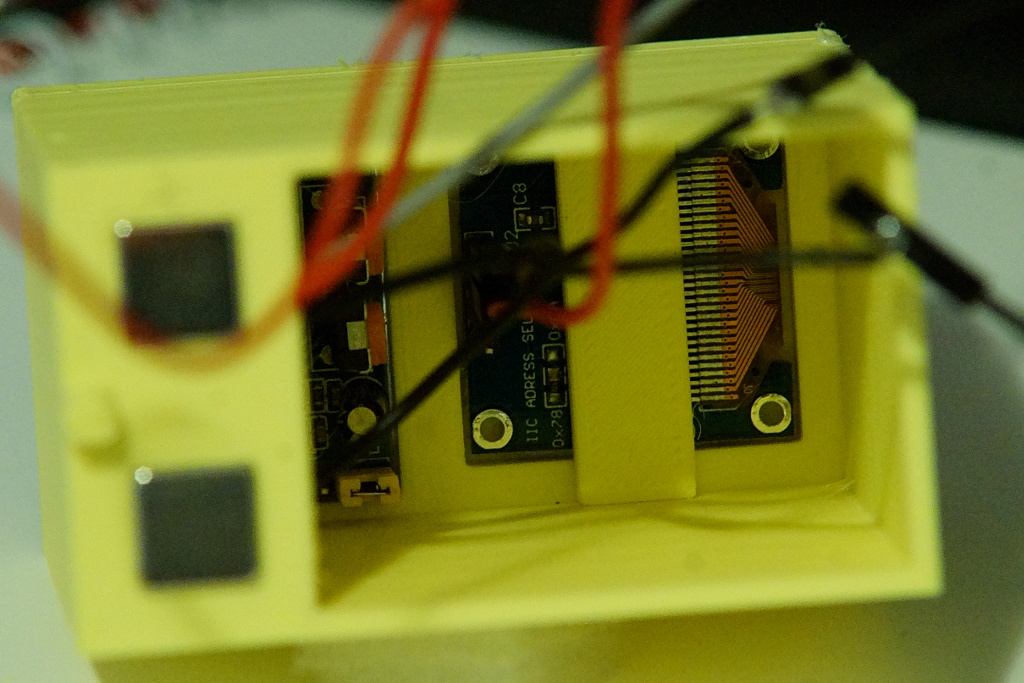
The 3D printed case has two mounting holes, one (on top) for the PIR sensor and one on the bottom fro the display.
You should mount the display first. Gently push it inside the mounting location (the glass is not very resistant, at least on the display I used, so be careful) and lock it in place with one of the small rectangular parts. This should be enough to keep it locked in place, leaving the pins accessible for wiring.
Now you should mount the PIR sensor but first, you should reduce a bit its sensitivity to avoid that it can be triggered by movements during sleep. I used some duct tape to mask the front lens, leaving only an opening close to the top of the sensor, in this way you will have to wave your hand over the clock to activate it. I also used the screws to calibrate sensitivity to a low level, so only a hand close to the sensor will activate it. Check the documentation of your PIR sensor to understand how to configure its sensitivity (if this is possible, of course).
Once you have masked and configured the sensor you can lock the lens in place and slide the sensor inside its mounting hole, fixing it with the rectangular block as you did for the display.
Wiring and Testing


Now it's time to wire your components together and check if the clock works.
You can see the schematic by downloading the PDF file attached to this step.
First, you should connect the I2C pins (SCL and SDA) of the ESP-32 board to the display.
On the doit board, those are pins labelled GPIO21 and GPIO22, position and labels may change on other ESP-32 based boards, but you should easily find SCL and SDA mentioned in the documentation.
Then you need to connect the output pin of the PIR (middle pin for my sensor but, again, check documentation if you are using a different one) to GPIO12.
At this point you will have to connect the 5V power supply (red cable) to VIN pins of the board, PIR and display and ground cable (black) to the 2 ground pins of the board (one should be enough, but I preferred to use both to keep the board more tightly connected inside the case), PIR and display
Things may look a bit messy, but you should be able to slide everything inside the case, leaving the ESP32 module on top and then attach the case to the base plate.
The display should turn on in less than one second, showing a message: "connecting to" and your SSID.
After a few seconds, it should display the current time and then adjust the images according to it.
Downloads
Adding Entries to the Calendar
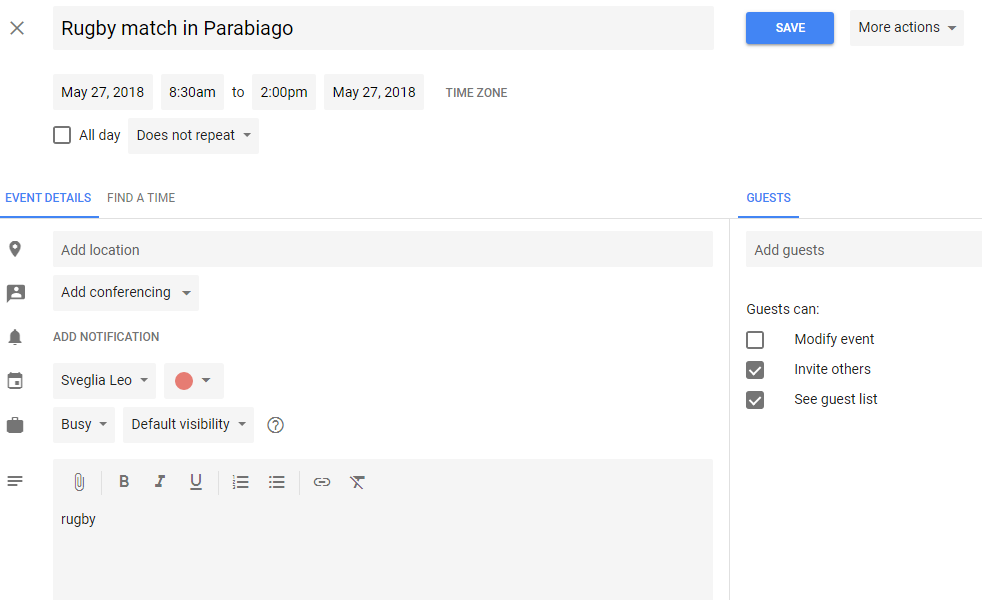
Now you can add new entries to the calendar.
You can just use the calendar website or the phone app.
Press the big "+" icon and configure your event.
The important things to notice (see screenshot) are:
- be sure that you selected the right calendar, Google uses your main calendar as default, you'll have to change it
- the start time of the event is also wake-up time, so the time when the display switches from night mode to the event
- the device only supports single events, no repeated/periodic ones
- The text in the subject field (up to 32 chars) will be displayed under the icon
- In the description field, you can add the name of one of the images you configured in step 4, or leave it blank to use the default icon
The application downloads the calendar every 10 minutes, so your event may not appear immediately if you configured it for the current day.
It's a good idea to delete old entries in the calendar, so the amount of data that the device will have to download to update its own schedule will not increase over time.
Conclusion

I hope that you'll try to build and modify this small device, using it as a way to learn about microcontrollers, connectivity etc. and also to make waking up in the morning a bit more fun for your kids.
I plan to document it on my blog soon, adding some more technical details compared to this build instructions.
If you have issues building it, feel free to use comments here. If you experience issues with software, please use github repo.
This is, of course, not a finished product. It's just a fun experiment showing how you can transfer data from an internet service to a physical dedicated device. It's still a work in progress for me, taking suggestions from the kids about how it can be improved. Feel free to share also your opinion and suggestions!