Controlling a Servo With an Arduino 101
by TechMartian in Circuits > Arduino
6499 Views, 24 Favorites, 0 Comments
Controlling a Servo With an Arduino 101


Servos are a very important piece of hardware in the maker hobby. It is has a wide variety of application due to it's small size, affordable, and lightweight nature while having a very fine precision. A servo motor offers many of the advantages and use cases of a stepper motor apart from one major deterrent; it lacks torque. There are relatively high torque servos for its size, however these servo motors are generally much more expensive.
One of the most popular use case for a servo motor is for controlling the control surfaces such as ailerons, elevators, and rudder of an RC airplane, allowing for fine tuning and control of a plane's roll, pitch, and roll respectively.
Tools and Materials

- Arduino 101 or Arduino Uno
- Servo Motor and servo horns
- Jumper Wires
- Screwdriver
Circuitry


The circuitry of a servo is very simple which is one of the major advantages of a servo over stepper motors. All that is needed are three wires for power, ground, and signal.
Connecting the Servo motor to the Arduino
- Connect the black (sometimes brown) wire from the servo to the GND pin on the Arduino using a black male/male jumper wire.
- Connect the red (sometimes orange) wire from the servo to the 5V pin on the Arduino using a red male/male jumper wire
- Connect the white (sometimes yellow) wire from the servo to pin 8 on the Arduino using any other coloured male/male jumper wire.
Centering the Servo

Servo motors usually do not come pre-centred out of the package. Luckily, it's not difficult to centre the servo. When you supply power on the servo it will centre itself.
- Momentarily connect the Arduino to a power source (your computer or a battery through the barrel jack), then unplug it.
- You will hear some gears spinning centering it.
- Adjust the servo horn to 0 degrees.
- Screw the servo horn to the top
Coding
It is quite simple to control a servo motor too! This is largely due to the availability of an Arduino library that allows us to finely adjust the motion of a servo in one line of code.
//include the servo library
#include
//create a servo object called servo1 Servo servo1;
void setup() { //attach servo1 to pin 9 on the Arduino 101 servo1.attach(9); }
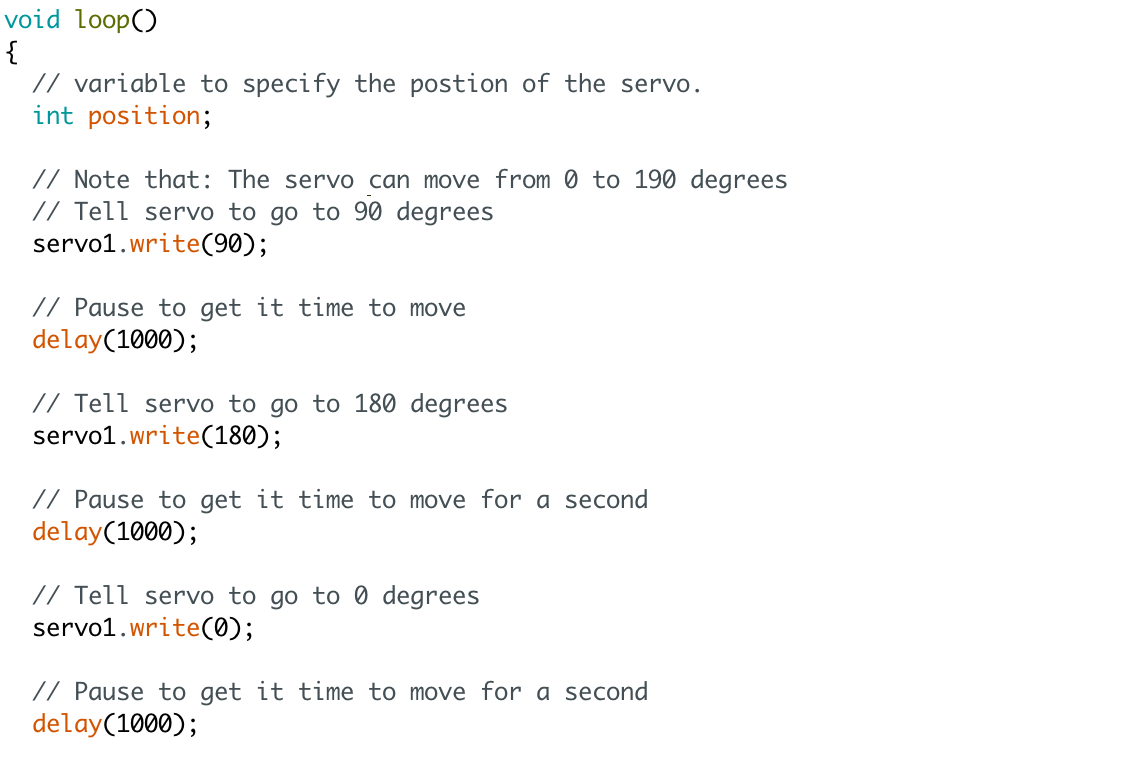
void loop() { // variable to specify the postion of the servo. int position;
// Note that: The servo can move from 0 to 190 degrees // Tell servo to go to 90 degrees servo1.write(90);
// Pause to get it time to move delay(1000);
// Tell servo to go to 180 degrees servo1.write(180);
// Pause to get it time to move for a second delay(1000);
// Tell servo to go to 0 degrees servo1.write(0);
// Pause to get it time to move for a second delay(1000);
}
Demo
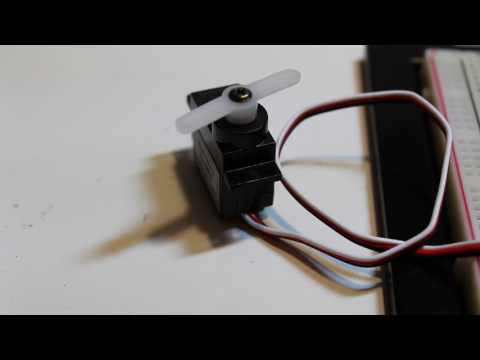
The servo will loop between 90 degrees and 180 degrees. In the demo video, I also had it programmed to incrementally move from 0 to 180.