Create Text Animations on 8x8 Dot Matrixes With Parola Library for Arduino
by dziubym in Circuits > Arduino
4973 Views, 3 Favorites, 0 Comments
Create Text Animations on 8x8 Dot Matrixes With Parola Library for Arduino

In this Tutorial I will show you how to work with MAX7219 8*8 Dot Matrix LED display module.
I will show you how to connect it to Arduino and also explain how to create complex text animations using Parola library
Please click the link to the YT video at the end of this tutorial to see the final affect.
Supplies


Just two components needed for this project
- Arduino Nano
- MAX7219 8*8 Dot Matrix LED display module
Connecting MAX7219 LED Display Module to Arduino


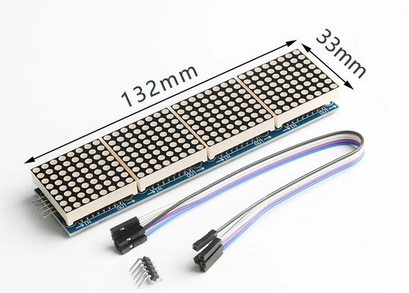
MAX7219 8*8 Dot Matrix LED display module is actually four separate modules connected together.
Each module has it dedicated MAX7219 modules and 8x8 dot matrix.
They are connected through:
- VCC - 5v
- GND - Ground
- DIN - Data in
- CS - Chip Select
- CLK - Clock pin
You can see 5 pins through which you can connect them to Arduino.
For the purpose of this tutorial I will connect the parts in the following way
- Module VCC -> Arduino VCC
- Module GND -> Arduino GND
- Module CLK -> Arduino D14
- Module DIN -> Arduino D11
- Module CS -> Arduino D10
Introduction to Parola Library


Parola makes displaying text on the MAX7219 modules easy and also provides a number of predefined text animations/transitions.
To work with Parola Library you actually need to install two libraries
- MD_Parola.h
- MD_MAX72xx.h
To do it
- download the corresponding ZIP files from GITHUB
- Install those ZIPs in Arduino IDE
Predefined Text Animations

Here is the list of predefined text animations with their ids that you would use in the code
- PA_PRINT
- PA_SCROLL_UP
- PA_SCROLL_DOWN
- PA_SCROLL_LEFT
- PA_SCROLL_RIGHT
- PA_SPRITE
- PA_SLICE
- PA_MESH
- PA_FADE
- PA_DISSOLVE
- PA_BLINDS
- PA_RANDOM
- PA_WIPE
- PA_WIPE_CURSOR
- PA_SCAN_HORIZ
- PA_SCAN_HORIZX
- PA_SCAN_VERT
- PA_SCAN_VERTX
- PA_OPENING
- PA_OPENING_CURSOR
- PA_CLOSING
- PA_CLOSING_CURSOR
- PA_SCROLL_UP_LEFT
- PA_SCROLL_UP_RIGHT
- PA_SCROLL_DOWN_LEFT
- PA_SCROLL_DOWN_RIGHT
- PA_GROW_UP
- PA_GROW_DOWN
That is quite a list.
If you want to see how they all look please watch the video using the link at the end of this instructable
Code to Program Text Animations

If you watched the video at the end of this instructable you would see that for the purpose of this tutorial I created a set of text animations that I later used to wrap up the video. Thanking for waching, asking for subscription etc.
I will here break down this code. You can adjust it to your needs.
We start with declarations where we :
- declare libraries
- hardware type of the LED module
There are 4 hardware types
- PAROLA_HW
- GENERIC_HW
- ICSTATION_HW
- FC16_HW
Please make sure you choose the right one for your module
- how many 8x8 matrixes we have in a chain (4 in our case)
- define PINS used to connect to Arduino
- Having all this defined we can also declare the module itself.
#define HARDWARE_TYPE MD_MAX72XX::FC16_HW
#define MAX_DEVICES 4
#define CLK_PIN   13
#define DATA_PIN  11
#define CS_PIN    10

MD_Parola P = MD_Parola(HARDWARE_TYPE, CS_PIN, MAX_DEVICES);
Next we define the structure that stores all the information necessary to run the animation
struct animations
{
  textEffect_t   anim_in; // Animation type
  textEffect_t   anim_out;// Animation type
  const char *   textOut;   // Text to display
  uint16_t       speed;        // Animation speed (multiplier for library default)
  uint16_t       pause;        // pause (multiplier for library default)
  textPosition_t just;
};
It consists of:
- animation type with which text arrives, animation type with which the text departs
- he actual text that we want to animate,
- the speed of the animation,
- the pause inbeteen arrive and depart
- the text aligment.
And using this structure we can create the table that would store composite animation.
animations animList[] =
{
  { PA_SCROLL_LEFT, PA_SCROLL_LEFT , "Thanks for watching", 4, 0, PA_LEFT },
  { PA_SLICE, PA_GROW_DOWN, "LIKE", 1, 2 , PA_CENTER },
  { PA_RANDOM, PA_GROW_DOWN, "SHARE", 1, 2 , PA_CENTER},
  { PA_SCROLL_LEFT, PA_SCROLL_LEFT ,"Subscribe", 5, 0 ,PA_LEFT},
  { PA_BLINDS, PA_GROW_DOWN ,"Patreon", 2, 2 ,PA_CENTER},
  { PA_SCROLL_DOWN_LEFT, PA_SCROLL_DOWN_LEFT ,"SEE", 4, 2 ,PA_LEFT},
  { PA_SCROLL_UP_RIGHT, PA_SCROLL_UP_RIGHT, "YOU", 4, 2 ,PA_RIGHT},
  { PA_SCROLL_DOWN_RIGHT, PA_SCROLL_DOWN_RIGHT, "SOON", 4, 2 , PA_CENTER}
};
In setup initialise the MAX7219 modules as well as setting time and pause for each application. Refer to attache video.
void setup() {
  P.begin();

  for (uint8_t i=0; i<ARRAY_SIZE(animList); i++)
  {
    animList[i].speed *= P.getSpeed(); animList[i].pause *= 500;
  }
}
In loop we go through the table with animations displaying them one by one.
And display them using the displayText function
See the syntax of that command in the attached slide
void loop() {
  static uint8_t i = 0;  // text effect index

  if (P.displayAnimate())// animates and returns true when an animation is completed
  {
    if (i == ARRAY_SIZE(animList))i = 0;  // reset loop index

    P.displayText(animList[i].textOut, animList[i].just, animList[i].speed,
                  animList[i].pause, animList[i].anim_in, animList[i].anim_out);
    delay(1000);
    i++;   // then set up for next text effect
  }
}
Conclusion

Hope you would find this tutorial useful. Here is the link to the video that would provide more details and explanations