Create a Custom Battlemap for Your Adventure!
by General_Redfox in Design > Digital Graphics
2614 Views, 18 Favorites, 0 Comments
Create a Custom Battlemap for Your Adventure!

Is this the location of the secret spy exchange? An ambush from nearby goblin scouts infiltrating town? Perhaps it's an old western duel, or the mysterious seer with vital information the party needs to survive! Whatever your need, we're going to create a map for your needs!
We’ll be using GIMP. This tutorial requires no prior experience with GIMP and is aimed at GM's wanting to use the program for the first time.
GIMP uses layers and other things not found in simple picture formats like .jpg, .png. It saves files in a .xcf format. That means it will keep your layers intact when you open the file to edit it later. When we’re done we’ll do an export to a jpg. Most Virtual Table Top (VTT) programs can’t handle large file sizes so we’ll have the original in a .xcf file in case we need to ever change it and export it into a less quality format like .jpg.
Tutoral Resources:
Software:
GIMP: https://www.gimp.org/downloads/ download and install it. It is available on Windows, Linux, and Mac.
textures:
http://www.vintyri.org/downloads/GIMP_Overland-Pat...
http://www.vintyri.org/downloads/GIMP_Structures-P...
Brushes:
Chapter 1 Setup: Install Brushes and Patterns
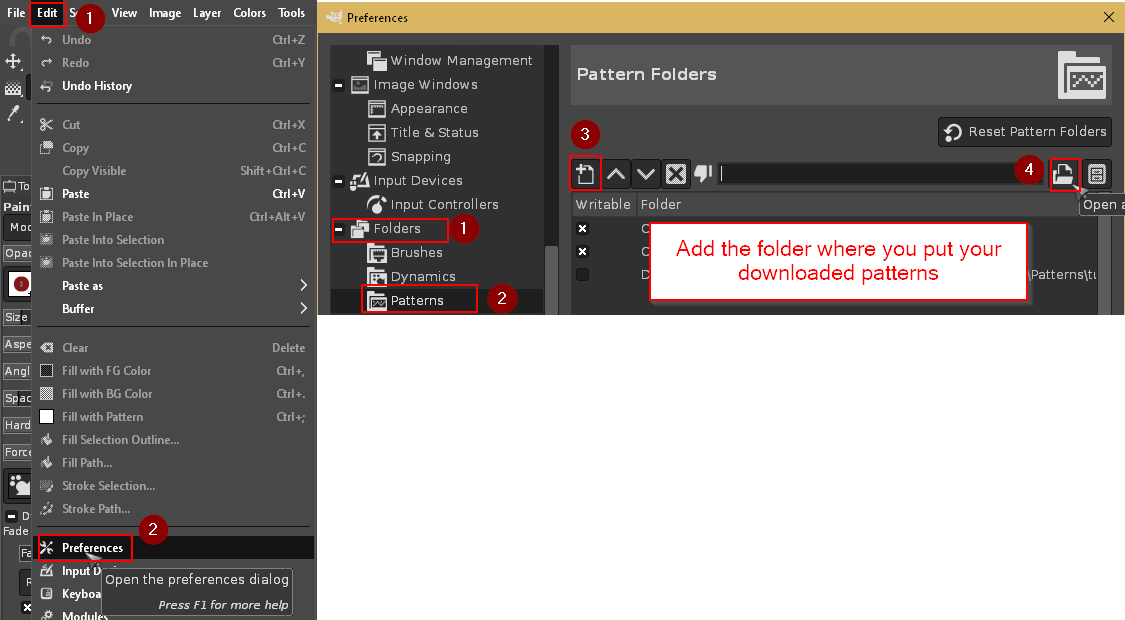
1. Download GIMP and install it. (we won't cover that here, but if you need help. I'm sure a helpful, friendly goblin on the internet can help you out. )
2. Download the patterns and brushes. Extract all the patterns into a single folder. Extract the brushes into a separate folder.
3. Install the patterns & brushes:
3a. Edit > Preferences.
3b. Expand Folders out > click "Patterns" > click the “+” button and select the folder where you put your patterns your textures.
3c. Click on Brushes click the “+” button and select the folder where you put your Brushes.
Chapter 1 Setup : Create the File and Add Alpha to the Background

Create new image
1. File > New 2800 x 2800 pixels.
Alpha
2. Right click the layer “Background” Layer in the lower right and click “Add Alpha Channel”. Right click the layer “Background” Layer in the lower right and click “Add Alpha Channel” Delete the background by pressing the delete key. You should see a grey checkerboard.
Chapter 1 Setup: the Grid
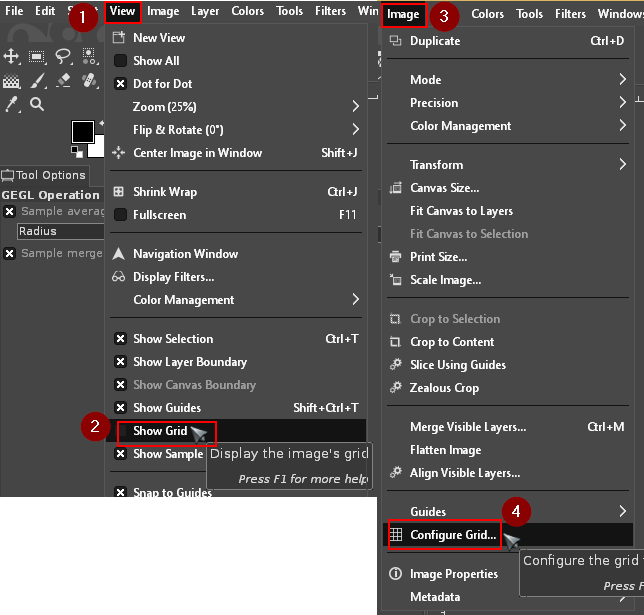
1. View > Show Grid.
2. Image > Configure Grid.
3. Set it to 50x50 pixels.
Chapter 2 Layers: Create the Layers

1. Click to create a new layer. (you can also use Ctrl+Shift+N) We'll need the following layers:
>road
>grass
>grass overlay
>building shadows
>buildings
>well
>well overlay
>rocks
>fog
Chapter 2 Layers: Setup Layer Masks
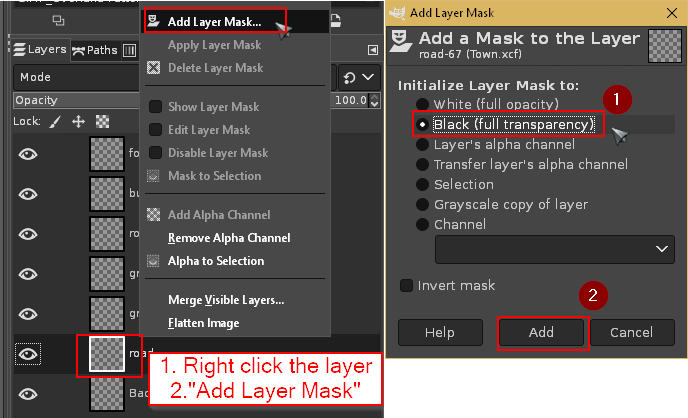
Layer masks allow us to use texture so they only show in areas we want. We have a road that goes through the middle of town, but doesn't go everywhere. There's also some brick/cobble and dirt. Using layer masks will allow us to "paint" these textures where we want roads, cobble, dirt, etc.
Layers that need Layer masks:
>well
>grass
>road
We need to setup layer masks on the road and grass layers.
1. Right click the layer.
2. Click add layer mask.
3. Select Black (Full transparency) - this means we won't see the pattern until we paint white on it. More on that later. See the picture for the ordering of layers.
Chapter 3: Patterns on Layers

We're going to put some texture onto the layers, but you won't see it yet because we haven't painted any white on the layer mask, the black box next to the layer. We'll need to do this for the road layer and the grass layer.
1. Click on the layer. (not the black box next to it)
2. Click on the patterns tab above. (You'll know it because there will be a lot of pictures in there)
3. Find the pattern for the layer:
>"Marble #2" for the well layer.
>"#200" pattern for the road layer.
>"#39" pattern for the grass layer.
>"#119" pattern for the background.
4. Left click and hold the pattern. (this will give you a pop up of a larger version of the pattern)
5. Drag the pattern onto the canvas.
You'll notice down on our layers that the road now looks grey/tan, the grass layer looks green, and the background layer looks brown. The canvas will look brown. Nice job! You did it!
Chapter 4: Prep the Paint Brush for Roads

We're now ready to start paining white on the road layer mask.
1. Setup your paintbush tool with the settings pictured. You can click the painbrush tool icon. (looks like a paint brush or press "P" on the keyboard)
2. Click foreground switch button near the black and white squares so the white one is in front.
Chapter 4 the Road: Paint the Road

1. Click on the black box on the road layer. This is the layer mask. Make sure your color foreground color is white.
2. Paint the road where you need it. Mine is going to be in a diagnal-ish line.
If it's not working double check you're painting white onto the layer mask. (the black box)
Chapter 5 the Grass: Paint the Grass

1. Click on the black box on the grass layer. This is the layer mask. Make sure your color foreground color is white.
2. Paint the road where you need it. Paint it so there's dirt around the edges of the road. This shows errosion by foot traffic.
If it's not working double check you're painting white onto the layer mask.
You can increase the size of your brush to cover larger areas easier.
Chapter 6 Grass Overlay: Creating Plasma Render Overlay.

1. Click on the grass overlay layer.
2. Click Filters > Render > Noise> Plasma.
Chapter 6 Grass Overlay: Plasma Settings

1. Defaults are good for this operation.
2. Click okay.
Chapter 6 Grass Overlay: Desaturate

1. Click Color > Desaturate > Desaturate.
2. Default settings are good here. Click Okay.
Chapter 6 Grass Overlay: Set Layer to Overlay Mode
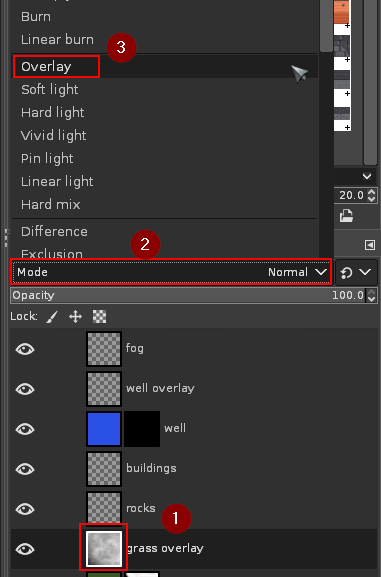
1. Click on the layer.
2. Click the drop down menu for the mode.
3. Select "Overlay".
It should now kinda look like cloud over-top the landscape.
Chapter 6 Grass Overlay: Finished Overlay

This is what our our overlay should make the image look like. It gives the grass some texture and gives some clouds overhead sort of look.
Chapter 7 Rocks: Paint Rocks

1. Click the paint tool and select the "hardness 100" brush.
2. Move the opacity up to 100%.
3. Paint a few different small sized rocks here and there.
Chapter 7 Rocks: Rock Shading
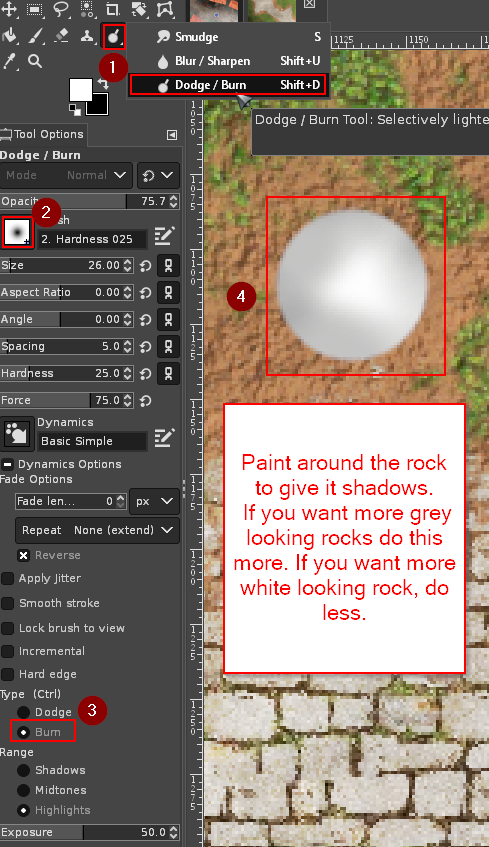
1. Click on the burn/dodge tool. (It may be hidden under the smudge tool) You can get to it quick by using shift+D.
2. Select the "Hardness 025" brush. (you may need to change the size of the brush depending on the size of rock you're working on.
3. Make sure you the "burn" bullet selected.
4. Paint around the rocks to give them shading.
You can paint more or less give give the rocks different looks.
Chapter 8 Buildings: Paint Buildings

Select the brush tool before you begin if it's not already selected.
1. Click the buildings layer.
2. Click the brushes tab in the upper right.
3. Select Building you want to paint. (remember you can click and hold to get a larger preview)
4. Click on the ground.
To rotate the buildings you can change the angle on the left side near the paintbush tool options. By default this is set at 0 degrees.
Chapter 8 Buildings: Paint the Shadows Under the Buildings

1. Click on the building shadows layer.
2. Click the paint bush tool.
3. Set your brush settings to look similar to the settings in the picture.
4. Click on the corner of one of the buildings.
5. Hold shift and click the next corner. (holding shift will give you a line)
You'll want to draw so just the edge of your brush sticks out of the edge of the building.
6. Outline all the buildings.
Chapter 9 the Well: Paint the Layer Mask

1. Click the layer mask for the well layer. (the black box)
2. Click the Ellipse selection tool. (or "E" on the keyboard )
3. Select a circle in the center of town.
You can get a perfect circle by holding Ctrl+Shift after you've clicked to start the circle.
Make sure to leave enough room for a border inside your selection.
4. Drag the white color from the colors on the left to the circle. This will expose our marble pattern.
Chapter 9 the Well: Create the Well Border

1. Click the well overlay layer.
2. Click Select > Shrink. Shrink by 20 pixels.
3. Drag the "#181" pattern to the circle.
4. Change the layer mode to overlay.
5. De-select the circle by clicking on Select > None or Ctrl+Shift+A.
Chapter 10 the Fog: Creating Plasma Render Overlay

1. Click on the Fog layer.
2. Click Filters > Render > Noise> Plasma.
Chapter 10 Fog: Plasma Settings

1. Change the seed to a different number than 1.This will give us a different plasma overlay.
2. Move the turbulence up just a little as well.
Chapter 10 Fog: Desaturate the Fog and Change Layer Mode
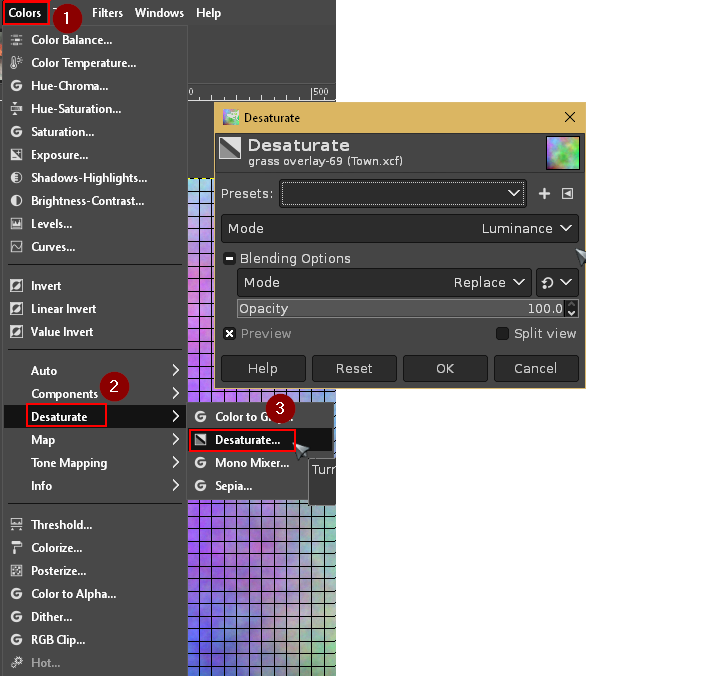
1. Click Colors > Desaturate > Desaturate.
2. Defaults are good. Click okay.
Chapter 10 Fog: Change Layer Mode

1. Click the Fog layer and change the mode to "Lighten only".
2. Change the opacity to a level that looks more like fog than clouds.
Chapter 11: Plotting and Scheming!

Export your drawing as a .jpg with about 80-90% quality. This will keep your file size lower.
1. File > Export. 2. Select .jpg as the file type. 3. Set the quality between 80 to 90.
You're now done! What will be your encounter?
Is this where the townsfolk meet for a weekly market? Is it the scene of the crime? Is this where the bandit ambush the party? Is this where the shady deals go down?
Tell me in the comments below!