D.I.Y Aquarium Wooden Pine Stand
by PhilipM50 in Workshop > Furniture
31018 Views, 105 Favorites, 0 Comments
D.I.Y Aquarium Wooden Pine Stand
![Aviary Photo_131007193155561296.png](/proxy/?url=https://content.instructables.com/F1X/UNNZ/ILE2OMP4/F1XUNNZILE2OMP4.png&filename=Aviary Photo_131007193155561296.png)
Here is my stand i build entirely in my back garden using a few power tools.It was stored in the passageway when it rained and bought back out once it had stopped raining for more work to be done on it (typical British September weather) lol.I hope you enjoy looking at the build pics.There are a couple of things i would change but over all it turned out nice and i am currently planning on building another stand from Iroko timber for a 6x2x2 i have recently bought.This is the first time i have put anything like this on a site like this so please excuse my terrible spelling and mistakes lol.
DIY Aquarium Stand
![11705122_932502706791926_3538568648623765080_n.jpg](/proxy/?url=https://content.instructables.com/FIM/EQ0P/ILE2OMFH/FIMEQ0PILE2OMFH.jpg&filename=11705122_932502706791926_3538568648623765080_n.jpg)
- The timber used is 18mm mdf......20mmx69mm pine.....20mmx144mm pine
- The tools used where as follows ......Tape Measure,Biscuit Joiner,,Router,Orbital Sander, and a jigsaw
- I built a carcass from 18mm mdf as this made a good foundation for the stand base
- Two upright pieces where added later to make the center part of the unit.
![11714519_932966540078876_671060345_n.jpg](/proxy/?url=https://content.instructables.com/FYQ/TMIO/ILE2OMFK/FYQTMIOILE2OMFK.jpg&filename=11714519_932966540078876_671060345_n.jpg)
The front frame is constructed from 20mmx69mm pine cut to the desired length which is then routered with a half inch round nose bit to create the 2 flutes on all the frame legs.
![11714488_932966556745541_118698689_n.jpg](/proxy/?url=https://content.instructables.com/FFC/HU9R/ILE2OMFI/FFCHU9RILE2OMFI.jpg&filename=11714488_932966556745541_118698689_n.jpg)
The front frame was then biscuit jointed and glued to the mdf carcass using D4 pva waterproof wood glue
![11122000_932966563412207_1028820629_n.jpg](/proxy/?url=https://content.instructables.com/FKZ/6G8K/ILE2OMFM/FKZ6G8KILE2OMFM.jpg&filename=11122000_932966563412207_1028820629_n.jpg)
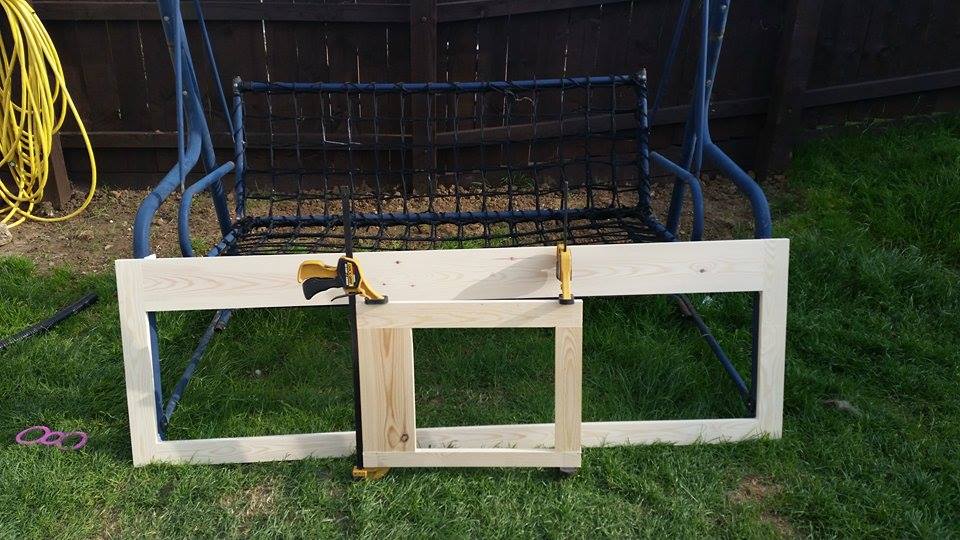
This is the start of the frame front and i just clamped the timber as i went along until it was fully dried and added each piece
![11655541_933006946741502_887999794_n.jpg](/proxy/?url=https://content.instructables.com/F3U/IZ5C/ILE2OMFQ/F3UIZ5CILE2OMFQ.jpg&filename=11655541_933006946741502_887999794_n.jpg)
Thats the front frame finished and drying.....the frame is 20mm longer than the carcass on each end so i could biscuit joint the end frames to the front as i wanted no screws at all in the frames
![11881020_950132358362294_1024400943_n (1).jpg](/proxy/?url=https://content.instructables.com/FKX/9MTW/ILE2OMOS/FKX9MTWILE2OMOS.jpg&filename=11881020_950132358362294_1024400943_n (1).jpg)
Next i made the end panels from the same timber as the front frame all biscuit jointed at the corners but this time i cut a 7mm groove along the inside edge so i could put 6mm v groove boards as paneling.The boards once assembled together are 2mm shorter than the desired size to allow for any expansion.
![11292024_933309396711257_1751825077_n.jpg](/proxy/?url=https://content.instructables.com/FGZ/HGQH/ILE2OMI3/FGZHGQHILE2OMI3.jpg&filename=11292024_933309396711257_1751825077_n.jpg)
Here the stand top has been made from 20mmx144mm pine boards biscuit jointed together and glued.It was then cut to the correct size and later i routered the edge.
![11753757_935729149802615_1086388194_n.jpg](/proxy/?url=https://content.instructables.com/FKK/Q9H4/ILE2OMKL/FKKQ9H4ILE2OMKL.jpg&filename=11753757_935729149802615_1086388194_n.jpg)
The end panels where biscuit jointed to the front frame and a chamfer bit was run up the corner. Two screws hold the back of the end panel to the carcass screwed from the inside and the top was added and screwed from the underside.
![11737172_935186236523573_26438798_n.jpg](/proxy/?url=https://content.instructables.com/F5G/SWNH/ILE2OMI8/F5GSWNHILE2OMI8.jpg&filename=11737172_935186236523573_26438798_n.jpg)
Next i constructed the tank surround in exactly the same way as the stand end frames but routered the inside edge
![11737038_933356403373223_193906308_n (1).jpg](/proxy/?url=https://content.instructables.com/F52/EU4O/ILE2OMHZ/F52EU4OILE2OMHZ.jpg&filename=11737038_933356403373223_193906308_n (1).jpg)
The front and end tank surround clamped and drying but this time i used 20mmx144mm for the top part of the surround to give myself some clearance above the tank
![11759615_935729106469286_504489585_n.jpg](/proxy/?url=https://content.instructables.com/F6C/MEP4/ILE2OMN0/F6CMEP4ILE2OMN0.jpg&filename=11759615_935729106469286_504489585_n.jpg)
I added 2 flutes to the top with a router
![11759071_935207836521413_860461524_n.jpg](/proxy/?url=https://content.instructables.com/FL5/JBG5/ILE2OMMZ/FL5JBG5ILE2OMMZ.jpg&filename=11759071_935207836521413_860461524_n.jpg)
The surround end panels were biscuit jointed to the front and glued and clamped to an 18mm mdf base
![11753900_935207823188081_1510937847_n.jpg](/proxy/?url=https://content.instructables.com/F95/8LQN/ILE2OML8/F958LQNILE2OML8.jpg&filename=11753900_935207823188081_1510937847_n.jpg)
![11733365_935729059802624_884169986_n.jpg](/proxy/?url=https://content.instructables.com/F5U/7VCL/ILE2OMHU/F5U7VCLILE2OMHU.jpg&filename=11733365_935729059802624_884169986_n.jpg)
Tank surround chamfered once dry
![11748730_935729119802618_615181604_n.jpg](/proxy/?url=https://content.instructables.com/F9G/UQ7S/ILE2OMJG/F9GUQ7SILE2OMJG.jpg&filename=11748730_935729119802618_615181604_n.jpg)
The lid was cut to size and later i routered the edge
![11739670_936738293035034_142068312_n.jpg](/proxy/?url=https://content.instructables.com/FGO/U5GM/ILE2OMI9/FGOU5GMILE2OMI9.jpg&filename=11739670_936738293035034_142068312_n.jpg)
At this stage i decided i wanted and arch in the middle section so i added an extra piece so i could cut an arch and also added some cut down ogee skirting
![11793197_939652542743609_1534678223_n.jpg](/proxy/?url=https://content.instructables.com/FYW/PNL8/ILE2OMN3/FYWPNL8ILE2OMN3.jpg&filename=11793197_939652542743609_1534678223_n.jpg)
The doors assembled the same as the end panels
![11805831_939982416043955_941246106_n.jpg](/proxy/?url=https://content.instructables.com/FAT/QSFT/ILE2OMNT/FATQSFTILE2OMNT.jpg&filename=11805831_939982416043955_941246106_n.jpg)
Here you can see the 18mm mdf base of the surround
![11805647_939982422710621_1997925491_n.jpg](/proxy/?url=https://content.instructables.com/F7F/O0Z4/ILE2OMNS/F7FO0Z4ILE2OMNS.jpg&filename=11805647_939982422710621_1997925491_n.jpg)
Dry fit of the doors
![11780602_939982432710620_601584901_n.jpg](/proxy/?url=https://content.instructables.com/FQO/9RN2/ILE2OMN1/FQO9RN2ILE2OMN1.jpg&filename=11780602_939982432710620_601584901_n.jpg)
just a front view of the stand
![11214297_943513549024175_8790374621332486750_n.jpg](/proxy/?url=https://content.instructables.com/FFB/LD14/ILE2OMI2/FFBLD14ILE2OMI2.jpg&filename=11214297_943513549024175_8790374621332486750_n.jpg)
The door furniture added then removed for varnishing
![11796445_943513599024170_3842875373704583499_n.jpg](/proxy/?url=https://content.instructables.com/F0W/AH39/ILE2OMNF/F0WAH39ILE2OMNF.jpg&filename=11796445_943513599024170_3842875373704583499_n.jpg)
The lid was cut at a 15 degree angle facing backwards to hide any light that may shine through and the furniture added
![11815928_943090732399790_1231884691_n.jpg](/proxy/?url=https://content.instructables.com/FPB/WFW7/ILE2OMNY/FPBWFW7ILE2OMNY.jpg&filename=11815928_943090732399790_1231884691_n.jpg)
At this stage i decided to add some braces under the lid as its quite heavy and i wanted longer screws in the hinges (you will see these in a later picture
![11825702_943933995648797_6876578391128657284_n.jpg](/proxy/?url=https://content.instructables.com/FVV/FKP0/ILE2OMOP/FVVFKP0ILE2OMOP.jpg&filename=11825702_943933995648797_6876578391128657284_n.jpg)
Here are the braces i spoke about
![11817082_943934128982117_8616927709370930734_n.jpg](/proxy/?url=https://content.instructables.com/FMA/WFNZ/ILE2OMOB/FMAWFNZILE2OMOB.jpg&filename=11817082_943934128982117_8616927709370930734_n.jpg)
I cut a piece of pine roughly 25mm wide and routered it then pinned it to the underside of the lid with a 1mm gap to stop any binding that may occur also it would hide any light that might shine through if the lid warped or twisted
![11204384_943934078982122_9029683463901566886_n.jpg](/proxy/?url=https://content.instructables.com/FSB/JZOO/ILE2OMGS/FSBJZOOILE2OMGS.jpg&filename=11204384_943934078982122_9029683463901566886_n.jpg)
I added an 18mm mdf shelf which is sat on shelf pins so i could remove it if i needed any space and coated the inside with 2 coats of acrylic varnish and 3 coats to the outside
![11813409_943934102315453_1980712876328728359_n.jpg](/proxy/?url=https://content.instructables.com/F8O/9HBP/ILE2OMNU/F8O9HBPILE2OMNU.jpg&filename=11813409_943934102315453_1980712876328728359_n.jpg)
Well thats the stand finished
![11027927_943934035648793_8142317941606317973_n.jpg](/proxy/?url=https://content.instructables.com/F01/IXJT/ILE2OMGQ/F01IXJTILE2OMGQ.jpg&filename=11027927_943934035648793_8142317941606317973_n.jpg)
![11796242_943934052315458_2641887609224431954_n.jpg](/proxy/?url=https://content.instructables.com/FS6/X632/ILE2OMN4/FS6X632ILE2OMN4.jpg&filename=11796242_943934052315458_2641887609224431954_n.jpg)
![11781672_943934062315457_5571084680671671401_n.jpg](/proxy/?url=https://content.instructables.com/FV3/ZZ1W/ILE2OMN2/FV3ZZ1WILE2OMN2.jpg&filename=11781672_943934062315457_5571084680671671401_n.jpg)
![11949721_959051104137086_1982146743_n.jpg](/proxy/?url=https://content.instructables.com/FH4/1Y04/ILE2OMPJ/FH41Y04ILE2OMPJ.jpg&filename=11949721_959051104137086_1982146743_n.jpg)
![12067917_978069192235277_743133581_n.jpg](/proxy/?url=https://content.instructables.com/FB8/JLRR/ILE2OMPM/FB8JLRRILE2OMPM.jpg&filename=12067917_978069192235277_743133581_n.jpg)
![12077404_977966652245531_851323487_n.jpg](/proxy/?url=https://content.instructables.com/FJH/25LI/ILE2OMP5/FJH25LIILE2OMP5.jpg&filename=12077404_977966652245531_851323487_n.jpg)
Here i have added some corner brackets just for decorative purposes as i felt it tied the surround in with the stand
![1977048_370421003140888_237746832330640643_n.jpg](/proxy/?url=https://content.instructables.com/FQS/2E9F/ILFFYB59/FQS2E9FILFFYB59.jpg&filename=1977048_370421003140888_237746832330640643_n.jpg)
This is how my tank looked when i bought it,rather pathetic i know.