DIY Bluetooth Speaker Using Esp32 With Controls
by Brian_Imenje in Circuits > Gadgets
7984 Views, 14 Favorites, 0 Comments
DIY Bluetooth Speaker Using Esp32 With Controls

Are you ready to turn your ESP32 into the ultimate Bluetooth audio experience? This project combines the power of the ESP32's Bluetooth capabilities with your creativity to craft a custom, portable speaker that rivals off-the-shelf options.
Whether you're a maker, music lover, or tech enthusiast, this guide will walk you through creating a Bluetooth speaker that connects wirelessly to your devices and delivers crystal-clear sound. With a sleek design, customizable features, and a dash of DIY fun, your ESP32 Bluetooth speaker will impress your ears and your friends.
Let’s dive in and transform your ESP32 into a musical masterpiece! 🎶
Supplies

.jpg)
.jpg)
.jpg)

What You’ll Need
Here’s what you need to start jamming:
- ESP32 microcontroller: The brains of the operation.
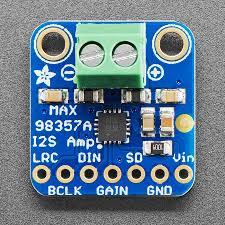
- MAX98357A DAC amplifier module: Converts digital audio signals into amplified sound.
- Speaker: 4Ω or 8Ω, 3W recommended for best results.
- Jumper wires: To connect everything neatly.
- 10μF capacitor (optional): For power smoothing.
- Micro-USB cable: To program and power the ESP32.
- 5 pushbuttons: For music control.
- Screwdrivers, tape, and a box (optional): Create a cool enclosure.
How It Works.
Your ESP32 will act as a Bluetooth receiver, decoding audio signals. The MAX98357A will then amplify these signals and drive your speaker to produce sound. This setup is simple yet powerful—perfect for a DIY sound system!
Gather the Tools and Materials
Make sure all components are on hand. Double-check your speaker rating (4Ω or 8Ω, 3W). Lay out your jumper wires and capacitor, if you're using one.
Circuit Wiring.
.jpg)

- Power Connections:
- VIN (ESP32) to VIN (MAX98357A): Provide power to the amplifier. Ensure the voltage matches the MAX98357A's requirements (typically 5V).
- GND (ESP32) to GND (MAX98357A): Common ground connection.
- Audio Signal Connections:
- BCLK (MAX98357A) to GPIO 27 (ESP32): Bit clock signal (controls the timing of audio data).
- LRC (MAX98357A) to GPIO 14 (ESP32): Left-right clock signal (determines which channel the audio data belongs to).
- DIN (MAX98357A) to GPIO 26 (ESP32): Digital audio data input.
- Control buttons:
- Connect one side of all the buttons to Ground.
- Connect the other side of the buttons to GPIO pins(esp32)ie. [5, 18,19,21,22]
- Optional Pins:
- SD (Shutdown): Connect to a GPIO pin to control the amplifier's power state. Leave it floating if not used.
- GAIN: Leave unconnected or follow the datasheet to adjust the gain.
- Optional Capacitor:
- Place the 10μF capacitor between VIN and GND on the MAX98357A to reduce noise.
Install the Necessary Libraries.
https://github.com/pschatzmann/arduino-audio-tools.git
https://github.com/pschatzmann/ESP32-A2DP.git
The above 2 libraries are required to run the project. For the Arduino IDE, you can simply download the zip file and install the libraries to the IDE.
For PlatformIO you can either add to the lib_deps as shown:
or just git-clone the repositories to the lib folder of your project.
Coding the Esp32.
Downloads
Upload the Code.
- Upload the code above by pressing the upload button in your editor.
- For PlatformIO you will have to build it first before uploading.
Testing the Setup
- Power up the ESP32 using a micro-USB cable.
- On your phone or computer, search for a Bluetooth device named ESPEAKER.
- Pair with it and play some music.
🎉 Boom! Your speaker should now sing your favorite tunes!
Troubleshooting
- If you get a compilation size error you can in fix it the following ways:
- In the Arduino IDE go to the tools menu and under partitions select a larger partition size[Huge App].
- In PlatformIO just add a partition table CVS file to the root of the project and tell platform io to use it by adding the following line to the platformio.ini file.
Downloads
Optional Enhancements.
Build an Enclosure:
- Use a 3D-printed case, or a wooden box, or repurpose an old toy to house your project.
- Add cutouts for the speaker, ESP32, and wires.
LED Indicators:
- Add an RGB LED to indicate Bluetooth status (e.g., blinking for pairing, steady for connection).
Battery Power:
- Add a rechargeable LiPo battery and charging circuit (like TP4056) to make it portable.
Light Show:
- Synchronize RGB LEDs with music to create a mini light show!
And Most importantly ANYTHING can be a bluetooth speaker as long as all the components fit
- me probably.
GodSpeed Creators.