DIY Composite Truck Topper for a Long‑Bed Truck (F‑350)
by maker_271 in Workshop > Cars
136 Views, 2 Favorites, 0 Comments
DIY Composite Truck Topper for a Long‑Bed Truck (F‑350)
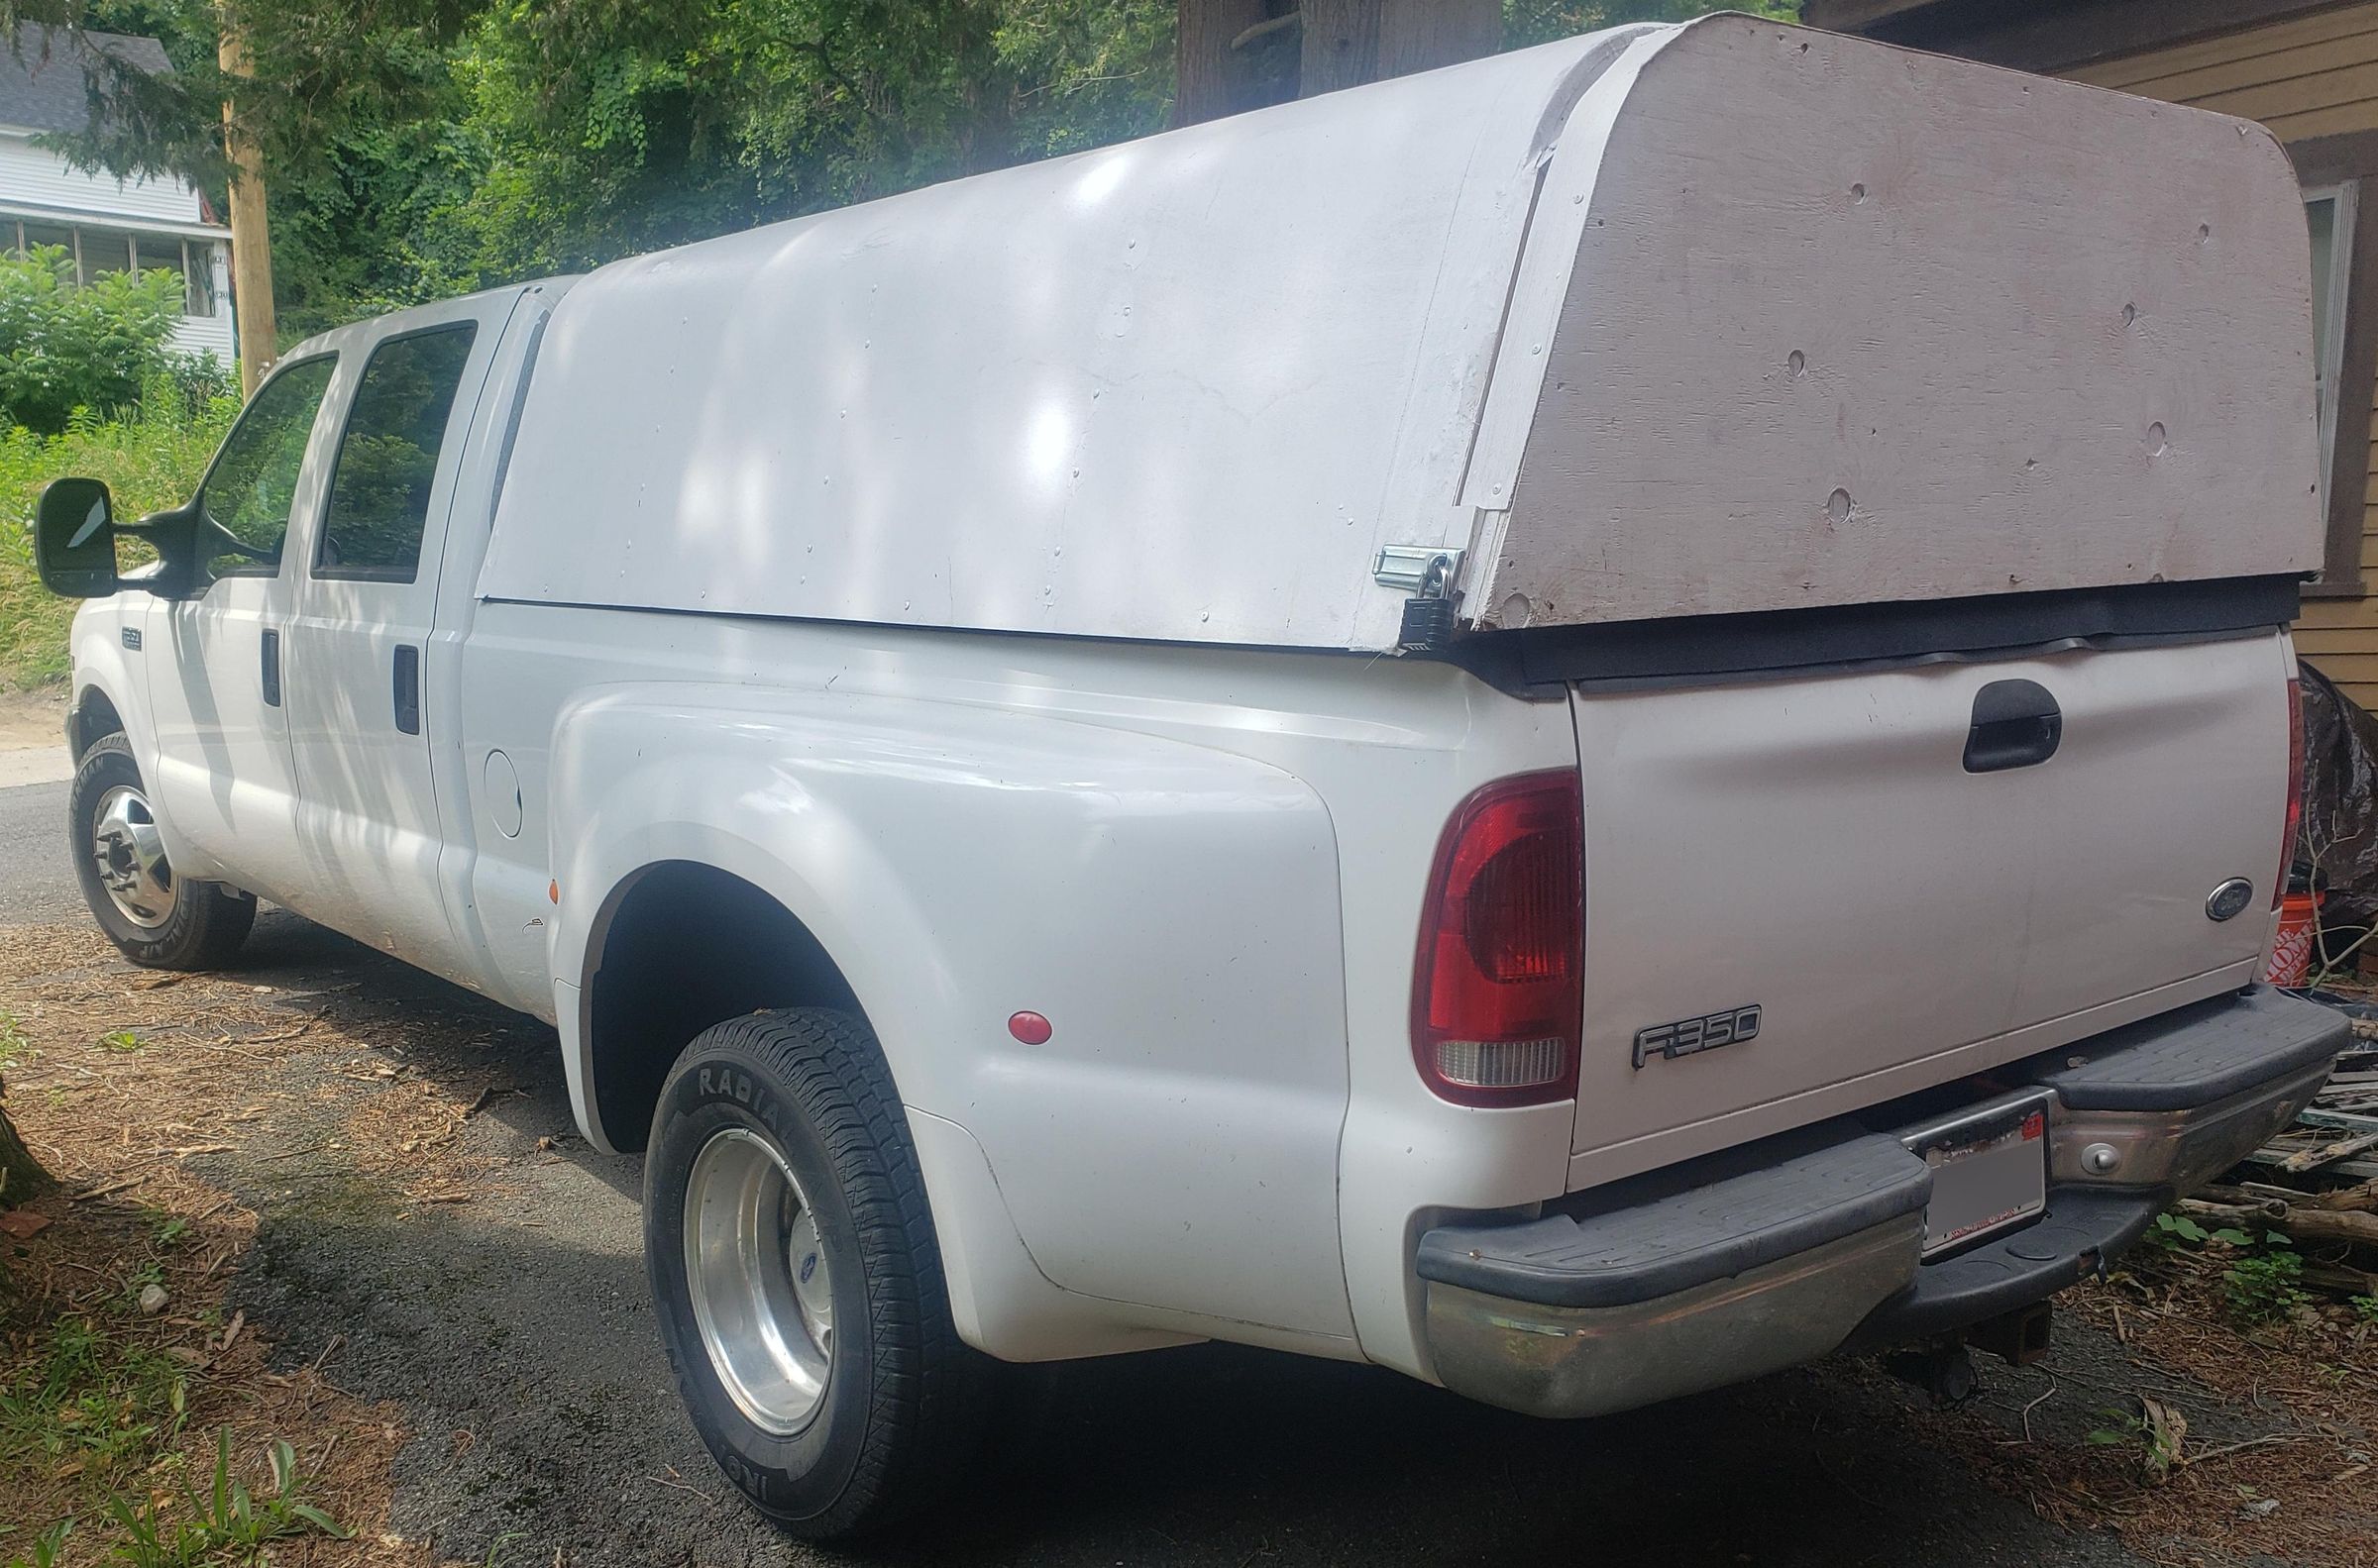
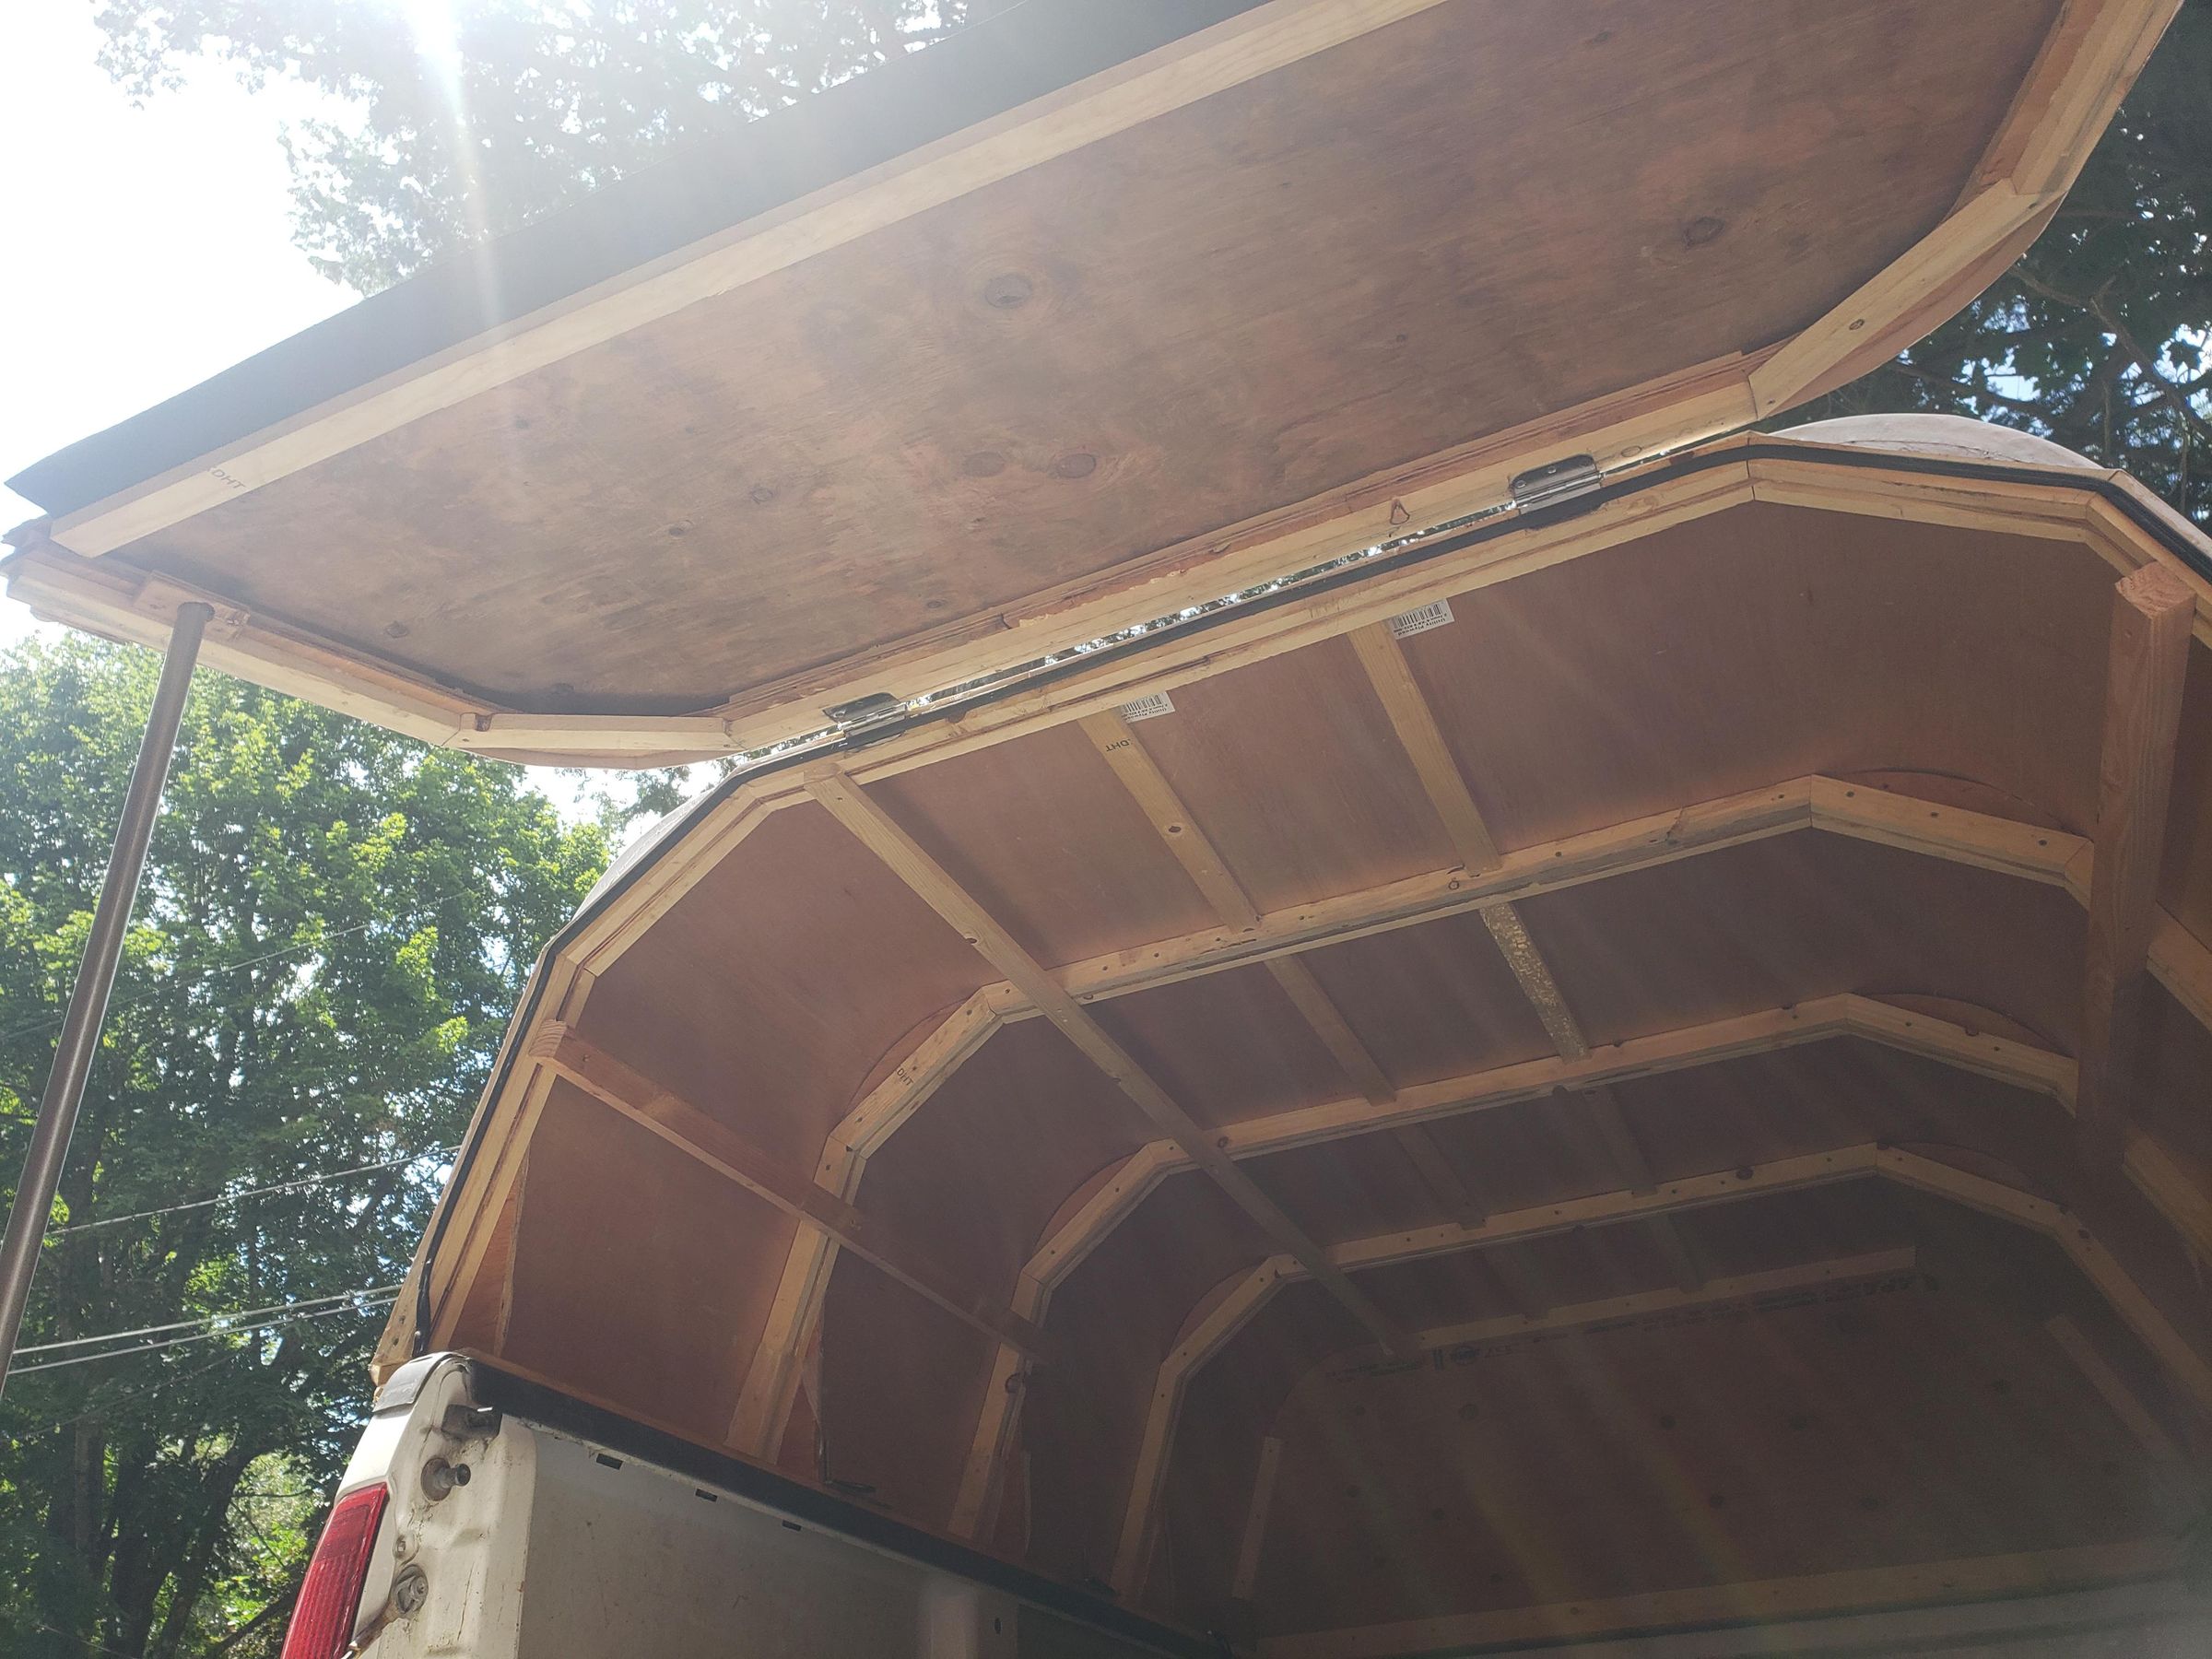
This project shows how to build a composite wood/fiberglass truck topper for a long‑bed truck (about 101 in bed length) using plywood, dimensional lumber, glue, epoxy, and fiberglass tape.
This project started as a necessity: I needed to haul a substantial load over roughly 3,200 miles and couldn’t justify spending thousands of dollars on a commercial fiberglass truck topper. Instead, I set out to build a strong, lightweight and weather‑tight shell using mostly plywood, dimensional lumber, glue, and fiberglass—something I could fabricate myself and trust under unknown highway conditions.
The design uses:
- A full‑size cab endwall template for accurate fit.
- Composite arches made from 1×2s and plywood gussets.
- Bed rails, purlins, and 1/8 in plywood sheeting.
- Fiberglass seams and exterior paint for weatherproofing.
- A hinged rear door that closes the extra bed length and locks securely.
You’ll need basic woodworking tools, epoxy/fiberglass handling skills, and enough space to work around the truck.
The build was inspired in part by the “Truck Canopy / Topper: 7 Steps” project on Instructables, but my requirements pushed the design further toward boat‑building techniques. I borrowed ideas from ribbed boat hull construction and created a frame from composite ribs (arches) and gussets, then skinned it in thin plywood and reinforced key areas with fiberglass and epoxy. The result is essentially an upside‑down boat bolted onto the truck bed: lightweight, stiff, and designed to distribute dynamic stresses through a composite structure rather than a few fasteners. The topper is light enough for a one-person install whereas a fiberglass topper for a full size bed is quite heavy.
On the road trip, the topper performed very well. It handled gusts, crosswinds, pressure waves from passing trucks, potholes, rough pavement, and thunderstorms without loosening or flexing excessively. It also turned out to be reasonably aerodynamic—fuel consumption was slightly better than running an open bed with just a tailgate. If you have access to basic woodworking tools and are willing to work carefully through the steps, you can build a similar topper that meets or exceeds the performance of many commercial options at a fraction of the cost.
Design caveat: You might notice there are some slight differences between the photos and description of steps. This is due to design discoveries made while building the topper, such as: it wasn't necessary to meticulously cut curved plywood for each arch except for the end arch, or the gussets were added later after the arch was assembled instead of being integrated with the arches. If I was building this a second time, I would build it with these minor changes.
Supplies
Wood and sheet goods
- 12 1×2 by 8 ft lumber (straight, knot‑free for arches)
- 2 1×6 lumber (bed rails, about 8 ft long or bed length)
- 3 plywood sheets 1/8 in thick 4 x 8 ft for covering the frame
- 3 plywood sheets ½ in thick 4 x 8 ft for endwalls and gussets
- Additional stock for purlins (dimensions to suit your design)
Adhesives and composites
- Original Gorilla Glue (polyurethane) for wood laminations
- Epoxy resin and hardener
- Fiberglass tape, 6 in wide (for arch/rail bonding and seams)
Fasteners and hardware
- 2 in decking screws (for wood assembly)
- 3/4 in flat‑bottom wood screws (for sheeting)
- 2 Stainless steel hinges (for rear door)
- 2 Lock hasps and padlocks
- 6 Bolts (for bed rail through‑bolting, sized to match 1/2 in holes)
- 6 Nuts, washer stacks, and metal spreader plates for rails
- 6 D‑rings (tie‑down points at bolt tops)
Seals and finishes
- D‑channel foam door/weather seal (about 1 in wide)
- 1/8 in rubber underflooring (for tailgate seal)
- Primer suitable for epoxy/fiberglass and wood
- Urethane Alkyd Semi‑Gloss Enamel Interior/Exterior paint (or similar)
- Optional: clear coat or bedliner coating
*Adjust quantities for your bed length and arch count as needed.
Tools
- Tape measure, straightedge, chalk line
- Carpenter’s square
- Circular saw (skillsaw)
- Jigsaw
- Chop/miter saw
- Drill/driver and bits
- Chisels (for hinge mortises)
- Clamps
- Brushes, mixing cups, stir sticks (for epoxy)
- Sandpaper and sanding tools
- Tarps or cover (to keep plywood dry before painting)
Design and Cut the Cab Endwall Template
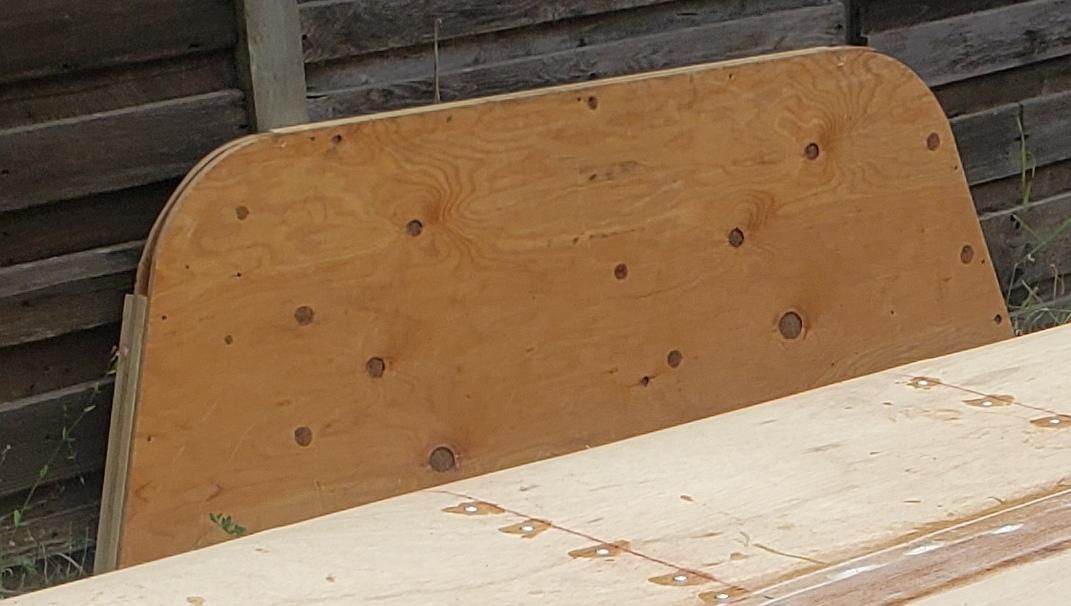
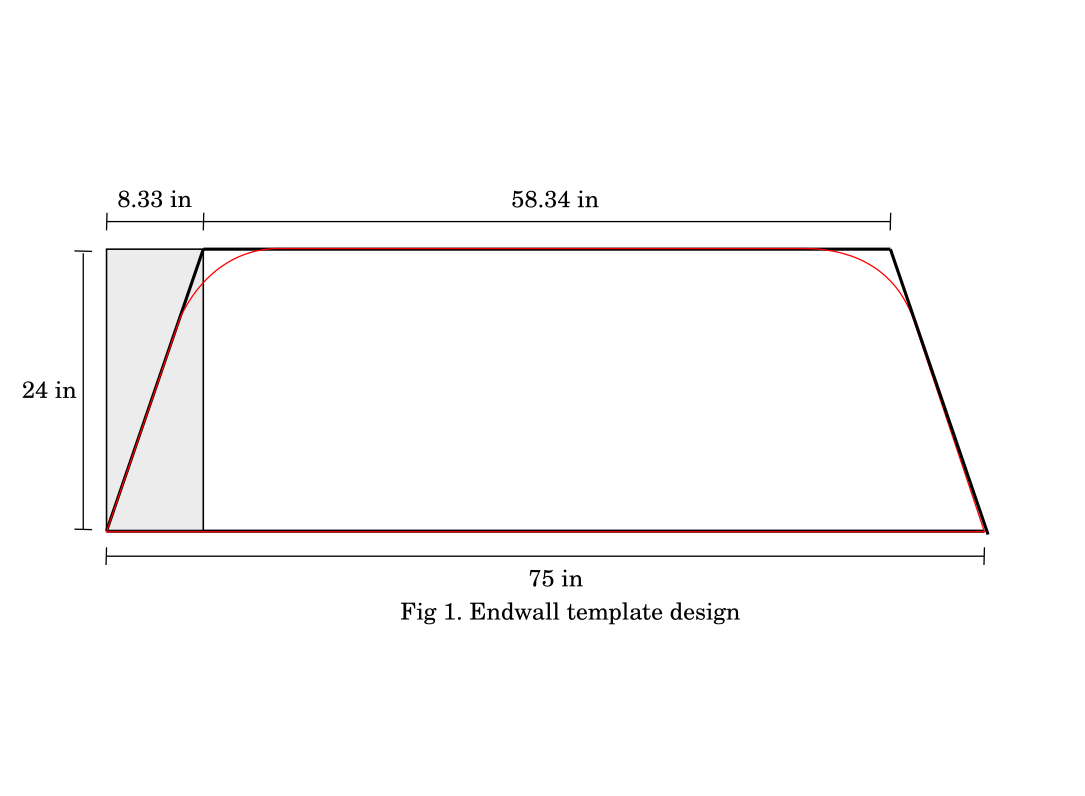
This step creates a full‑size plywood template that matches the rear of your cab and defines the basic curve and taper of the topper.
Measure the cab and bed
- Measure the vertical height of the cab rear from the bed rail level to the top of the cab.
- Measure the lower width of the cab rear at its widest point.
- Measure the upper width near the roof (usually narrower).
- Compute the “lift” (difference between lower and upper width) to define the taper.
- Measure the bed width at the rear and note any inward slope of the bed sides.
Lay out and cut the right‑triangle template
- On a plywood sheet, draw the lower width line.
- From one end, mark the cab height as a vertical line.
- From the top of that vertical, mark the upper width back toward the other side.
- Connect upper and lower corners with a diagonal: this is the cab side taper.
- Cut the straight edges (bottom, side, top) with a circular saw, using a rigid guide (angle bracket or straight aluminum) for clean lines.
Test‑fit and add the radius
- Set the template on the bed against the cab and confirm the fit and taper.
- Scribe a gentle radius at the top that your 1/8 in cover can bend around without cracking.
- Use a flexible batten to draw a fair curve.
- Cut the radius with a jigsaw, following the scribed line by eye rather than forcing a rigid guide.
- Test‑fit again and adjust if necessary.
This endwall template defines the cab interface and the curve used later for arches and endwalls.
Build Composite Arches With Integrated Gussets
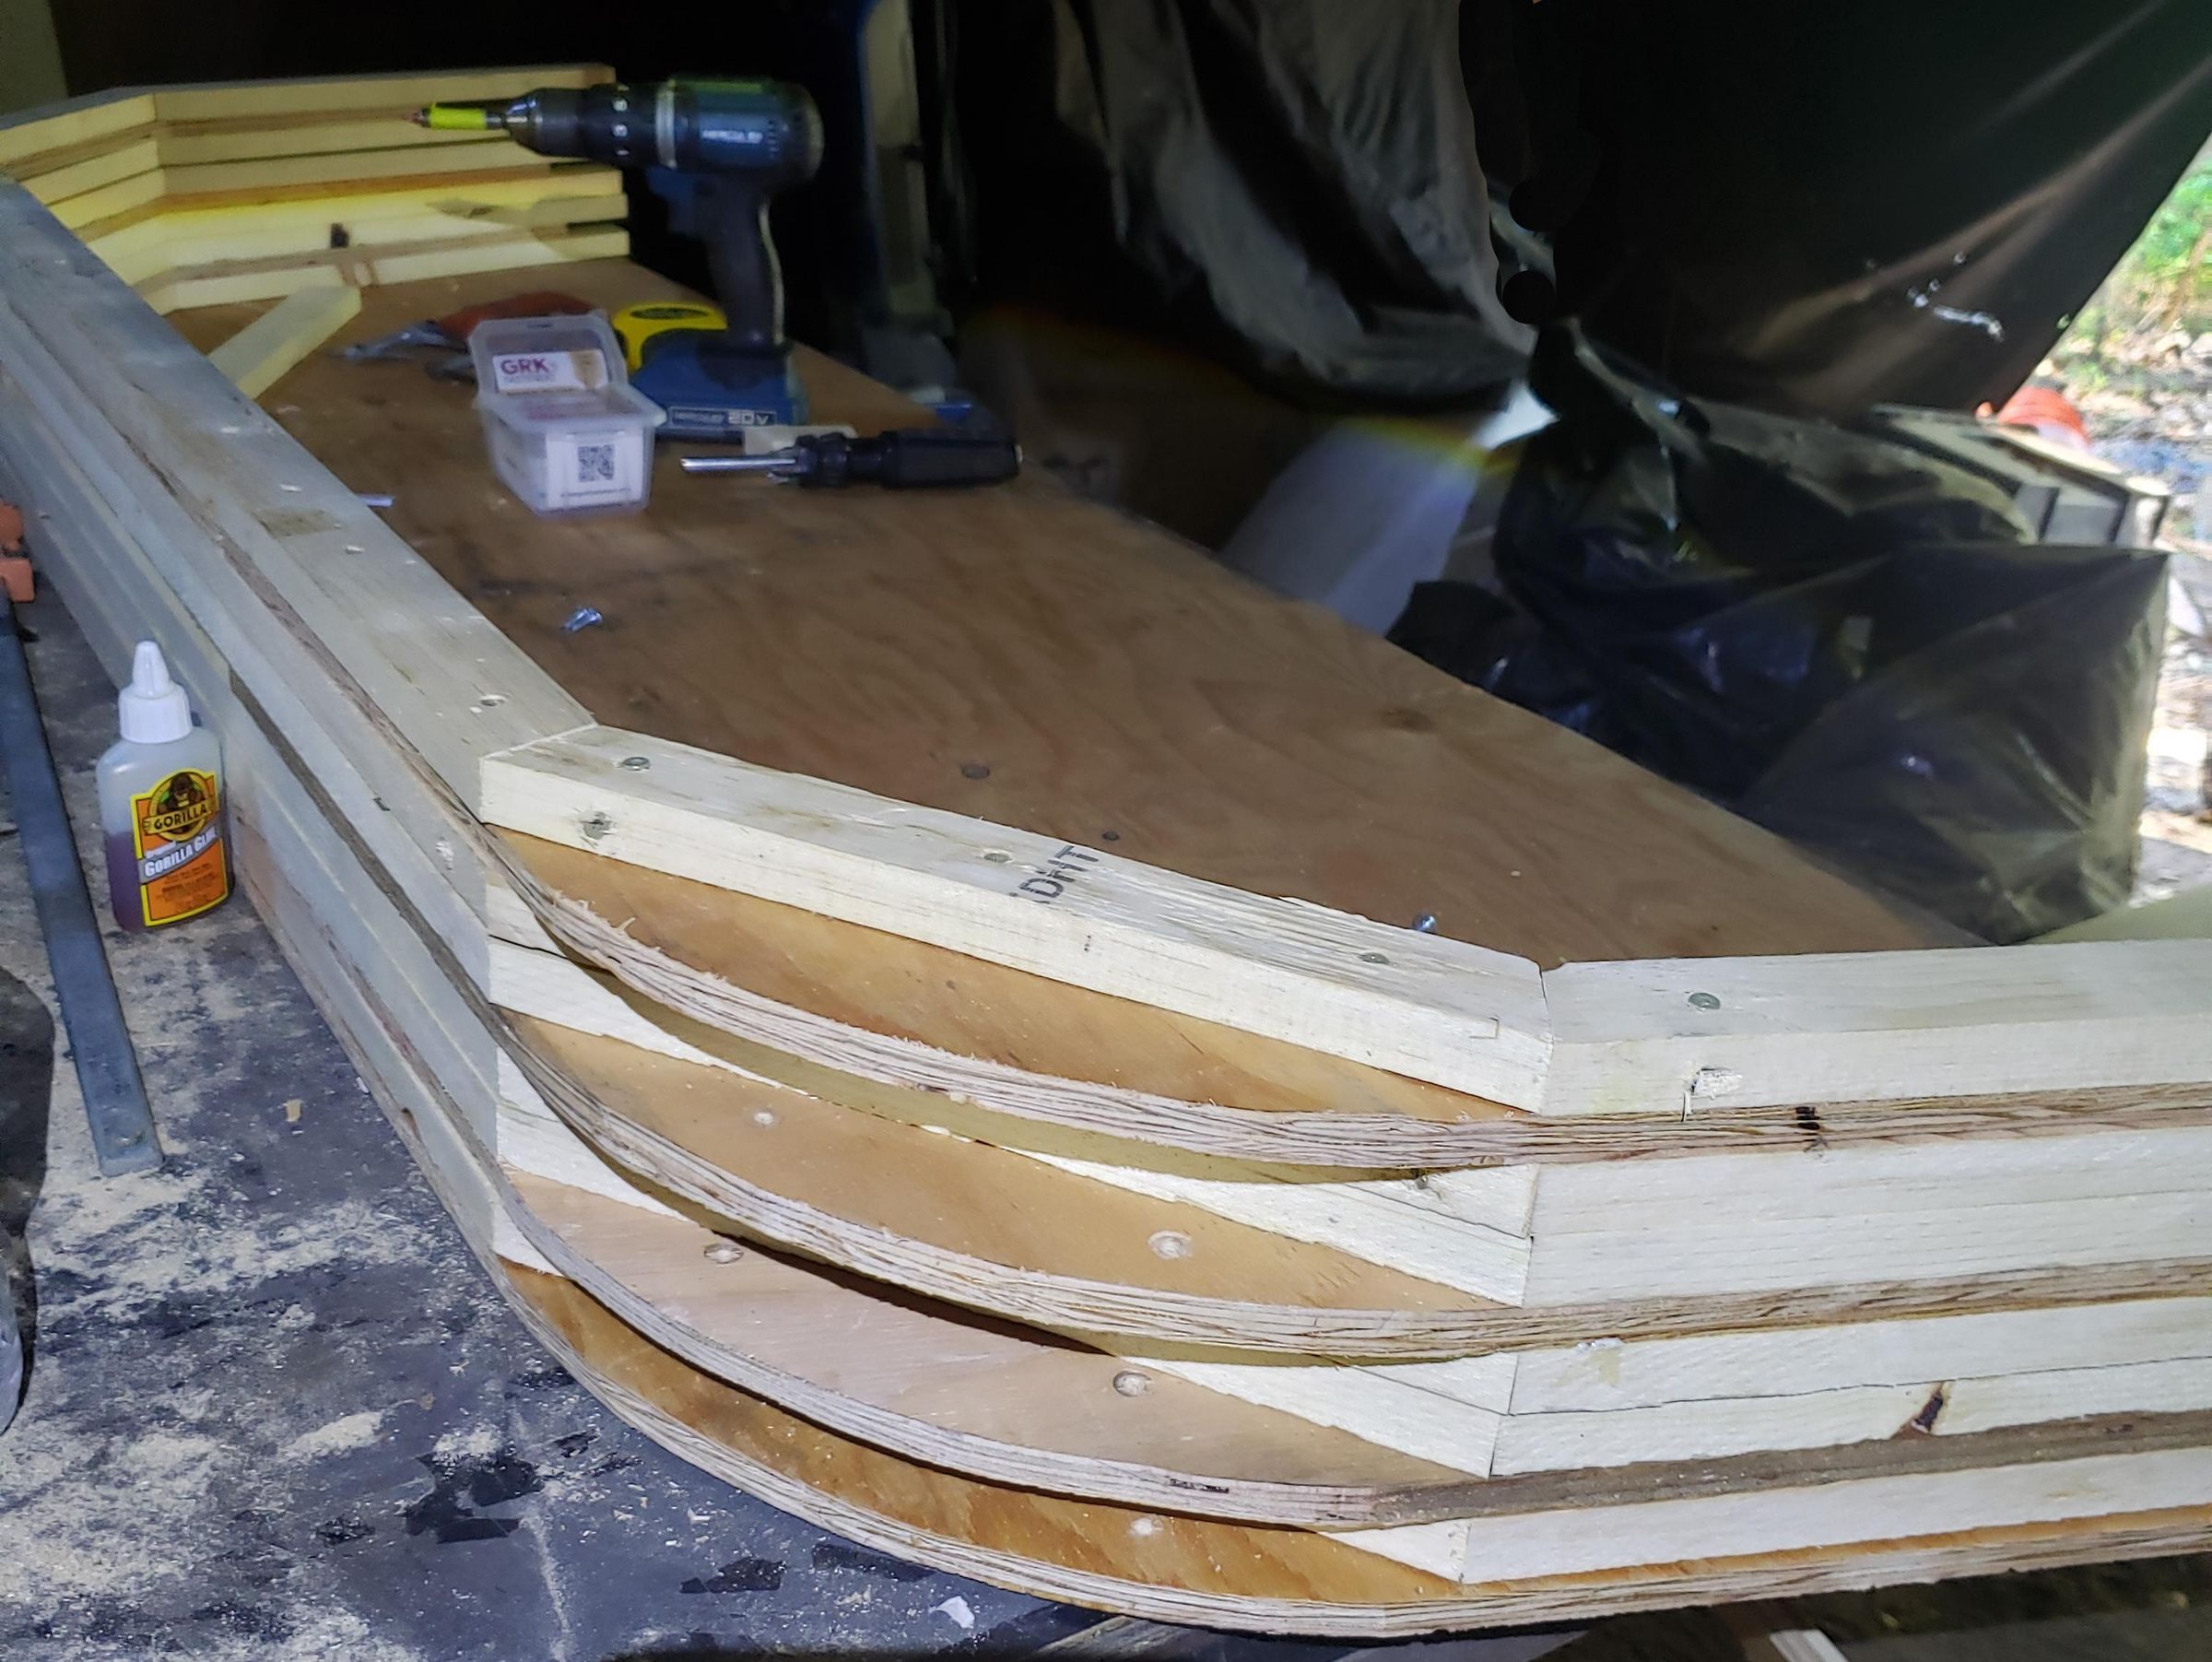
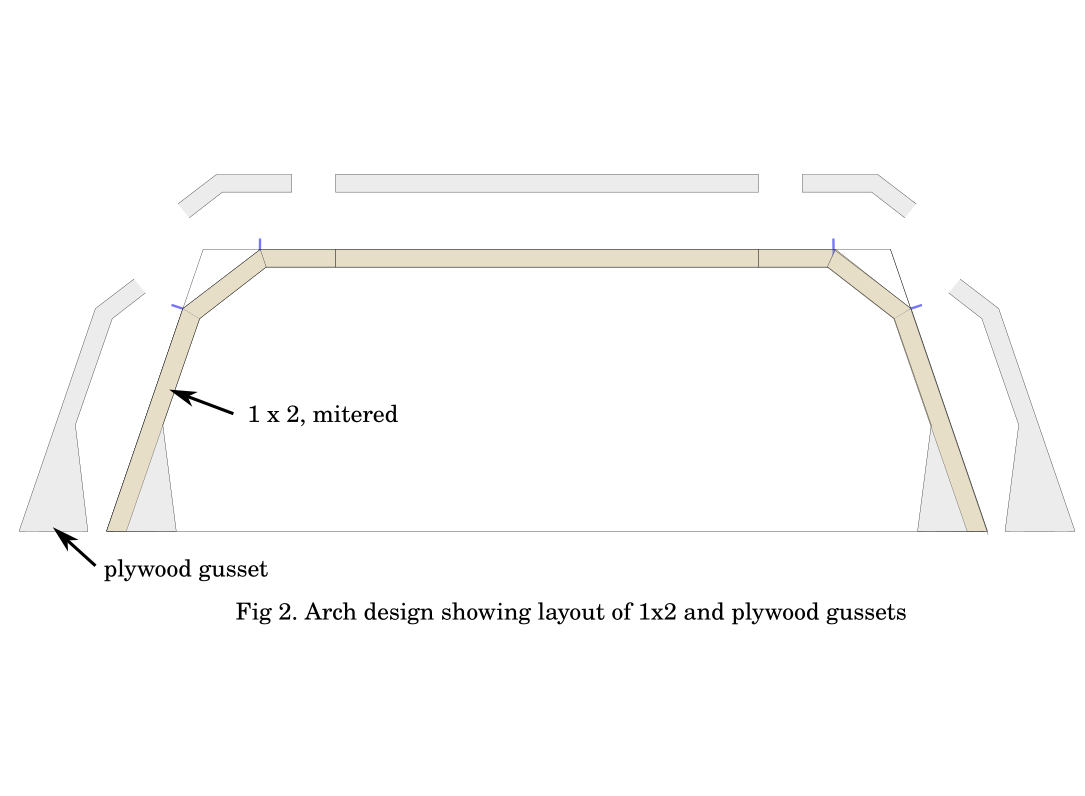
These arches are the structural backbone of the topper: composite beams made from 1×2s, plywood cores, and gussets that resist cracking and flex.
Extract dimensions from the template
- Mark where the straight sides transition into the radius and where the radius transitions into the straight top.
- Measure:
- Length of the straight lower side.
- Length of the straight top.
- Straight (chord) distance between the two radius endpoints.
Find and set a single chop‑saw angle
- Aim to use one consistent angle for all joint ends.
- Start with about 18° and cut test pieces.
- Lay tests on the template at the radius endpoints and adjust until the miters close tightly.
- Use this angle for all 1×2 segment ends.
Cut the 1×2 arch segments
Cut five segments for each arch:
- Lower left side
- Upper left side
- Top
- Upper right side
- Lower right side
- Cut the first set of five 1×2 segments using your measured lengths and chosen angle.
- Lay them on the template to confirm the arch shape.
- Cut a second identical set (these will form the outer layer of the composite arch).
Design and cut gusset templates (with corrected dimensions)
You’ll integrate plywood gussets that match the rail width and tie the side segments together.
- On plywood, place the five 1×2 segments and trace their outline to capture the arch footprint.
- At the lower part of each side, create a gusset:
- Base width: 6 in, matching the 6 in width of the rail.
- From that base, draw the gusset upward at an angle so that its top line meets the 1×2 side segments, forming an inner triangle.
- Split the plywood core into two templates:
- One joins the lower side to the upper side.
- One joins the upper side to the top.
- Each template includes the gusset triangle at the lower side.
- Cut these templates with the circular saw.
- Test‑fit against the endwall template and 1×2 segments.
- Use these templates to mark and cut four plywood core pieces (two for each side of the arch).
Special arch with curved plywood face
One arch needs a curved plywood face that matches the endwall radius:
- Use the endwall template to scribe the exact radius onto a plywood piece.
- Cut this curved piece with a jigsaw.
- Incorporate this curved plywood into one of your composite arches so its outer surface follows the endwall curve exactly.
This special arch will be used at the rear, and the same geometry is mirrored in the door.
Assemble each composite arch on the template
- Place the endwall template on a stable surface.
- Lay the first set of five 1×2 segments on the template in their positions.
- Lightly wet mating surfaces with water; apply Gorilla Glue where the plywood will sit.
- Place the plywood core pieces (with gussets) onto the glued 1×2 segments.
- Apply glue on top of the plywood cores.
- Place the second set of five 1×2 segments on top, aligning with the lower layer.
- Clamp the entire sandwich to the template so it follows the arch curve.
- Drive 2 in decking screws through outer 1×2, plywood, and into inner 1×2, adding extra screws at segment joints.
- Let the glue cure.
Managing length tolerances and trimming arch feet
When you cut multiple 1×2 segments on a chop saw and assemble them to follow a template, small length and angle deviations accumulate. Over several joints, this can easily lead to ±1/4 in or more variation at the bottom of the arch where it meets the rails. If you don’t address this, the arch feet won’t line up and the plywood sheeting will telegraph unevenness.
To control this:
- Intentionally leave extra length at the arch feet
- When cutting the two lower side pieces that will attach to the bed rails, add about 1/2 in extra length beyond what the template suggests.
- This gives you “trim allowance” so you can cut the arch feet back to a common line later.
- Trim each arch using the template after assembly
- After you’ve glued and screwed an arch together on the template, use the template itself as a guide to trim the feet:
- Stand the arch on the template and mark where the true rail line should be.
- Use a circular saw (skillsaw) to carefully cut each foot back to that line, being careful not to nick or damage the template.
- Doing this per arch gives you much better control than trying to rely solely on initial chop‑saw cuts.
- Repeat until you have the total number of arches you need (e.g., six), including the one special curved‑face arch.
- Stack and align arches for final QA
- Once all arches are assembled and roughly trimmed, stack them together on a flat surface.
- Align the arches with a square and clamp them so their tops and curves match as closely as possible.
- Inspect the bottom edges:
- If you see variations at the arch feet, mark them and perform light additional trimming so all arch bottoms line up within a tight tolerance.
- This step ensures that when you later attach the 1/8 in plywood sheeting, it will sit on a consistent set of ribs and produce a clean, continuous curve.
- Note: It is possible to ruin hours of work if you attempt to trim all arches as a stack with aggressive cuts. For most builders, trimming each arch individually against the template and then using the stack‑up as a final quality check is safer and more repeatable.
By explicitly planning for trimming and using both the template and a stacked‑arch alignment check, you prevent accumulated chop‑saw deviations from showing up at the rail interface. This is one of the reasons the finished topper presents such a smooth, aerodynamic profile rather than a “wavy” roof.
Assemble the Frame on the Truck Bed and Fiberglass
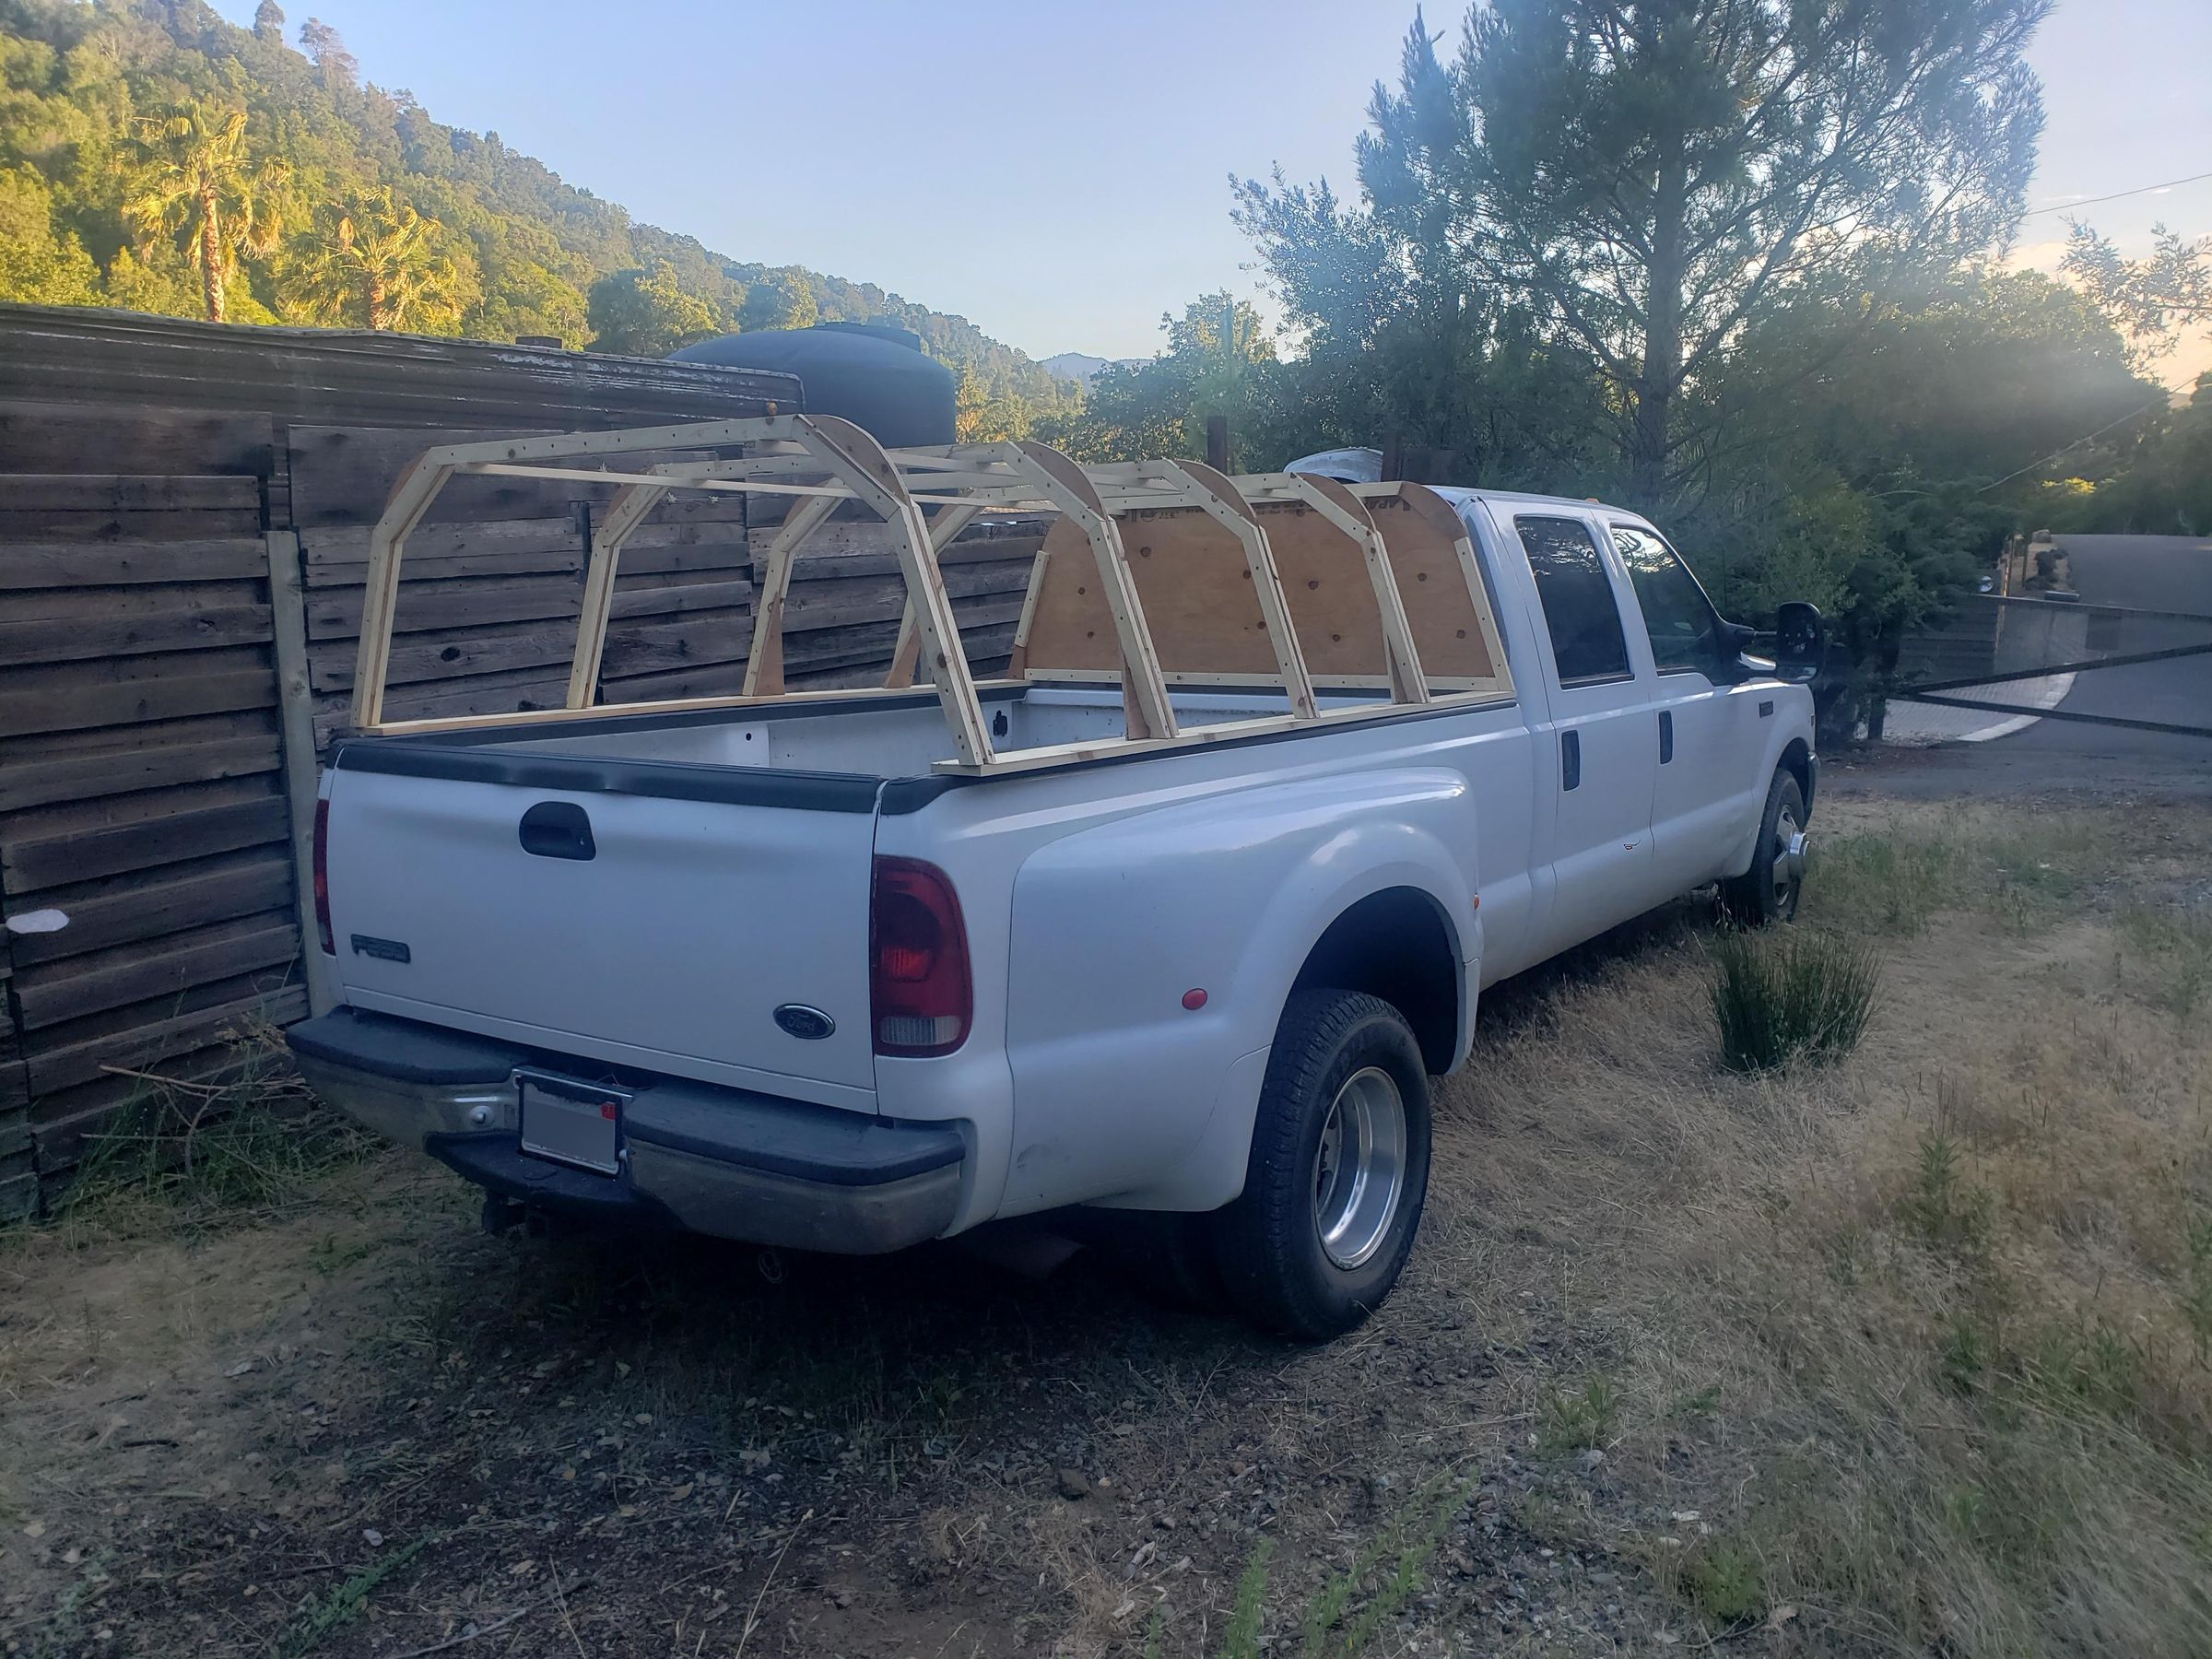
Now you build the main frame—rails, arches, and initial purlins—and bond the arch bases to the rails with fiberglass.
Install and square the bed rails
- Place two 1×6 rails on the bed, one on each side, roughly centered over the bed rails.
- Measure widths at front and rear and adjust rails to match or suit your design taper.
- Align the front ends of the rails to the same reference point on each side for squareness.
- Clamp the rails securely to the bed.
Install the front endwall on the front arch
- Use the endwall template to cut the actual front endwall plywood.
- Fasten the front endwall to the front arch with glue and screws.
- This front bulkhead defines the cab‑side geometry and stiffens the frame.
Place arches on the rails
- Mark arch center locations on the rails (e.g., every 24 in).
- Place each arch on the rails at its marks.
- Temporarily attach each arch to each rail with one screw per side.
- Square each arch to the bed with a carpenter’s square; brace with short blocks if needed.
Position the special curved‑face arch at the rear
- Place the curved‑face arch at the rear end of the frame.
- This arch will form the interface where the top sheeting meets the rear endwall/door and will later be fully sealed with fiberglass and epoxy.
Add temporary purlins and remove the frame
- Attach two temporary purlins under the arch tops, spanning across all arches.
- With rails, arches, and temporary purlins in place, lift the frame off the bed.
- Set it on 2×4s or sawhorses for fiberglass work.
Fiberglass the arch bases to the rails
- Cut about 20 sections of 6 in wide fiberglass tape, each 12 in long.
- Clean and lightly sand rail surfaces and arch bases.
- Mix epoxy with gloves on.
- Wet the rail under each arch and 6 in up each side of the gusset.
- Lay a 12 in tape section centered on each arch base, wrapping up both sides of the gusset.
- Wet out the tape with epoxy until clear, removing bubbles.
- Let epoxy cure fully.
This creates composite “saddles” that distribute loads from arches into rails.
Attach the 1/8" Plywood Sheeting
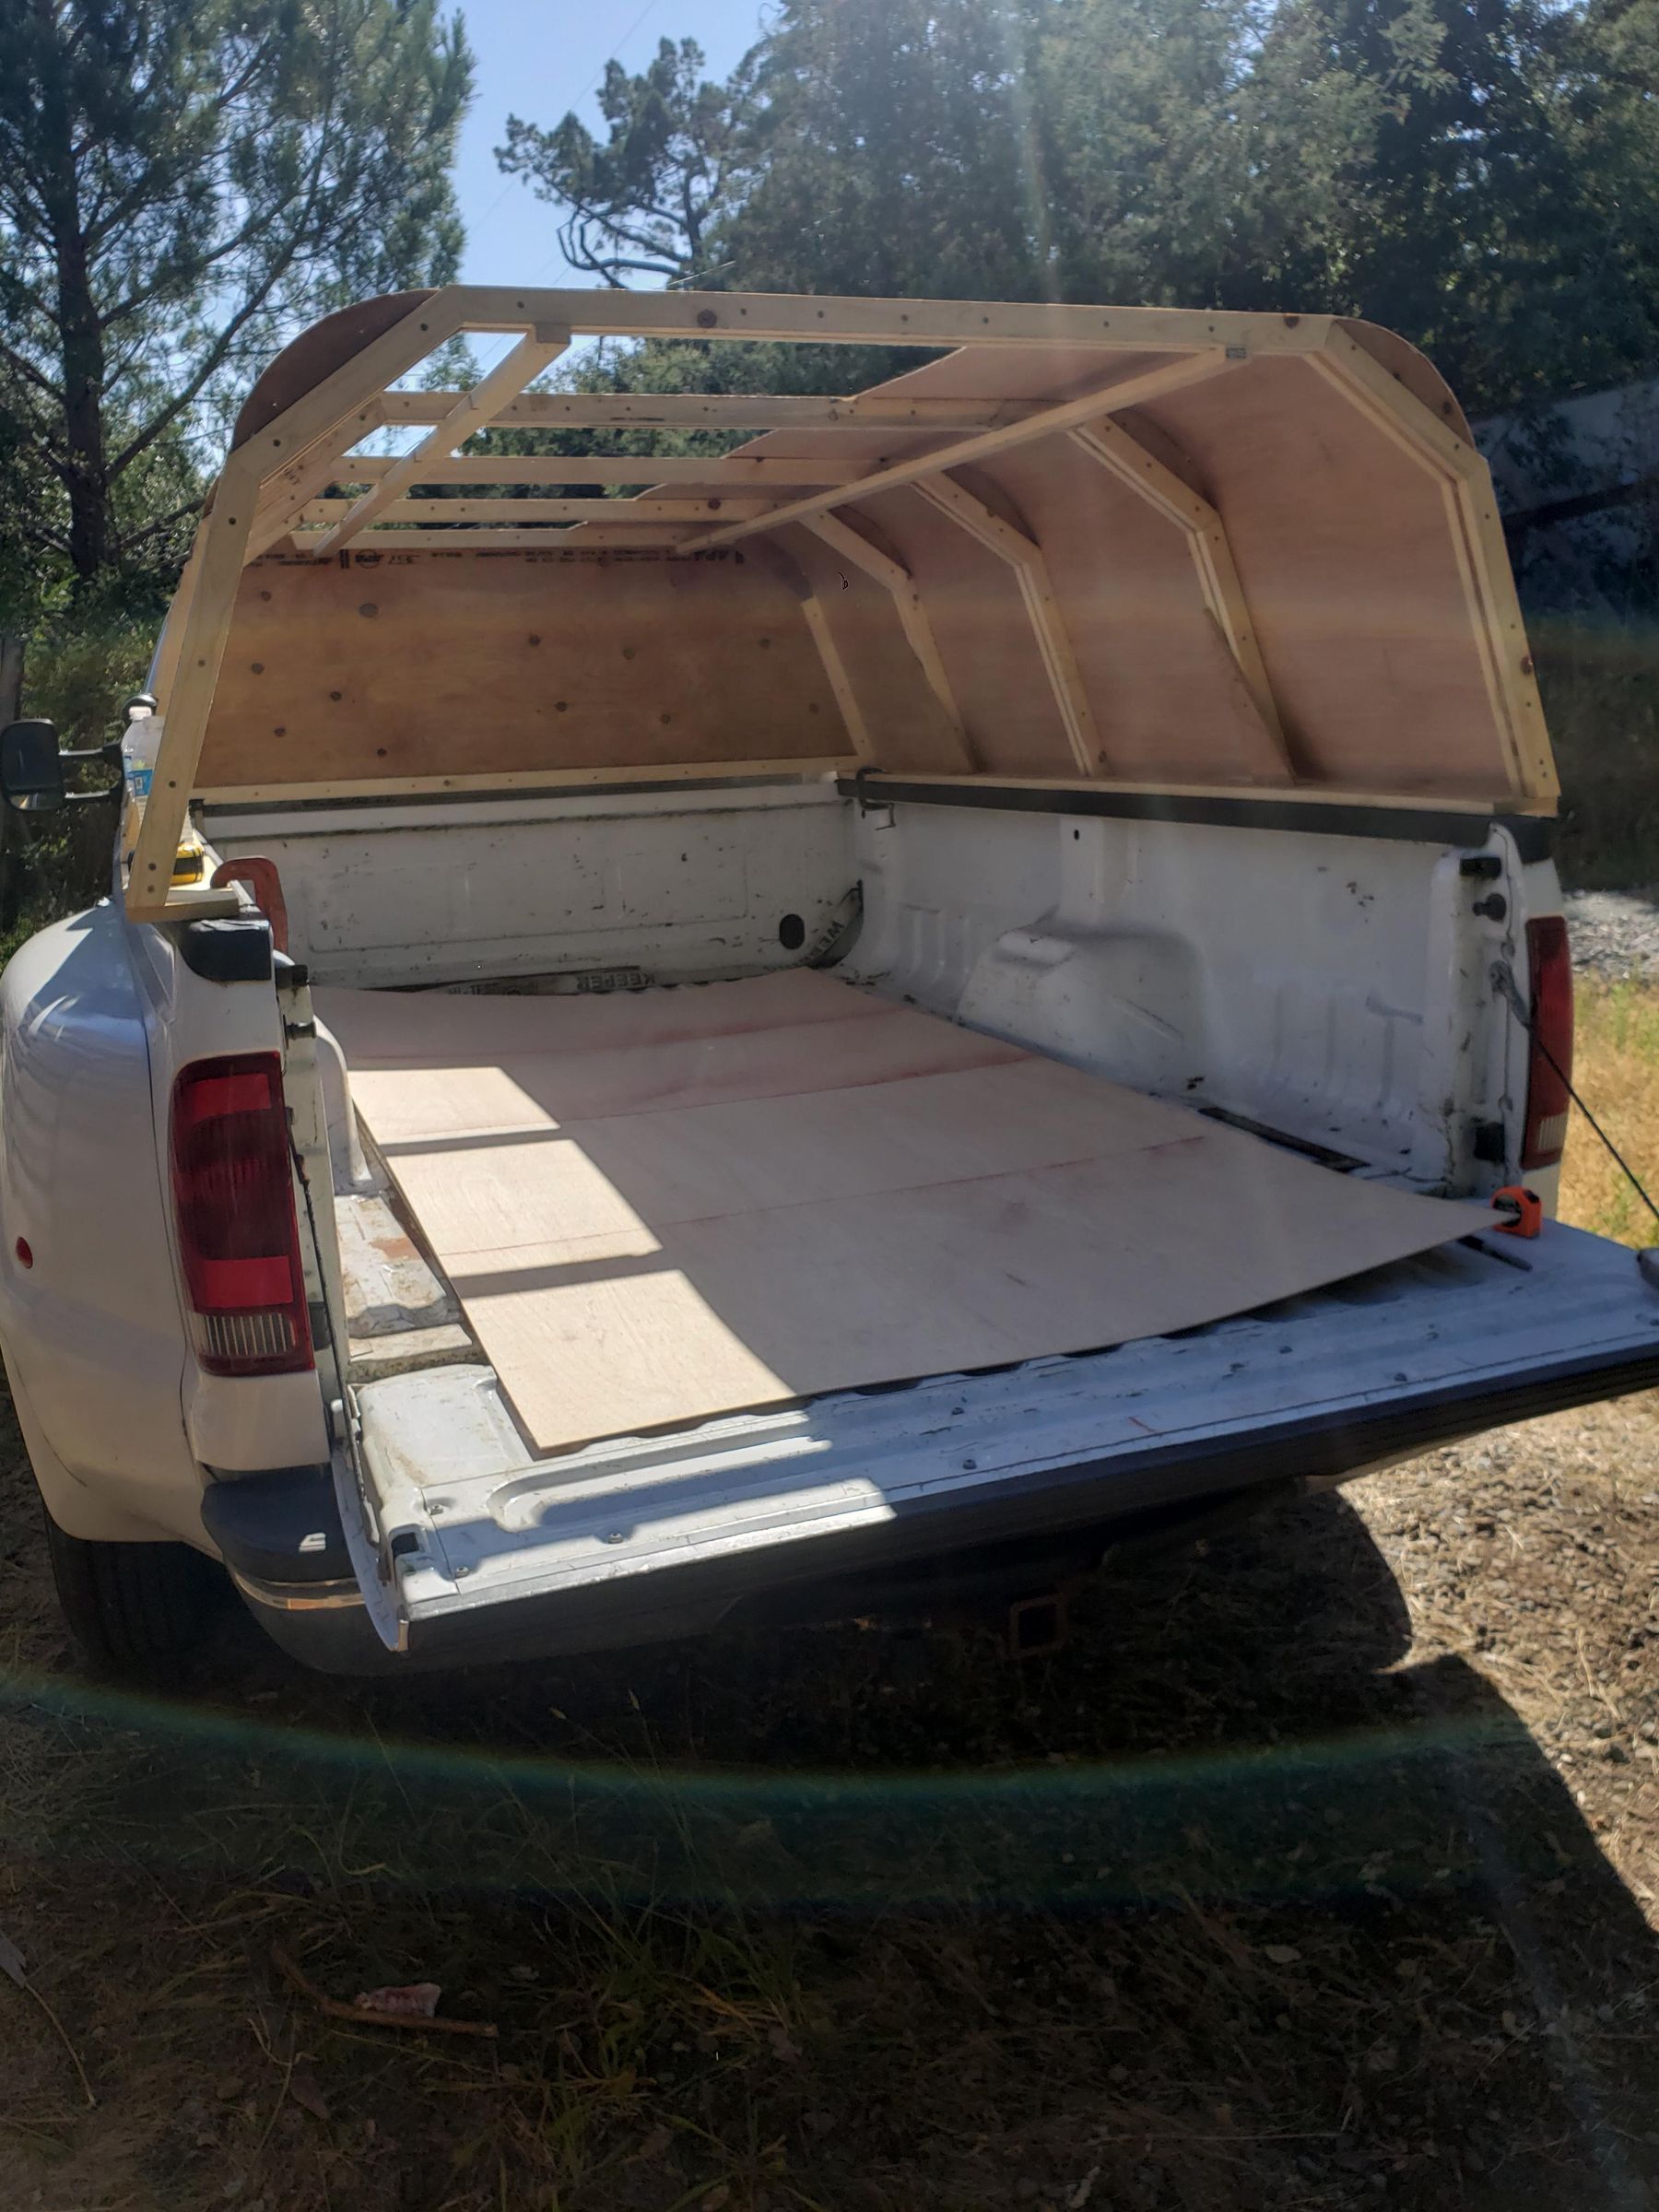
Now you skin the frame with 1/8 in plywood, forming the shell.
Reinstall and square the frame
- Place the cured frame back onto the truck bed.
- Verify alignment and squareness, then clamp the rails to the bed again.
Layout screw lines on side sheets
- On each 1/8 in plywood sheet, mark where arches will contact (e.g., every 2 ft).
- Snap straight lines across the sheet at each arch location.
- Along each line, mark screw positions at 4 in spacing.
Glue and attach side sheets with drip edge
- Apply glue to the outer edges of the arches.
- Position the first side sheet so its marked lines align with arches and bottom edge gives a 3/4 in drip edge.
- Install a single 3/4 in flat‑bottom screw at one lower arch position to hold the sheet.
- Adjust for consistent drip edge and install a second screw on another arch.
- Screw along the bottom row of each arch, then move up row by row at 4 in spacing, pulling the sheet tight.
Bend plywood over the curved arch
- At the curved sections, start at the center arch.
- Gently bend the sheet to match the arch curve.
- Install a screw a few inches inward from the miter joint on the center arch to anchor the bend.
- Continue across arches, row by row, letting screws draw the sheet into the curve.
Repeat for the other side. At the top, you’ll have about a 12 in gap between side sheets.
Remove temporary purlins and install permanent purlins
- Remove the temporary purlins now that sheeting provides lateral stiffness.
- Measure gaps between each pair of arches at the top where side sheets end.
- Cut purlins to these lengths.
- Install purlins between arches, with about a 1 in overlap onto which the center top strip will sit.
Install the top center sheet
- Cut a 12 in wide 1/8 in plywood strip (or width to match the gap).
- Test‑fit over the purlins and arches; ensure slight overlap onto side sheets.
- Apply glue to arch tops and purlins.
- Screw the center strip down into purlins, keeping the surface flat where all three sheets meet.
Fiberglass the Plywood Seams
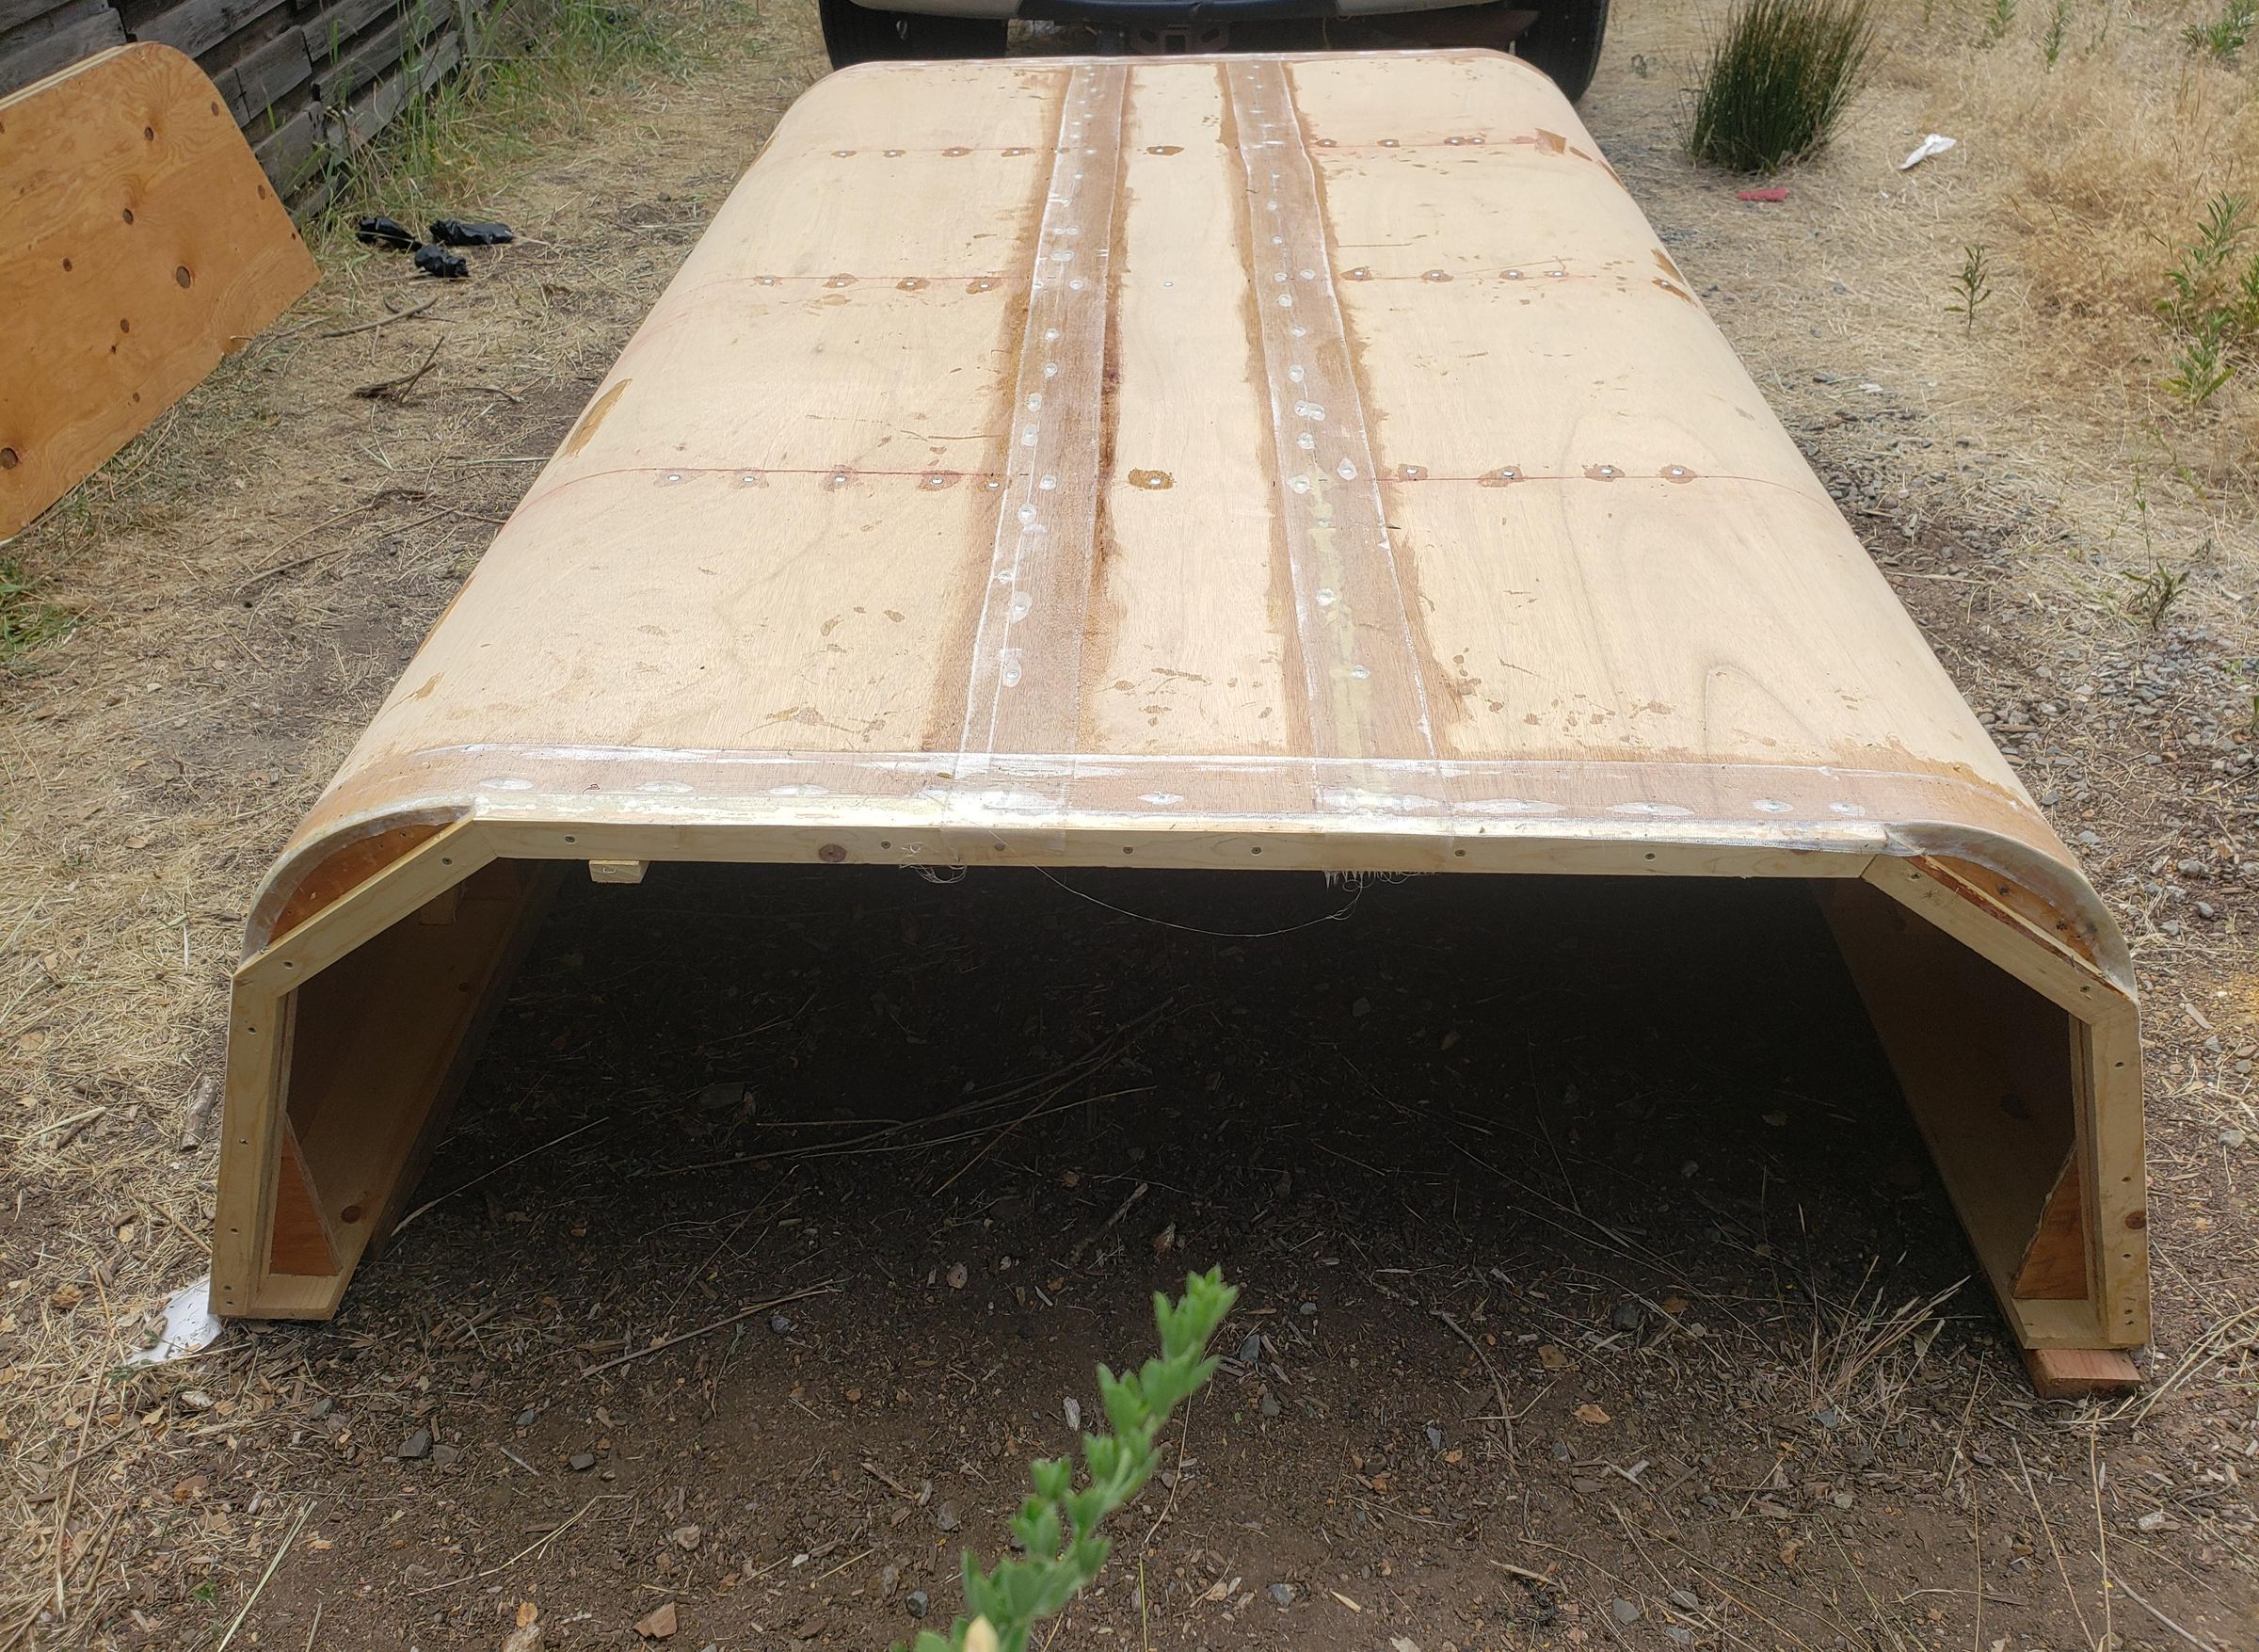
Seal the top and end seams so the shell is continuous and waterproof.
Remove topper from truck
- Lift the topper off the bed and place it on supports.
- Clean and sand seam areas along the top and at endwalls.
Glass the top seams
- Cut two lengths of fiberglass tape long enough to run front‑to‑rear along the top seams.
- Mix epoxy and wet the wood along each seam.
- Lay the tape centered over the seam.
- Wet out the tape until clear and fully bonded.
Glass the end seams
- Cut tape to run the full width of the topper where top sheeting meets the endwall (front and rear).
- Wet the endwall and adjacent top panel with epoxy.
- Apply tape bridging endwall and top; wet out thoroughly.
Because the rear end uses an arch with a curved plywood face matching the endwall, the small gap between sheeting and endwall is a consistent seam that fiberglass tape can easily bridge.
Handle screws and holes
You have two options:
- Remove screws: After cure, remove sheeting screws, dab epoxy into each hole to seal, and rely on composite bonding.
- Leave screws: Keep screws for mechanical backup, and dab epoxy over each head to prevent water ingress (this is what you did).
Paint and Seal the Exterior
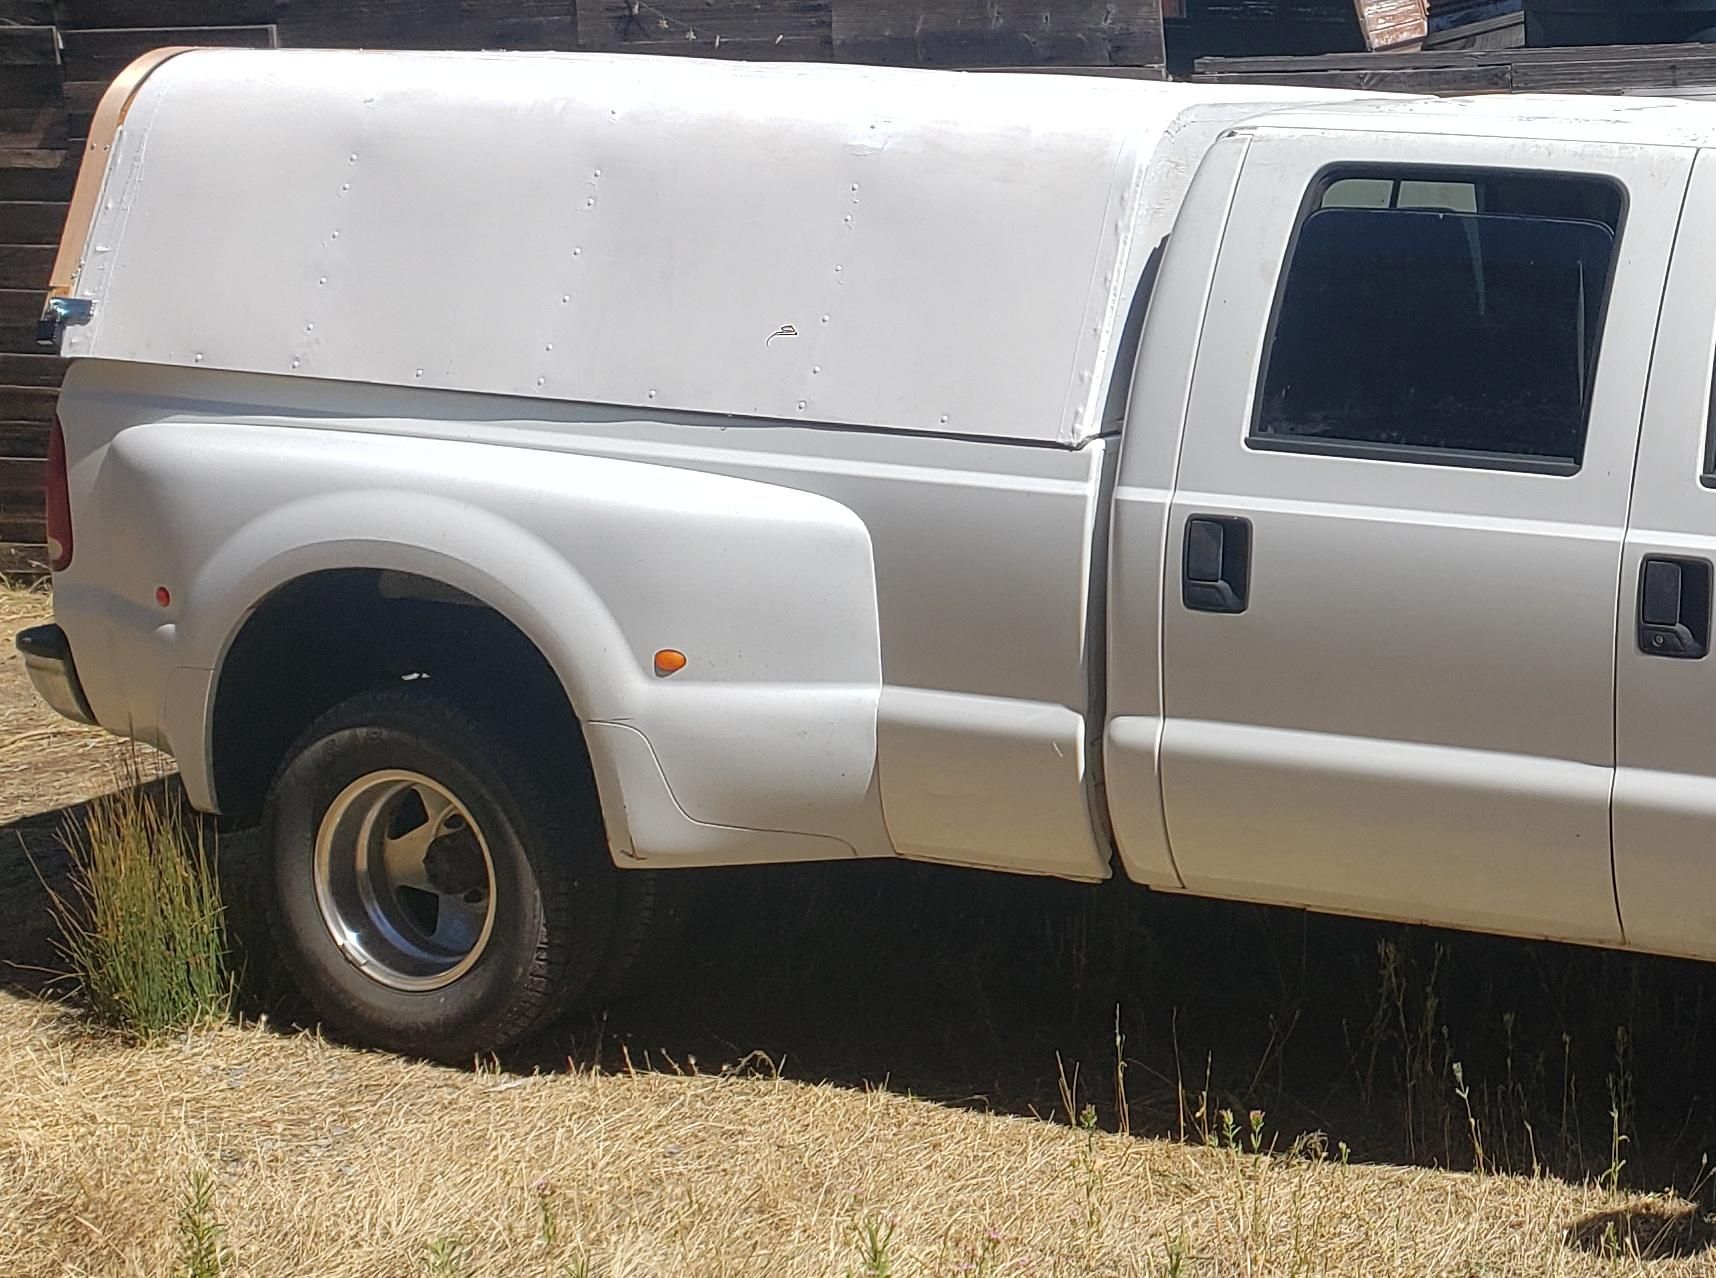
Protect the shell from moisture and UV with sanding, primer, and paint.
Keep plywood dry until painting
- Avoid exposing bare plywood to rain; warping and raised grain can occur.
- If rain starts, cover the topper with tarps and let it dry completely before painting.
Sand seams and epoxy
- Sand fiberglass seams to remove ridges and rough edges.
- Feather edges into the plywood to soften the transition.
- Sand epoxy over screws and patches for better primer adhesion.
- Remove dust.
Prime seams and epoxy areas
- Spray or brush primer onto fiberglass seams and epoxy patches.
- Let it dry per product instructions.
Choose and apply paint
- Use a durable exterior enamel such as Urethane Alkyd Semi‑Gloss Interior/Exterior paint.
- Match the truck color by bringing a sample to the paint store, or use a contrasting scheme/bedliner coating.
- Apply the first coat over the entire shell.
- Let dry, then re‑sand seams (they tend to absorb paint).
- Repaint seams and apply a second full coat to fully seal plywood and glass.
- Optionally add clear coat.
At this point the shell is weatherproof, but the rear opening still needs a door.
Build and Install the Rear Door
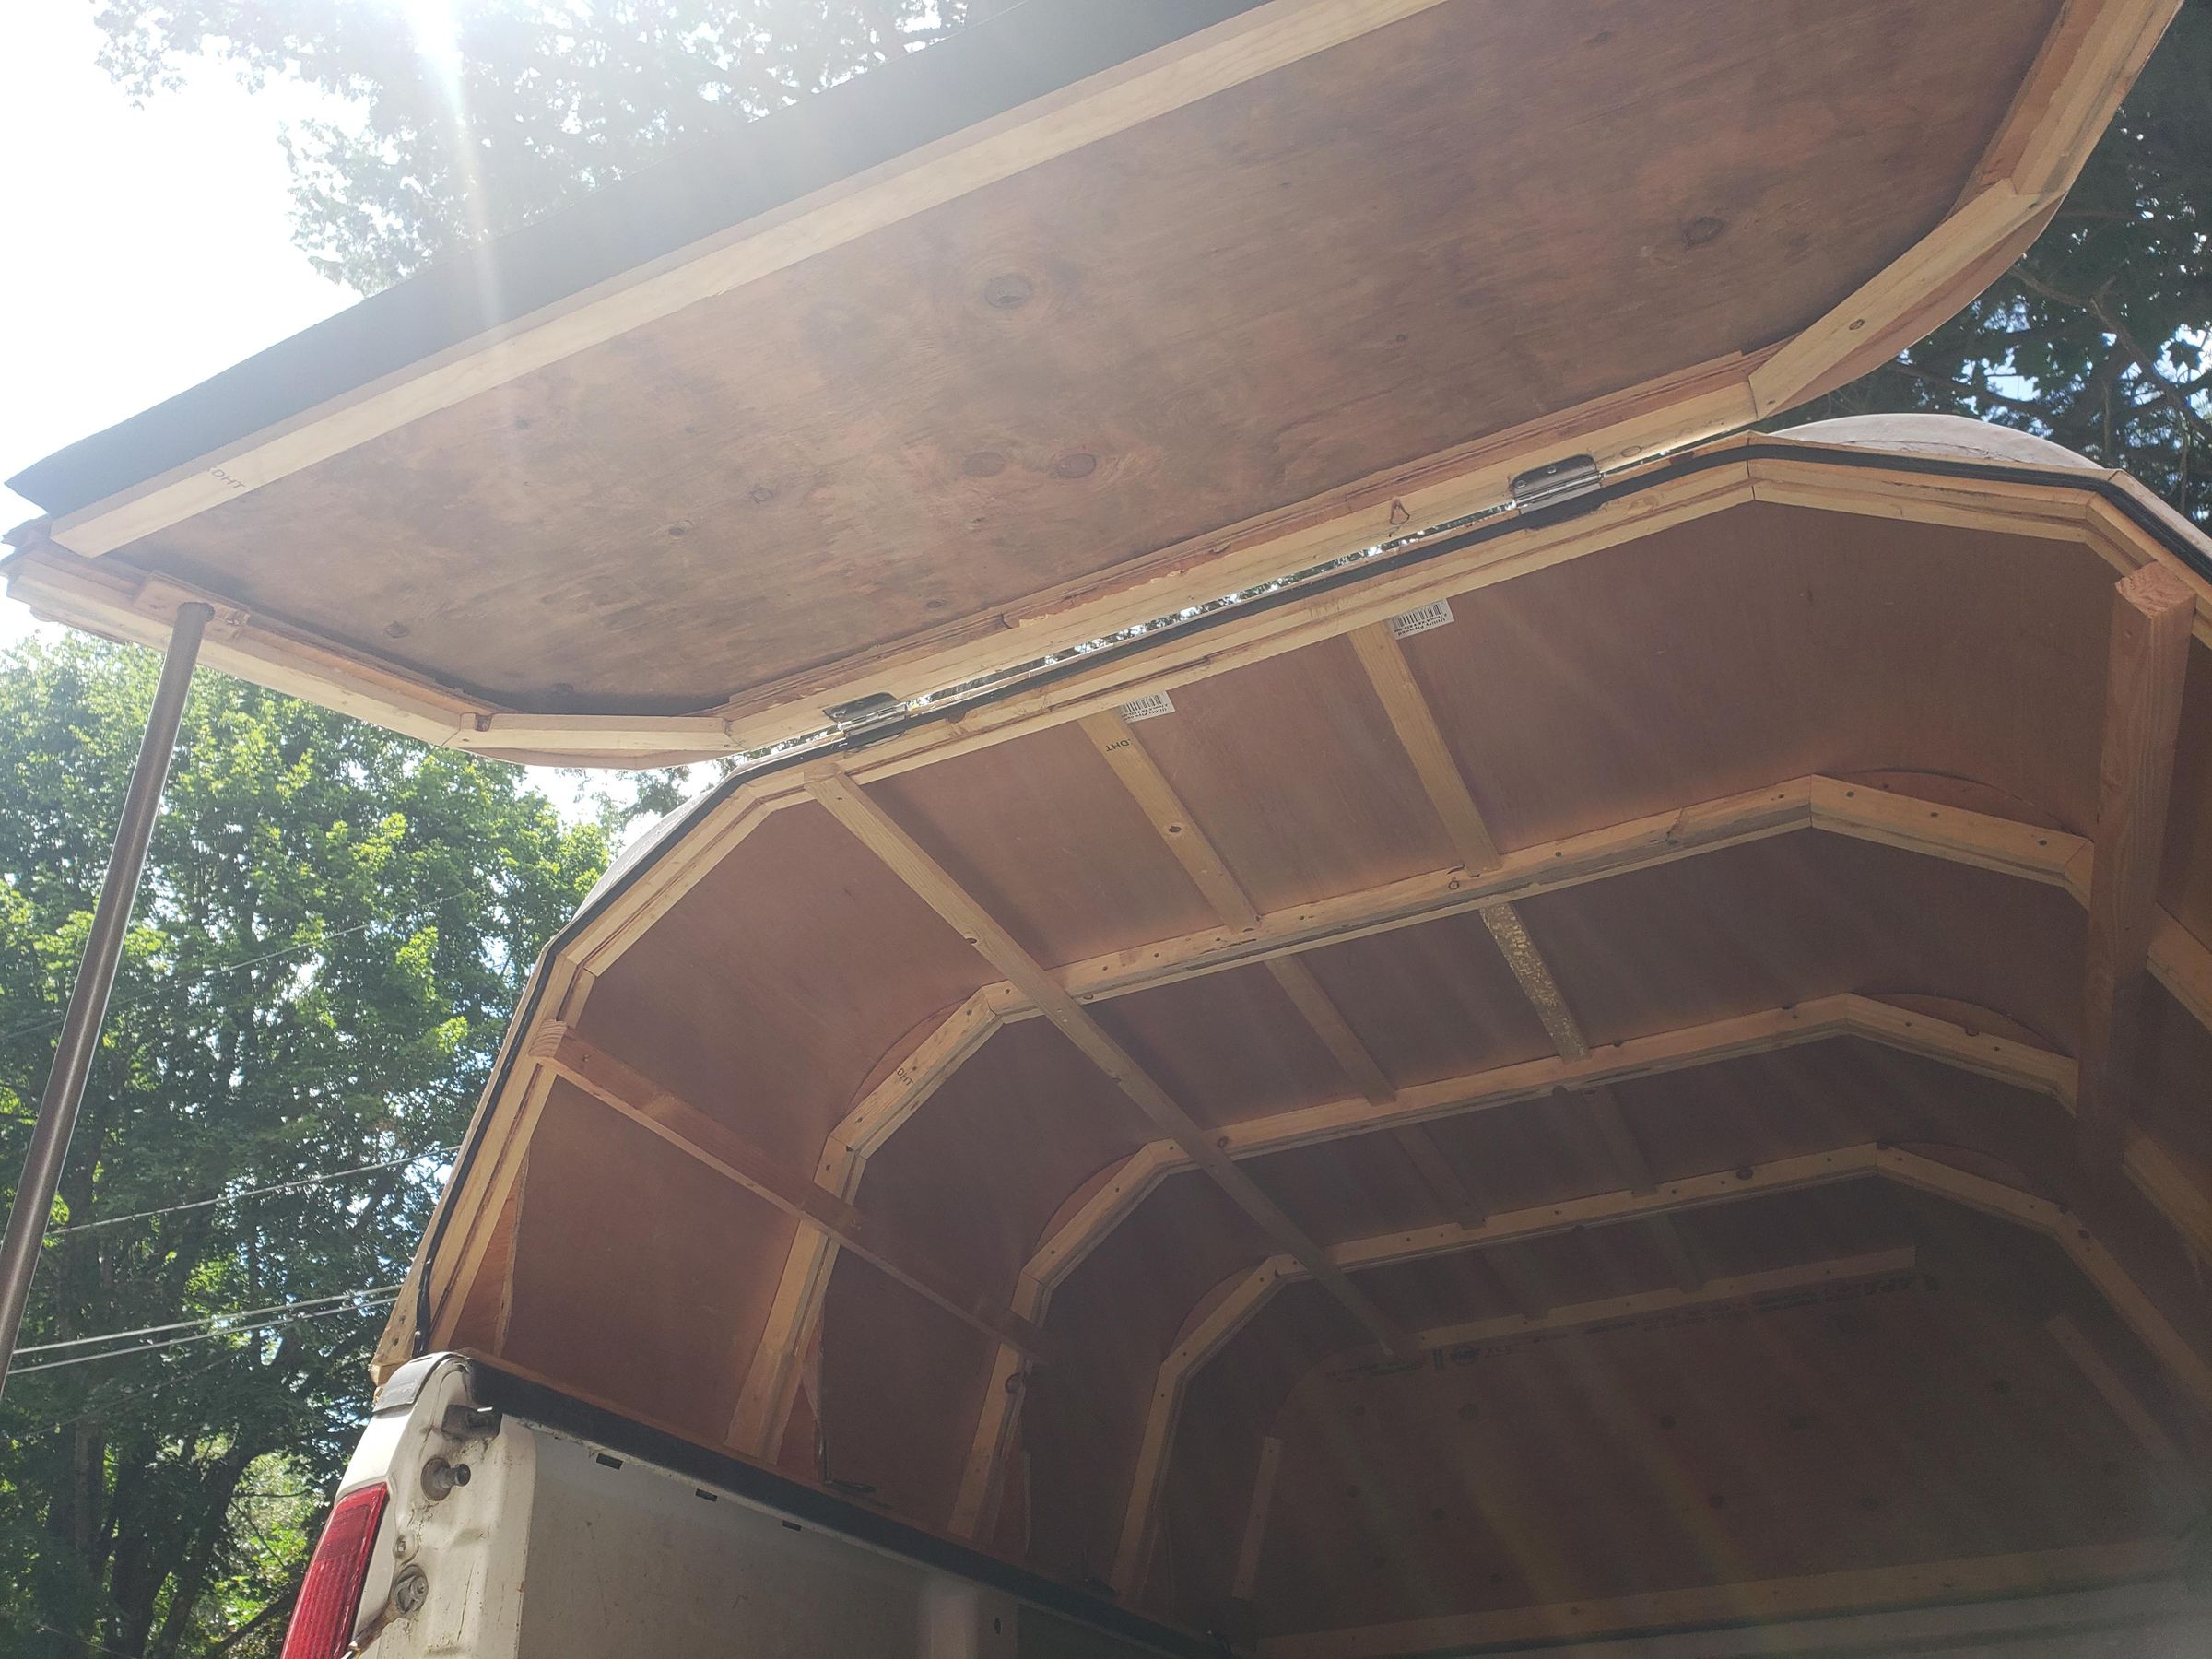
Solve the bed length gap and provide a lockable rear entry.
Door concept
- Bed: 101 in long; 8 ft plywood leaves a ~3 in gap at the tailgate.
- Solution: Build a rear door from an arch + plywood endwall identical to the front, hinged to the rear arch of the topper, with seals and locks.
Assemble the rear door panel
- Use one composite arch as the door frame.
- Cut a plywood endwall identical to the front endwall (same radius/width).
- Attach plywood to the door arch with glue and screws, replicating the sheeting method.
- Add a thin plywood strip along the door’s outer edge by fastening it to the arch to form a clean, strong edge.
Paint the door
- Sand any rough edges, prime epoxy spots if needed.
- Paint with the same enamel used on the shell, with at least two coats.
Install hinges flush
- Choose hinge positions where the door arch meets the topper’s rear arch.
- Mark hinge outlines on both arches.
- Chisel recesses so hinge leaves are flush with the wood surface.
- Screw hinges to the door arch first, then to the topper rear arch. Note: you might want to install the topper before installing the door since the door makes it more difficult to position the topper on the truck bed rails.
- When closed, the two arches should mate perfectly.
Add seals
- Attach a 1 in wide d‑channel foam strip along the mating arch surfaces so it compresses when the door closes.
- Cut a strip of 1/8 in rubber underflooring.
- Attach the rubber to the inside bottom edge of the door so it overlaps the tailgate when closed, sealing the gap (same method as many fiberglass toppers).
Add locks
- Install two lock hasps on each side of the door, fastening them to solid topper structure.
- With a tailgate lock and two padlocks on the door hasps, the topper is secure.
Bolt the Topper to the Truck Bed
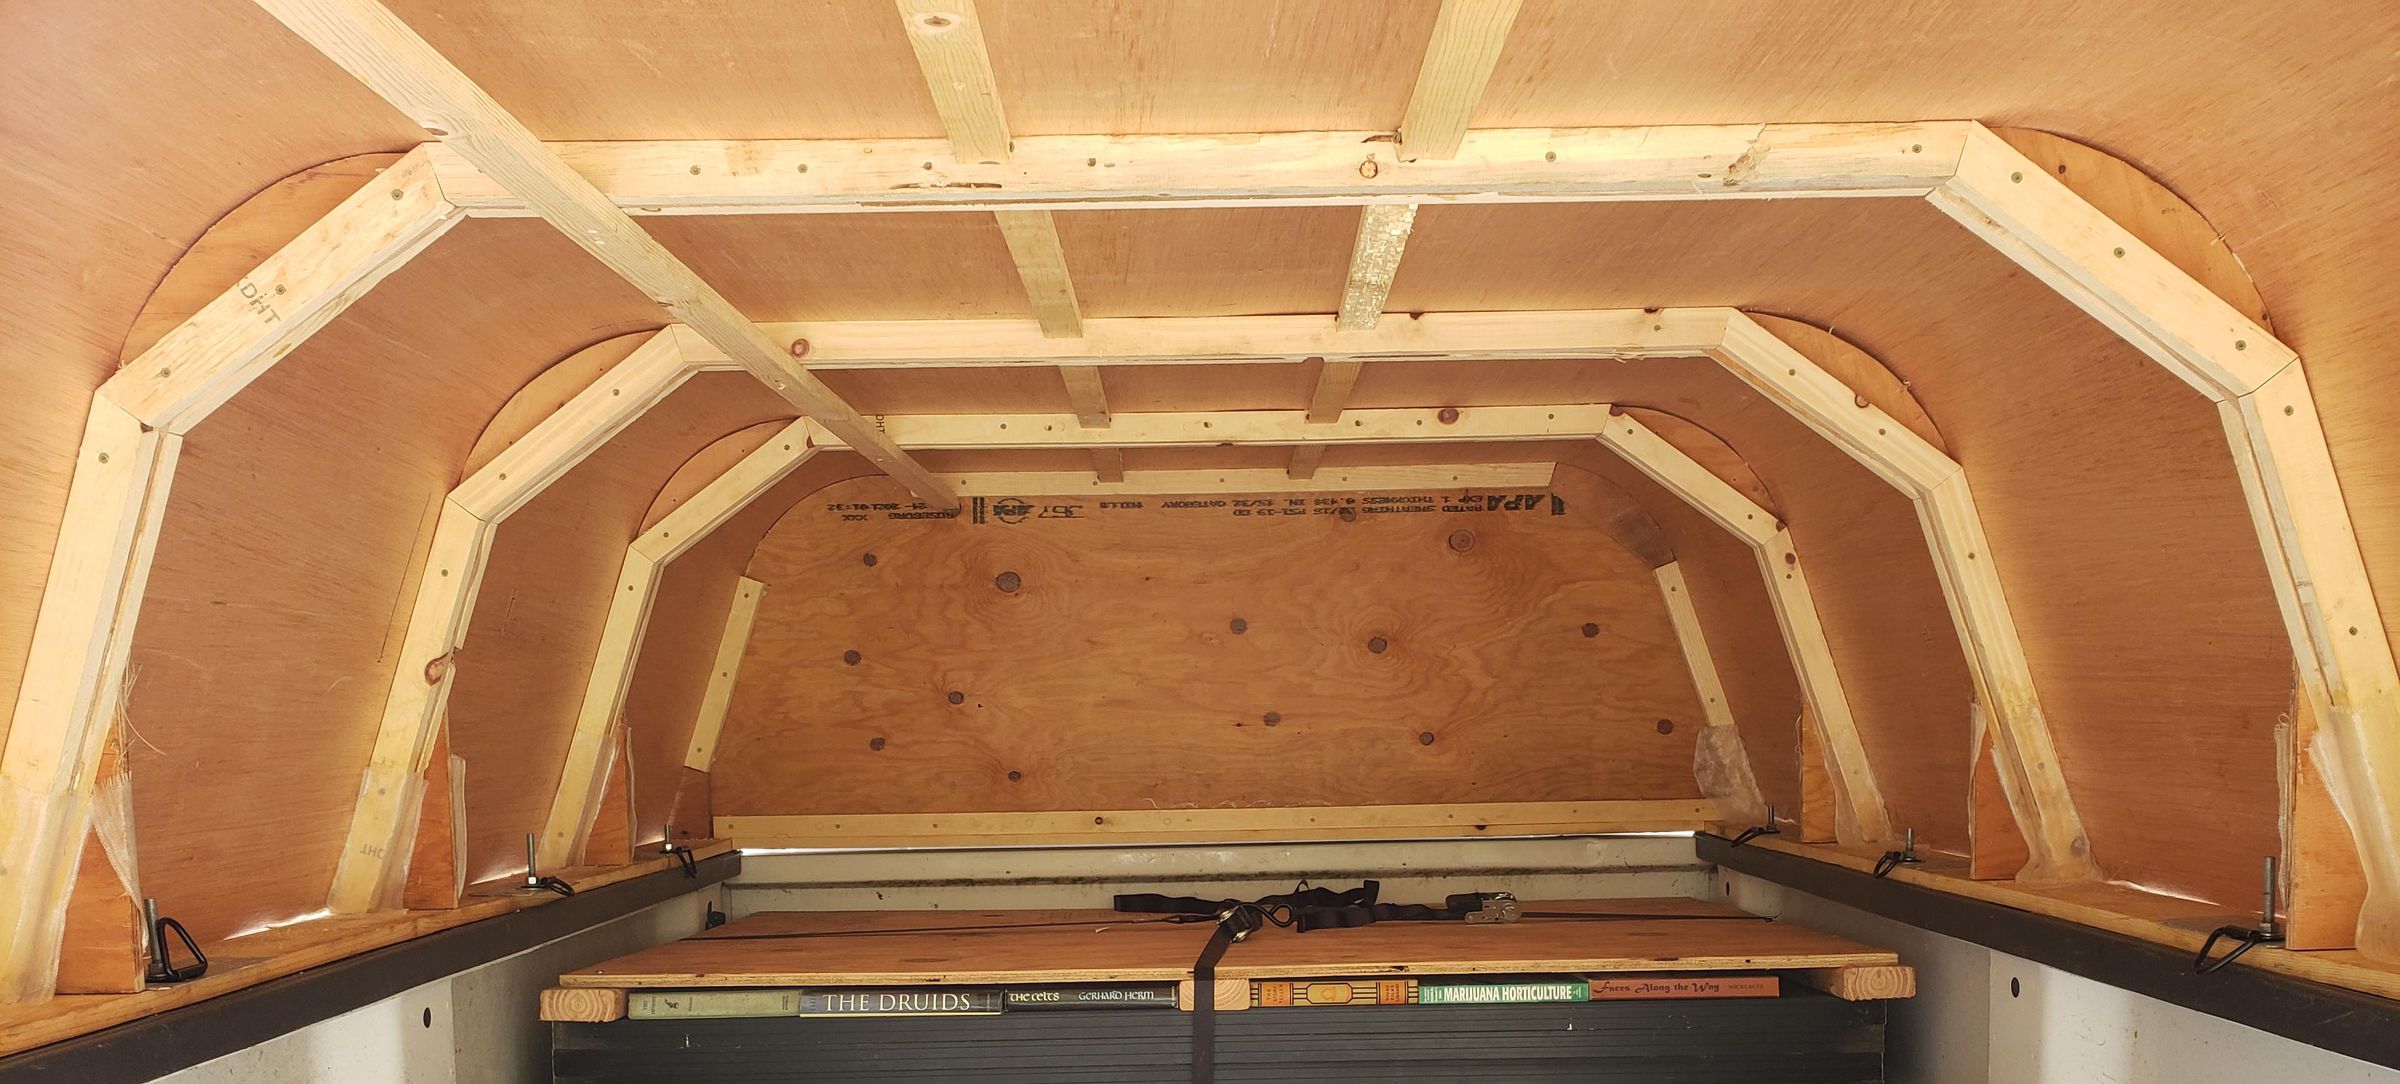
Replace unreliable c-clamps with a bolt‑through system for long trips and heavy loads.
Why bolts instead of clamps
- Test drives showed clamp loosening due to bed flex and vibration.
- Long‑distance travel with a full load demands a fastening system that won’t loosen.
Drill bed rail holes
- Plan six bolt locations along the bed rails.
- Mark each location and drill 1/2 in holes through the bed rails.
- Deburr the holes.
Add washers and spreader plates
- Place washer stacks under each bed rail hole to distribute load and support the rail.
- Attach metal plates to the topper’s wooden rails directly under each bolt location to spread load across more wood.
Install bolts and D‑rings
- Insert bolts through bed rails, spreader plates, and topper rails.
- At the top, install D‑rings captured under heads or nuts to provide tie‑down points.
Lock hardware
- Apply medium‑strength threadlocker (e.g., blue) to each bolt’s threads.
- Tighten nuts to a firm, consistent torque, clamping the topper securely to the bed.
- Verify that the topper does not move when pushed or pulled.
With bolts, washer stacks, spreader plates, D‑rings, and threadlocker, the topper is locked to the truck bed and will remain secure under wind gusts, crosswinds, thunderstorms, and pressure waves from passing trucks.
Closing Notes and Future Modifications
Because this topper is built primarily from wood and laminated composite arches, it’s very friendly to future modifications. The frame and sheeting can accept screws, small cutouts, and fixtures much more easily than a molded fiberglass shell, so you can treat it as a platform rather than a fixed product.
Possible upgrades include:
- Interior storage and organization: Add upper shelves, cubbies, or gear rails screwed into the arches or purlins. The composite ribs behave much like 2×4s in size, but are stronger due to lamination, making them good attachment points for light structural features.
- Lighting and electrical: Install interior LED strips, reading lights, or cargo lights, routing wiring along the arches or behind thin trim panels. The wood structure makes cable routing and fixture mounting straightforward.
- Windows and access panels: Cut in side windows or small access hatches and frame them with additional wood trim, seals, and hardware. This can be done incrementally as you refine how you use the topper.
- Roof accessories: While the exact load capacity hasn’t been analytically quantified, the roof structure is robust enough that you can consider adding external racks or tie‑down points—especially if they are mounted where arches and purlins intersect. Start with modest loads and build up conservatively.
- Interior finishing: Improve comfort and appearance by painting or staining the interior, adding varnish to exposed wood, or installing thin carpeting or liner materials on walls and ceiling for insulation and noise reduction.
In short, this topper is not just a one‑off solution to a single road trip; it’s an adaptable wooden/composite shell you can continue to refine, customize, and upgrade over time as your hauling and camping needs evolve.