DIY Inexpensive Double Elastic Joint.
2555 Views, 18 Favorites, 0 Comments
DIY Inexpensive Double Elastic Joint.


DIY inexpensive Double elastic joint.
Good morning
Here is a little DIY Double elastic joint, intended to be used with small motors (I used it for my home-made cnc mill, which has low-power step motors saved from an old slide projector).
This kind of joint act like a 2-stages cardan joint, which tolerate all misalignment of the 2 axes: angle error, parallel shift and overall length.
Here Plexiglas® pieces and plastic screws were used, in order to keep it light and because I already had this material off-the-shelf (so, really inexpensive).
The joint is composed by a series of 3 Plexiglas pieces, separated by some sheets of elastic material (here was Teflon®, for the same reasons than the Plexiglas); in this way every piece can move respected to the others.
This Instructable is for a 5mm axis Motor, turning a M5 screw (the well-known 'screw-and-nut' mechanism).
******************************************
Notice: To do this double joint, only 'old style' tools were used: no Laser cutter nor 3D printer (too long for me to create the models and to find such machines near me).
So, you will need:
* Some Plexiglas (or other lightweight material), thick enough to cut off some 10mm thick pieces;
* Some flexible plastic sheets (I used Teflon);
* 2 M4x15 plastic Bolt-and-nut with washers;
* 4 M4 plastic screws (short – you can cut some other M4x15 screws…);
* Threading tools for M4 holes - of course, you can use screws of a different size, and you just need the threading tools of the same size;
* a long M5 screw (I used an Headless M5 x 100mm one), useful as an aligning tool;
* Saw, files, drill, to shape and pierce the Plexiglas;
* Scissors (and punching tool, if you have) to cut and pierce the flexible sheet;
* Screwdriver and suitable tools for screws and bolt-and-nuts.
The Central Piece.

Cut a Plexiglas bloc of about 10x10x40mm, and than pierce with 3 aligned holes:
* the central one is 5mm diameter (for the centering tool - see later)
* the outer two are 4mm diameter (for the M4x15mm plastic bolt-and-nuts).
The 3 holes are about 12mm spaced;
the overall dimensions are not critical, but the distance between the holes must be the same for the 3 Plexiglas pieces, for mounting reasons.
The Two End Pieces.
.JPG)
At the beginning they are just like the central piece, with just a difference: the 2 outer holes are 3,2 mm diameter because later they will be threaded as M4.
*********
morning-after edit: one of the 2 pieces has the central hole threaded as M5, because it will be fixed to a long screw of the same size (see later on).

With saw and file, cut in a ‘T’ shape the two end pieces, as in the picture (please forget the plastic sheet, for the moment);
Thread to M4 the outer holes (so, 4 threaded holes totally).
Flexible Sheets.

Cut two 40x40mm (roughly) pieces in the flexible sheet;
(I used 4 pieces, fixed 2 by 2 in sandwich, because my Teflon sheet was too thin).
Pierce every flexible piece with 5 holes of about 5mm diameter, like in the picture; by the way, the distance between the central hole and each outer hole is 12mm, the same as on the Plexiglas pieces.
Mounting the Joint

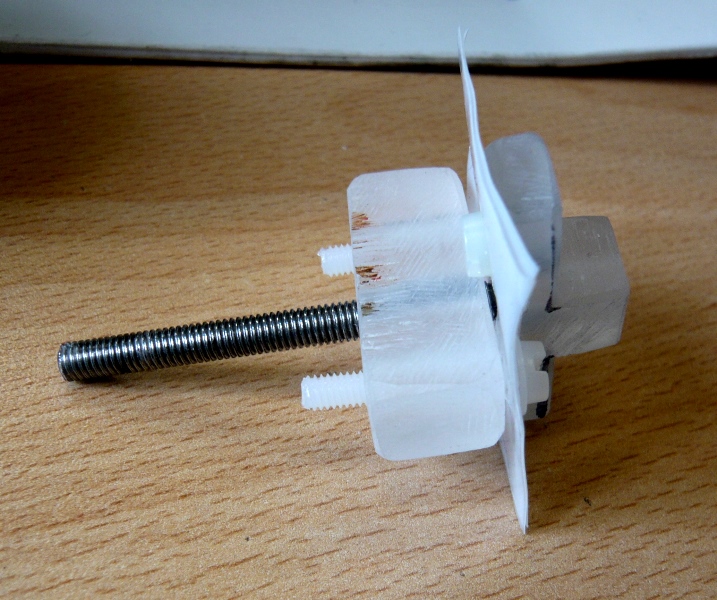

During all this assembling work, You can use a M5
screw (a long one, I used a 10cm one) to keep all the pieces aligned.
In sequence:
* fix one outer T-shaped Plexi with one flexible sheet, using two short M4 plastic screws;
* place this composed piece on the centering tool, just like a barbecue skewer (see 1st picture). If one of the two T-shaped Plexi has the central hole threaded, it's maybe easier to place this Plexi first (the other one will be placed at last).
* place the central Plexi piece on the centering tool; prepare the two M4x15 screws inserted, but without the nuts for the moment (see 2nd picture);
* prepare the second flexible sheet fixed on the other outer T-shaped Plexi (here again use two short M4 screws);
* place this last composed piece on the centering tool; fix its flexible sheet to the central Plexi with the 2 plastic nuts (see 3rd picture). Tighten the two bolt+nuts;
* remove the centering tool;
Rapid Test...

Every piece can move slightly respect to the others: flex, push, pull, parallel shift…)
The Joint in Its Final Place (exemple)

Here for the final use; in this case:
* on the right is a Stepper motor with a 5mm axe (fixed only by insertion! I was lucky…);
* on the left is a 50cm long, M5 screw: to fix it, I had to thread as M5 the corresponding T-shaped Plexi.