DIY Raspberry / Orange Pi NAS That Really Looks Like a NAS - 2023 Edition
by tobychui in Circuits > Raspberry Pi
170067 Views, 635 Favorites, 0 Comments
DIY Raspberry / Orange Pi NAS That Really Looks Like a NAS - 2023 Edition


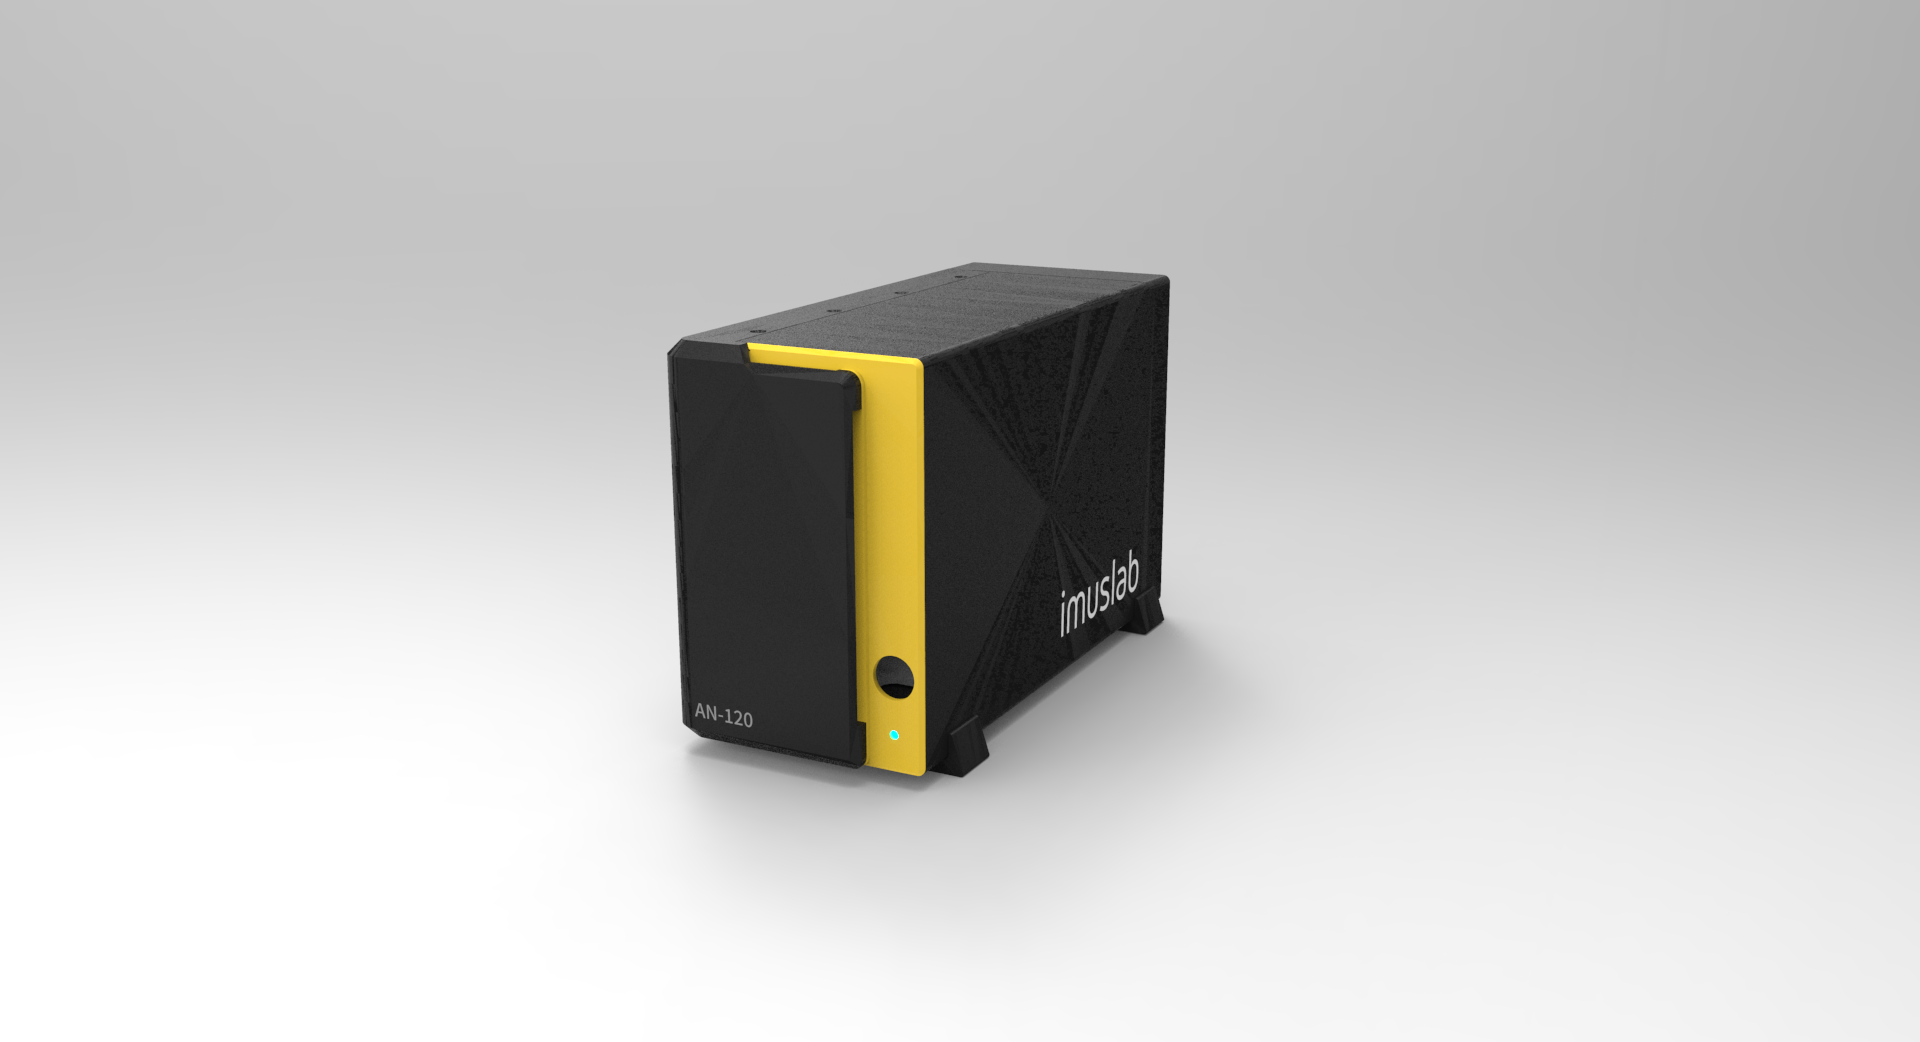

Background Story
Back in 2018, I published an instructable sharing my build on my Raspberry Pi NAS that really looks like a NAS project. I have been using it for some time back in 2018 - 2019 and finally move on to a NUC as host as this is wasting too much space and I was doing frequent travel back in those time.
During recent years, as Google started to limit their "unlimited" cloud storage for university, my student account also get affected. I started to move my files back to my NUC and all my available storage devices like PC and external hard disks.
My NUC only got a single slot for 2.5 inch HDD and after using it for years, it finally started to run out of space. This is the reason why I urgently need another solution that is low cost, with more storage space with 3.5 inch HDD and small footprint. After some consideration, I decided to remake this project, this time with much more compact and reproducible design (i.e. can be mass manufactured if I want to).
As I am an open source software and hardware developer, I am always delightful to share my design to anyone who needs it. So that is why I am here to share the design to you guys, and hope I can solve your issue if you are facing similar issues as I do.
Design Goals
In my design, I want to achieve the following goals.
- Small foot print, try to utilize every inch of space inside the device as possible
- Low cost, try to use low cost components and achieve the best performance out of the device
- High compatibility, it should be works with parts that can be purchased all around the globe
- Low dependencies, it should be with minimal dependencies of a single manufacturer
- Acceptable speed, it should be able to playback 1080p video for 1 - 2 people with up/down speed of at least 100Mbps
That is why I finally settle on this design. Stay tune and in the following sections, I will show you how to make your own NAS in less than 60 USD!
Supplies
To build yourself this NAS, you need the following parts (Sort from hardest to buy to easiest / generic)
- SATA to USB2.0 Adapter (Any one that can fit inside will do. If you are using a different one than mine, you can modify the adapter holding arm to fit. More details below)
- Orange Pi Zero (Or any SBC that can fit inside this case, including Raspberry pi 4, Orange Pi Zero 2 etc)
- Custom Power Management PCB
- XL6009 adjustable / fixed voltage buck boost converter ( 2 x 12V, 1 x 5V, pick one with higher build quality for 24/7 operations)
- 2.1mm DC power jack
- 6010 DC Fan (5V, 12V or 24V, depends on your config)
- M3 x 4, M3 x 5, M3 x 6 and M3 x 10 screws
- 12V 6A, 24V 3A power brick or 65W GaN charger + 20V 3.25A triggering cable
- hot glue
- soldering tools, wires and all electronic project essentials
Prepare the 3D Models - Part 1


For those using the Orange Pi Zero with my choice of USB to SATA adapter, you can skip directly to step 3.
Use Alternative Single Board Computer (SBC)
If you are using Raspberry Pi or other SBC, you might need to do minor adjustment to the model. Download the backplate_generic.stl file attached in this step and import it to TinkerCAD or aPrint Editor.
Depending on the board of your choice, create the hole on the backplate template as shown in the photo above.
Downloads
Prepare the 3D Models - Part 2


Use Alternative SATA to USB Adapter
If you are using an alternative SATA to USB adapter, the model modification process might be a bit more complex. Here in the photo above, is the dimension of the mount points for the SATA to USB Adapters.
Notice the four screws hole at the corner of the outer shell is for mounting the back units. Please don't use those screw holes when designing your adapter if possible, otherwise you will also need to change the back case design.
In my design, I made use of the two screw holes on the adapter to mount it to my custom fitted 3D printed piece. If your adapter have similar holes on them, you can utilize those hole to mount it. Otherwise, you can just design a simple mounting arm shape and glue them in place with plenty of hot glue.
In this step, also attached the stl file of the mount I designed as a template.
Downloads
Start 3D Printing!


The 3D printing part of this project took me around 2 days when printing in highest quality (as you are going to use it for long period of time, why need to rush it out?) I am printing them with Ender 3 at 0.2mm layer height and 35mm per seconds for maxmium quality.
- legs.stl: Support legs for the NAS
- psu_mount.stl: mount for the power regulation PCB
- SATA adapter mount: mount for the SATA to USB adapter
- wide_case, wide_cover, case_back: Main body pcs of the NAS
- front_panel: Front panel of the NAS, contain a hole for status LED
- pull_handle, tray: Hard disk tray components
- backplate: dust cover for the back of the NAS, including 6010 fan mount
Ordering the PCB and Assemble It


I have ordered my PCB from PCBWay, as they are one of the best PCB manufacturer I know that can dig a square hole on the PCB without additional service charge. Then I solder the buck boost converter onto the PCB as shown in the photo above. From left to right on the first photo, it is the 12V, 12V and 5V power channel for HDD1, 2 and SBC respectively. Some minor components are also get soldered on including a capacitor for ripple filtering for the SBC, a 5.1v zener diode (optional, but it saved my SBC once when my first batch of cheap XL6009 converter blows up) and a power LED + resistor.
If you are on a really tight budge, you can manually solder wires to the converter to the HDD / SATA adapter. But I guess making a PCB will make the whole project more repeatable in the future if I need more units built. You can get the gerber files here:
https://drive.google.com/file/d/1Tmfq3RrY0x8C9qf5TM5jI6WkntdhGjJz/view?usp=sharing
Tear Down the SATA to USB Adapter and Assembly the Adapter Arm


The SATA to USB adapter than can be screw onto the adapter support arm with M3 x 5 screws. Next, route the HDD power wires and USB signal wire from the power converter board.
The process is pretty much differents depends on what adapter you use. For here I am showing how I did it with my adapter.
- Find the USB port of the adapter, connect it to the HDD1 / 2 USB port pins on the power conversion board
- FInd the 12V input port for the adapter, connect it to the HDD1 / 2 12V output. Notes that the output from the converter board have 4 lines, carrying 12V or GND power. If your disk do not require so much power, you can only use two of them, otherwise you can use all 4 wires for power.
- Connect the USB Host to your PC or SBC and test if it works
After the wiring is done, screw the adapter to the back of the case with 4 x M3x10 screws
Assemble the Hard Disk Tray


The hard disk tray is compose of two parts. First you need to insert a screwed insert (usually made with copper) into the pull handle and screw in two M3x5 screws from the other side. After this is done, you can screw your hard disk into the tray with 6 x M3 x 6 screws (4 screws also works but not ideal)
After done, insert the two hard disk to the case and push it firmly so the SATA port connect with the adapter at the back.
In the photos above, I 3D printed a special version with open side to show the direction of insert.
Make a Custom Stands Off for the Adapter Board and SBC of Choice


3D print or use any method you want to create a stands off that hold the power conversion board and the SBC in place. Glue the stand off to the internal side of the main case.
If you have any other modification or want to build in more hardware like the ESP32 for remote management purpose, you can also place them here.
Connect the SBC to the Power Regulation Board


Connect the 5V output from the power regulation board to the SBC. If you are using a power hungry SBC like the Raspberry Pi 4, you might need to use all of the 4 outputs from the power regulation board for 5V power. Otherwise, you can use a pair of 5V / GND cable for status LED or the back plate fan.
After that, connect the USB Host pins to the SBC. Depending on your SBC, you might need to add a USB hub inside as well (e.g. pi zero 2 w). In my case, as I don't want to solder directly to the SBC GPIO pins (the Orange Pi Zero uses the GPIO for USB2 and USB3 output, and only expose the USB1 as a physical USB-A port), I use a pref board to make myself a simple plug and play adapter to make my maintenance in the future easier. I also added a cap actor to prevent current surge during startup.
Here in the last 3 diagram, are the reference connection of my suggested SBC for this project. Note that for Raspberry Pi 4, you might need to flip the board up side down and solder wires directly to the bottom test pads.
Before you close it up, install Armbian (non Raspberry Pi) or Raspberry Pi OS (for Raspberrys) on to a SD card with 32GB or above capacity. (Recommend 64GB)
Close It Up and Time for Software!


After all the steps are done, you are now ready to close it up.
Screw all parts together with M3x5 screws and it should be started to look like a really professional NAS!
But wait, how about the software? What should I use for my own NAS?
Install ArozOS


As both a software and hardware developer, of course I also developed my OS for my NAS. This time with huge updates to the previous one I mentioned back in 2018.
The software I developed for my NAS is named "ArozOS". It is a web desktop web operating system that provide you full-fledged desktop experience within your browser. By using only your web browser, you can access your musics, video, photo and documents, all using just one single browser window. It also works on mobile as well. If you want to read more about ArozOS, visit https://arozos.com
For those who have experience in working with software, you might be able to get started faster by reading the Github README file directly.
https://github.com/tobychui/arozos
Of course, you can stop here and pick an alternative NAS OS like Open Media Vault or FreeNAS to use with this hardware (Yes, they are also compatible and you can use them on my hardware design). But you already read through 4 hours write time worth of Instructable, why not give my OS a try :)
Setup Your SBC and Install Arozos


Follow the standard steps to setup your linux with an root account and a personal account. For the personal account, I recommend using a simple to remember name like "aroz" or "pi" if you are the kind of person that will always forgot your account. After this is finished, you can download arozos from the offical page. The following commands can get you started quickly.
Tips: If you afraid of losing your account in the future, you can write down your management account and password on a memo paper and stick it inside the NAS case.
First, create a folder at your home directory for arozos.
cd ~/
mkdir arozos
cd arozos
Next, go to arozos Github release page and download the latest arozos binary that fit your SBC. Here are some examples of them:
Orange Pis that use H3 / H5 CPU, pick: arozos_linux_arm
Orange Pis that use H616 CPU, Raspberry Pi 4 or other arm64 SBC, pick: arozos_linux_arm64
During the time I am writing this instructable, the latest version is 1.124. So copy the link from github and run the following comamnds. But if you found v2.0xx is out, I would recomend to use the latest verison instead.
wget https://github.com/tobychui/arozos/releases/download/v1.124/arozos_linux_arm
wget https://github.com/tobychui/arozos/releases/download/v1.124/web.tar.gz
mv arozos_linux_arm arozos
Notes: v2.0 is coming soon :)
After the download is finished, install the required dependencies
sudo apt-get update
sudo apt-get install ffmpeg samba -y
And give it a suitable permission to run ArozOS. If you don't care about permission, you are the only one who can login to this server and you want things just works, you can use the following commands.
sudo chmod 777 -R ./
(I usually recommend something like 775 or 755, change this depending on your needs)
Finally execute arozos with sudo (skip sudo if you don't need hardware, power and WiFi management)
sudo ./arozos
It will take a while to unzip the critical files and boot up the system. So do not press Ctrl + C nor closing your SSH windows if it stuck there for a while.
Install Launcher and Add the Service to Systemd (Optional)

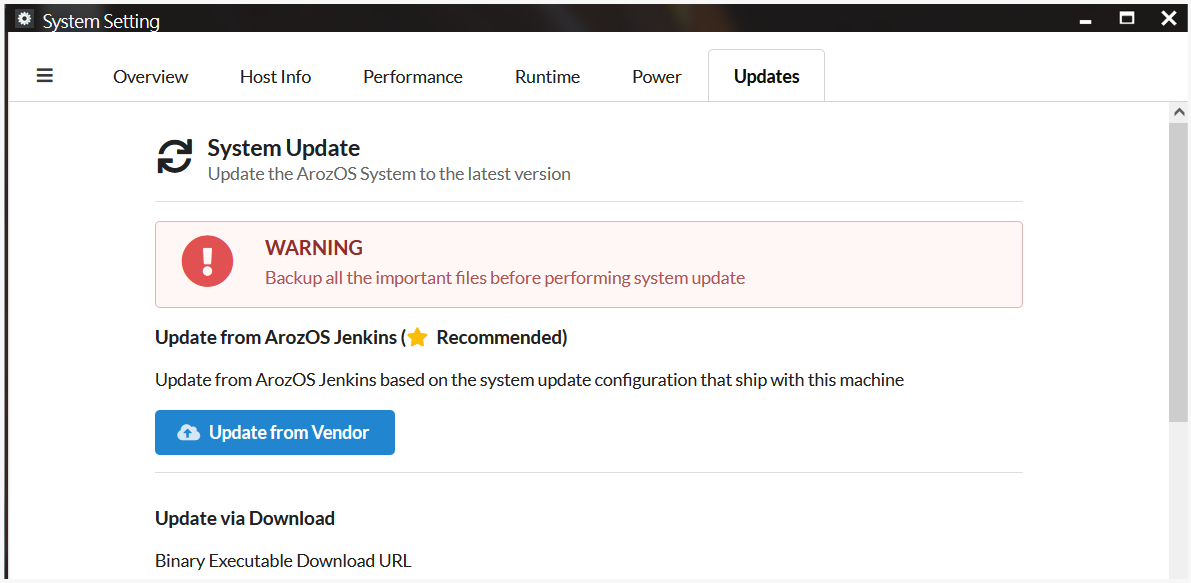
To make arozos start on boot and add OTA Update feature to the launcher, you can optionally download the launcher and add the arozos start service to systemd.
Download and Install ArozOS OTA Update Launcher (Optional)
If you want to install OTA update features to your ArozOS system, you can choose to install the launcher and use the launcher to start arozos on start.
https://github.com/aroz-online/launcher
To install the launcher, just put the launcher binary next to the arozos binary and point the start command to the launcher instead of the arozos binary. For example, if your SBC is using the H3 processor which is an armv7 processor, you can use the following command to download and start arozos with.
wget https://github.com/aroz-online/launcher/releases/download/v1.120/launcher_linux_arm
mv launcher_linux_arm launcher
./launcher -port 8080 -tls=true -hostname="My NAS"
# Or pass any startup paramter to it, it will relay to arozos binary
After you have successfully setup and started the launcher, you will find that there is a new tab in System Setting named "Updatess". From there, you can update your arozos NAS system with one click. Cool right?
Adding ArozOS to Systemd for Auto Startup (Optional)
If your Linux distro is using systemd (most of them do nowadays), you can add it to systemd to make arozos startup with your NAS when power on. The command is simple if you know how to use nano.
cd /etc/systemd/system/
sudo systemctl enable systemd-networkd.service systemd-networkd-wait-online.service
sudo nano arozos.service
and add the following contents to the file (Assuming you are using the username: pi)
[Unit]
Description=ArozOS Cloud Service
After=systemd-networkd-wait-online.service
Wants=systemd-networkd-wait-online.service

[Service]
Type=simple
ExecStartPre=/bin/sleep 10
WorkingDirectory=/home/pi/arozos/
ExecStart=/bin/bash /home/pi/arozos/start.sh

Restart=always
RestartSec=10


[Install]
WantedBy=multi-user.target
Change the path in the WorkingDirectory and ExecStart paramter if your username is not "pi".
Next, create a start.sh under ~/arozos with the following startup parameters
#!/bin/bash
sudo ./arozos -hostname="My NAS" -port 8080
And finally startup the systemd service
sudo systemctl start arozos.service
sudo systemctl enable arozos.service
Now, your arozos system should be able to start with your NAS when powered on :)
Setting Up Your Root Account on ArozOZ
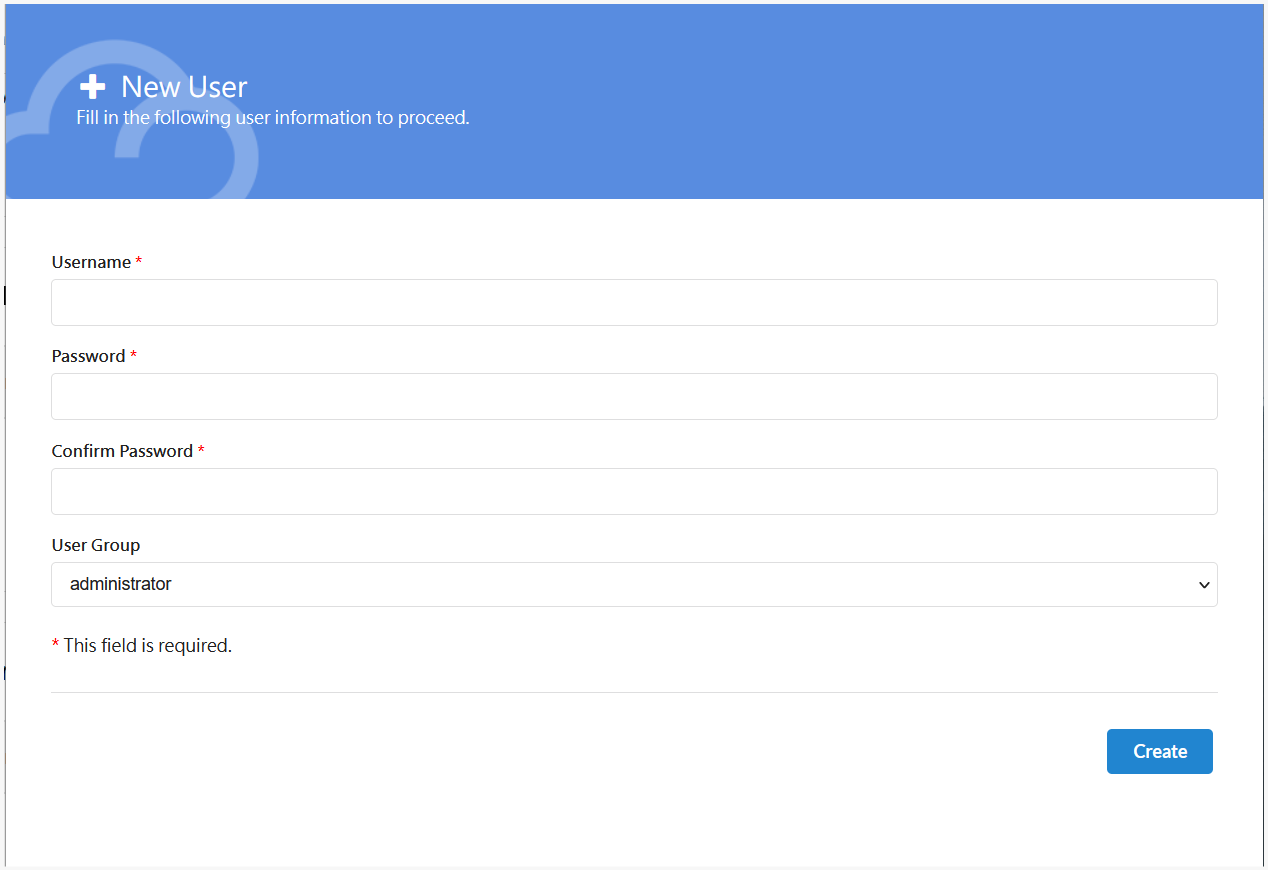

After your arozos system is running (To check, use "sudo systemctl status arozos"), open a web browser and navigate to
http://{your_pi_IP_Addr}:8080
Then you will be greeted with this user registration page. Enter your preferred username and password as the root admin account.
After Submit, you will be redirected to the login interface. If everything is working correctly, you will see a wonderful desktop interface after login. You can change the wall paper by right click and pick a build in theme or setup a custom path in the "Personalization" setting.
Important Notes
- Only use English in your username, preferably without space
- If you are not from an English speaking country, DO NOT TURN ON BROWSER TRANSLATION FUNCTION as this is known to cause of some strange bug in the root account setup stage. (Fixed in v2.010 or above)
Mounting Your Two HDD Into ArozOS

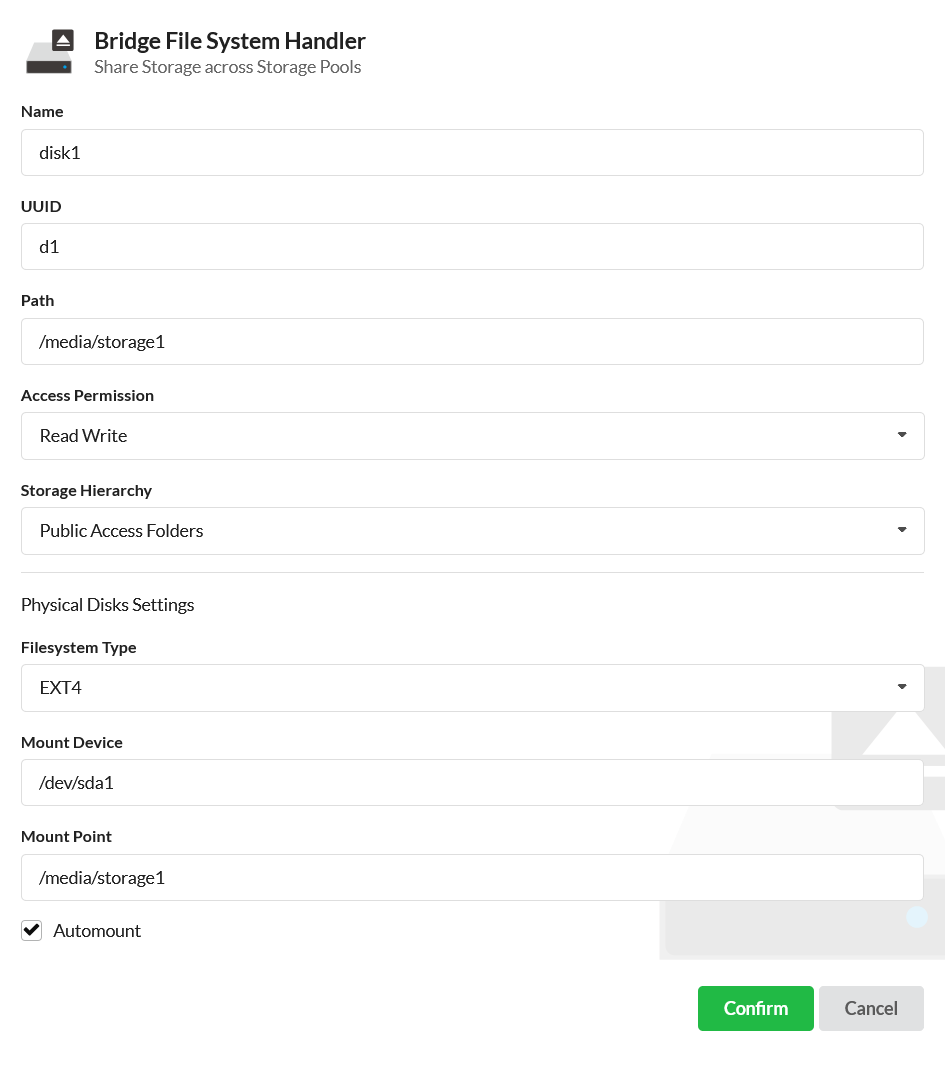
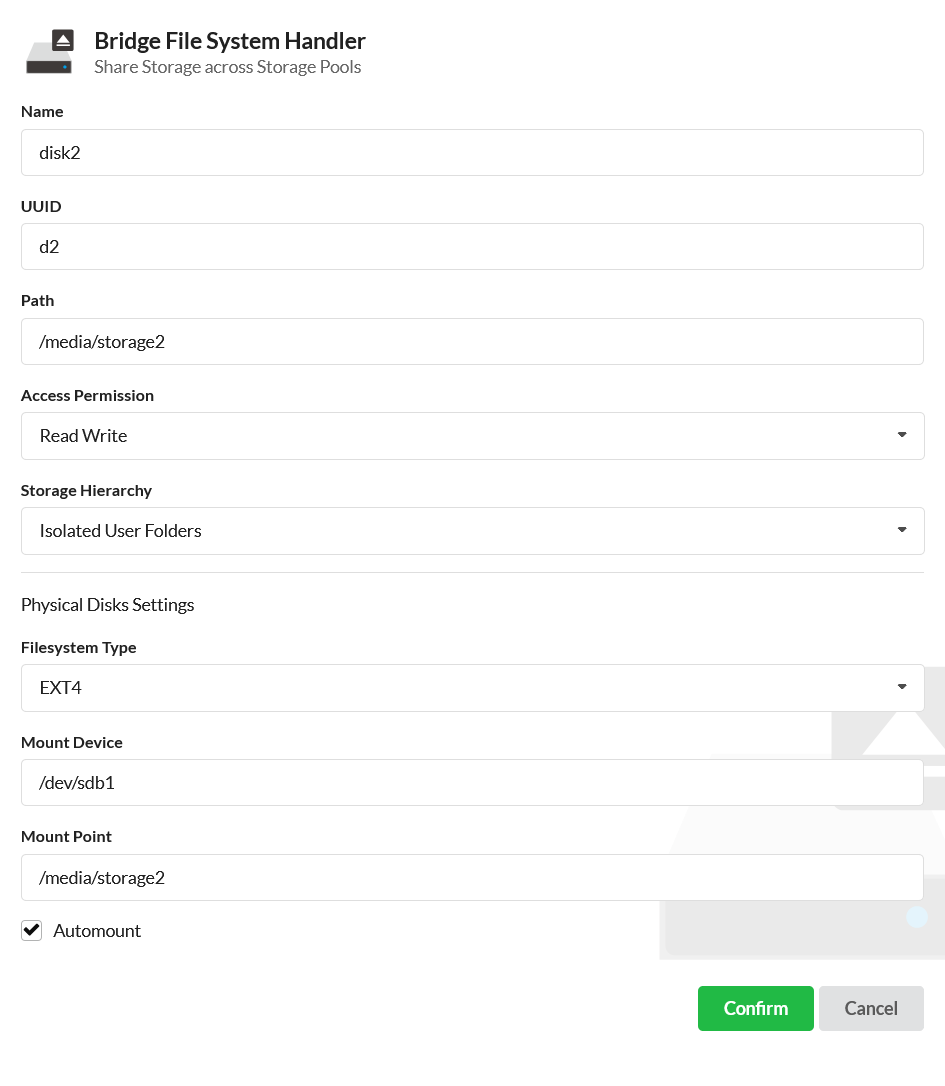
In this stage, you will not be able to see your disk yet. You need to mount them to the arozos so arozos can protect your data by providing a sandbox layer to your disk. To setup your disk, first you need to know where is your disk and what partition is inside them. If you have no idea about your disk format or partitions, and you have no important data in it, you can use fdisk command to format it completely.
After formatted and created a file system (e.g. ext4 or ntfs), you will be greeted with a new device file under /dev/ as something like /dev/sda1 or /dev/sdb1
Lets assume each of your disk has only 1 partition in EXT4 format and it is detected as /dev/sda1 and /dev/sdb1. Now you can create a mount point for them by creating two folder in /media root.
mkdir /media/storage1
mkdir /media/storage2
Then go to ArozOS, System Settings > Disk & Storage > Storage Pools, and setup it as follows (See the attached example config).
In the example config, we use sda1 as disk1 and sdb1 as disk2.
You might notice other than the name of disk, ID, device path and mount point is different, you also notice the "Storage Hierarchy" is different.
"Storage Hierarchy" if set to Public Access Folder, it means every user can access the disk as a "Shared disk". Anything uploaded to it can be viewed, write and delete by any users that have permission to access the disk.
"Storage Hierarchy" if set to Isolated User Folders, it means every user have their own private space on the disk, and user can't see other people's file. However, the user can still share his file by the "Share" function in the system and provide other user with a file share link.
Notes: The screenshot above is from v2.010 internal preview. If you decide to stick with v1.1xx, you can watch this tutorial on Youtube
Complete!!!


Now, you got yourself a complete open source, low cost NAS system that can support up to two hard disk at 4TB each. In the future when you got more storage needed, you can simply build more of them as ArozOS provide clustering and cross mounting features (i.e. mount all your low power ARM NAS as "network drive" into one powerful gateway node power by Intel / AMD CPU, and access through your private domain)
I am also working on an alternative version (last photo) for using with old, second hand old hard disk where the disk is much more easily replacable / hot-pluggable. For now, this version is still in prototyping stage. I will open source this version as well if people are showing interest to this design. So please don't hesitate and let me know what you think!