Digital Calendar Clock Using 1307 RTC, I2C LCD and Arduino Uno
by erintse01 in Circuits > Arduino
934 Views, 2 Favorites, 0 Comments
Digital Calendar Clock Using 1307 RTC, I2C LCD and Arduino Uno

Use time-related operations in most projects. For example, we can automate our outdoor lights over time. It will automatically open from the specified time to another preset time. Or we can make an automatic school bell. There are a lot more. The MCU can't do it on its own. We use RTC (Real Time Clock) to set the real time in the MCU.
The "Digital Calendar Clock" is the foundation project of RTC. There are many types of RTC modules on the market. Here I use 1307 RTC module.
Here I'm using the same I2C LCD I documented earlier.
Supplies
- DS1307 RTC
- Arduino IDE
- I2C LCD
DS1307 Real-time Clock

DS1307 is an RTC IC that helps in tracking time. This is an 8 pin IC
In the DS1307, data is transmitted in binary decimal encoded bit patterns. The data transfer rate of the DS1307 is 56 bytes.
I2C is the protocol used to communicate with MCU
DS1307 RTC Module mainly consists of DS1307 IC, 3V button battery, 2 pull-up resistors and a 32.768 kHz crystal oscillator.
We can get the current hour, minutes, seconds, day of the week, day, month and year.
DS1307 Pinout Descriptions
Pins 1, 2: These pins are for standard 32.768 quartz crystals.
Pin 3: This pin is used to connect the battery of DS1307.
Pin 4: We have to apply ground on this pin.
PIN 5: This pin is labeled SDA, which is short for Serial Data Line.
PIN 6: For serial clock input (SCL) and data synchronization.
Pin 7: This pin is used to output the square wave getter (SQW).
Pin 8: On this pin we provide external power supply (Vcc).
Key Points to Create Arduino Sketch
Here we use the "RTClib" library. We can get a 24 hour clock. For the 12-hour clock, we need to convert it. There are many ways to do this conversion. Here I use if, else and map() functions.
Install the Library in the Arduino IDE

We need to install two libraries.
1. The first one is "RTClib". This is a main library. So you can use the same library for some other RTC modules. To install this library, open the Arduino IDE and go to Sketch > Include Library > Manage Libraries and type RTClib in the search bar in the upper right corner. Then click Install.
2. The second library is "LiquidCrystal-I2C". Go to the link and download the library Arduino-LiquidCrystal-I2C-library. Then open the Arduino IDE and go to Sketch>Include Library> Add.ZIP Library. Next select the downloaded ZIP file and click Open.
Coding
Step1.
Next I'll create a sketch. First add three header files 1.RTClib.h, LiquidCrystal_I2C.h and Wire.h. The Wire library is used because here we use the I2C protocol for communication. The RTClib library will help in communicating with the RTC module. LiquidCrystal_I2C library helps in communicating with I2C LCD.
#include <RTClib.h>
#include <Wire.h>
#include <LiquidCrystal_I2C.h>
Step2.
Next I state that I am going to use RTC. Here is the DS1307 and create an object called "rtc" for this device.
RTC_DS1307rtc
Step3.
Then I create another object to call I2C LCD. The object name is lcd. And set the LCD address, number of columns and number of rows. Here the address of my I2C LCD is 0x27, the number of columns is 16 and the number of rows is 2. This is my situation. If you are using a different LCD, use its column and row numbers. If you don't know the address of your LCD, click here and go to step 1 in that article.
LiquidCrystal_I2C lcd(0x27, 16, 2);
Step4.
In the setup section, initialize the LCD and turn on the LCD backlight.
lcd.begin();
lcd.backlight();
Step5.
Prints a message on the LCD when the RTC is not running. This is for debugging purposes. Clear the LCD and set the cursor to (0, 0).
if (!rtc.begin()) {
lcd.clear();
lcd.setCursor(0, 0);
lcd.print("RTC Not Working");
}
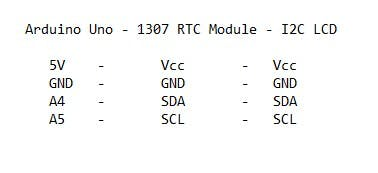
Complete Wiring

Last Step
Upload the code to the Arduino Uno. Then comment or delete (I recommend the first option) the statement
"rtc.adjust(DateTime(F(__DATE__), F(__TIME__)));"
Use "//" and upload the code again.
Digital calendar clock complete. You also get a digital calendar clock