Digital Compass

This project is a digital version of the traditional compass, we will be using our Module on the Go, MOTG-Compass that is powered by the LSM303 Magentometer + Accelerometer. We will then use an uLCD-220RD module to replicate a round compass that points to the north.
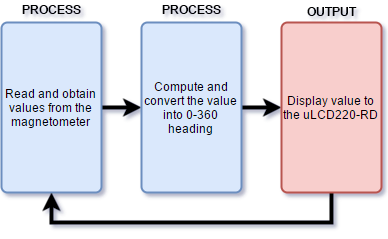
The Arduino UNO will basically communicate with the MOTG-Compass, compute and analyse the values produced and provide a 0-360 heading for the uLCD-220RD to display.
We will be using Pololu LSM303 Library from github.
How It Works
Build

Build the circuit as shown in the diagram.
Program the ULCD-220RD
Download the project file here.
- Open the Visi Genie file using Workshop 4.
- Click on the “Build Copy/Load” button.
- Connect the display to the PC using uUSB-PA5 and a mini USB cable. Make sure that you are connected to the right port. Red Button indicates that the device is not connected, Blue Button indicates that the device is connected to the right port.
- Now click on the “Compile and Load” button.
- Workshop 4 will prompt you to select a drive to copy the image files to a uSD Card. After selecting the correct drive, click OK.
- Mount uSD Card.The module will prompt you to insert the uSD card.
Properly unmount the uSD Card from the PC and insert it to the uSD Card slot of the display module. The image in the demonstration must appear on your display after completing the steps above.
Program the Arduino

- Open the project using the Arduino IDE. Make sure you have already downloaded/installed/added the Pololu LSM303 Library on your Arduino IDE, if not, please follow this link: https://github.com/pololu/lsm303-arduino
- Change and configure the settings on the “Tools”
- Select the correct Communication Port.
- Click on the “Upload” Button to compile, debug and load the code to the Arduino UNO.
- If uploading is successful, you will encounter the message above.
Serial Monitor (Optional)

The program uses the Serial Monitor to display debugging messages, you can open this as an option and to monitor the activities performed by the project
Demonstration

