Digital Dice (Arduino)


Hey! Welcome back to another one of my Instructables! Today, we will be making a digital Dice using and Arduino, 7-Segment display, and some code! Let's get started!
Supplies
For this Instructable, you will need:
- Arduino Uno R3: https://a.co/d/0lki3hk (x1)
- Jumper Wires: https://t.ly/nh7CW (x9)
- 7-Segment Display: https://t.ly/nDW-c (x1)
- 150 Ω Resistors (Check the resistance before buying!): https://t.ly/zd5ru (x7)
Wiring
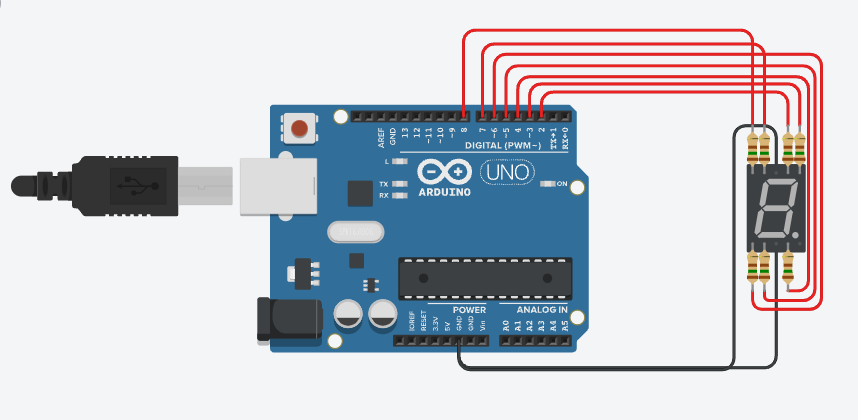
This step should be fairly simple. For this tutorial, I will be using a cathode common 7-segment display, the reason I tell you this is because some displays are anode common, and could invert the signal of the pin (Eg. HIGH=OFF, LOW=ON). Anyways, onto wiring. Common (for this example) goes on GND (we will do this twice because we have 2 commons on the same slot, different sides), so that means that all of our other pins will go on the digital / analog side. Now, when wiring the output wires, include a 150 Ω resistor. Now, just repeat until you are ready for coding!
Tip: Put your wires (A, B, C...) in order on the pins (A=2, B=3...) it will help when coding!
Coding

Now, time for code! Code will get quite lengthy, so I will only provide the .ino file this time! Anyways, let's start! First, we want to make a function called writeNumber, we want this function to take one argument, the number we want to write. Once we have that argument, we set the display accordingly. Everything else is quite easy, it is setting the display which gets quite lengthy. Once we have our function made, we want to use the random function (built-in), and generate a random number, 1-6, and once generated, display that number, then wait about 2000 ms (2 Seconds) and do it again.
Downloads
Extra!
Now this isn't really a "step", just some other ideas you can add to this project!
- A button to generate a new number instead of a delay
- A buzzer to alert of a new number
- An LCD instead of a 7-Segment display
- More numbers
Well, this is the end of this tutorial. If you have any problems, feel free to send me a message! Anyways, if you enjoyed this tutorial, make sure to favorite it!