Doomscroller-Preventor
by just_another_person in Circuits > Gadgets
157 Views, 1 Favorites, 0 Comments
Doomscroller-Preventor
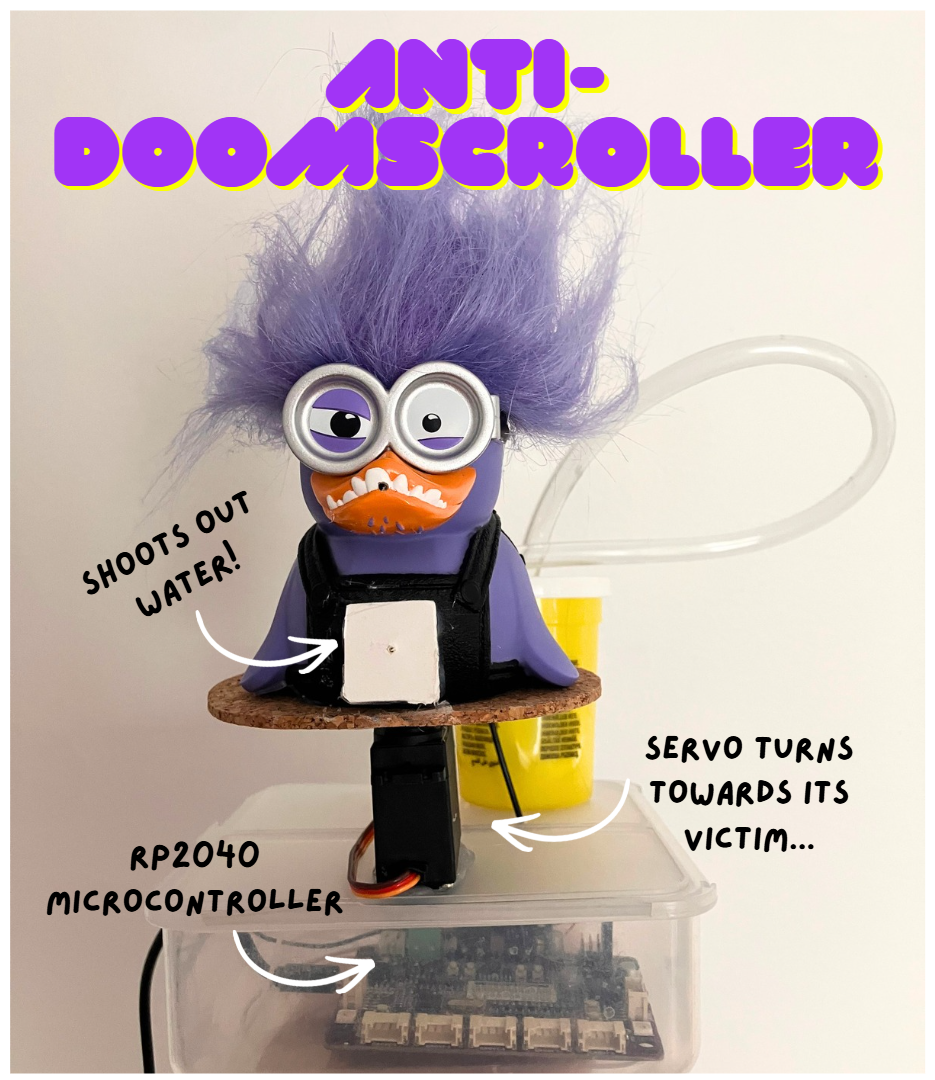
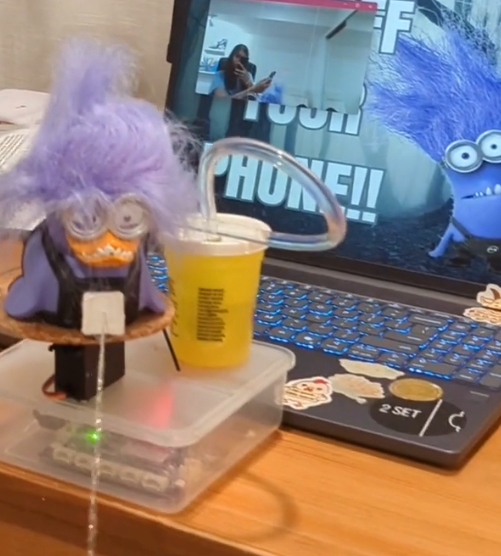

Ever catch yourself mindlessly scrolling on your phone? Have you ever had your screen time exceed the amount of sleep you get?
Well, if that sounds like you (or it sounds like someone you know...), build a Doomscroller-Preventor that uses a webcam and a custom AI model to detect when someone is holding a phone. In my at-home tests, it has proved to be quite an effective way to look up from your phone, as well as a quick & fun robotics project :)
When the system detects a phone, it displays a warning image, plays an alarm, sends a Discord notification, turns a servo toward the person’s face position, and fires a jet of water! The project uses a laptop for computer vision and a Maker Pi RP2040 for physical control.
For a quick safety note: Use only a small, low-pressure pump and keep the water stream away from people's eyes, electronics, electrical connections, and other sensitive equipment. Test the pump with the nozzle pointed into a container before testing the complete system.
Supplies
Hardware
- Laptop or desktop with webcam
- Raspberry Pi RP2040 board, specifically Maker Pi RP2040 with USB data cable
- High-torque servo
- Small DC water pump (with tubing)
- External 6 V power supply for the servo/pump setup
- Water container
- 2x Jumper wires (to connect external power supply to Maker Pi)
- Small box (to fit Maker Pi); I used a plastic food container
- Hot glue
Software
- Python 3 on the laptop
- MicroPython on the RP2040
- Thonny IDE
- A custom YOLO model file, such as best.pt (linked below)
- A warning image and alarm audio file
- Discord webhook, optional
You will also need the three code files provided with this project:
Set Up the Maker Pi RP2040
Hold the BOOTSEL button on the Maker Pi RP2040 while connecting it to your computer with a USB data cable. The board should appear as a USB drive.
Download the appropriate MicroPython .uf2 firmware file for the RP2040, then drag the .uf2 file onto the USB drive. The board will automatically restart after the firmware is copied.
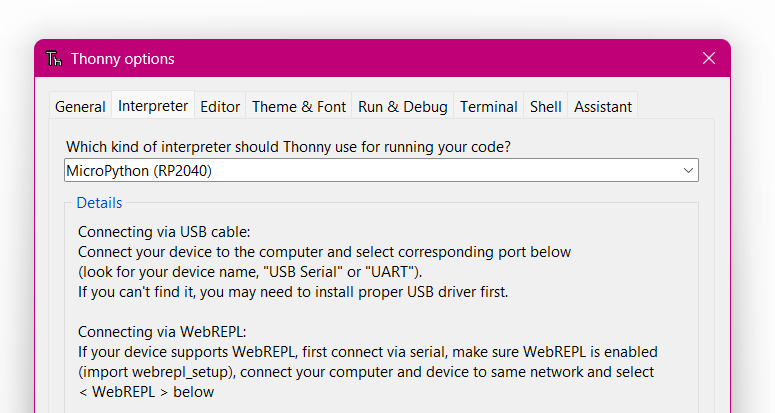
Open Thonny and go to Tools → Options → Interpreter. Select the MicroPython interpreter for the RP2040 and select the COM/serial port assigned to the board.
Connect the Servo and Pump
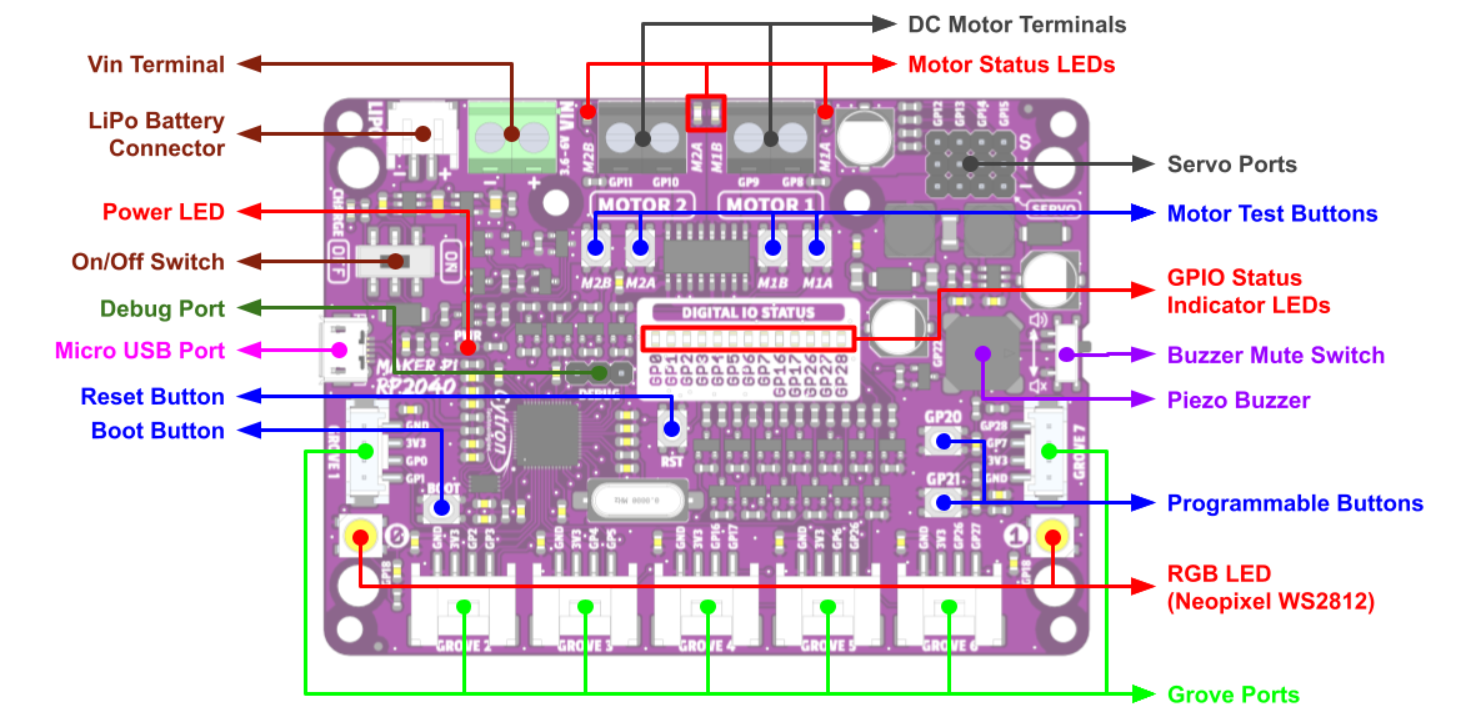
Connect the servo's signal wire to the Servo 4 header on the Maker Pi RP2040. In this project (for the code provided in the 'supplies' section), Servo 4 uses GP15.
Connect the water pump to Motor 1, which is controlled by GP8 and GP9 in the RP2040 code.
Use the external 6 V power supply for the servo/pump setup rather than relying on USB power, using the two jumper wires if necessary. Make sure the power supply is appropriately rated for the components you are using.
Connect the external power ground to the RP2040 ground so that the control signals share a common reference.
Attach tubing to the water pump (make sure it fits snugly to the pump to prevent leakage onto any components-- use superglue if necessary) and place the pump's intake in the water container. For my version, I used a play-dough container to store the water supply-- cut a small hole in the lid for the wires and tubing to come out of.
Remember to keep the water container and tubing well away from the computer, RP2040, power connections, and other electronics! Test the pump with a low-pressure stream directed into a container before operating the complete system.
Upload the RP2040 Controller Program
In Thonny, create a new file named main.py, and paste the RP2040 water pump and servo control code into the file. Save main.py to the RP2040.
The program waits for commands from the laptop over USB serial. Commands use the format: angle,pump (for example: 45,1). The first number specifies the servo angle, while the second number controls the pump:
- 1 = pump on
- 0 = pump off
The RP2040 also includes a communication timeout. If it stops receiving commands from the laptop for approximately 0.3 seconds, it automatically turns the pump off and returns the servo to its neutral position.
Test the Servo and Pump Manually
Before running the laptop computer-vision program, test the physical hardware separately. To do this, in Thonny, stop main.py if it is currently running so that you can use the RP2040's Python REPL.
Test the servo with set_angle(45), and confirm that the servo moves. Then test the pump with control_pump(1), and again confirm that the pump activates. Turn it off with control_pump(0).
If either component does not work, check the wiring, external power, shared ground, and pin assignments before continuing.
Do not run the laptop program while Thonny is holding the RP2040's serial connection open.
Train or Obtain the Phone Detector
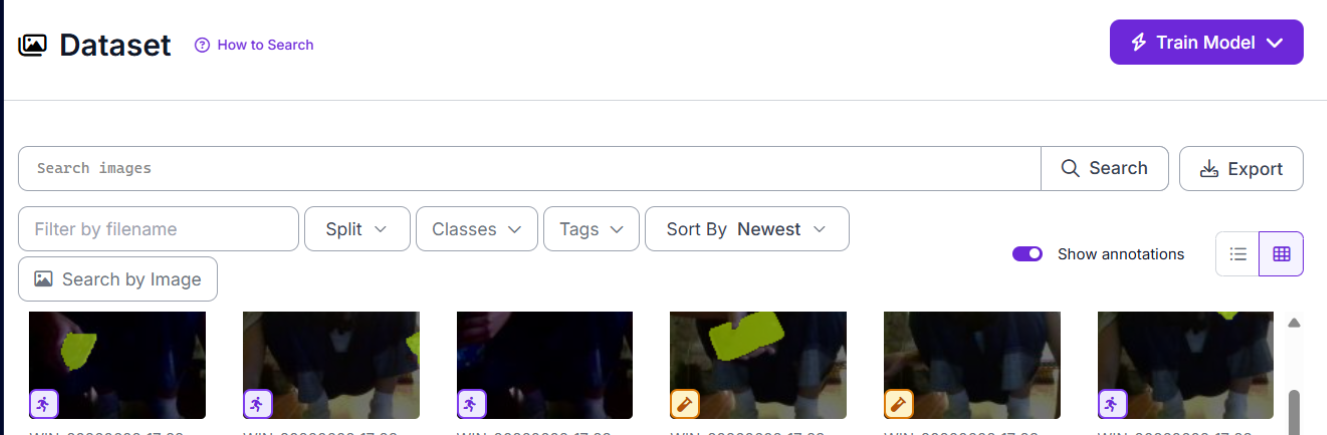
Train a phone-detection model using Roboflow and YOLOv8, or use the project's existing best.pt model. The original project trained on roughly 200 annotated images and used YOLOv8 for phone detection. If you train your own model (as I did), include phones at different:
- angles
- distances
- lighting conditions
- orientations
- backgrounds
- positions in the frame-- get creative with this!
Also, make sure to include images that contain no phones so that the model learns what should not be classified as a phone. Use the provided custom YOLO training code to train the model. After training, download the best-performing weights as best.pt, and place best.pt in the same project folder as the laptop phone-detection Python file.
For example:
Doomscroller-Preventor/
├── phone_detector_robot_controller.py
├── best.pt
├── alarm.wav
└── get_off_phone.png
The laptop code loads the model using YOLO("best.pt"), so keeping the model in the same project folder means you don't have to use a computer-specific file path-- although if you would prefer to put it in your own-named folder, you can easily make the necessary code adjustments by changing the file path.
Install the Laptop Libraries
Open Command Prompt or PowerShell on the laptop and install the packages used by the program:
pip install opencv-python pyserial ultralytics flask requests pygame numpy
These libraries allow the laptop to...
- process webcam video with OpenCV
- run the custom YOLO model with Ultralytics
- communicate with the RP2040 through USB serial with PySerial
- run the local Flask component
- send Discord notifications through HTTP requests
- play the warning/alarm audio with Pygame
- perform numerical and image-processing operations with NumPy
Configure the Laptop Code
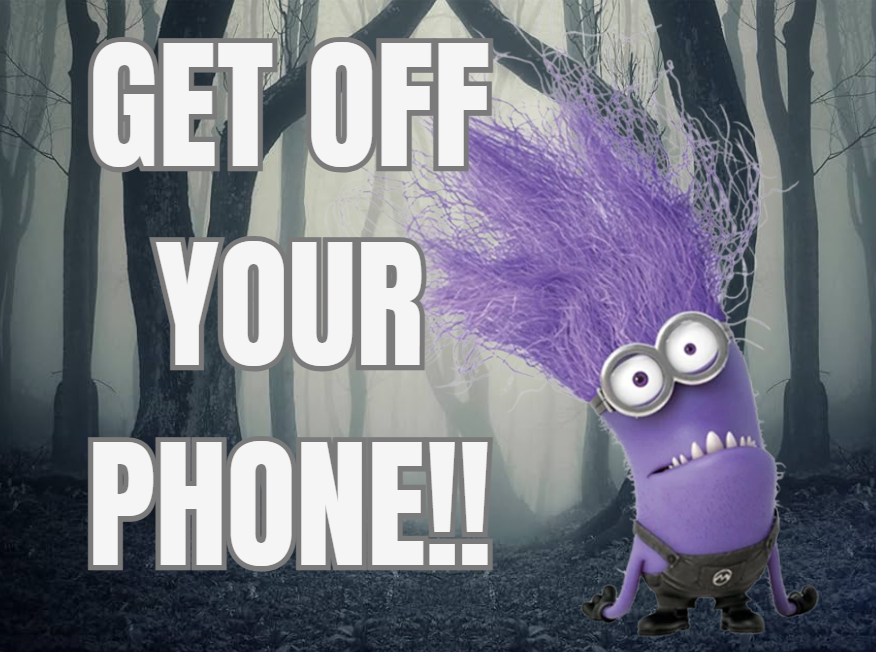
Open the laptop Python file from the repository. Choose your own alarm sound and computer background image (I made mine minions themed, pictured above!). Make sure the model, alarm, and warning-image filenames match the files in your project folder-- i.e. the code uses relative paths such as:
- audio_path = "alarm.wav"
- image_path = "get_off_phone.png"
and loads the model with:
- YOLO("best.pt")
But, if you use different filenames, make sure to change these values accordingly-- for example, if your warning image is named warning.png, change image_path = "get_off_phone.png" to image_path = "warning.png".
After you do that, update the serial port in:
arduino_serial = serial.Serial(
port='COM6',
baudrate=115200,
timeout=0.01
)
Replace COM6 with whatever serial port your RP2040 has been assigned (you can find the correct port in Windows Device Manager → Ports (COM & LPT))
Keep the baud rate at 115200. The laptop program communicates with the Maker Pi over this serial connection by sending commands such as 45,1 to control the servo and pump.
Remember to close Thonny before running the laptop program, because Thonny may otherwise keep the RP2040's COM port occupied.
Add Your Discord Webhook
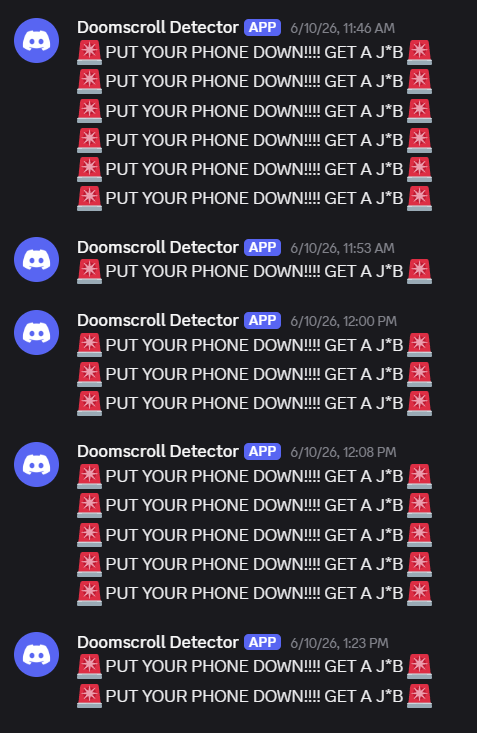
Discord notifications are optional, but personally I prefer them because of the in-phone notification to end your doomscrolling! To enable them, create a webhook in a Discord channel by opening the channel settings, selecting Integrations → Webhooks, and creating a new webhook.
The code I attached uses the environment variable DISCORD_WEBHOOK, so set this environment variable to your Discord webhook URL. When a phone is detected, the program sends a warning message through the webhook. The notification has a cooldown of approximately 30 seconds, preventing the program from repeatedly spamming the Discord channel while the phone remains detected.
If you do not want Discord functionality, you can leave the webhook unset and use the rest of the system normally.
Use First-face-position Locking
The project intentionally does not continuously follow the person's face (to avoid the servo from 'twitching' for minor adjustments); rather, when the phone is detected and a face is found, the laptop program determines whether the center of the face is in the left, center, or right third of the webcam frame.
The current code uses approximately:
Face position Servo angle
Left third 45°
Center third 0°
Right third -45°
These values are stored using the code's existing tracking variables, including:
- last_known_clean_angle
- current_tracked_angle
- in_firing_session
When the phone is first detected, the program establishes the initial target angle. While the detection remains active, it continues using current_tracked_angle rather than continuously recalculating the servo direction from the person's current face position. Because of this, if the person moves from the center toward the left after the initial detection, the servo stays aimed at the original center position.
You can customize the three servo angles if your physical servo is mounted differently/in a different orientation. For example, if your servo rotates in the opposite direction, reverse the positive and negative values.
Configure the Phone-Detection Grace Period
The laptop program uses last_phone_seen_time to keep track of when a phone was most recently detected. The code allows a short grace period after the phone disappears so that a single missed YOLO detection does not immediately shut down the system.
The current grace-period logic uses approximately current_time - last_phone_seen_time <= 0.8, which means the system can tolerate a brief detection gap of approximately 0.8 seconds.
When the phone has been absent longer than this period, the active response ends. The program stops the pump, stops the alarm, resets the firing-session state, and resets the tracked servo target so that the next phone detection can establish a new initial position.
If you want to change how tolerant the system is to missed detections, the 0.8 value can be adjusted.
A shorter value makes the system respond more quickly when a phone disappears; a longer value makes it less sensitive to brief missed detections.
Assemble Hardware & Run the Full Project
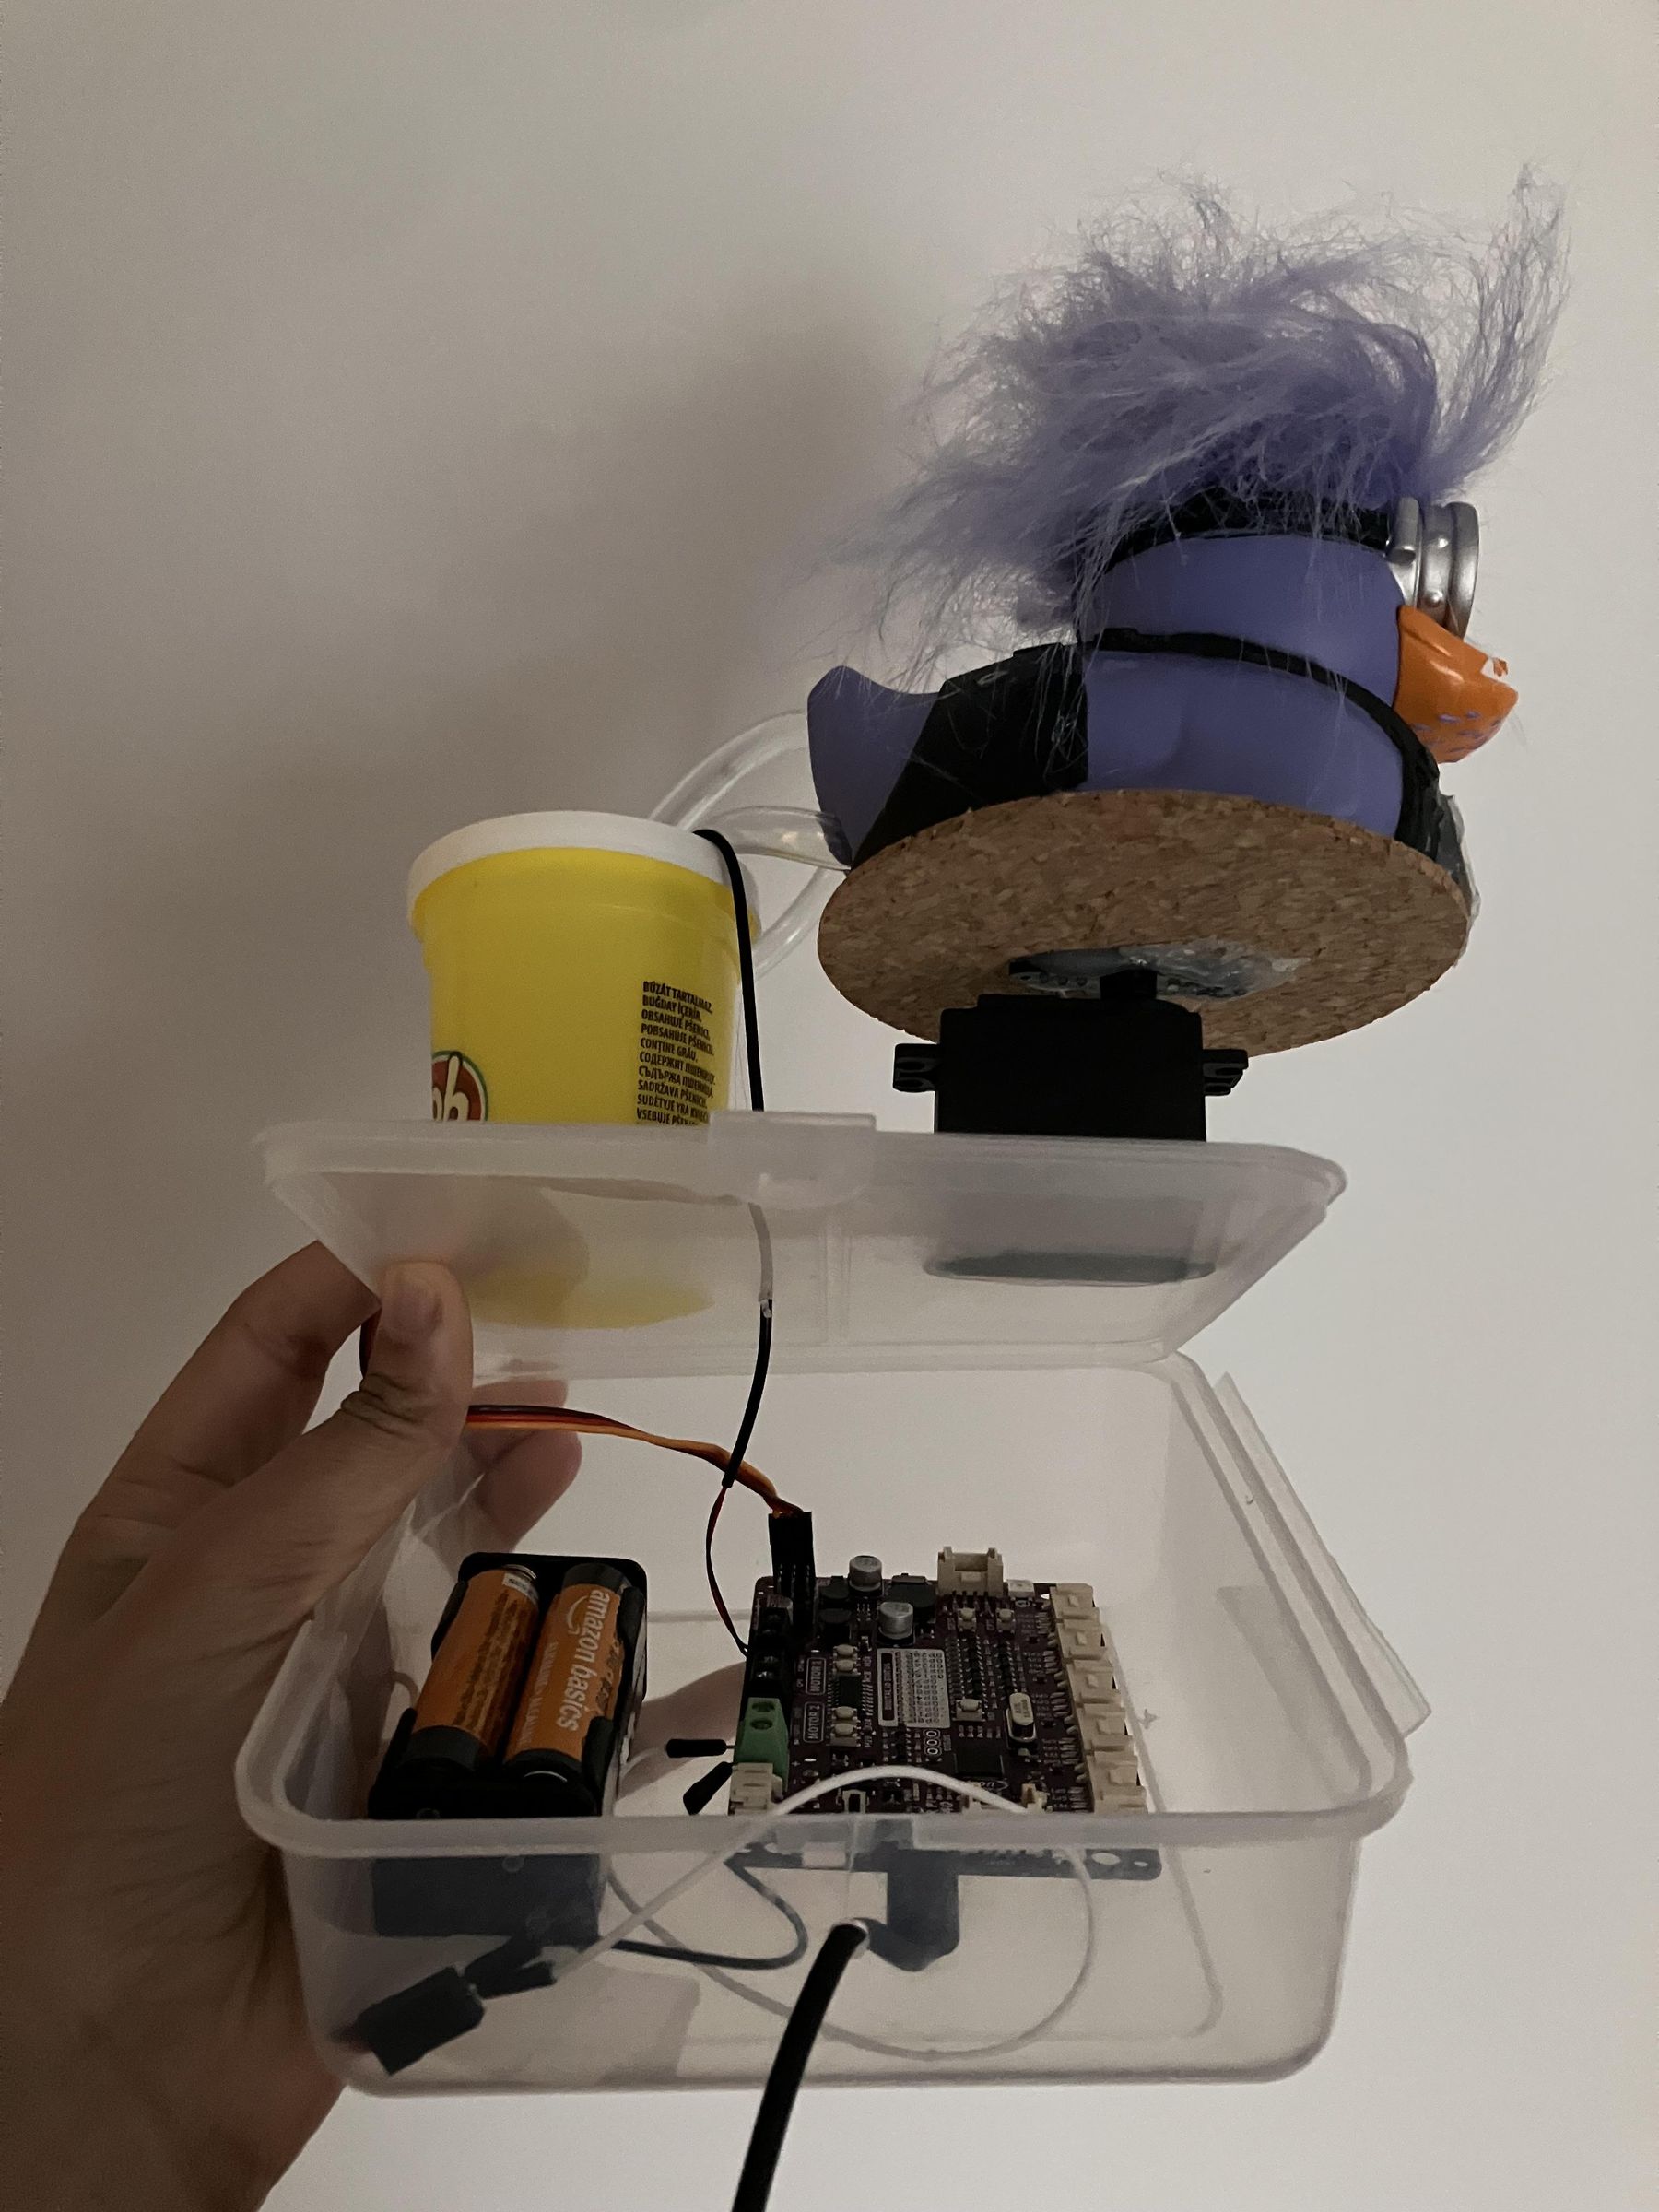
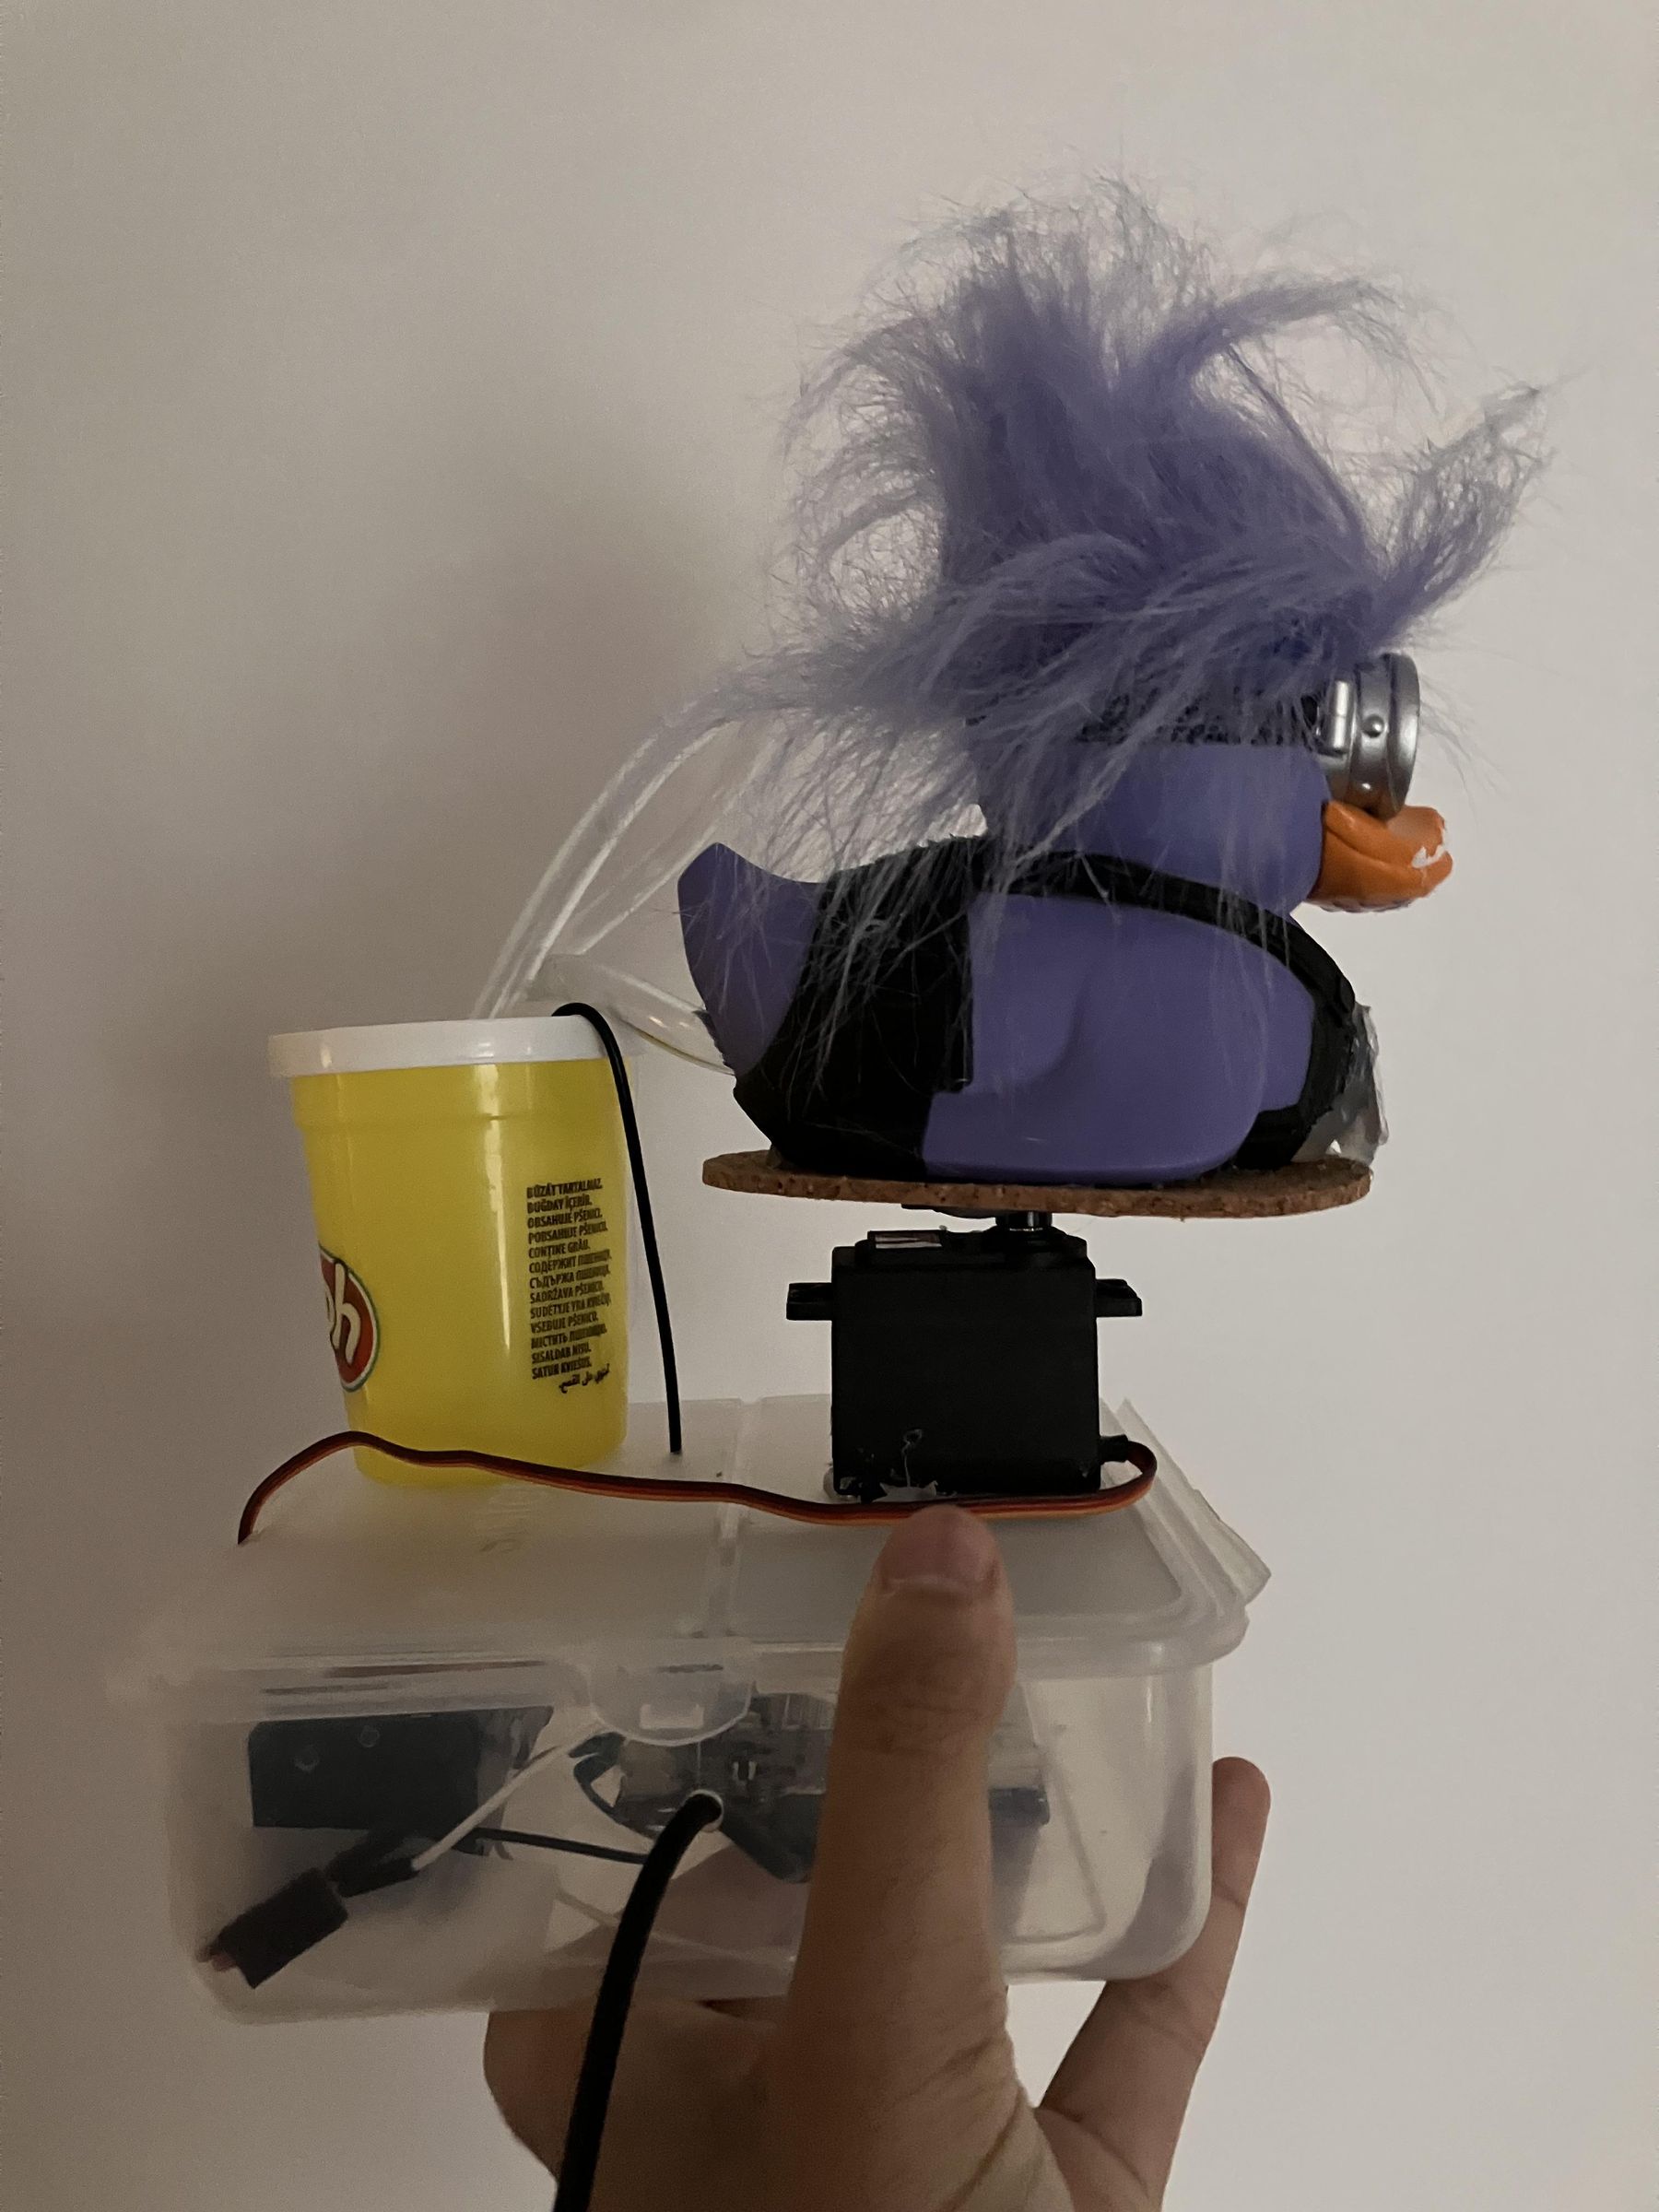
Connect the RP2040 to your computer through USB and confirm that main.py is saved on the board.
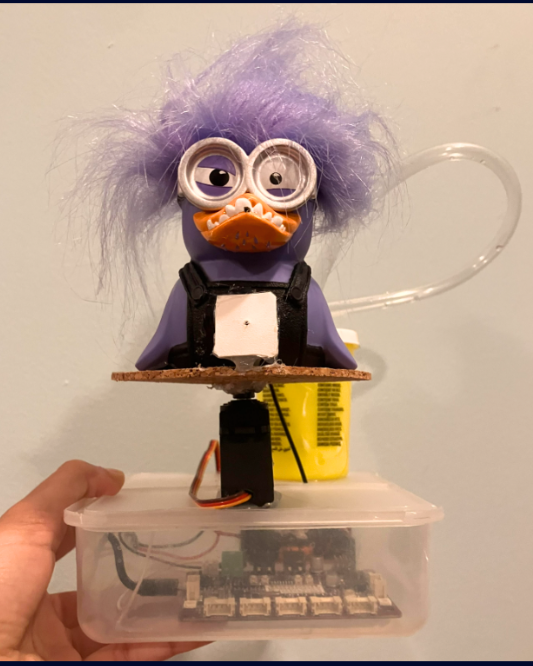
For the finished, compact version of the project, place the Maker Pi RP2040 inside a small waterproof enclosure (I used a plastic food container). Cut or drill small openings for the USB cable and servo wiring, then secure the servo motor to the top of the enclosure with hot glue.
To create the water-spraying duck, attach the pump tubing (the end that is not inside the play-dough container) to the inside of the duck's chest, at the location indicated by the white square in the image. Carefully make a small opening in the rubber at the center of the tubing so that water can exit through the front of the duck. Secure the tubing so that it does not pull loose when the servo moves.
Mount the duck on top of the servo motor, as shown in the image, so that the servo can rotate the duck toward the selected target zone. Glue the play-dough/water-supply container to the top of the box as well, as shown.
Very very important: before running the complete system, make sure the water stream is directed into a safe container and cannot reach the computer or other electronics!!!
Make sure:
- the webcam is connected
- best.pt is accessible
- the warning image is accessible
- the alarm file is accessible
- the correct RP2040 COM port is configured
- no other program is holding the RP2040 COM port open
- the pump tubing is secure
- the water container is safely positioned
Close Thonny's serial connection, then run the laptop Python script.
Point the webcam toward the area you want to monitor-- when the custom YOLO model detects a phone and a face is found, the system should:
- Detect the phone.
- Record the person's initial face zone.
- Determine the corresponding servo angle.
- Rotate the servo toward that initial position.
- Display the warning image.
- Play the alarm.
- Send the optional Discord notification.
- Activate the pump.
- Keep the servo at the original target while the phone remains detected.
When the phone has been absent beyond the configured grace period, the active response ends and the system resets for the next detection.
Troubleshoot Common Issues
If the laptop cannot open the COM port:
Close Thonny if it is connected to the RP2040 interpreter. Also close other serial-monitor programs. Verify the COM number in Device Manager → Ports (COM & LPT) and make sure the number in serial.Serial(...) matches.
If the servo moves in the wrong direction:
Check that the servo is connected to Servo 4 / GP15. If the hardware is oriented differently from the original project, adjust the left, center, and right angle values in the laptop code.
If the servo twitches or the RP2040 resets:
Check the external power supply and confirm that the servo and pump are not drawing more current than the supply can provide. Confirm that the required grounds are connected correctly.
If the pump does not activate:
First test:
control_pump(1)
directly in the RP2040 REPL. If it works there, check the USB serial connection and laptop code. If it does not work, check the Motor 1 wiring, external power, pump, and tubing.
If the pump remains on unexpectedly:
The RP2040 contains a 0.3-second communication timeout that should turn the pump off when commands from the laptop stop arriving. If the pump does not shut off, disconnect its power and troubleshoot the motor-control circuit before continuing.
If phone detection is inconsistent:
Collect additional training images and retrain the YOLO model. Focus especially on difficult examples with poor lighting, unusual phone orientations, different distances, cluttered backgrounds, and partially hidden phones.
If the warning appears but the Discord notification does not:
Check that the DISCORD_WEBHOOK environment variable is configured correctly.
If the system stops responding after a brief connection problem:
Check the USB connection and restart the laptop program if necessary. The RP2040's automatic timeout is intentionally designed to shut the pump off when communication is interrupted.