Drawing Bot - Explaining the Code
by rodahbengi in Circuits > Arduino
211 Views, 0 Favorites, 0 Comments
Drawing Bot - Explaining the Code

My team and I created to help break down the code
Supplies

Tools from kit;
· 1 Arduino Uno
· 1 Small Breadboard
· 1 Motor Driver
· 1 Button
· 1 Medium Cardboard Box
· 1 Marker
· 1 Large Sheet of Paper
· 2 Hobby Gearmotors
· 2 Wheels
· 15 Jumper Wires
· 1 Battery Pack
· 4 AA Batteries
Link to all of the tools : SparkFun Inventor's Kit for Arduino Uno - v4.1 - KIT-15631 - SparkFun Electronics
Code Step 1 and Writing Setup 1


First step name what the project will be
// Drawing Bot propjet
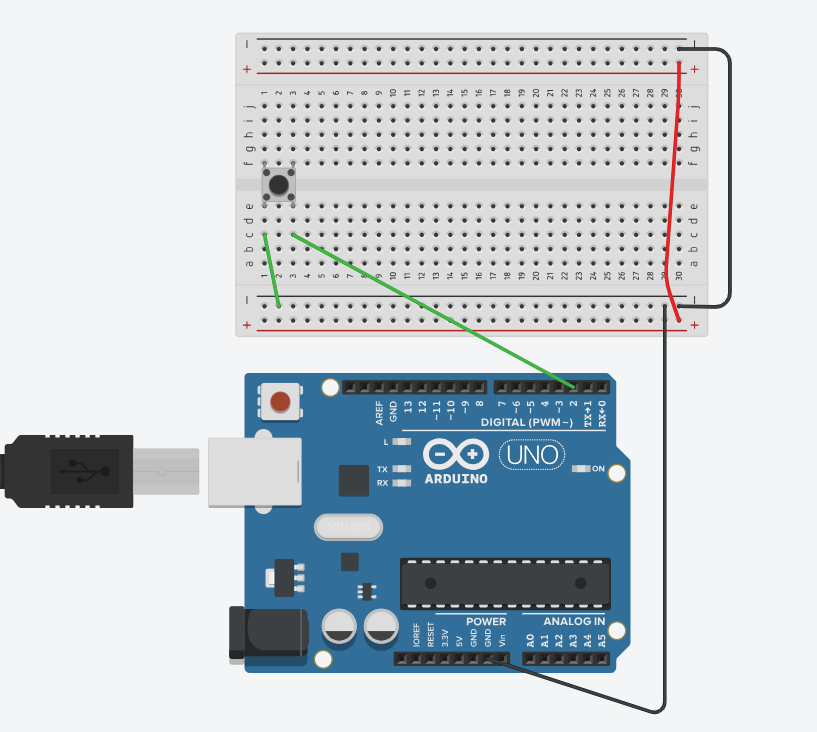
We than create an integer value for the button and assign it a value of 2 on the Arduino Board
Int button =2;
Int buttonval;
Void set up ()
{
// set up button
pinMode (button, INPUT_PULLUP);
// helps detect when button is pushed
serial.begin(9600);
}
Code Step 2 and Writing Setup 2


int AIN1 = 13;
int AIN2 = 12;
int PWMA = 11;
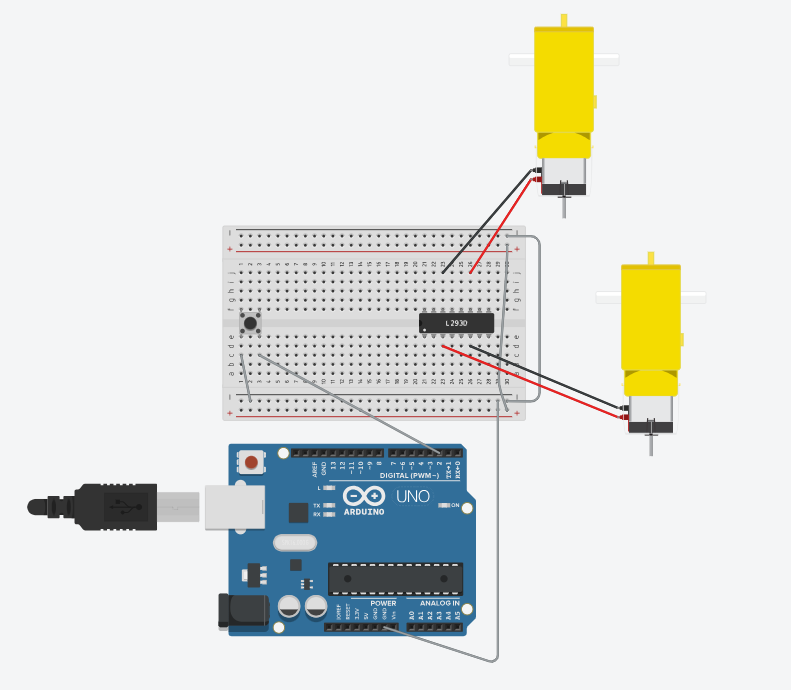
// These lines declare variables named AIN1, AIN2, and PWMA, assigning them values 13, 12, and 11 respectively. These values represent the pin numbers on the Arduino board that are connected to control the first motor.
// In the void set up
{
// Set up Motors
pinMode(AIN1, OUTPUT);
// This line configures pin AIN1 (which is connected to the first motor) as an output, indicating that it will be used to send signals to control the motor.
pinMode(AIN2, OUTPUT);
// Similarly, this line configures pin AIN2 (another pin for the first motor) as an output.
pinMode(PWMA, OUTPUT);
// This line configures pin PWMA (the PWM pin for controlling the speed of the first motor) as an output
// Set up Button
pinMode(button, INPUT_PULLUP);
//This line configures the button pin as an input with a pull-up resistor enabled. It means that when the button is not pressed, the pin will be in a HIGH state, and when the button is pressed, the pin will be in a LOW state.
Serial.begin(9600);
// This line initializes serial communication with the computer at a baud rate of 9600 bits per second. This allows us to send data from the Arduino to the computer for debugging or other purposes.
}
Code Loop Setup 1

void loop() //* will run as long as the board is on
{
// Create on/off code
// This part of the code checks the button state. If the button Is pressed, some action will take place. If the button Is not pressed it will wait briefly and then check the state again.
buttonval = digitalRead(button); //*Reads the digital state of button
if (buttonval == LOW){ //Button Pressed
else {
//Button not pressed
delay(100);
//Wait and check again
}
Code Loop Setup 2

void loop()
{
// Create on/off code
// This checks if the button is pressed or not and stores that information in a variable called buttonval
buttonval = digitalRead(button);
if (buttonval == LOW){ //Button Pressed
delay(3000); //Delay for three seconds for safety
// Both Forwards for 2.5 seconds, This sends a signal to the motor to spin in one direction.
digitalWrite(AIN1, HIGH);
digitalWrite(AIN2, LOW); // This sends another signal to the motor to spin in the same direction.
analogWrite(PWMA, 191); // This controls the speed of the motor. A higher number means faster speed.
// Backwards for 3 seconds
digitalWrite(AIN1, LOW); // This sends a signal to the motor to spin in the opposite direction.
digitalWrite(AIN2, HIGH); // This sends a signal to the motor to spin in the opposite direction.
analogWrite(PWMA, 191); // This controls the speed of the motor
else {
//Button not pressed the motors AIN1 and AINS are set low
digitalWrite(AIN1, LOW); // This sends a signal to the motor to stop spinning.
digitalWrite(AIN2, LOW); // This sends a signal to the motor to stop spinning.
analogWrite(PWMA, 0); // This stops the motor completely by setting its speed to 0.
Loop Step 3 Part 1

void loop()
{
// Create on/off code
buttonval = digitalRead(button);
if (buttonval == LOW){ //Button Pressed
delay(3000); //Delay for three seconds for safety
//Both Forwards for 2.5 seconds
// The first motor (AIN1 and AIN2) moves forward.
Both motors move at a medium speed (PWM value of 191).
digitalWrite(AIN1, HIGH);
digitalWrite(AIN2, LOW);
analogWrite(PWMA, 191);
// The second motor (BIN1 and BIN2) also moves forward.
digitalWrite(BIN1, LOW);
digitalWrite(BIN2, HIGH);
analogWrite(PWMB, 191);
delay(2500);
//Turning for 1 second
// The first motor continues moving forward
digitalWrite(AIN1, HIGH);
digitalWrite(AIN2, LOW);
analogWrite(PWMA, 191);
// The second motor now moves backward, causing the robot to turn
digitalWrite(BIN1, HIGH);
digitalWrite(BIN2, LOW);
analogWrite(PWMB, 191);
delay(1000);
// Forward for 4 seconds, Both motors move forward again
digitalWrite(AIN1, HIGH);
digitalWrite(AIN2, LOW);
analogWrite(PWMA, 191);
digitalWrite(BIN1, LOW);
digitalWrite(BIN2, HIGH);
analogWrite(PWMB, 191);
delay(4000);
//Turning for 2 seconds
// The first motor keeps moving forward
digitalWrite(AIN1, HIGH);
digitalWrite(AIN2, LOW);
analogWrite(PWMA, 191);
// The second motor moves backward again to make the robot turn more.
digitalWrite(BIN1, HIGH);
digitalWrite(BIN2, LOW);
analogWrite(PWMB, 191);
delay(2000);
// Backwards for 3 seconds
// The first motor now moves backward.
The second motor still moves backward
digitalWrite(AIN1, LOW);
digitalWrite(AIN2, HIGH);
analogWrite(PWMA, 191);
Loop Step 3 Part 2

else {
//Button not pressed we stop the motors
digitalWrite(AIN1, LOW);
digitalWrite(AIN2, LOW);
analogWrite(PWMA, 0);
delay(100);
//Wait and check again This pauses the program for 0.1 seconds (100 milliseconds).
}
}
Loop Final Part 1

void loop()
{
// Create on/off code
buttonval = digitalRead(button);
if (buttonval == LOW){ //Button Pressed
delay(3000); //Delay for three seconds for safety
//Both Forwards for 2.5 seconds
digitalWrite(AIN1, HIGH);
digitalWrite(AIN2, LOW);
analogWrite(PWMA, 191);
digitalWrite(BIN1, LOW);
digitalWrite(BIN2, HIGH);
analogWrite(PWMB, 191);
delay(2500);
//Turning for 1 second
digitalWrite(AIN1, HIGH);
digitalWrite(AIN2, LOW);
analogWrite(PWMA, 191);
digitalWrite(BIN1, HIGH);
digitalWrite(BIN2, LOW);
analogWrite(PWMB, 191);
delay(1000);
// Forward for 4 seconds
digitalWrite(AIN1, HIGH);
digitalWrite(AIN2, LOW);
analogWrite(PWMA, 191);
Code Loop Final Part 2

digitalWrite(BIN1, LOW);
digitalWrite(BIN2, HIGH);
analogWrite(PWMB, 191);
delay(4000);
//Turning for 2 seconds
digitalWrite(AIN1, HIGH);
digitalWrite(AIN2, LOW);
analogWrite(PWMA, 191);
digitalWrite(BIN1, HIGH);
digitalWrite(BIN2, LOW);
analogWrite(PWMB, 191);
delay(2000);
// Backwards for 3 seconds
digitalWrite(AIN1, LOW);
digitalWrite(AIN2, HIGH);
analogWrite(PWMA, 191);
digitalWrite(BIN1, HIGH);
digitalWrite(BIN2, LOW);
analogWrite(PWMB, 191);
delay(3000);
}
Code Loop Final Part 3

else {
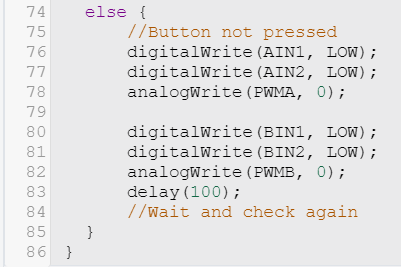
//Button not pressed
digitalWrite(AIN1, LOW);
digitalWrite(AIN2, LOW);
analogWrite(PWMA, 0);
digitalWrite(BIN1, LOW);
digitalWrite(BIN2, LOW);
analogWrite(PWMB, 0);
delay(100);
//Wait and check again
}
}
Final Code Set Up


int AIN1 = 13;
int AIN2 = 12;
int PWMA = 11;
int BIN1 = 8;
int BIN2 = 9;
int PWMB = 10;
//We than create an integer value for the button and assign it a value of 2
int button = 2;
int buttonval;
void setup()
{
// Set up Motors
pinMode(AIN1, OUTPUT);
pinMode(AIN2, OUTPUT);
pinMode(PWMA, OUTPUT);
pinMode(BIN1, OUTPUT);
pinMode(BIN2, OUTPUT);
pinMode(PWMB, OUTPUT);
// Set up Button
// Helps detect when button is pushed
pinMode(button, INPUT_PULLUP);
Serial.begin(9600);
}