Easier, Quieter DIY Tent Swamp Cooler — No Electrical Work, ~$225, 2-3 Hours
by alexdegtiar in Outside > Camping
30 Views, 0 Favorites, 0 Comments
Easier, Quieter DIY Tent Swamp Cooler — No Electrical Work, ~$225, 2-3 Hours
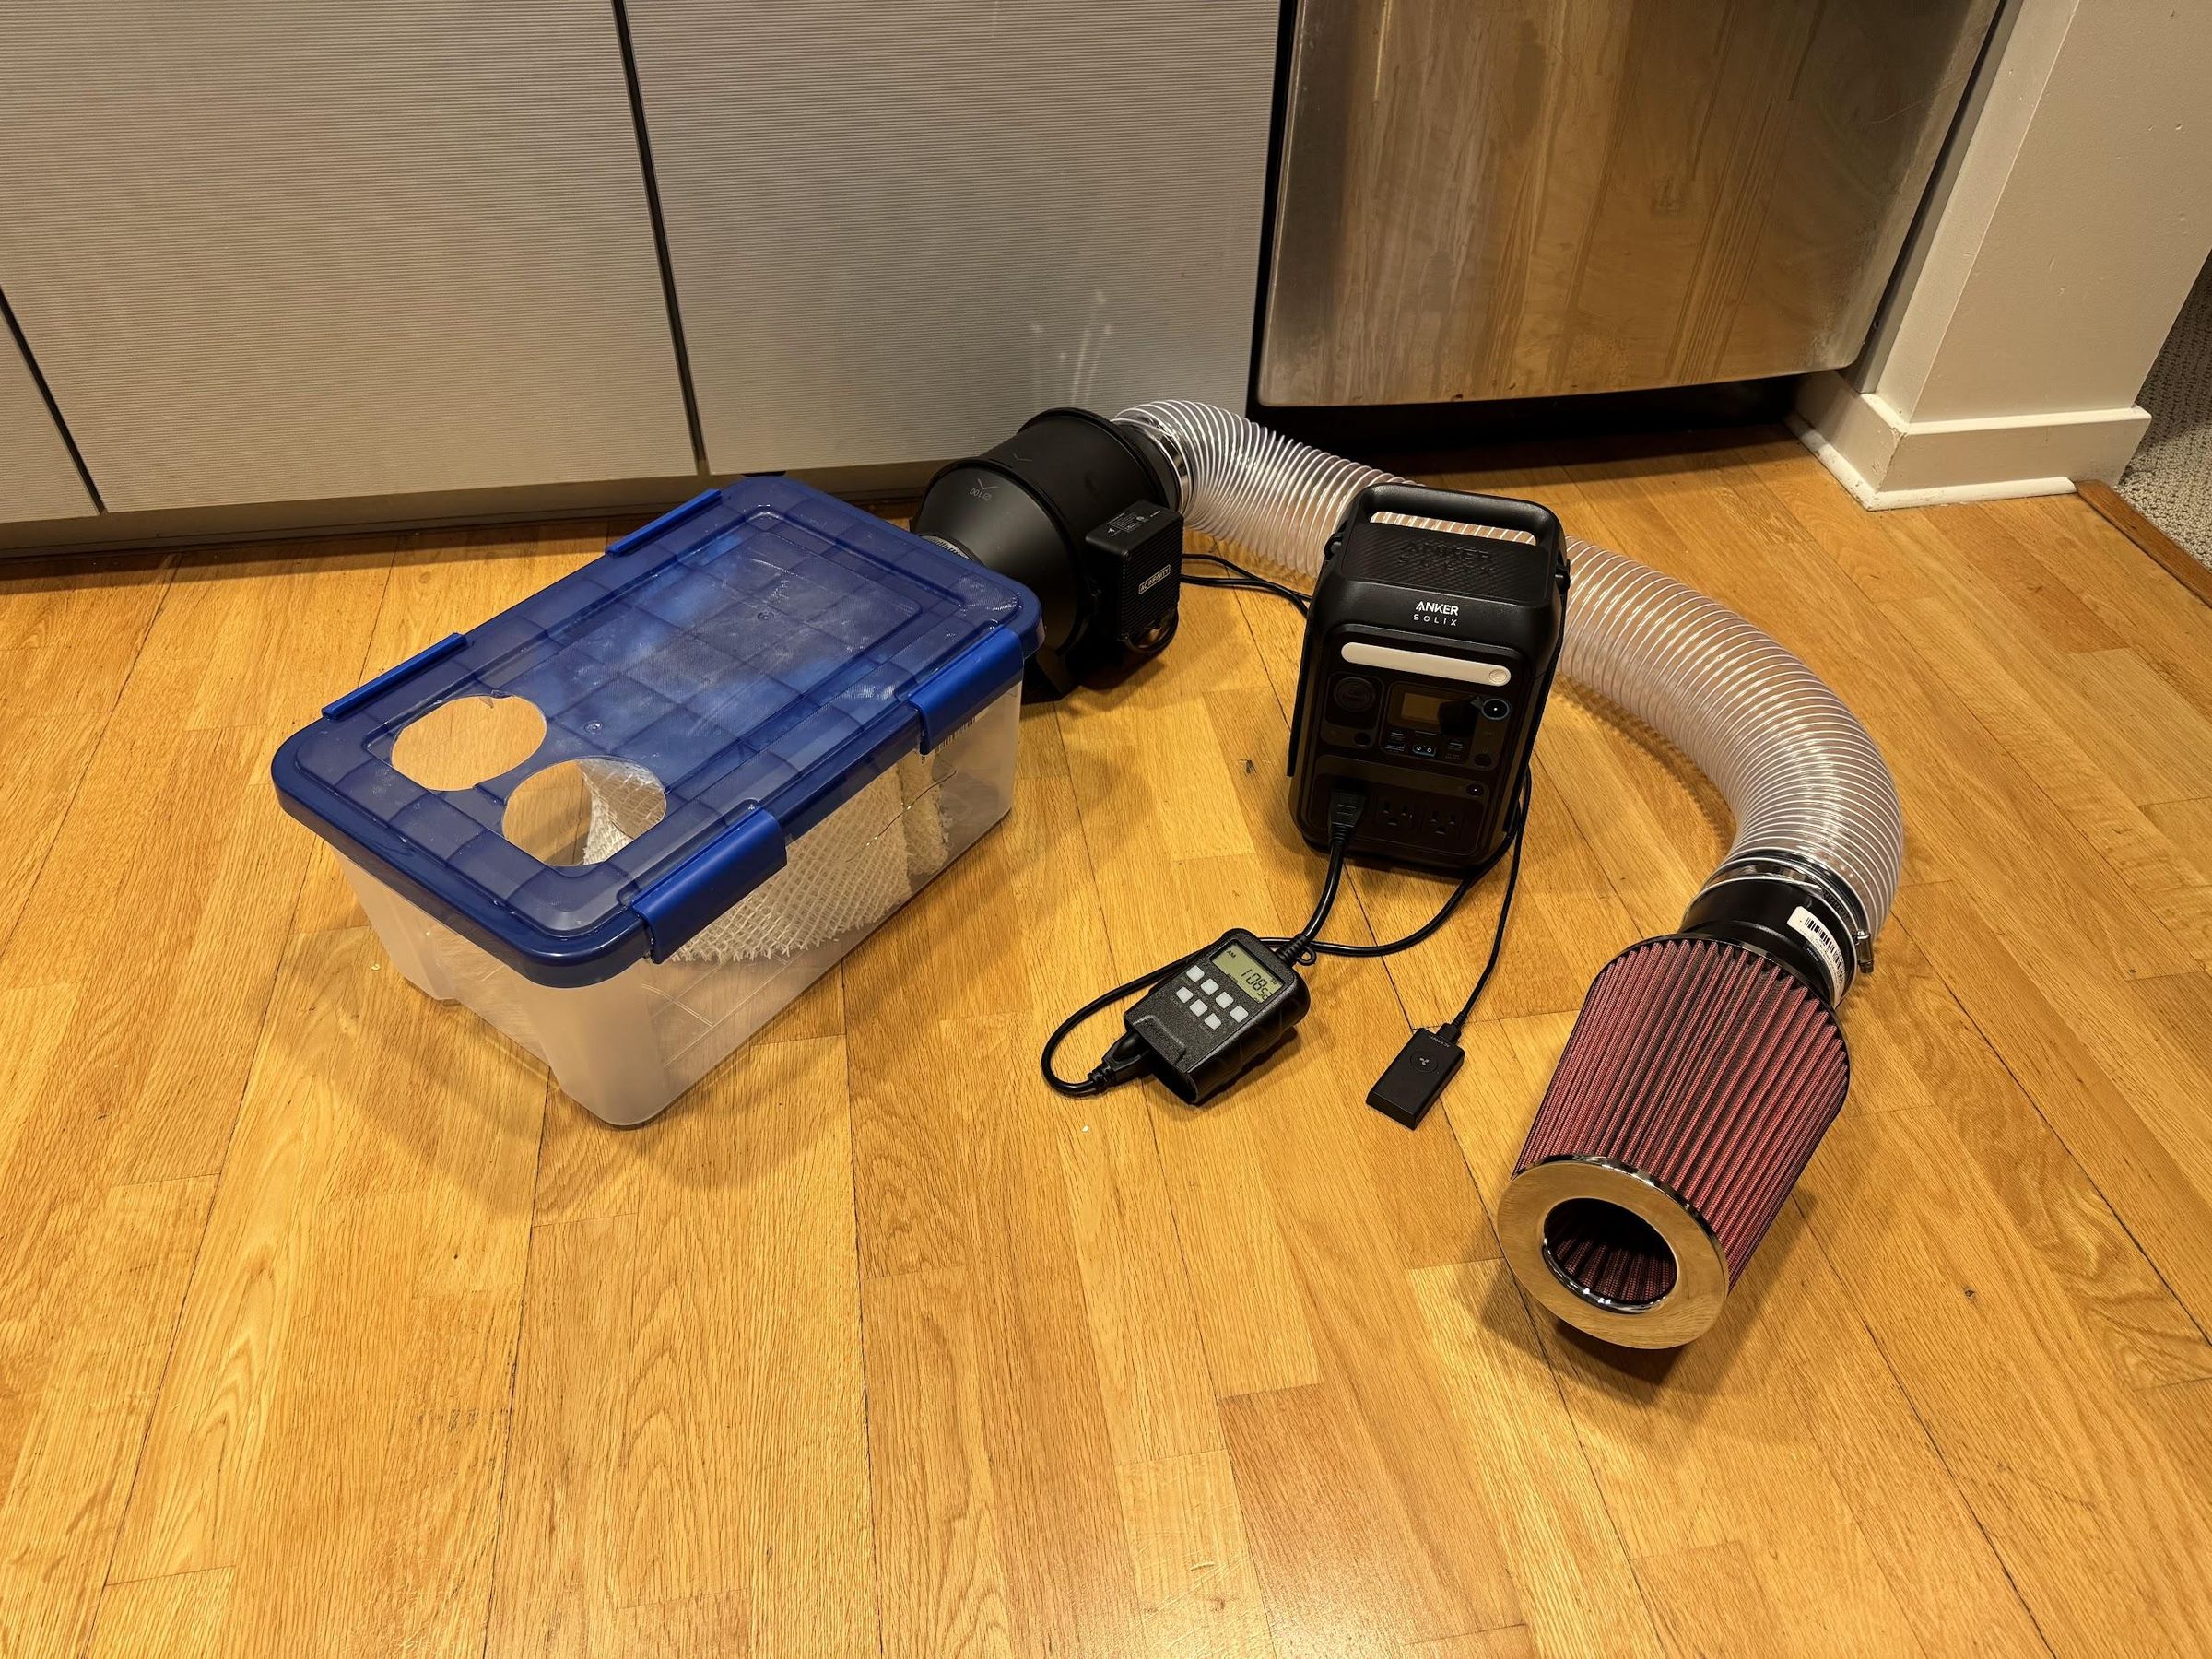
This is a quieter, much easier build of the classic Yurt Cooler — the DIY evaporative cooler a lot of Burning Man camps run — with all of the soldering and 12V wiring removed. If you have built one, or been put off by the wiring, that is the change: one part swap does it.
Outside air is pulled through a washable cone filter, pushed by a quiet inline duct fan into a plastic tote of water-soaked humidifier wicks, and discharged into the tent as cool, humid, filtered air. The tent runs at slight positive pressure, which also helps keep dust out.
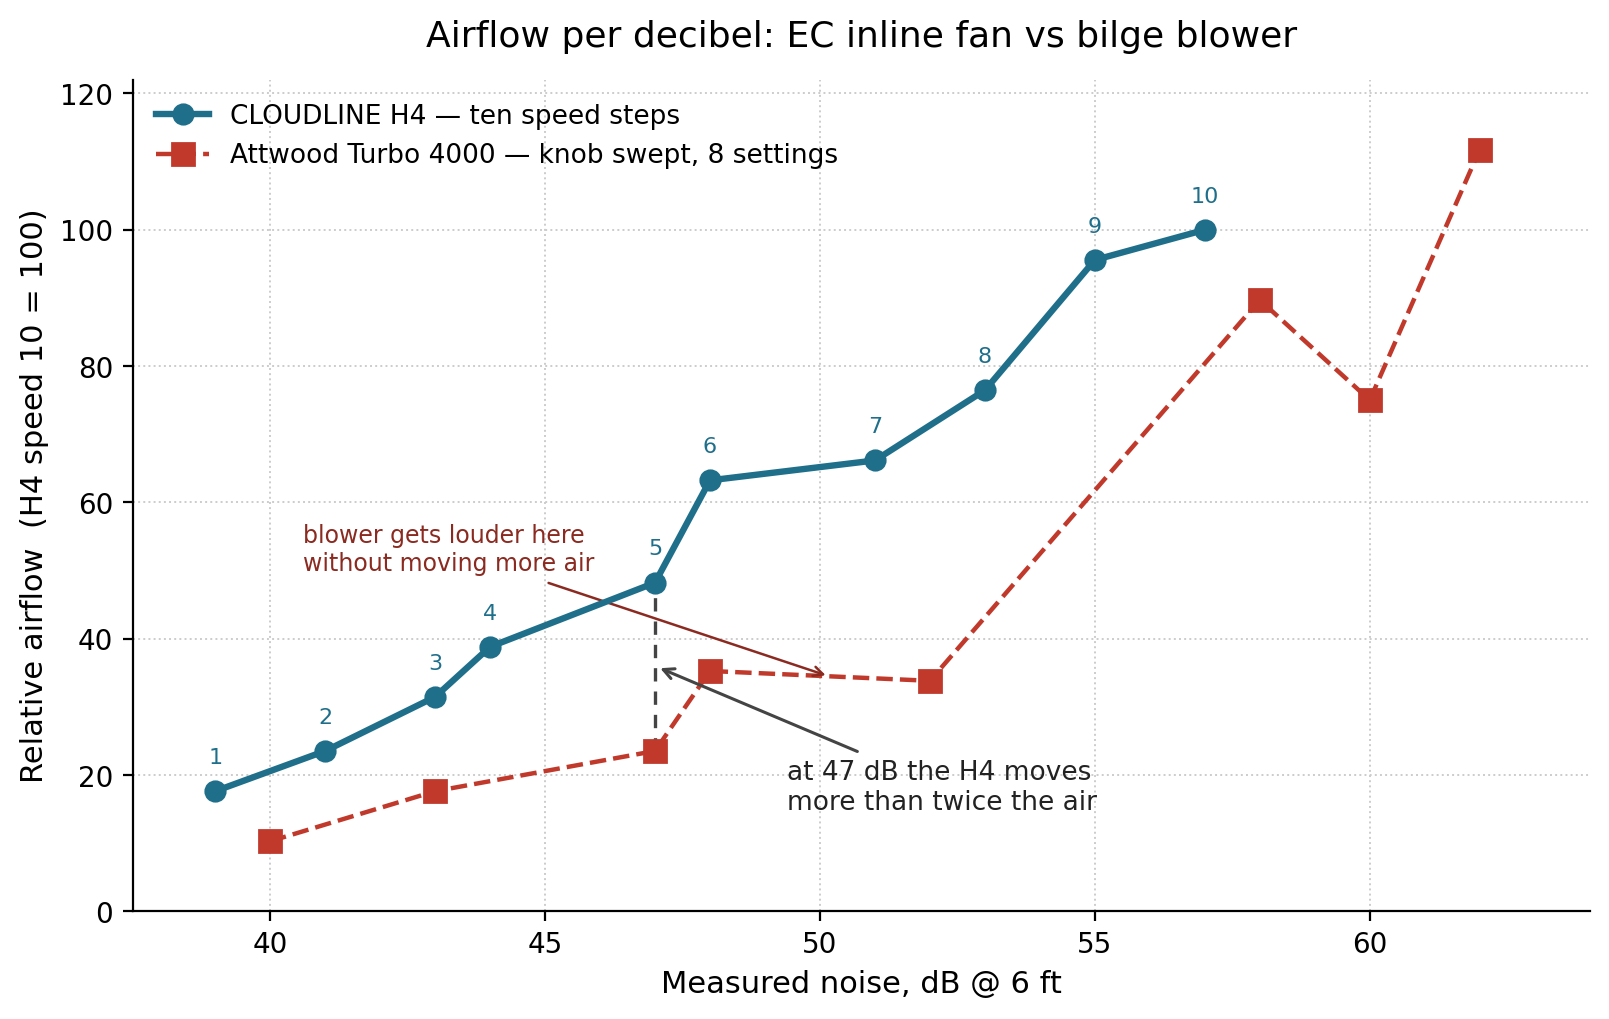
The cooling itself is unchanged from the original — same wicks, same water, same geometry. What v3 changes is the build and the noise. The build is now a hole saw and hose clamps, 2-3 hours, no electrical work at all. And measured against the original 12V blower on the same cooler, the duct fan moves 80-105% more air at the same measured noise.
About $225 without a power station.
Every raw reading and the method behind it, including its known weaknesses: Experiments
Downloads
Supplies
Prices are August 2026 US sourced, before tax.
Needed
- AC Infinity CLOUDLINE H4, IP65 version — $99. Buy the humidity-proof H4, not the PRO S4: same platform, IP65-sealed motor, slightly quieter.
- AC Infinity Noise Reduction Clamp, 4" — $14. Nitrile rubber coupler. Joins fan to tote wall, seals it, and kills vibration. Includes 2 worm clamps.
- 4" cone air filter, 102 mm neck — $21. Washable automotive intake filter.
- 4" x 10 ft PVC dust-collection hose — $27. Wire-reinforced; the soft cuff ends grip 4" collars tightly. Includes 4 worm clamps.
- 4" hose connector — $10. Rigid sleeve adapting the hose end to the cone filter's neck.
- IRIS USA 19 Qt WeatherPro tote, model 500199 — $15. The cooler body, holds ~5L. Use this exact tote if you can: its geometry wedges the filter and wicks just right. Substitutes work, but check the wick fit before you cut anything.
- Humidifier wick filters, HWF75 / “Filter D” — $27. The evaporative media; one set lasts the week. Any HWF75-compatible wick works.
- Stainless steel wire, 20 ga (0.032" / 0.8 mm) — $10. Forms the rack holding the wicks upright. ~38" needed; 18-20 ga is the useful range.
- Power station with an AC inverter, ~288 Wh — $260. Any similar unit works. It must have an AC inverter — this build runs on 120V. 288 Wh is the minimum I'd use. A larger capacity battery gives you more buffer for hazy weather, poor orientation, heavier fan use, and for other devices.
About $223 without the power station, about $483 with it.
Nice to have
- Outlet digital timer — $16. Digital, not mechanical, so it does not tick. This is what cools the tent before you wake up.
- Flexible 4" caps, 2-pack — $14. Transport and storm caps for the fan openings.
- Solar panel, 11-28V, XT60.
- 100W (minimum) $65. 200W (comfortable) $160.
- Overprovisioning above the battery's 100W input limit is safe and allows it to charge better in poor conditions.
- Keep panel voltage inside the 11-28V window, including open-circuit on cold mornings.
- Fine-dust filter media — $13. Taped over the power station's vents to keep dust out of the internals.
- Waterproof travel bag for the power station — $33. Unzip the front and sides while it runs.
- 1+ gallon water jug — $16.
Tools
- Drill, plus a 4" hole saw (fan opening) and a 3.5" hole saw (lid vents)
- Small bit, ~5/64", for the wire-rack holes — also handy to pre-drill a pilot for each hole-saw cut
- Coarse sandpaper, 80-120 grit, to smooth the cut edges; a finer pass afterwards is optional
- Box cutter or utility knife, to trim saw artifacts off the lid and cut the hose to length
- Wire cutters, for the hose's steel helix and the stainless wire
- Flathead screwdriver or 5/16" nut driver for the worm clamps — bring this one to the playa
- Permanent marker, for the fill line
- Eye protection and an N95 or better while cutting: you are making airborne microplastics
- Something to catch and clean up the plastic swarf, so none of it becomes moop
Cut the Holes
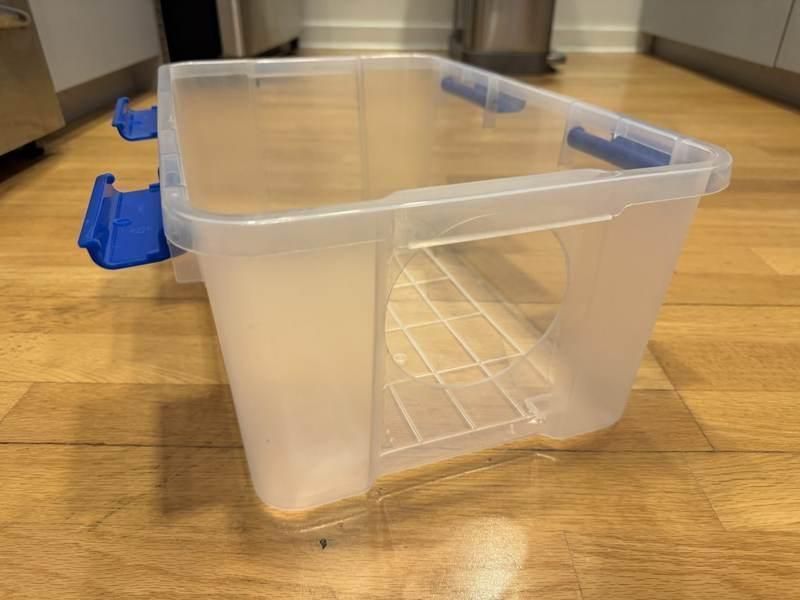
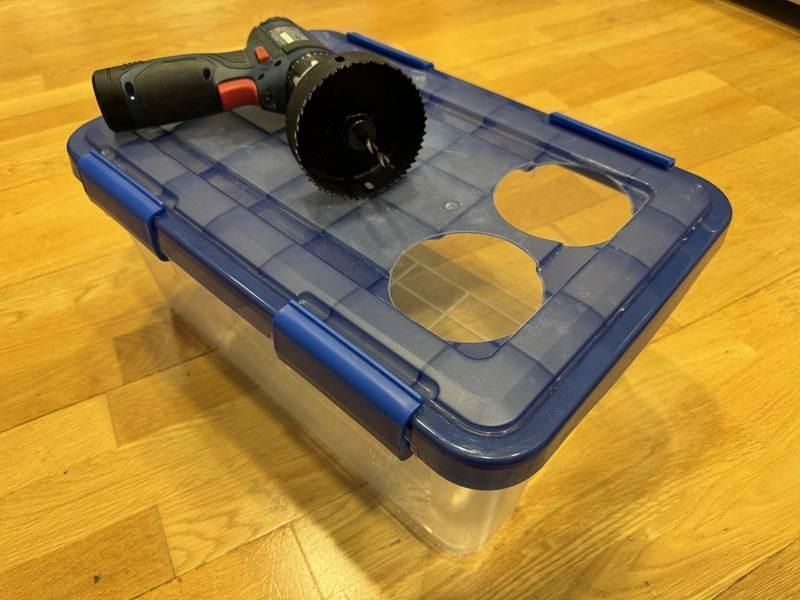
Cut one 4" hole in an end wall of the tote for the fan. Put it as high as you can while still clearing the lid — everything below it is water capacity. Go slowly at the end of the cut: the disc can catch in the saw and jerk your hand.
Cut two 3.5" holes in the lid at the opposite end. This is where the cooled air leaves.
Sand every cut edge smooth. This is not just cosmetic — a clean edge is what lets the rubber coupler seat and seal in the next step. Trim any big saw artifacts with a box cutter first.
Build the Wire Rack
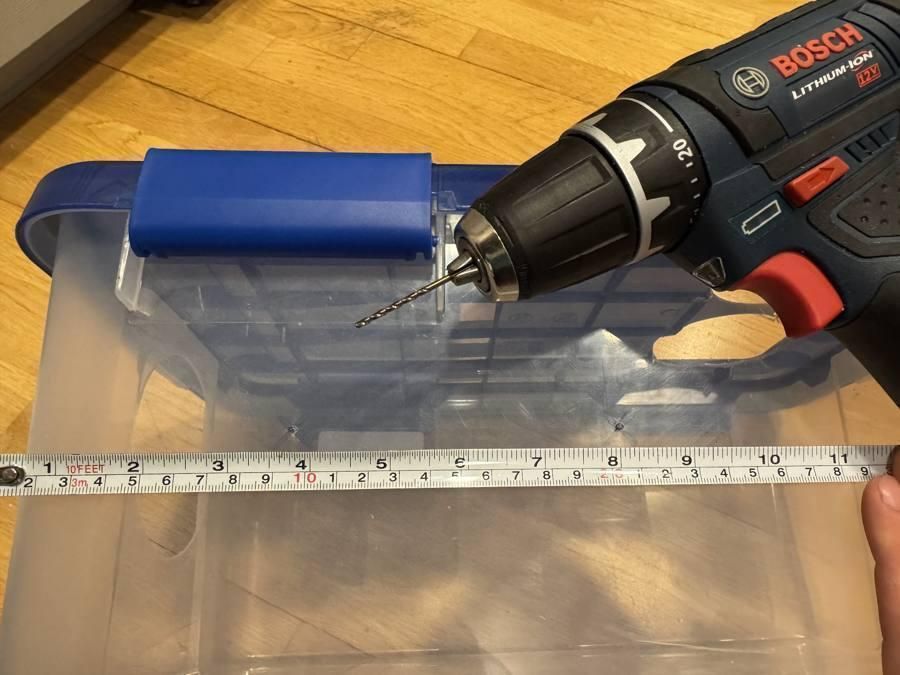
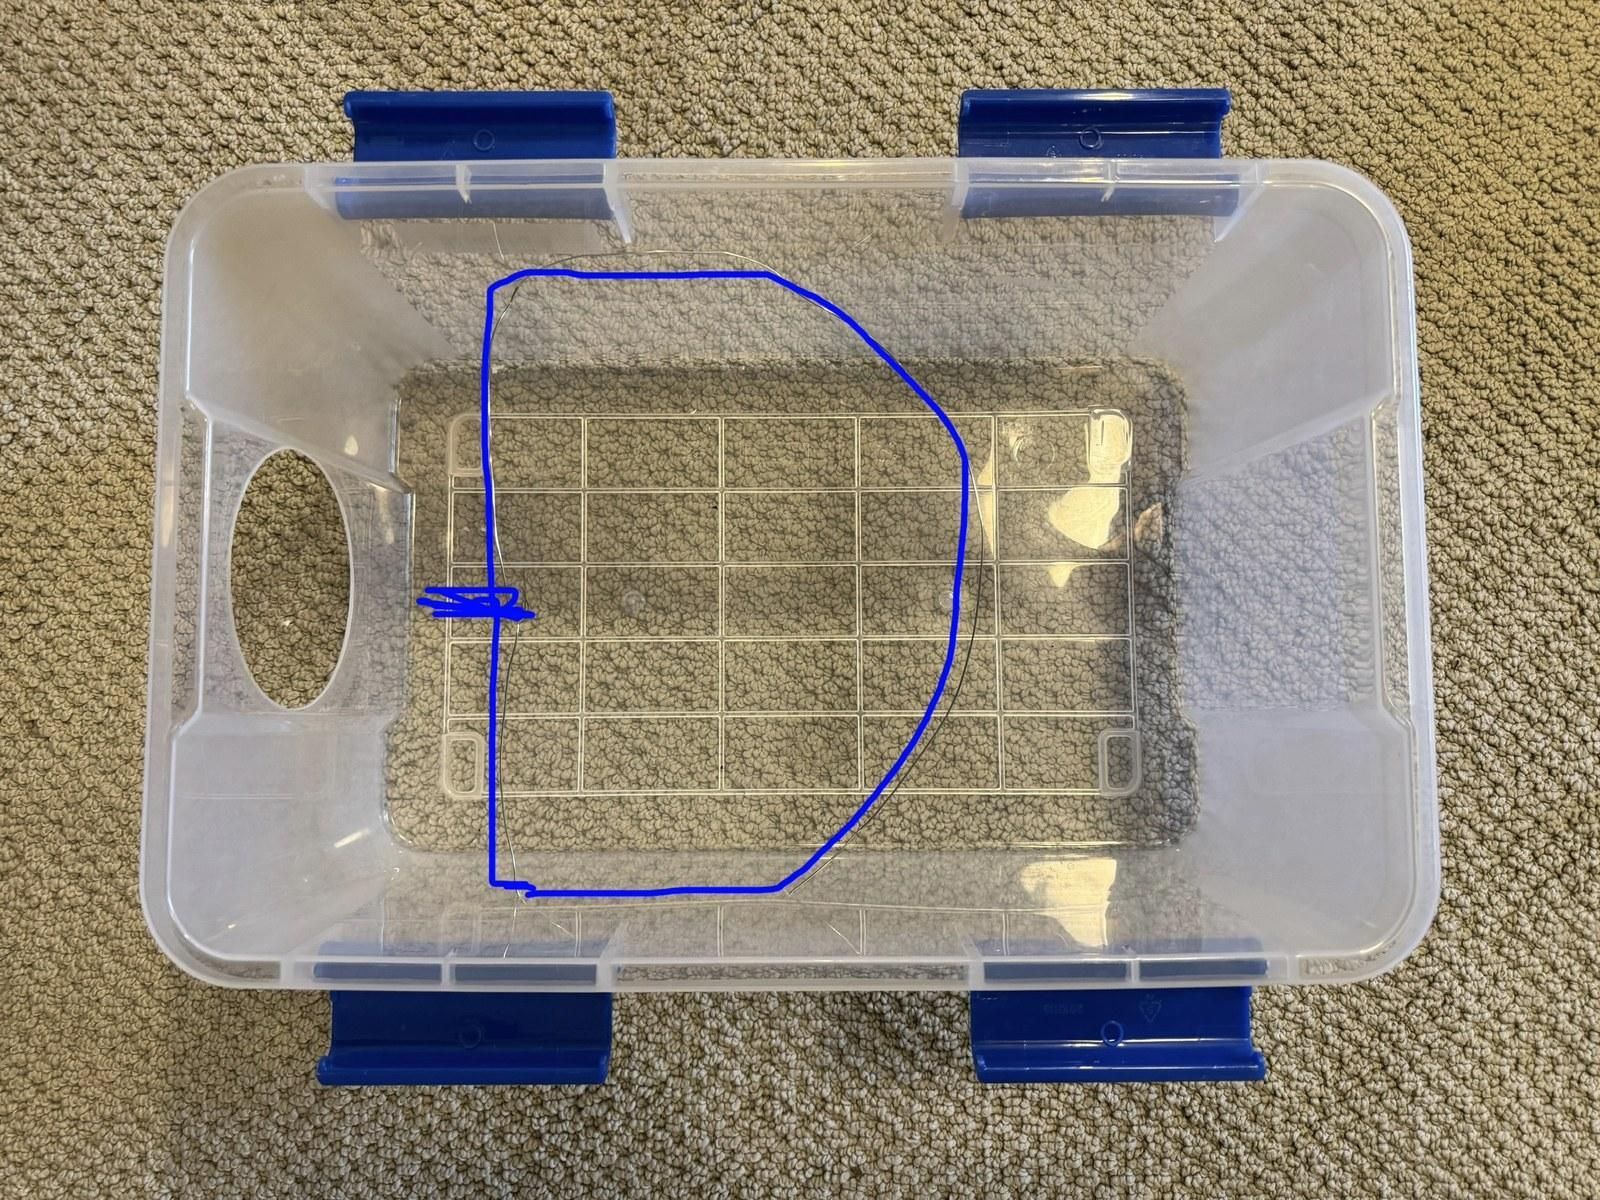
The wicks need to stand upright across the airflow, and this wire holds them there.
On each long wall, drill two ~5/64" holes roughly 3.75" and 8" from the vent end. Thread about 38" of stainless wire through them to form a D shape: straight along the walls, curving around the vent end. Twist the ends together on the intake side to hold the shape.
Cut and Fit the Wicks
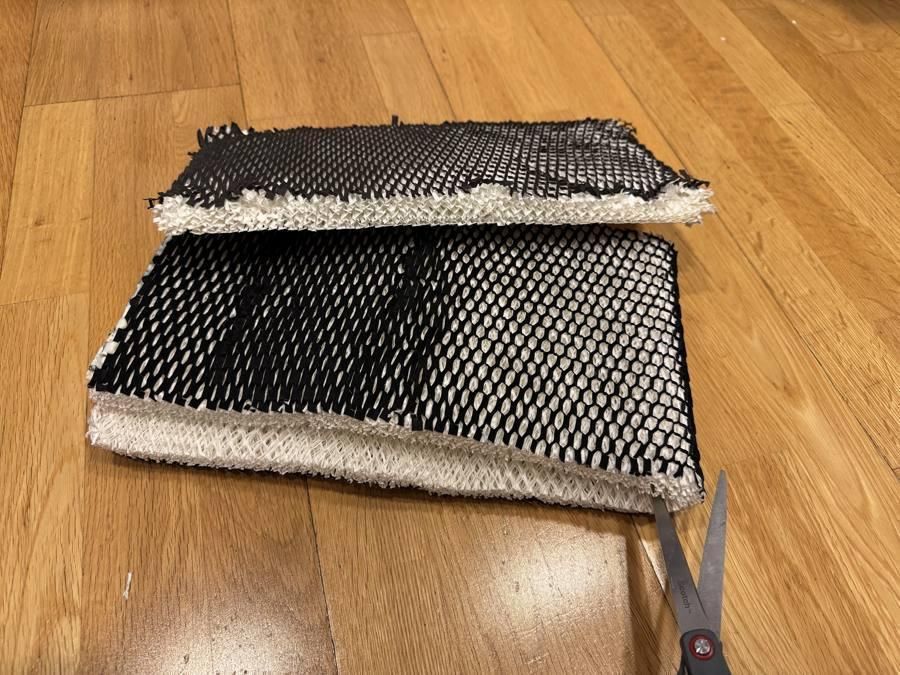
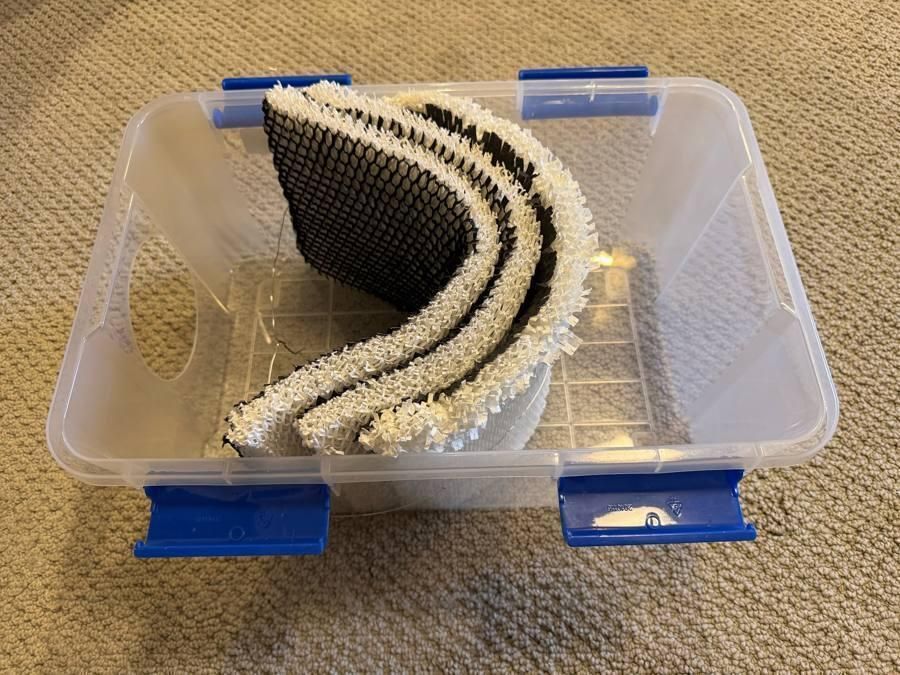
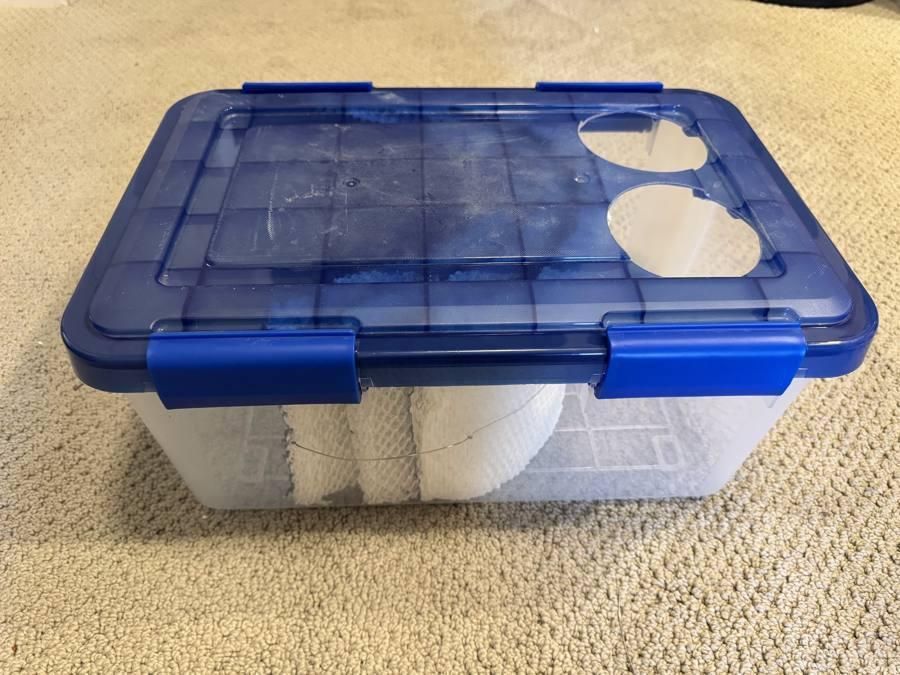
The wicks arrive as closed loops. Cut each one in half into flat sheets — a 2-pack gives you 4, and the build uses 3.
Stand them inside the wire, following the D so they press against both walls. This matters more than it looks: any gap at the edges is air bypassing the media entirely, and bypassed air is not cooled air. Press them up tight against the lid ceiling for the same reason.
Keep the vent end clear so the last wick does not sit under the lid openings and block them.
Mount the Fan
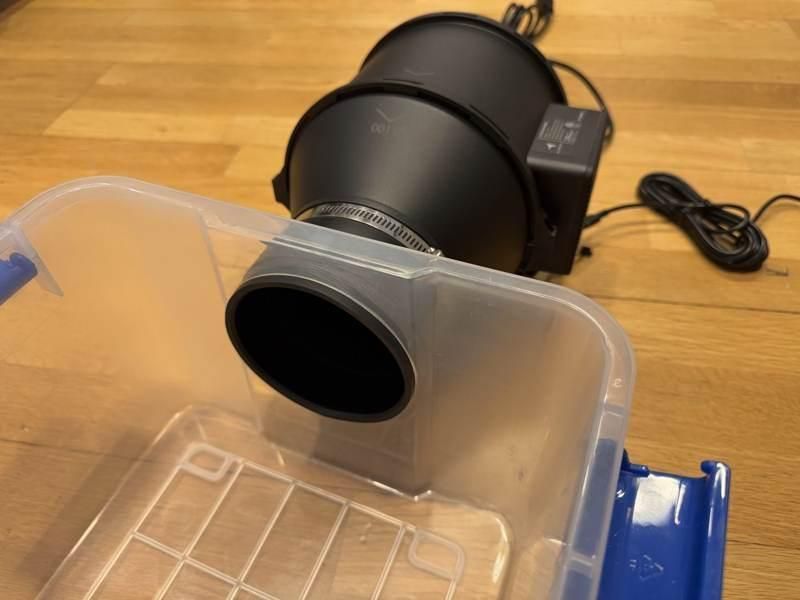
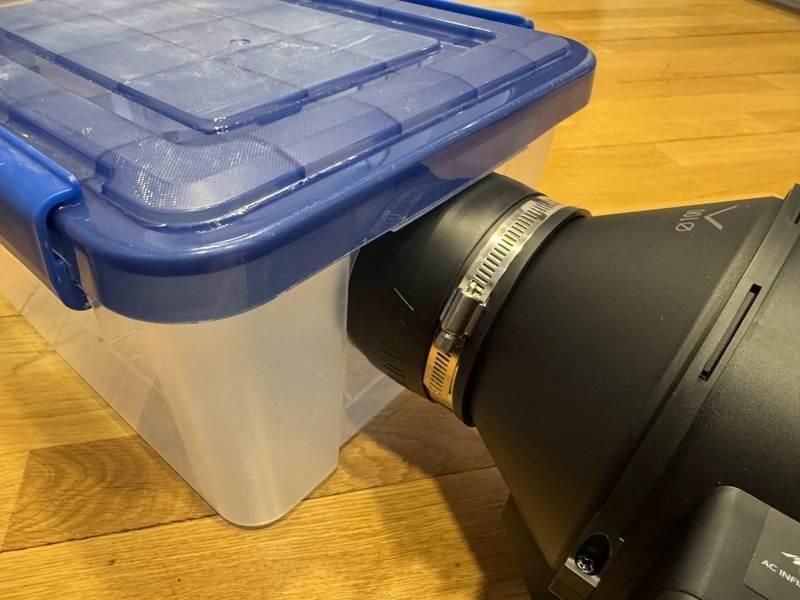
Seat the Noise Reduction Clamp into the wall hole, then clamp the fan's discharge collar into it. That rubber sleeve is the gasket, the vibration isolator and the mount all at once — it is most of why this build is quiet instead of rattly.
Check the airflow arrow on the fan housing. It must point INTO the tote.
Intake Hose and Filter
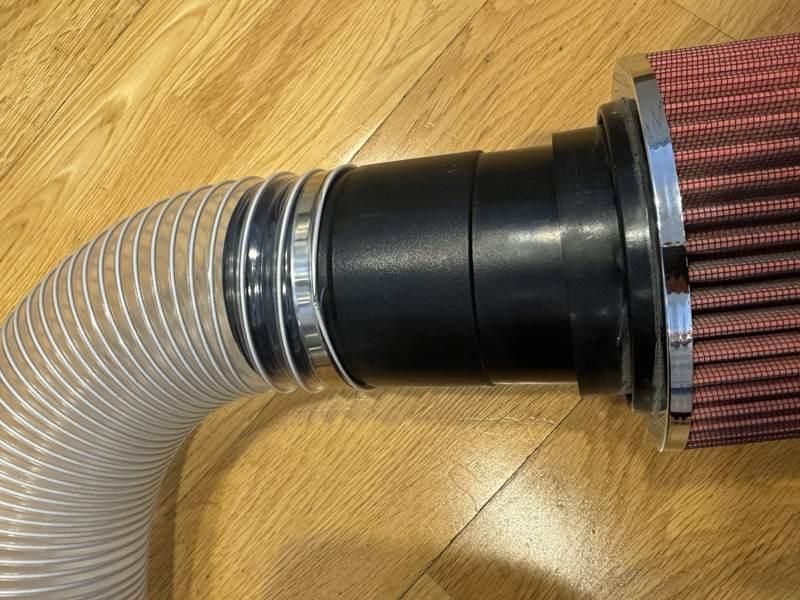
Cutting the hose is optional; I cut mine to about 5 ft. Run it stretched rather than accordioned, and never leave it twisted or kinked.
Cuff the hose over the fan's intake collar and add a stainless clamp over the cuff. The interference fit plus the clamp is dust-tight — no tape needed.
Join the other end to the cone filter with the 4" connector: seat the connector in the cone's neck, cuff the hose over it, clamp both.
Keep the filter outside the tent and off the ground, on a crate or a spare tote, so you are not sucking up ground dust.
Through the Tent, and Finishing
The hose passes through the tent door zipper — zip the door around it — or through a zipper-mounted vent plate if you want a proper seal. The tote and fan sit INSIDE the tent; only the hose and cone filter live outside.
For exhaust, crack one ceiling vent flap, sized modestly so the tent still holds slight positive pressure, ideally at the opposite end from the cooler. Cooled air has to have somewhere to go or you are just adding humidity to a closed box.
At the first fill, mark the water line on the tote wall: just below the fan opening, about 5L in this tote. Keep the power station, timer and plugs out of the tote's spill path, and unplug the fan before filling or moving it.
If your power station has a power-saving or AC auto-off setting, turn it OFF. Otherwise the inverter drops the fan under light load and no timer will bring it back. If using the Solix C300, use the Anker app to turn these off.
Transport and Daily Use
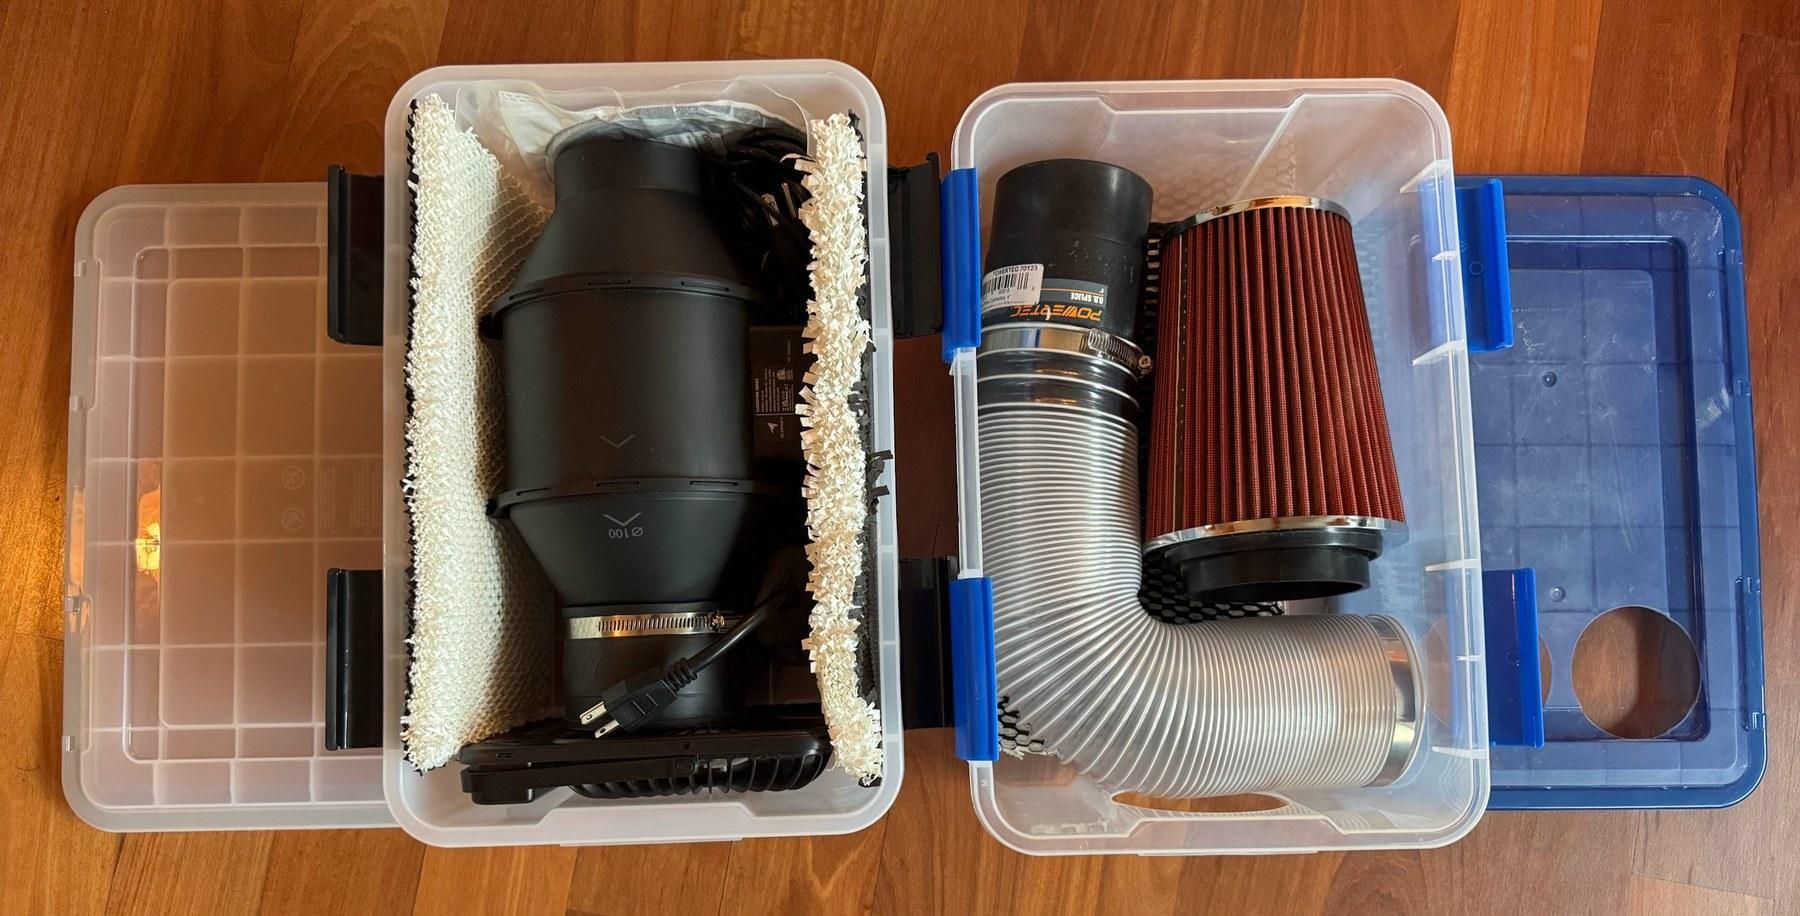
Everything packs into the cooler tote plus a second tote the same size: fan, wicks, cords and timer in one; hose and cone filter in the other, coiled loosely and never creased.
The routine that works for me: a plug timer starts the fan at 6:30am so the tent is cool before I wake up, speed 5 while I am around, speed 1 as a filtered dust-positive trickle when I am out, off in the evening. Refill to the marked line when you get home.
Budget 1-2 gallons of water a day, and plan on recharging the power station daily — a > 100W panel covers roughly a day's use in clean sun, and camp shore power refills it in 1-2 hours. I bring a 200W to buffer for dusty days and poor panel positioning.
One last thing: there is no internet on playa. Download the PDF attached to the intro before you leave, so the build notes and the troubleshooting list are on your phone when you actually need them.
Downloads
What I Measured
One instrumented session, both fans on the same cooler with the same wet wicks, minutes apart, plus separate battery-rundown tests.
Airflow versus noise: across 43-53 dB the duct fan moved 80-105% more air than the bilge blower at the same measured noise; at 47 dB, an exact match, more than double. The blower is also not monotonic — some of its settings buy more noise without more air.
Saturation efficiency: about 80% (±15), with no trend I could resolve across all ten speeds. I expected faster air to come out less cold. It didn't. So cooling scales with airflow, and choosing a speed is a noise-and-power decision rather than a cooling-quality one. Honest caveat: two identical speed-5 runs two hours apart read 70.8% and 87.2%, so treat 80% as approximate — that spread is larger than any difference between speeds.
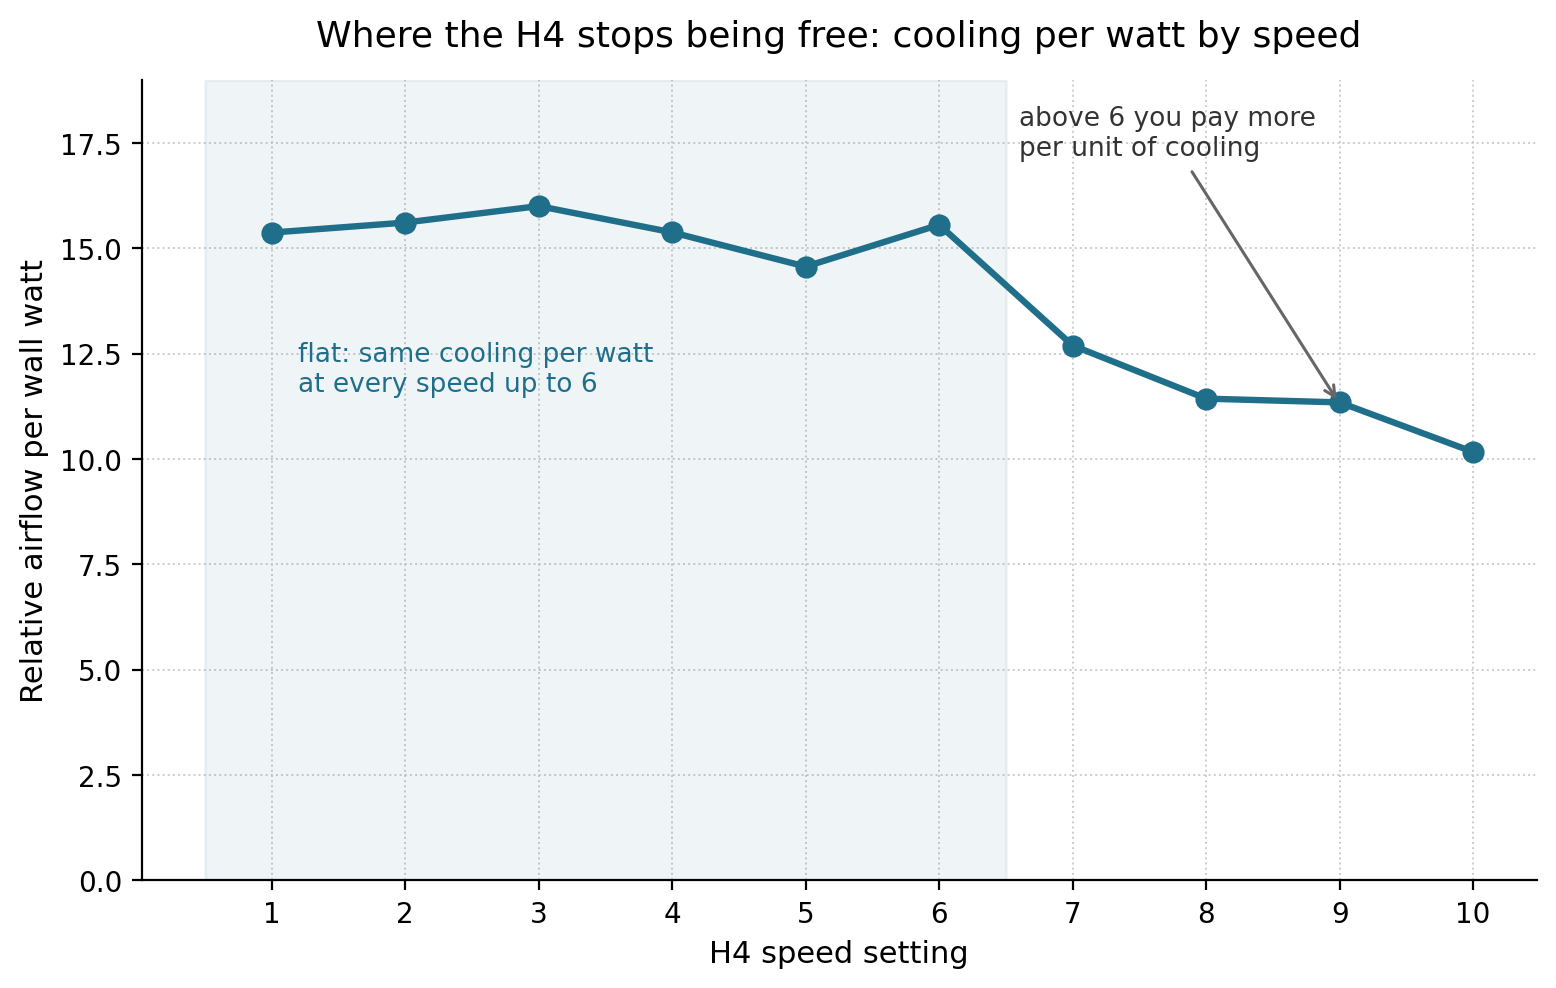
Power and runtime: 3 / 9 / 28 W at the wall at speeds 1/5/10, giving about 25 / 13 / 7 hours on a 288 Wh pack, at 39 / 47 / 57 dB measured at 6 ft. Speed 1 sits at my room's noise floor. Airflow per watt is flat from speed 1 through 6 and then falls off, so the bottom half of the dial is effectively free to choose between.
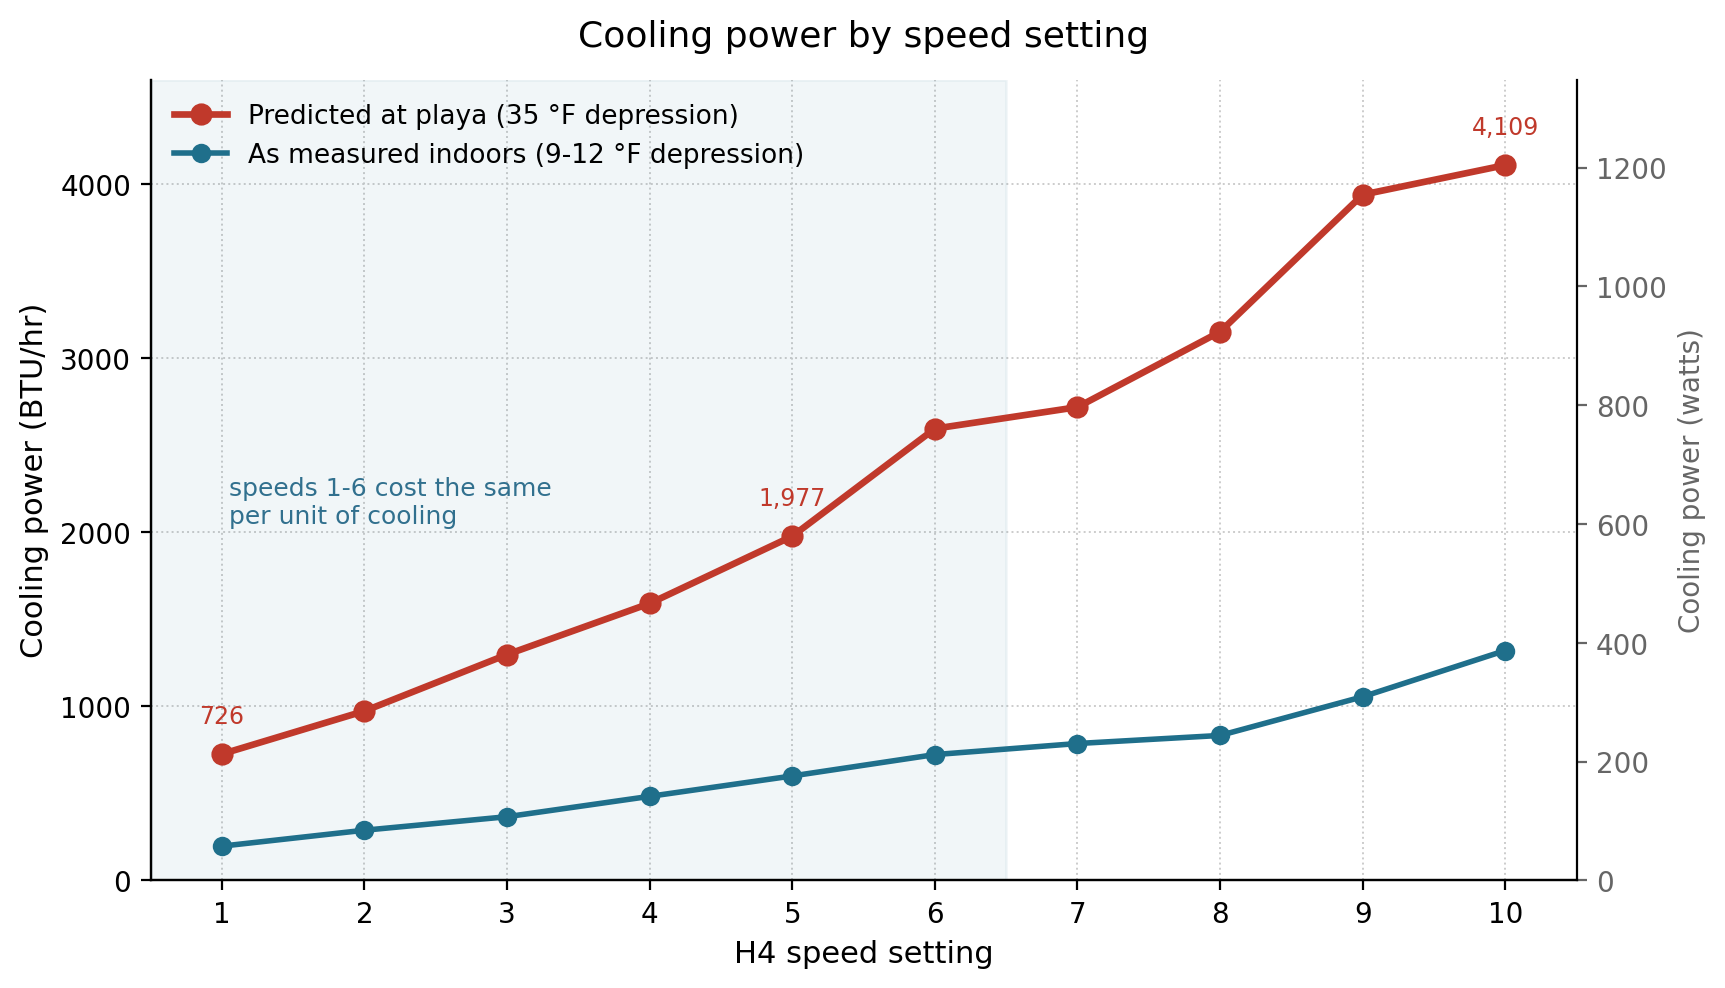
Converting that airflow into cooling output: at a playa-like 35°F wet-bulb depression, speed 5 works out to roughly 2,000 BTU/hr and speed 10 to about 4,100 — call it 14 and 28 pounds of ice melting per hour, from a fan drawing 10 to 30 watts. The energy comes from the water and the dry air, not from the fan.
Absolute CFM is a manufacturer-anchored ballpark only, roughly ±30%. My hot-wire anemometer read about 5x low against the fan's free-air rating, so every airflow comparison here is a ratio between two readings taken the same way, which survives a constant scale error. The absolute number does not. If you want to check any of this yourself, every reading, the full method and its known weaknesses are in the spreadsheet — attached to this step, and online here.
One result I cannot explain: dry wicks restricted airflow MORE than wet ones, consistently, on both fans and at every speed. If you have a theory, I would like to hear it.
Credits and Lineage
This design is a community lineage and none of the evaporative core is mine.
- v1 — the original Yurt Cooler design and wick-filter concept (Luke Allen and Chris Gervang), who measured 13°F below shade temperature in a hexayurt.
- v2.1 — Oskar Arvidsson (oskar@arvidsson.co): moved the cooler inside the tent with the cone filter outside, packed the build into its own box for transport, and went to solar plus a USB-PD power bank.
- v2.2 — Joanna Ma (joanna.m.ma@gmail.com): the no-cut ducted intake for tents you cannot cut a hole in, plus the programmable 12V timer and the on-playa assembly instructions.
- v3 (this build) — Alex Degtiar (alexdegtiar@gmail.com): the CLOUDLINE H4 fan swap and AC architecture, the hose and rubber couplers, outlet-timer scheduling, and the measurements above.