Easy Beginner Video Game [Using Roblox Studio]
by jacksonriley24 in Design > Software
1195 Views, 3 Favorites, 0 Comments
Easy Beginner Video Game [Using Roblox Studio]


Roblox is an online platform that allows users to create games and play them. Roblox Studio uses the coding language "RobloxLua" for its games. Roblox Studio is a great way to start making video games and earning a bit of money off them, it is also fun to play the game you made with your friends! So in this tutorial I am going to show you how to make an interesting parkour game. The best part is its free! It doesn't require any shopping trips or annoying mishaps. All you have to do is download Roblox and Roblox Studio!
The designing in Roblox Studio is pretty similar to a cad software and it would be helpful if you had a bit of experience with cad. If you don't it's ok! this is a great way to learn to make very simple designs!
Supplies
Roblox: https://www.roblox.com/
Roblox Studio: https://www.roblox.com/create
It's all free!!! You can even make money!
Setting Up Your Game (Part 1)

Once Roblox Studio is downloaded, open it up and you should be In a place like this.
Next click "New" and then click "baseplate" -- Circled in orange
Setting Up Your Game (Part 2)

Once it loads it should look something like this^
Now you're going to click "File" -- circled in orange
A drop down menu will appear.
Setting Up Your Game (Part 3)
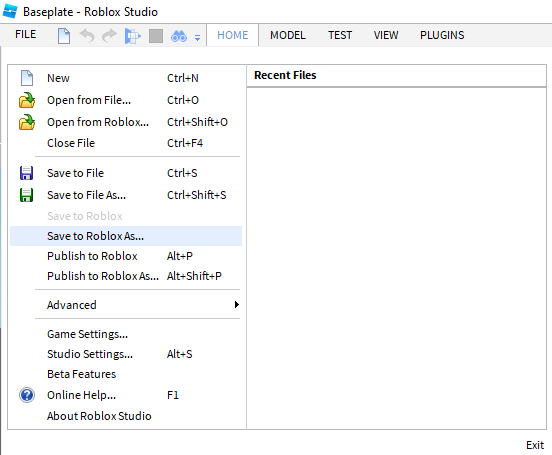
Now click "Save to Roblox as..."
This will pull up a window that says "Basic Info"
Setting Up Your Game (Part 4)
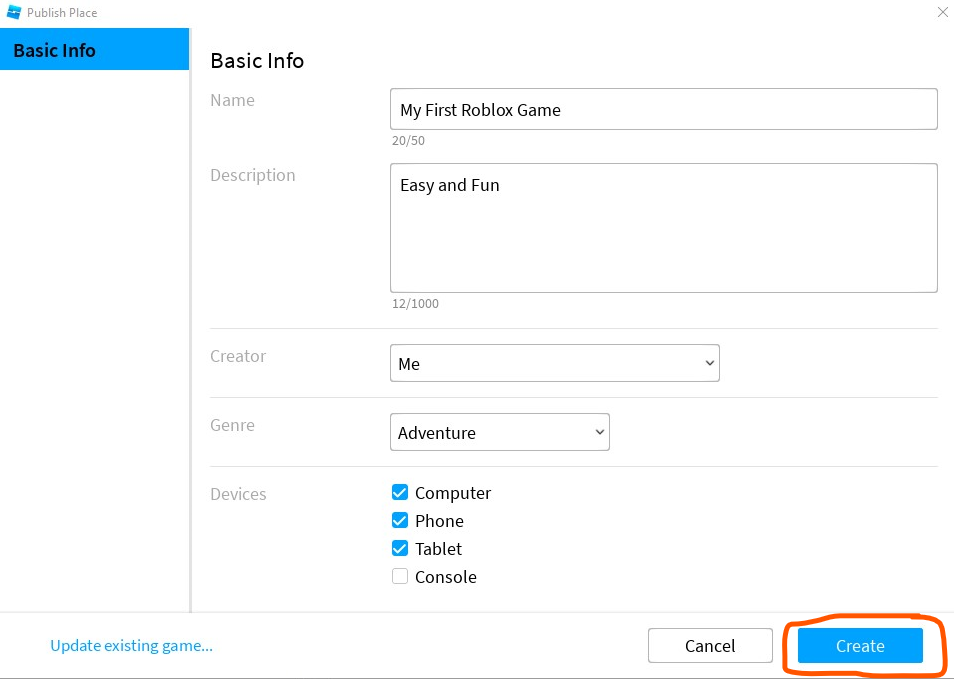
Fill out all the info and click create.
Do not select the "Console" box.
Setting Up Your Game (Part 5)
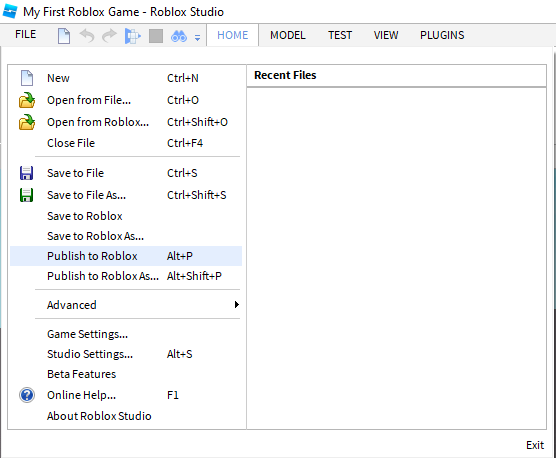
Click "File" in your game again, but this time click "Publish to Roblox" on the drop down menu.
Nothing will appear to happen.
Setting Up Your Game (Part 6)

This part is a bit tricky so pay close attention.
1. Go to Roblox home website: https://www.roblox.com/home
2. Go to "create" -- circled in orange
3. Find the game you made in "My creations" and click the gear with the arrow next to it -- Circled in orange
4. Click "Configure Game" in the drop down menu
This will bring you to a "Configure Game" page
Setting Up Your Game (Part 7)

Once you’re there, change settings to public and enable api services, then hit save.
Now you can go back to your game.
Saving Your Game

As you work on your game you are going to want to save it so your work isn’t erased.
You can do this by clicking "File", and then clicking “save to Roblox”
Do this occasionally like you would on a paper.
Parts

Add parts by clicking "part". Drag them around to rearrange them. Press scaling to change their size.
Tower

First make a giant tower out of parts that is hollow in the center. Make a small entrance at the bottom.
Next change the tower part's specs in the properties box on the bottom right hand corner -- circled in orange
Change the specs to what ever you want.. just play around!
Anchoring
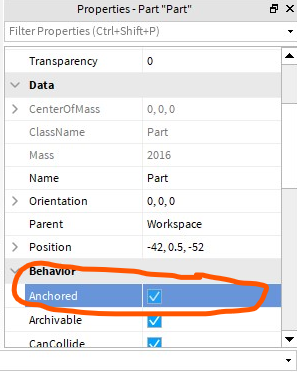
Also you want to make sure all the parts you put in your game are anchored which you can do by scrolling down in the properties and selecting anchored.
make sure to do this to ALL of your parts in your game (including tower)
Spawn Point

Next put the spawn point at the entrance of your tower by
pressing model and then spawn, then drag it to the entrance of your tower.
Make a Leaderboard (part 1)

We made it to the scripting (hard part)!
So to make a leaderboard go to "serverscriptservice" in the "explorer" box on the left of your screen. Hover your mouse over "serverscriptservice" and you will see a small + sign.
Click on that plus sign and a drop down menu will come up. Now click "Script" in the menu. And it will lead you to a blank script.
Make a Leaderboard (part 2)

Then rename the script to “Stats” by right clicking on the script.
Make a Leaderboard (part 3)
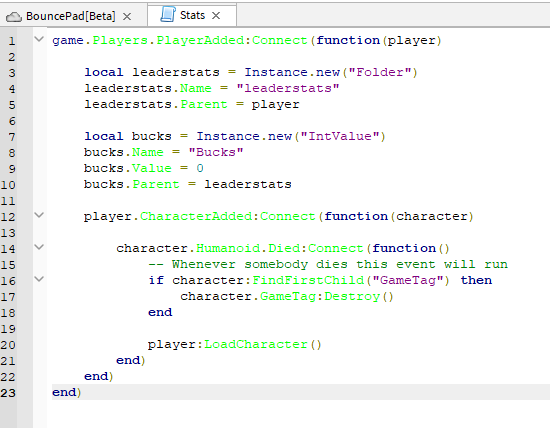
Enter this script into the blank "Stats" script:
game.Players.PlayerAdded:Connect(function(player)
local leaderstats = Instance.new("Folder")
leaderstats.Name = "leaderstats"
leaderstats.Parent = player
local bucks = Instance.new("IntValue")
bucks.Name = "Bucks"
bucks.Value = 0
bucks.Parent = leaderstats
player.CharacterAdded:Connect(function(character)
character.Humanoid.Died:Connect(function()
-- Whenever somebody dies this event will run
if character:FindFirstChild("GameTag") then
character.GameTag:Destroy()
end
player:LoadCharacter()
end)
end)
end)
Testing

Now is a good time to test your game soooooo
go to the top of your screen and click "Play"!
Bounce Pads (part 1)

1st add a part at the bottom of your tower, but don’t cover the bottom fully.
Bounce Pads (part 2)
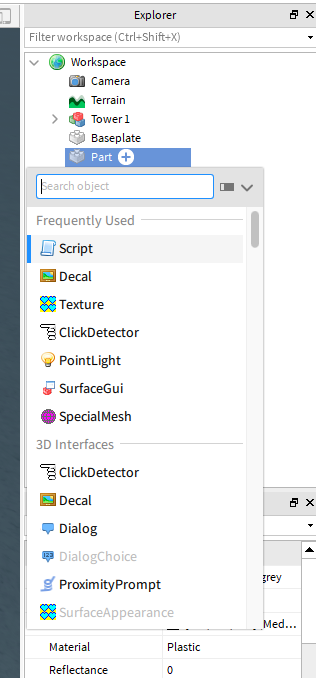
Click on the part you added and it will show up as blue in the explorer. Hover your mouse over it and add a script the same way that you did to the "serverscriptservice".
This will take you to a blank script.
Bounce Pads (part 3)

Enter this script into the blank script:
local
jump = script.Parent
local function jump_pad(otherPart)
local hrp = otherPart.Parent:FindFirstChild('HumanoidRootPart')
local bodyVel = hrp:FindFirstChildWhichIsA('BodyVelocity')
if hrp and not bodyVel then
local newVel = Instance.new('BodyVelocity')
newVel.Velocity = Vector3.new(0,100,0)
newVel.MaxForce = Vector3.new(10000,10000,10000)
newVel.P = 5000
newVel.Parent = hrp
wait(1)
newVel:Destroy()
end
end
jump.Touched:Connect(jump_pad)
Bounce Pads (part 4)

Now make sure your part is anchored as I showed before.
Next, you will need to click on the bounce pad part, then proceed to use Ctrl + D to duplicate the bounce pad.
It will look like nothing has happened, but if you try to move your pad around you will see that there are two separate pads now.
Now you’re going to want to arrange your pads in series up the tower so you can bounce up to the top on them(like in the picture). (Keep using Ctrl + D)
MAKE SURE THEY ARE ANCHORED
Create a Finish (part 1)

Add a part to the top of your tower and stretch it across, then change its color using the properties box, so it looks like an end block.
REMEMBER TO MAKE SURE YOUR PART IS ANCHORED
Create a Finish (part 2)

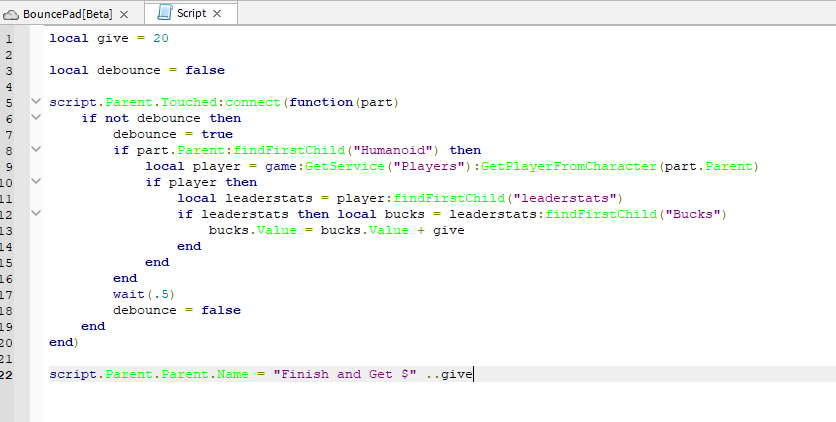
Next add a script to that part as we did to the bounce pads.
Then enter in this script:
local give = 20
local debounce = false
script.Parent.Touched:connect(function(part)
if not debounce then
debounce = true
if part.Parent:findFirstChild("Humanoid") then
local player = game:GetService("Players"):GetPlayerFromCharacter(part.Parent)
if player then
local leaderstats = player:findFirstChild("leaderstats")
if leaderstats then local bucks = leaderstats:findFirstChild("Bucks")
bucks.Value = bucks.Value + give
end
end
end
wait(.5)
debounce = false
end
end)
script.Parent.Parent.Name = "Finish and Get $" ..give
Create a Finish (part 3)

Now add another script to the same part and enter this:
function onTouch(part)
local humanoid = part.Parent:FindFirstChild("Humanoid")
if (humanoid ~= nil) then -- if a humanoid exists, then
humanoid.Health = 0 -- damage the humanoid
end
end
Checkpoint

Your structure should look like this so far.
Obstacles (part 1)
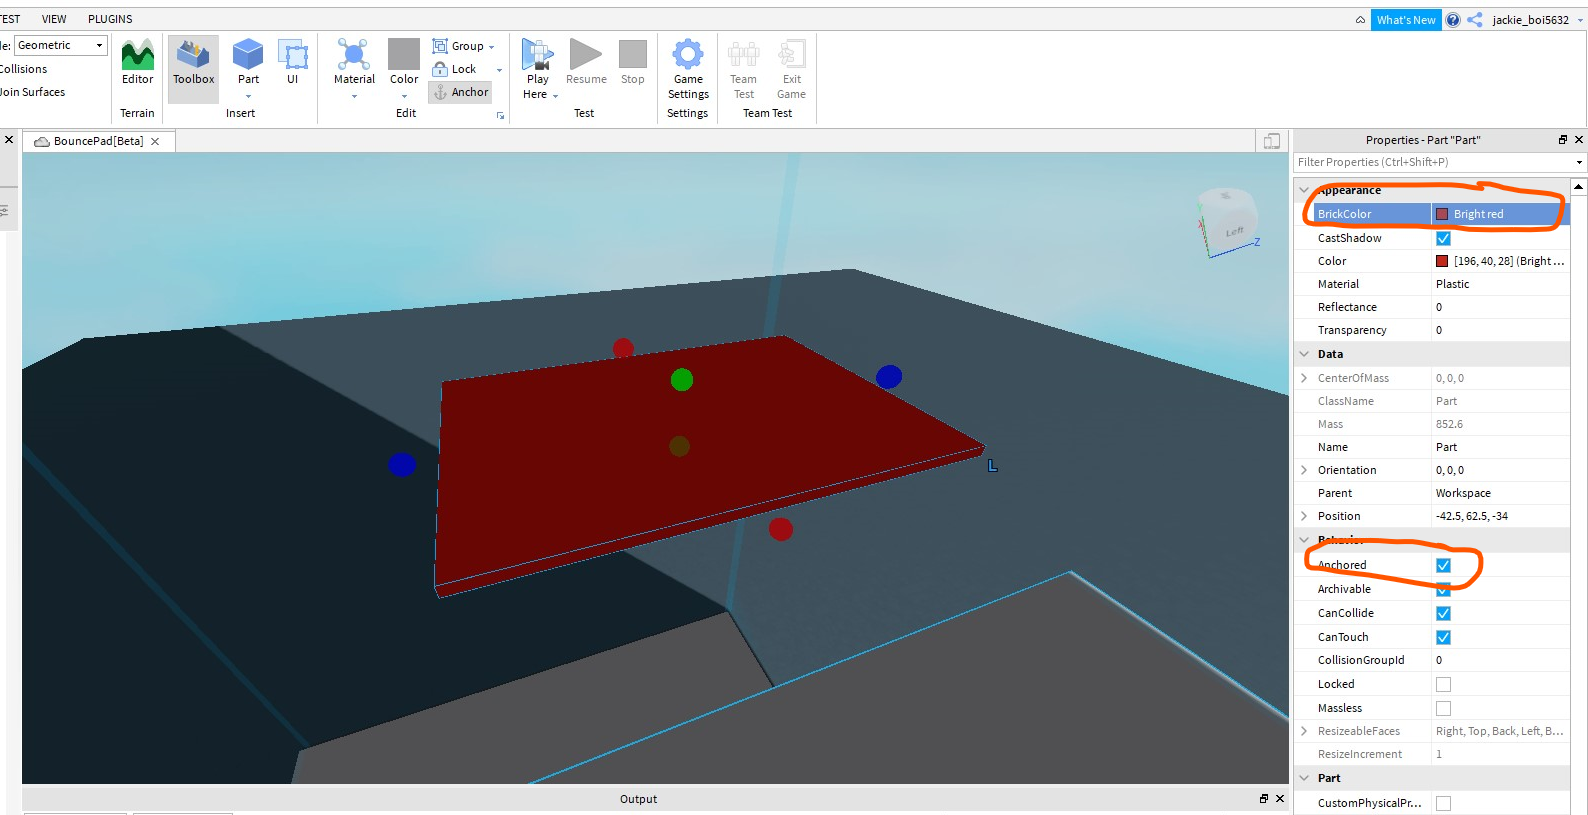
This part will add a little more fun to you course by giving the player something to dodge while bouncing up the tower.
So you're going to want to...
First you will want to spawn a part.
Second you want to anchor that part (circled)
Third you want to change its color so players will know it’s dangerous. (circled)
Obstacles (part 2)

Add a script to this part
Obstacles (part 3)

Enter this code:
function onTouch(part)
local humanoid = part.Parent:FindFirstChild("Humanoid")
if (humanoid ~= nil) then -- if a humanoid exists, then
humanoid.Health = 0 -- damage the humanoid
end
end
script.Parent.Touched:connect(onTouch)
Obstacles (part 4)

First test to see if the killpad you just made works: just step on it, and if you die it works.
Next Duplicate more killpads
And Vola! your tower is complete!
Publish Your Game

Now to publish your game, go to file and Select “Publish to Roblox”
Accessing Your Game

Once you have published your game it is eligible to earn money and is open to the public on the Roblox website.
You can get to your game by going to your profile and then clicking on creations
Going Farther

Now you can make your game better by adding levels and harder/easier courses
And you can also earn robux which you can use on other games or trade them in for real money if you get enough. You can see how much you have by looking at the top right of the Roblox home page.
Happy Scripting!