Easy Customizing of Apple Mail Stationery
by LasVegas in Circuits > Apple
137819 Views, 22 Favorites, 0 Comments
Easy Customizing of Apple Mail Stationery

In this Instructable, I'm going to demonstrate a process to de-gender the Birth Announcement Stationery by adding pink and yellow versions to it. You will need Photoshop or a similar editor to make the graphic changes. It would also behoove you to install Apple's Developer's Tools package from the original Mac OS X Install DVD to use the Property List Editor tool. You can edit the Property List files with a text editor, but it's much less intuitive and elegant...
When Apple first introduced Leopard (Mac OS X vers. 10.5), one of the really neat features was the Stationery feature in the Mail application. They had supplied a number of professionally designed templates making it very easy to send out very cool emails. Some of them even had the ability to change the base color! This was especially important in the "Birth Announcement" Stationery.
At some point over the seven updates to Leopard, the original Stationery were replaced with even better constructed templates. Unfortunately, one of the sacrifices were that fewer of them had the color change feature. Most disappointing is that the "Birth Announcement" is now only available in blue! What if you want to announce a girl? What if you're announcing your new High-Def Entertainment System? You're going to need/want something other than blue!
Last week, I set out to learn how to make my own Stationery files for Mail. Part of the process is to understand how the current stationery works. It a lot easier to modify what's already there than to create new from scratch. The results are also instantly gratifying like we've grown to expect in this day and age.
Locate the Stationery File for Editing...

Stationery for Mail are located in any of three places. Original files are located in the Library folder of the hard drive's main directory. add-on stationery may also be located in your Home folder's Library or the Network's Library. In all cases they follow a like path within the Library. Since there are very few custom Stationery, likely you only have Apple's supplied Stationery in the mail Library. You can find them by following this path:
/Library/Application Support/Apple/Mail/Stationery/Apple/Contents/Resources/
The specific Stationery that we will be editing is located in the Announcements folder following the additional path:
Announcements/Contents/Resources/Baby.mailstationery
Be sure to make a backup copy of this file before editing it. The easiest backup technique is to select the Baby.mailstationery file and select the menu item: Finder -> Compress "Baby.mailstationery". This will copy the original file into a zip file within the same folder. Don't skip this step! If you totally hose the original, you can always recover it with the backup.
Identifying the Pieces...


The Baby.mailstationery file is what Apple refers as a package. It's actually a disguised folder holding all the pieces that define the file.
To access the package right-click (Control-click) the file and select Show Package Contents. Within the contextual menu, you will find yet another Contents folder and another Resources folder within that!
Finally, in the Resources folder we find all the pieces that make up our stationery:
baby_clip.jpg .............. graphic component
banner.jpg ................... graphic component
bbg.jpg ......................... graphic component
bg_pattern.jpg ............ graphic component
bottom.jpg ................... graphic component
content.html ................ layout script
Description.plist ......... file library
English.lproj ............... Localization
Frames.png ................ graphic component
lbg.jpg ......................... graphic component
letter_bg.jpg ............... graphic component
Mask1.png .................. graphic modifier
placeholder.jpg .......... sample photo
rbg.jpg ......................... graphic component
tbg.jpg ......................... graphic component
thumbnail.png ........... Preview
We will need to edit are the files content.html which defines the layout and the Description.plist which identifies all the pieces that define our Stationery. First we need to add alternate versions of every item listed as a graphic component.
Masks are special alpha-channel graphics files used for merging one graphic into another. With a little practice, you can create your own in Photoshop. The placeholder files are usually photographs intended to preview the Stationery before you place your own photo. Finally, the thumbnail is the preview that you select the Stationery from the list of them. These items don't have anything to do with the color scheme, so we'll just leave those alone...
Gender Bending...


Select all of the items labeled as "graphic component" using the Command key. You can either drag the group to Photoshop (or your preferred graphic editor) in your dock, or Right-click (Control-click) any of the selected items and choose "Open With..." to select your graphic editor.
I'm only going to give instructions for Photoshop. If you're using a different graphic editor, you may need to find another technique.
Start with the most complex image to find your color-change technique. The simpler items will follow suit. I chose to experiment with the "Frames.png" file.
To change this blue ribbon to pink only requires manipulation of the Image's Hue/Saturation. Select "Hue/Saturation" in the menu "Image -> Adjustments."
To get a nice Pink, I dragged the Hue setting all the way to -180 and raised the Lightness about 10. You're welcome to tweek these numbers if you don't like the pink I used. Remember these numbers! They will have to be repeated in every file.
Don't save anything yet. Go on to edit the background (bg_pattern) and framing images (bbg, lbg, rbg and tbg) using exactly the same procedure as the ribbon.
Changing Just a Portion of a Graphic...


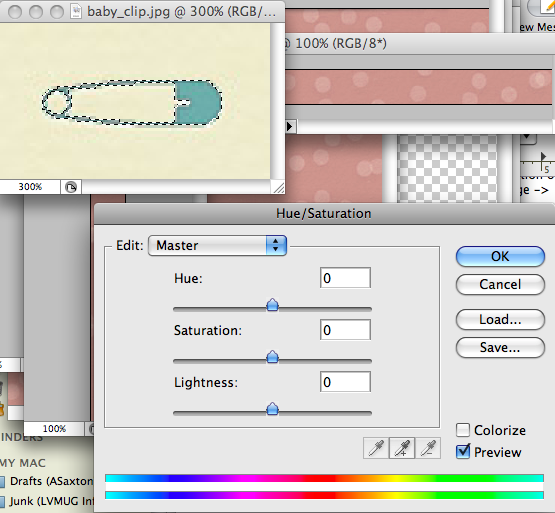

The remaining items are a little trickier to work with. We only want to change the hue of a limited portion of the pictures. We'll do this by selecting only the portions of the picture we want to change and adjusting the hue of only the selected portion. The most difficult will be the baby-clip image, so that's the one we'll start with...
Since the image is relatively small, we'll first zoom the image 300%. Now we'll use the menu item Select -> Color Range... to select the background. Why the background? There's more of it, so it's a lot easier to select. Just click in the background and adjust the Fuzziness so the baby-clip is the only pink area. Now check the box Invert to reverse the selection to get only the baby-clip... Click OK and proceed to apply the same Hue changes as above.
Repeat the same procedure with the "letter_bg" and "bottom" and banner images. These, you'll want to reduce the Fuzziness a bit to sharpen the selection.
Save Our Work...


Now that all the files are colorized, use the menu item File -> Save for Web & Devices... to save each of the jpegs as jpeg (80% quality) with ".pink" before the ".jpg" suffix. Finally save the Frames.png as a 24bit - PNG file, retaining transparency. This is important as JPG doesn't support transparencies.
Before we go any further, use the eye-dropper tool to select the darker pink from any of the jpg files, click the foreground color box and make note of the hexadecimal code for that color. We'll need this to set the font color later. in this case, the color "#c2968d" should be written down.
Before we go any further, use the eye-dropper tool to select the darker pink from any of the jpg files, click the foreground color box and make note of the hexadecimal code for that color. We'll need this to set the font color later. in this case, the color "#c2968d" should be written down.
And Now the Non-gender...


Now we want to create yellow images for those non-gender or multi-gender
situations. Again, we start with the Frames.png file to find our base color change.
Since we've already made a color change, we need to revert to before the change. Fortunately, in all cases, that was just one command ago. We can simply select the menu item Edit -> Step Backward once. Now we simply go back to Image -> Adjustments -> Hue/Saturation again to adjust for our yellow. Now a Hue adjustment of -140 and Saturation to +60 gives us a great yellow... Follow through with the same settings on all files and then save them the same way, but this time use the tag "yellow" as in Frames.yellow.png. Don't forget to grab the test color! In this case "#d0b379" is the color we need to record.
When you're done, be careful not to save any of the Photoshop documents over the original blue graphics. These need to retain their original glory... Close each of the graphic images being careful to select Don't Save for each instance.
Now our resource folder has expanded to 36 files. Don't bother renaming the original graphics files. As long as the name is unique from the other two colors, they'll be fine.
Wait! the Name's Blue Too...

Now that all of our graphics are together, we need to make a tiny adjustment to the content.html file. Currently, it already knows where all the graphics fit, but we're going to want to change the color of the title text. We simply need to add a label for that.
Open the content.html file with your favorite code editor. Personally, I use TextWrangler. If you just don't want to add this free utility to your Mac, you can change the suffix of the file to "txt" and edit it in TextEdit. Be sure to name it back to content.html when you're through.
Checking the Quicklook of the html file, we're going to want to edit the color definition of the Taylor Ethen Andrews line. Looking through the code, we find the following:
<div class="body-title" id="body-title">
<font face="Georgia, Times, serif" color="#71acae" style="font-size:26px;">
<span contenteditable="true" apple-content-name="title" style="display:block;width:361px">Taylor Ethan Andrews
</span>
</font>
</div>
In the <font> definition we want to write down the "#71acae" color code and add and identifier to the line so the color can be changed. To do so, we simply add the text class="title-font" to the end of the <font> definition.
<font face="Georgia, Times, serif" color="#71acae" style="font-size:26px;" text class="title-font">
That's it! Save the file and on to the next step.
Now the Hard Part…


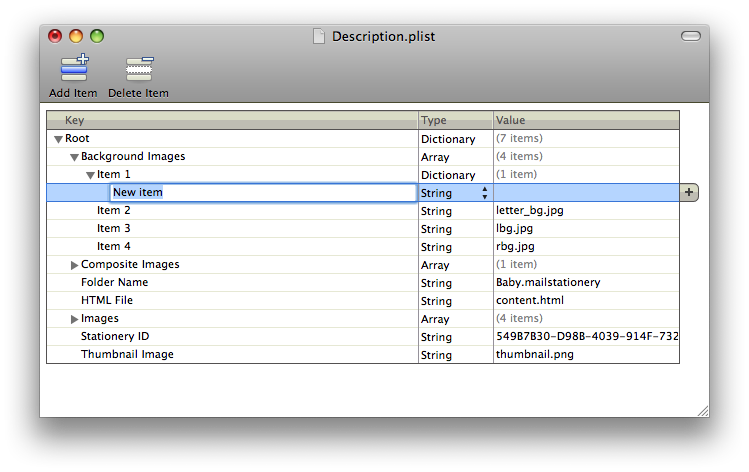




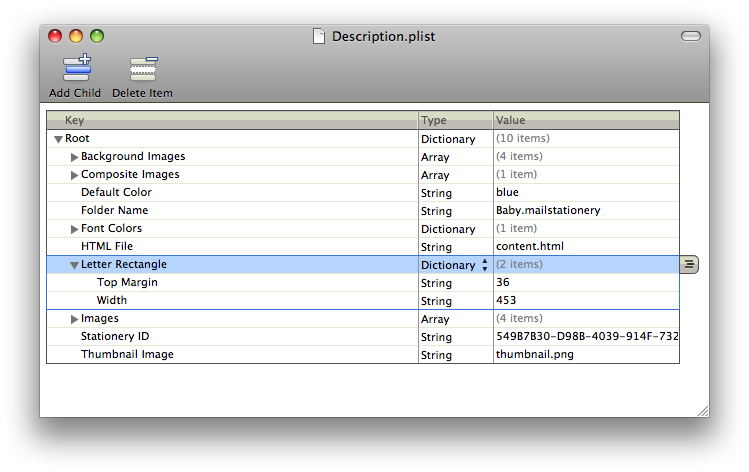


If you haven't installed Apple's Developers Toolkit, the following will be a lot more difficult. Yes. you can edit it in a text editor, but that will require almost a complete rewrite. Using Property List Editor will make it a lot easier. This is the part that tells you how it all works. For those that don't want to learn anything, you can download this file below. For those willing to learn, read on...
Double-click the Description.plist file to open it. If Property List Editor is installed, it will open the file.
Throughout the file, you'll find each graphic defined by one filename. We need to convert each instance into a Dictionary of three filenames.
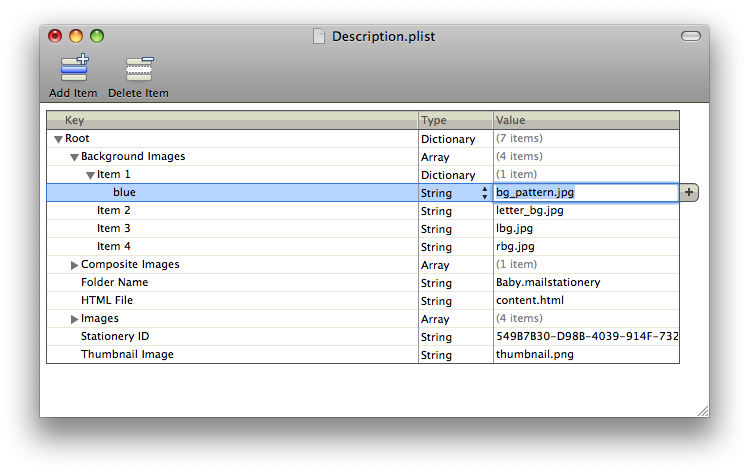
Select the value "bg_pattern.jpg" of Background Images -> item 1 and copy it to the clipboard. Now change the Type to Dictionary. Expand the list by clicking the arrow left of "item 1" or pressing the right-arrow on the keyboard. Now the Add icon will change to "Add Child." Click it... Type in the color and paste in its Value. Click "Add Item" and name the second color followed by the filename for that color. Now repeat for the third color.
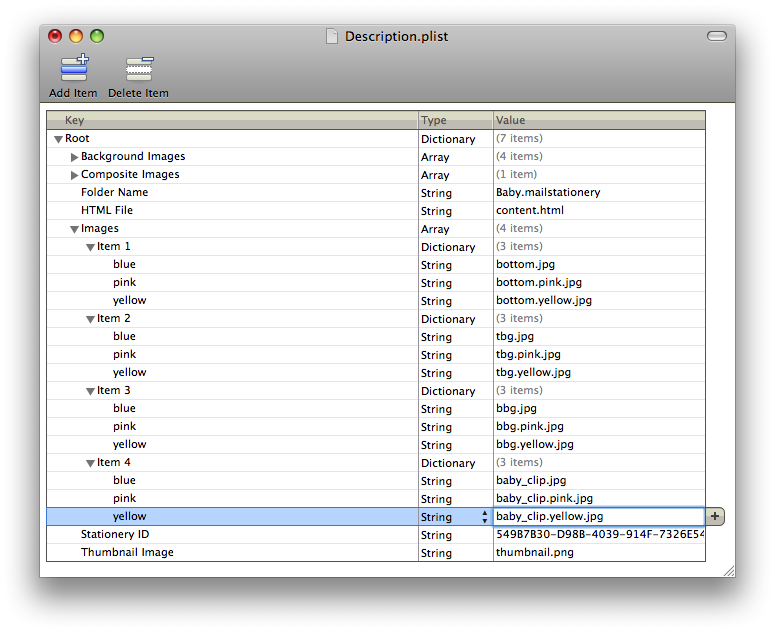
Repeat this procedure for all Background Images, Images and the two Composite Images files.
Now that our images are defined, let's define our font color. Select the "Folder Names" line, click "Add Item," name it "Font Colors" and assign its type as Dictionary. Open it and add another dictionary by the class name we assigned to the Font definition. Add the three color items and give them the values we wrote down previously.
We now need to define the editing portion of the Stationery. This will prevent the color from changing while your writing and clicking. Click Add Item, name it Letter Rectangle and set it as Dictionary. Now, click the arrow to the left and click Add Child. Name the child, Top Margin and set it to 24. Click Add Item, name it Width and set it to 456.
Lastly, create a new field called Default Color and set it to blue.
Save your work...
If you didn't notice, I made a typo in the Background images by misnaming the lbg.pink.jpg file. This resulted in the left-background-image not changing. The last graphic shows the correction.
Downloads
Test the Results...


If all went well, you should be able to open the Stationery in Mail and click the preview icon or background to change its colors.
Now, Mac users... Announce your newborn daughters, twins or new HD Entertainment Systems!
As an exercise, try adding completely different background graphics to other Stationery.
Additional Resource: Apple's developer document on Mail
BONUS!!!
Below you will find two installer packages. BabyColors will install this modification. StickyColors will install a number of color choices into the Sticky selection under Stationery.
Extra!!!


After completing this Instructable, I continued learning how to contruct stationery. I've created two that I consider quite cool. You're welcome to download the installer and install it in your Mac. If you like it and would like to share it, send this Instructable to your friends.
Big Note: An alternative to Sticky with a lot more space to fit your note.
Hand Card: A lot like those placards you see in the airports.
Please don't distribute this package outside of Instructables.
Big Note: An alternative to Sticky with a lot more space to fit your note.
Hand Card: A lot like those placards you see in the airports.
Please don't distribute this package outside of Instructables.