EleTect: Mitigating Human-Elephant Conflict With TinyML
by Abhinav krishna in Circuits > Electronics
1262 Views, 4 Favorites, 0 Comments
EleTect: Mitigating Human-Elephant Conflict With TinyML

Communities in Kerala that live close to forest boundaries are seriously threatened by conflicts between humans and elephants. Tragic events that result in death, wild elephants have destroyed families and uprooted livelihoods. The number of human casualties were 3930 during an eight-year period which requires immediate response. "EleTect, " our endeavor, uses technology to facilitate early detection. At the margins of forests, nodes with TinyML capabilities keep watch and swiftly notify authorities. Our inventiveness doesn't stop there, though. We use the sound elephants naturally dread, the drone of honey bees as a harmless deterrent. "EleTect" seeks to alter the narrative by encouraging safer coexistence, reducing conflicts, and supporting conservation efforts—one in which people and elephants coexist together
Supplies
Hardware components
Grove Vision AI Module V2
Seeed Studio Grove Vision AI Module V2 × 2
https://www.seeedstudio.com/Grove-Vision-AI-V2-Kit-p-5852.html
Camera Module
Raspberry Pi Camera Module × 2
https://www.raspberrypi.com/products/camera-module-v2/
Seeed Studio XIAO ESP32S3 Sense
Seeed Studio XIAO ESP32S3 Sense × 2
https://www.seeedstudio.com/XIAO-ESP32S3-Sense-p-5639.html
XIAO ESP32C3
Seeed Studio XIAO ESP32C3 × 2
https://www.seeedstudio.com/Seeed-XIAO-ESP32C3-p-5431.html
Grove - LoRa Radio 868MHz
Seeed Studio Grove - LoRa Radio 868MHz × 3
https://www.seeedstudio.com/Grove-LoRa-Radio-868MHz.html
Seeed Studio LoRa Antenna
Seeed Studio LoRa Antenna (EU 868 MHz compatible) × 1
https://www.seeedstudio.com/Lora-Fiberglass-Antenna-860-930MHz-5dBi-600mm-p-4927.html
DFRobot DFMini
DFRobot DFPlayer Mini MP3 Module × 2
https://www.dfrobot.com/product-1121.html
Speaker: 3W, 4 ohms
Speaker: 3W, 4 ohms × 2
https://www.adafruit.com/product/1314
Arduino Mega 2560
Arduino Mega 2560 Rev3 × 1
https://store.arduino.cc/products/arduino-mega-2560-rev3
SIM800L GSM Module
SIMCom SIM800L GSM/GPRS Module × 1
https://www.simcom.com/product/SIM800.html
TP 4056 Battery Charger module
TP4056 Li-ion Battery Charger Module× 3
https://robocraze.com/products/tp4056-battery-charger-c-type-module-with-protection-1
Solar Panel, 2.5 W
5V / 2.5W Solar Panel × 3
https://www.adafruit.com/product/500
Solar Power Manager 5V
DFRobot Solar Power Manager 5V × 3
https://www.dfrobot.com/product-1712.html
Software apps and online services
Seeed Studio SenseCraft AI
Edge Impulse Studio
Edge Impulse Studio
https://studio.edgeimpulse.com/
Roboflow
Google Colab
https://colab.research.google.com/
Arduino IDE
Arduino IDE
https://www.arduino.cc/en/software
Node-RED
Node-RED
SolidWorks
Hand tools and fabrication machines
3D Printer (generic)
3D Printer (generic)
https://www.creality.com/products/ender-3-3d-printer
Solder Wire, Lead Free
Solder Wire, Lead Free
https://www.kester.com/products/product/44-flux-cored-wire
Soldering iron (generic)
Soldering iron (generic)
https://www.hakko.com/english/products/hakko_fx888d.html
Premium Female/Male Extension Jumper Wires, 40 x 6" (150mm)
Premium Female/Male Extension Jumper Wires
Problem Statement

Kerala, a state known for its lush forests and diverse wildlife, has faced a growing hazard :Human- Elephant Conflicts. Tragic incidents involving wild elephants turning deadly have occurred in areas such as Wayanad, Mananthavady, Munnar, and Idukki. An angry elephant crushed a tribal woman who was collecting honey in the wild. A man in Mananthavady lost his life as a result of a tusker breaking into a residential area. In the same way, another guy was attacked by an elephant on the Kannimala estate, which is close to Munnar. And an elephant in the Idukki district killed a 70-year-old woman. These tragic occurrences highlight how urgent it is to develop workable answers. With an emphasis on early detection, deterrents, and communication, the "Eletect" project seeks to protect lives, foster coexistence, and make a positive contribution to wildlife conservation. "Eletect" uses technology to identify elephants early in order to lessen the impact of these conflicts. Despite their majesty and strength, elephants have a startling weakness: they are afraid of some noises. The sound of bees buzzing is the most noticeable among them. The sound of bees is a surefire way for these gentle giants, despite their great strength, to become wary and even retreat. We may use this amazing natural occurrence to our advantage and the benefit of elephants as well as people. Using this knowledge in the "Eletect" project to develop a long-term resolution to conflicts between people and elephants. We carefully use honey bee noise to discourage elephants from approaching residential areas where people live. As a harmless deterrent, the buzzing noise guides elephants away without endangering them. It's a peaceful strategy that honors both species. At the boundaries of forests, nodes with TinyML capabilities are placed in a thoughtful way. Elephants are deterred and conflicts avoided by using deterrents like playing honey bees noises. Costeffective warnings are ensured through the use of LoRa or LoRaWAN technologies to promote communication between nodes and central systems. The project aims to reduce conflict, support conservation efforts, and encourage a safer cohabitation between humans and elephants. Scalability guarantees that the solution may be successfully implemented in various locations, safeguarding both human life and natural environments.
Solution Overview


By integrating the Seeed Studio Grove Vision AI V2 module and Xiao ESP32S3 Sense within the same enclosure, equipped with a speaker for emitting deterrent sounds, we've created a comprehensive system for elephant detection and mitigation. The Grove Vision AI V2 module runs a vision-based TinyML model using the onboard camera to detect elephants, while the ESP32S3 Sense employs a sound-based TinyML model to detect elephant presence through surrounding sounds. This combination not only ensures multiple layers of detection but also allows for real-time decision-making without relying on external servers, thanks to TinyML's efficiency and autonomy. Furthermore, by harnessing solar power for all components, the system becomes self-sustainable, making it ideal for deployment in remote areas. The use of TinyML on low-power IoT devices not only minimizes energy consumption but also facilitates rapid response to detected events, such as activating deterrent measures like playing honeybee sounds to prevent elephants from entering human habitats. This holistic approach addresses the challenges of human-elephant conflicts by offering a sustainable, efficient, and effective solution.
This is how we planned to deploy the project.We will be having multiple nodes in the elephant attack prone area which wil spot the elephant and produce deterrent sounds and also a master to which all the nodes will send the information through LoRa and The master willsend alert to the locals when an elephant is spotted near them and aslo will send all of the collected data to the base station from where we can monitor everything and study about the elephant behaviours and track the pattern of elephant sighting which can be used to improve the projects accuracy and make the life of those who are affected safer.
Studies shows that elephants are afraid of bee sounds, so we decided to use it as the deterrent sound.
🌿 Field Survey, Government Approval & Real-World Testing


To ensure that EleTect truly addresses on-ground challenges of human-elephant conflict (HEC), we conducted an extensive community survey and received official clearance for field testing from the Divisional Forest Officer (DFO) Kothamangalam, Mr. Varun Dalia IFS, and Forest Range Officer, Mr. Jaleel.
🧭 Survey & Study Area
Our field study focused on Kothamangalam and Kottapady, two regions of Kerala severely affected by elephant incursions. These locations lie at the foothills of the Western Ghats, close to dense forests — making them high-risk zones for HEC incidents.
Using household surveys, we collected firsthand data from residents to understand the real impact of conflicts.
Out of 100 houses surveyed, 85 reported direct elephant attacks on residential or agricultural areas.
Major losses identified included:
- Crop damage: Reported by 66% of respondents
- Injury or death of people: Reported by 38.4% of respondents
These alarming numbers reinforced the urgency of deploying a technological mitigation solution like EleTect
🏛️ Official Approval & Collaboration
We formally presented EleTect to the DFO office, Kothamangalam, and the Forest Range Office, discussing both its safety and community benefits.
After technical evaluation, the forest department approved live field trials of the system within designated buffer zones around Kothamangalam and Kottapady.
The department’s involvement ensured ethical deployment — protecting both wildlife and local communities — and validated EleTect as a practical conservation technology.
🧪 Real-World Dataset Collection & Model Verification
📸 Real-World Dataset Collection
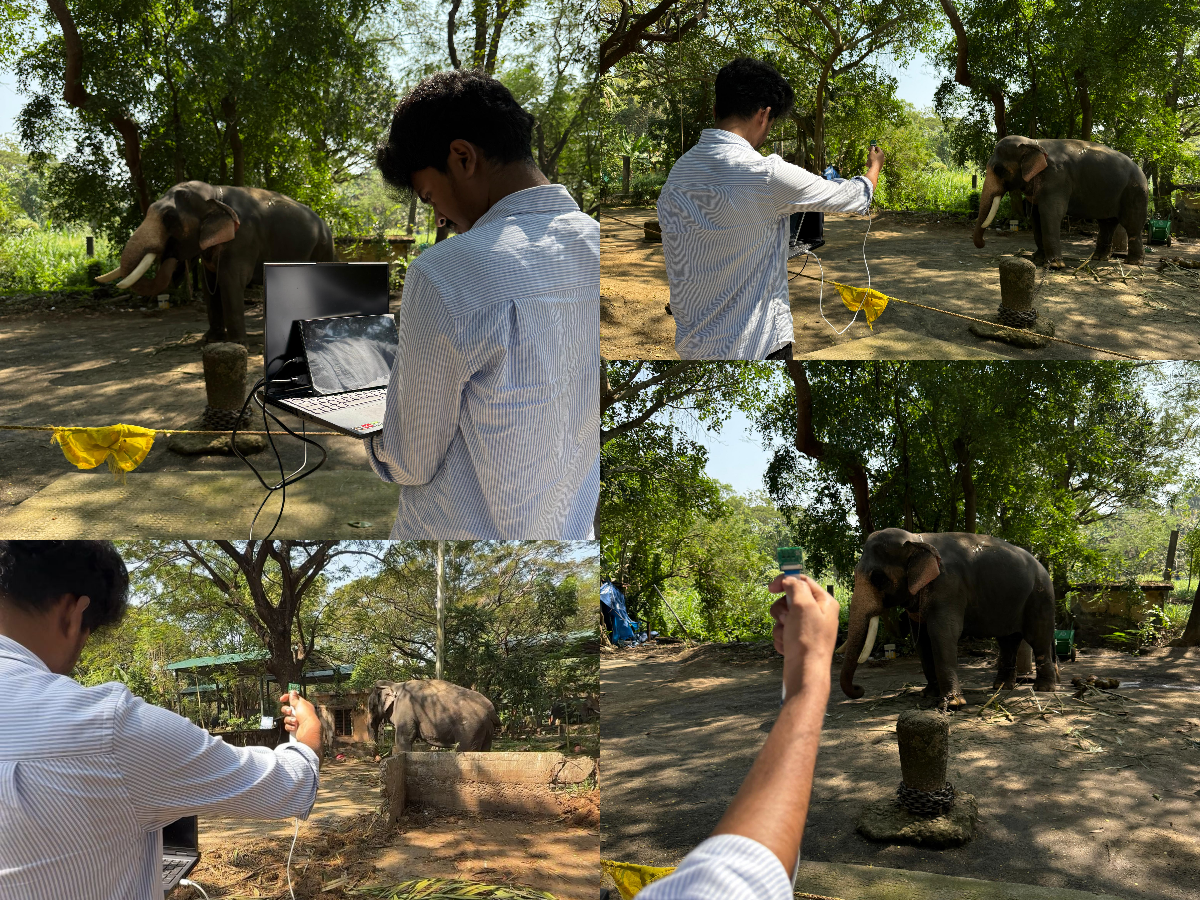
To build a reliable and region-specific vision model, we collected live elephant imagery directly using the Grove Vision AI V2 camera module. Instead of relying solely on online datasets, we captured real photographs and short video frames of elephants in local forest areas and wildlife reserves. These images reflect true environmental conditions such as lighting changes, foliage density, partial occlusions, and natural elephant posture variations.
After collection, we curated and annotated the dataset to ensure clean bounding boxes and accurate labels. This helped us build a custom dataset tailored to the Western Ghats ecosystem, improving the model’s performance in practical field deployment rather than laboratory conditions.
🧭 Real-World Testing & Model Verification
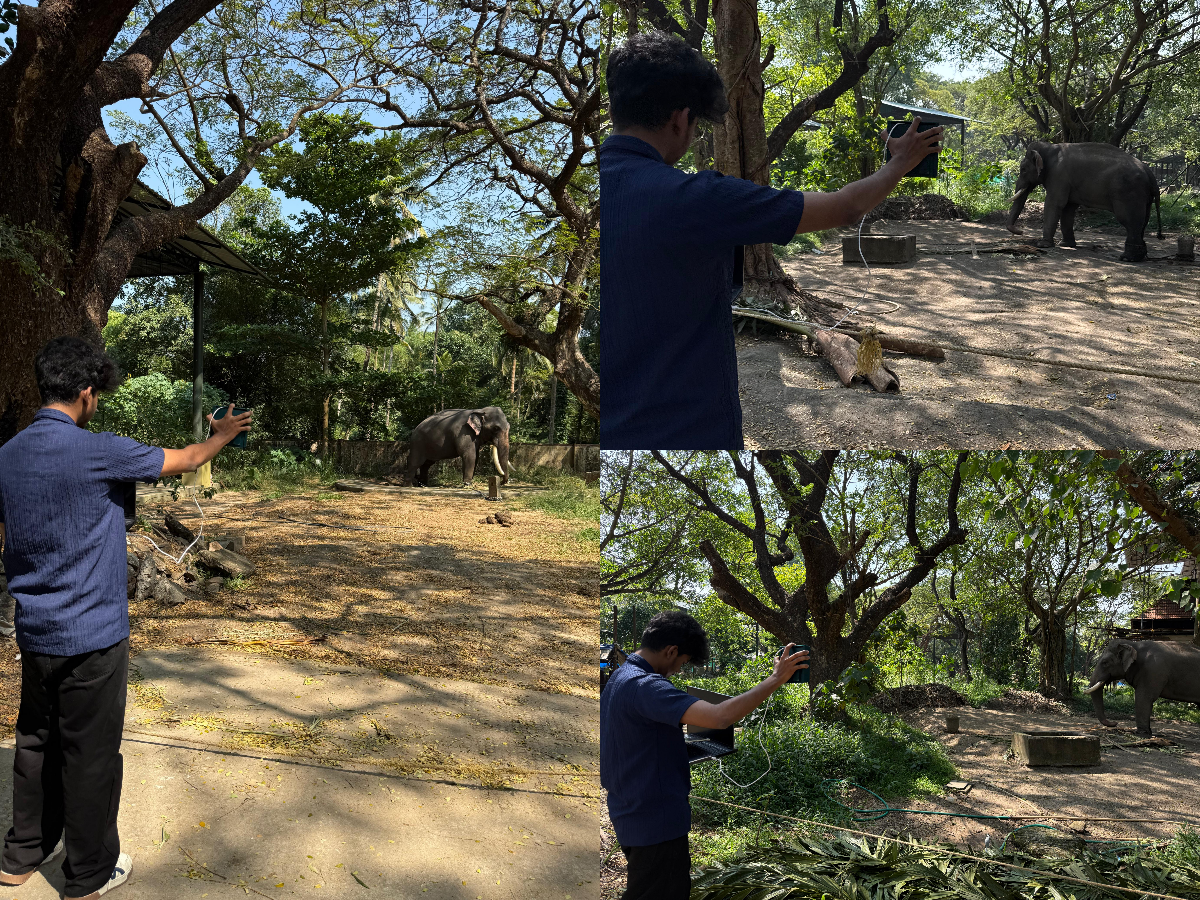
Once the model was trained, we conducted field testing in real environments where elephants are commonly sighted. The vision model was deployed on the Grove Vision AI V2 and tested ON Eelephants. During field tests, the model showed high detection accuracy, correctly identifying elephants even against complex natural backgrounds and challenging lighting conditions.
The system performed consistently and in real-time, validating that the combination of custom dataset + edge deployment works effectively in the wild. These trials confirmed that the model can be trusted for safety-critical use cases, and gave us confidence to move forward with pilot deployment in collaboration with the Forest Department.
🌍 Field Testing & Early Results


Following approval, EleTect prototypes were installed along forest boundaries where elephant movement was frequent.
Each node combined vision + audio TinyML with LoRa connectivity to relay detections in real time.
Initial trials showed promising outcomes:
- Locals reported fewer night-time elephant entries after installation.
- Forest officers received consistent detection logs and LoRa alerts.
- The bee-buzz deterrent effectively turned elephants away without harm.
The positive community feedback and official validation confirm that EleTect can be scaled safely for real-world conservation use.
Setting Up the Nodes

We will deploy Nodes like this in the areas prone to elephant attacks.The node consists of :
- Seeed studio Grove vision module V2 and OV5647 Camera
- Seeed studio XIAO ESP32C3
- Seeed studio XIAO ESP32S3 Sense
- Seeed studio LoRa module
- LoRa antenna
- DFmini
- Speaker(Which will produce Honey bee voice as deterrent sounds)
- Solar panel, Solar battery charger and battery
Grove Vision AI Module V2 Overview


The Grove Vision AI Module V2 is a game-changer in the world of microcontroller-based AI vision modules. Powered by the ARM Cortex-M55, it outperforms regular ESP32 CAM-based boards while consuming significantly less power. After extensive testing, we found it to be exceptionally powerful and precise.
Comparison with Xiao ESP32-S3 Sense Board
In our tests, we compared the Grove Vision AI Module V2 with the Xiao ESP32-S3 Sense board. The difference is clear in the comparison video. The Grove Vision AI Module V2 delivers a higher frame rate while maintaining low power consumption, outperforming the Xiao ESP32-S3 Sense board.
The product arrives in standard Seeed Studio packaging. Inside the box, you'll find:
- The Vision AI Module V2
- A connecting wire
- A sticker with a brief introduction to the module
Specifications
The module features the WiseEye2 HX6538 processor, which includes:
- Dual Core ARM Cortex M55:
- High Performance Core clocked at 400MHz
- High Efficiency Core clocked at 150MHz
- ARM Ethos-U55 microNPU (Neural Processing Unit) clocked at 400MHz
- PUF (Physical Unclonable Function) hardware security
These features enable rapid AI and ML processing, making it ideal for computer vision projects requiring high frame rates and low power consumption.
Memory and Connectivity
- 60MB of onboard flash memory
- PDM microphone
- SD card slot
- External camera connectivity
- CSI port
- Grove connector
- Dedicated pinout for connecting Xiao series microcontroller boards from Seeed Studio
Software Compatibility
The module supports a wide range of AI models and frameworks:
- SenseCraft AI models, including Mobilenet V1/V2, EfficientNet-Lite, YOLO v5/v8
- TensorFlow and PyTorch frameworks
It is compatible with popular development platforms like Arduino, Raspberry Pi, and ESP dev boards, making it versatile for further development.
Applications
Our tests confirmed that the Grove Vision AI Module V2 is suitable for a variety of applications, including:
- Industrial Automation: Quality inspection, predictive maintenance, voice control
- Smart Cities:Device monitoring, energy management
- Transportation: Status monitoring, location tracking
- Smart Agriculture: Environmental monitoring
- Mobile IoT Devices: Wearable and handheld devices
We can declare with confidence that the Grove Vision AI Module V2 delivers unmatched AI processing capabilities, flexible model support, a wealth of peripheral possibilities, high compatibility, and an entirely open-source environment after conducting rigorous testing. It is a great option for a variety of AI and computer vision applications because to its low power consumption and great performance.
Hardware Overview
Refer this article, 2024 MCU AI Vision Boards: Performance Comparison, it is possible to confirm how powerful Grove Vision AI (V2) is when compared to Seeed Studio Grove - Vision AI Module, Espressif ESP-EYE, XIAO ESP32S3 and on an Arduino Nicla Vision. Do check it out.
Connecting to a CSI interface camera
Once you have the Grove Vision AI V2 and camera ready to go, then you can connect them via the CSI connection cable. When connecting, please pay attention to the direction of the row of pins and don't plug them in backwards.
Boot / Reset / Flashed Driver
Boot
If you have used some unusual method that has caused the Grove Vision AI to not work properly at all (at the software level), then you may need to put the device into BootLoader mode to revive the device. Here is how to enter BootLoader mode.
Method 1
Please disconnect the connection cable between the Grove Vision AI and your computer, then press and hold the Boot button on the device without releasing it. At this time, please connect Grove Vision AI to your computer with a Type-C type data cable, and then release it again. At this point the device will enter BootLoader mode.
Method 2
With the Grove Vision AI connected to your computer, you can enter BootLoader mode by pressing the Boot button and then quickly pressing the Reset button.
Reset
If you're experiencing problems with device data suddenly not uploading or images getting stuck, you can try restarting your device using the Reset button.
Driver
If you find that the Grove Vision AI V2 is not recognised after connecting it to your computer. Then you may need to install the CH343 driver on your computer. Here are some links to download and install the CH343 driver.
Windows Vendor VCP Driver One-Click Installer: CH343SER.EXE
Windows Vendor VCP Driver: CH343SER.ZIP
Windows CDC driver one-click installer: CH343CDC.EXE
Windows CDC driver: CH343CDC.ZIP
macOS Vendor VCP Driver: CH34xSER_MAC.ZIP
Below is a block Diagram of the Grove Vision AI (V2) system, including a camera and a master controller.
Downloads
Getting Started With SenseCraft Web Toolkit.


SenseCraft AI empowers users to effortlessly deploy a vast library of publicly available AI models on tot heir edge devices such as Recomputer(Jetson), XIAOS3, and more, and provides a seamless and user-friendly experience, allowing you to deploy public AI models directly on to your edge devices with just a few clicks.Say good bye to complex configurations and coding – with SenseCraft AI, you can efftortlessly unlock the power of AI on your devices. SenseCraft AI also allows you to upload and share your own trained AI models with the community. By publishing your models, you contribute to a growing library of shared knowledge, fostering collaboration and innovation among AI enthusiasts.Now we will quickly get started the modules with SenseCraft AI, and this will only require the module only.
Step 1. Connect the Grove Vision AI V2 to the SenseCraft AI Model Assistant
First, we need to open the main SenseCraft AI Model Assistant page.
Create an account and login
Please use a Type-C type cable to connect Grove Vision AI V2 to your computer.
Here we are using a public model for testing the Grove Vision V2.
we selected the "Gesture Detection" model to deploy.
Click on "Deploy Model"
Then click on "connect"
Click on "Confirm" and select the connected serial port
Now the model will begin to get uploaded to the Grove vision V2
Now you can see that we have successfully uploaded the model.Now we can test it by showing different gestures
we can see how good the new Grove vision V2 is when compared to other MCUs and the previous version, we really got a massive upgrade in every terms, Really Loved it.
We can see that in the Preview Settings on the right hand side, there are two setting options that can be changed to optimise the recognition accuracy of the model.
- Confidence: Confidence refers to the level of certainty or probability assigned by a model to its predictions.
- IoU: IoU is used to assess the accuracy of predicted bounding boxes compared to truth bounding boxes.
Arduino Environment Preparation


1. Visit the official Arduinowebsite: https://www.arduino.cc/en/software
2. Click on the "Windows" or "Mac"buttonbased on your operatingsystem.
3. Download the ArduinoIDE1.8.19installer.
4. Once the downloadis complete, runtheinstaller.
5. Follow the installation wizard, acceptingthe license agreement and choosing the installation directory.
6. If prompted, allow the installer to install device drivers.
7. Once the installationis finished, click"Close" to exit the installer.
8. Open the Arduino IDE fromthedesktopshortcut or the start menu. 9. You're now ready tostart usingArduinoIDE 1.8.19!
Downloading the necessary libraries
1. Open your web browser and navigate to the GitHub repository:
https://github.com/Seeed-Studio/Seeed_Arduino_SSCMA
2. Click on the green "Code" button and select "Download ZIP" to download the library as a ZIP file.
3. Save the ZIP file to a location on your computer where you can easily find it.
4. Open the Arduino IDE.
5. Go to Sketch > Include Library >Add.ZIPLibrary.
6. In the file browser window that appears, navigate to the location where you saved the downloaded ZIP file.
7. Select the ZIP file and click "Open" to add the library to your Arduino IDE.
8. The Seeed_Arduino_SSCMAlibrary should now be installed and ready to use.
9. To verify the installation, go to Sketch>Include Library and check if "Seeed_Arduino_SSCMA" appears in the list of installed libraries.
You also need to download one more library
Go to the Sketch menu, then select Include Library>Manage Libraries.... This will open the Library Manager.In the search bar at the top of the Library Manager, type in ArduinoJSON. The search results will list the ArduinoJSON library. There will be an Install button next to the library. Click the Install button. The ArduinoIDE will automatically download and install the library into your Arduino development environment.
Installing the board to Arduino IDE
1. Open theArduinoIDE.
2. Go to File>Preferences.
3. In the "Additional BoardsManager URLs" field, enter the following URL:
4.Click "OK" to close the Preferences window.
5. Navigate to Tools >Board>Boards Manager.
6. In the Boards Manager window, search for "ESP32".
7. Locate the "ESP32 by Espressif Systems" entry and click on it.
8. Select the latest version from the drop down menu and click "Install".
9. Wait for the installation process to complete. This may take a few minutes.
10. Once the installation is finished, close the Boards Manager window
Custom Model for Elephant Detection


In this part, we'll kick off by labeling our dataset with the intuitive tools provided by Roboflow. From there, we'll advance to training our model within Google Colab's collaborative environment. Next up, we'll explore deploying our trained model using the SenseCraft Model Assistant, a process designed to smoothly bridge the gap between training and real-world applications. By the conclusion of this part, you'll have your very own custom model ready to detect elephants, operational on Grove Vision AI V2.
From dataset to model deployment, our journey consists of the following key stages:
1. Dataset Labeling — This section details the process of acquiring datasets suitable for training models. There are two primary methods: utilizing labeled datasets from the Roboflow community or curating your own dataset with scenario-specific images, necessitating manual labeling.
2. Model Training with Google Colab — Here, we focus on training a model capable of deployment on Grove Vision AI V2, leveraging the dataset obtained in the previous step via the Google Colab platform.
3. Model Upload via SenseCraft Model Assistant — This segment explains how to employ the exported model file to upload our elephant detection model to Grove Vision AI V2 using the SenseCraft Model Assistant.
Step 1.Create a free Roboflow account
Roboflow provides everything you need to label, train, and deploy computer vision solutions. To get started, create a free Roboflow account.
Step 2. Creating a New Project and Uploading images
Once you've logged into Roboflow, Click on Create Project.\
Name your project ("EleTect"). Define your project as Object Detection. Set the Output Labels as Categorical
.Step 2. Creating a New Project and Uploading images
Once you've logged into Roboflow, Click on Create Project
Name your project ("EleTect"). Define your project as Object Detection. Set the Output Labels as Categorical
Now it's time to upload elephant images.
Collect images of elephants. Ensure you have a variety of backgrounds and lighting conditions. On your project page, click "Add Images".
You can drag and drop your images or select them from your computer. Upload at least 100 images for a robust dataset.
click on Save and Continue
Step 3: Annotating Images
After uploading, you'll need to annotate the images by labeling elephant.
Roboflow offers three different ways of labelling images: Auto Label, Roboflow Labeling and Manual Labeling.
Auto Label: Use a large generalized model to automatically label images.
Roboflow Labeling: Work with a professional team of human labelers. No minimum volumes. No upfront commitments. Bounding Box annotations start at $0.04 and Polygon annotations start at $0.08.
Manual Labeling: You and your team label your own images.
The following describes the most commonly used method of manual labelling.
Click on "Manual Labeling" button. Roboflow will load the annotation interface.
Select the "Start Annotating" button. Draw bounding boxes around the elephant in each image.
Label each bounding box as elephant.
Use the ">" button to move through your dataset, repeating the annotation process for each image.
Step 4: Review and Edit Annotations
It's essential to ensure annotations are accurate.
Review each image to make sure the bounding boxes are correctly drawn and labeled. If you find any mistakes, select the annotation to adjust the bounding box or change the label.
Step 5: Generating and Exporting the Dataset
Once all images are annotated. In Annotate click the Add x images to Dataset button in the top right corner.
Then click the Add Images button at the bottom of the new pop-up window.
Click Generate in the left toolbar and click Continue in the third Preprocessing step.
In the Augmentation in step 4, select Mosaic, which increases generalisation.
In the final Create step, please calculate the number of images reasonably according to Roboflow's boost; in general, the more images you have, the longer it takes to train the model. However, the more pictures you have will not necessarily make the model more accurate, it mainly depends on whether the dataset is good enough or not.
Click on Create to create a version of your dataset. Roboflow will process the images and annotations, creating a versioned dataset. After the dataset is generated, click Export Dataset. Choose the COCO format that matches the requirements of the model you'll be training.
Click on Continue and you'll then get the Raw URL for this model. Keep it, we'll use the link in the model training step a bit later.
Congratulations! You have successfully used Roboflow to upload, annotate, and export a dataset for elephant detection model. With your dataset ready, you can proceed to train a machine learning model using platforms like Google Colab.
Training Dataset Exported Model


Step 1. Access the Colab Notebook
You can find different kinds of model Google Colab code files on the SenseCraft Model Assistant's Wiki. If you don't know which code you should choose, you can choose any one of them, depending on the class of your model (object detection or image classification).
If you are not already signed into your Google account, please sign in to access the full functionalities of Google Colab.
Click on "Connect" to allocate resources for your Colab session.
select the panel showing RAM and Disk
select "Change runtime type"
Select "T4 GPU"
Now run the "Setup SSCMA"
you will get a warning like this click on "Run anyways"
Wait untill the repositary is fully clonedand installed all the dependencies.
now its finished
Now run the "download the pretrain model weights file
Step 2. Add your Roboflow Dataset
Before officially running the code block step-by-step, we need to modify the code's content so that the code can use the dataset we prepared. We have to provide a URL to download the dataset directly into the Colab filesystem.
To customize this code for your own model link from Roboflow:
1)Replace Gesture_Detection_Swift-YOLO_192 with the desired directory name where you want to store your dataset.
2)Replace the Roboflow dataset URL (https://universe.roboflow.com/ds/xaMM3ZTeWy?key=5bznPZyI0t)
with the link to your exported dataset (It's the Raw URL we got in the last step in Labelled Datasets). Make sure to include the key parameter if required for access.
3)Adjust the output filename in the wget command if necessary
(-O your_directory/your_filename.zip).4)Make sure the output directory in the unzip command matches the directory you created and the filename matches the one you set in the wget command.
Step 3. Adjustment of model parameters
The next step is to adjust the input parameters of the model. Please jump to the Train a model with SSCMA section and you will see the following code snippet.
This command is used to start the training process of a machine learning model, specifically a YOLO (You Only Look Once) model, using the SSCMA (Seeed Studio SenseCraft Model Assistant) framework.
To customize this command for your own training, you would:
1)Replace configs/swift_yolo/swift_yolo_tiny_1xb16_300e_coco.py with the path to your own configuration file if you have a custom one.2)Change work_dir to the directory where you want your training outputs to be saved.3)Update num_classes to match the number of classes in your own dataset. It depends on the number of tags you have, for example rock, paper, scissors should be three tags.4)Adjust epochs to the desired number of training epochs for your model. Recommended values are between 50 and 100.5)Set height and width to match the dimensions of the input images for your model.6)Change data_root to point to the root directory of your dataset.7)If you have a different pre-trained model file, update the load_from path accordingly.
Step 5. Exportthe model
After training, you can export the model to the format for deployment. SSCMA supports exporting to ONNX, and TensorFlow Lite at present
Step 6. Evaluate the model
When you get to the Evaluate the model section, you have the option of executing the Evaluate the TFLite INT8 model code block.
Step 6. Download the exported model file
After the Export the model section, you will get the model files in various formats, which will be stored in the Model Assistant folder by default. Our stored directory is EleTect.
select "ModelAssistatnt"
In the directory above, the .tflite model files are available for XIAO ESP32S3 and Grove Vision AI V2. For Grove Vision AI V2, we prefer to use the vela.tflite files, which are accelerated and have better operator support. And due to the limitation of the device memory size, we recommend you to choose INT8 model.
After locating the model files, it's essential to promptly download them to your local computer. Google Colab might clear your storage directory if there's prolonged inactivity. With these steps completed, we now have exported model files compatible with Grove Vision AI V2. Next, let's proceed to deploy the model onto the device.
Upload Models to Grove Vision V2 Via SenseCraft Model Assistant


Please connect the device after selecting Grove Vision AI V2 and then select Upload Custom AI Model at the bottom of the page.
You will then need to prepare the name of the model, the model file, and the labels. I want to highlight here how this element of the label ID is determined.
If you are using a custom dataset, then you can view the different categories and its order on the Health Check page. Just install the order entered here.
Then click Send Model in the bottom right corner. This may take about 3 to 5 minutes or so. If all goes well, then you can see the results of your model in the Model Name and Preview windows above.
Or you could use the model published by Us.Go to search and in public models search for "EleTect", you can find it.
Click on deploy and connect your grove vision V2.
Press Confirm and you are good to go.Now that we have done training the vision based model, now we can train the audio model also for increased accuracy
Now that we have done training the vision based model, now we can train the audio model also for increased accuracy
Training Audio Based TinyML Model on XIAO ESP32S3 Sense


XIAO ESP32S3 Sense Introduction
A compact yet powerful development board designed to kickstart your journey into intelligent voice and vision AI. With its integrated camera sensor, digital microphone, and SD card support, this tiny board packs a punch, offering embedded ML computing power and photography capabilities. Whether you're delving into edge computing or exploring AI applications, the XIAO ESP32S3 Sense is your go-to tool for realizing innovative projects with ease and efficiency.
Edge Impulse Introduction
Edge Impulse is a platform for developing machine learning models specifically designed for edge devices and embedded systems. It provides a comprehensive set of tools and services that enable developers to quickly create, train, and deploy machine learning models without requiring deep expertise in machine learning.
Recording Audio with XIAO ESP32S3 Sense
Let's use the onboard SD Card reader to save.wav audio files, we need to habilitate the XIAO PSRAM first.
Insert the microSD card into the microSD card slot. Please note the direction of insertion, the side with the gold finger should face inward.
Then compile and upload the following program to XIAO ESP32S3.
Now, Compile and run the code and get samples of different elephant sounds. You can also capture noise and other sounds. The Serial monitor will prompt you to receive the label to be recorded.
Send the label (for example, Elephant). The program will wait for another command: rec. And the program will start recording new samples every time a command rec is sent. The files will be saved as elephant.1.wav, elephant.2.wav, elephant.3.wav, etc. until a new label (for example, Noice) is sent. In this case, you should send the command rec for each new sample, which will be saved as Noice1.wav, Noice.2.wav, Noice.3.wav, etc. Ultimately, we will get the saved files on the SD card.
send the first label name first, through the serial monitor
Then send command rec and start recording the elephant sounnd using XIAO.
Collect both samples in same amount.
Use a card reader to save all the sound samples stored inside the SD card to your computer.
Training Exported Models With Edge Impulse


We should initiate a new project at Edge Impulse and give it the same name “EleTect”.
Once the project is created, select the Upload Data tool in the Data Acquisition section. Choose the files to be uploaded.
make sure to balance between train and test set.80/20 is the best recommended ratio.
All data on dataset have a 1s length, but the samples recorded in the previous section have 10s and must be split into 1s samples to be compatible. Click on three dots after the sample name and select Split sample.
Once inside the tool, split the data into 1-second records. If necessary, add or remove segments. This procedure should be repeated for all samples.
Goto Impulse design
An impulse takes raw data, uses signal processing to extract features, and then uses a learning block to classify new data. First, we will take the data points with a 1-second window, augmenting the data, sliding that window each 500ms. Note that the option zero-pad data is set. This is important to fill with zeros samples smaller than 1 second (in some cases, I reduced the 1000 ms window on the split tool to avoid noises and spikes).
The next step is to create the images to be trained in the next phase. We can keep the default parameter values or take advantage of the DSP Autotuneparameters option, which we will do.
We will use a Convolution Neural Network (CNN) model. The basic architecture is defined with two blocks of Conv1D + MaxPooling (with 8 and 16 neurons, respectively) and a 0.25 Dropout. And on the last layer, after Flattening four neurons, one for each class.
Edge Impulse will package all the needed libraries, preprocessing functions, and trained models, downloading them to your computer. You should select the option Arduino Library and at the bottom, select Quantized (Int8) and press the button Build. When the Build button is selected, a Zip file will be created and downloaded to your computer.
Deploying Models to XIAO ESP32S3 Sense


Upload the zip file to you Arduino IDE
Before we use the downloaded library, we need to enable the ESP NN Accelerator. For that, you can download a preliminary version from the project GitHub, unzip it, and replace the ESP NN folder with it under: src/edge-impulse-sdk/porting/espressif/ESP-NN, in your Arduino library folder.
Link Address: https://github.com/Mjrovai/XIAO-ESP32S3-Sense/blob/main/ESP-NN.zip
Then you will get the program, compile and run it.
Setting Up the DFMini


The DFMini Player module is a small music player. It is low cost and low power and reproduces sounds stored on a memory card.
Based on this, the module can be controlled via the standalone mode, that is, in this mode, there will only be the DFMini module, a battery to power, the speaker, buttons to control it, and the SD card with the songs.
Another way to control it is to use an Arduino or another control device. The Arduino, for example, will send commands through serial communication with the DFMini Player Module.
To control it, it is important to use the basic standalone circuit
The two buttons shown in the circuit above are used to change the music tracks and control the volume of the sound.
The button connected to pin IO1 is used to go to the previous track and reduce the volume.
With a quick touch the system returns to the previous song, however, if you press the button for more than 1 second, the system will reduce the volume of the song.
The button connected to pin IO2 is used to go to the next track and increase the volume.
With a quick touch the system advances to the next song, however, if you press the button for more than 1 second, the system will increase the volume of the song.
In this standalone method, the songs must be saved on the memory card
This way, each time the buttons are pressed, the system will play each song in ascending or descending order.
However, when using Arduino or another control device, we must modify the way of organizing the musical files on the SD Card.
Now, I'll explain how to control the DFMini Player using the Arduino through serial communication.
Controlling the DFMini Player with Arduino
In this step, the volume control, range control, equalization commands and other features will be sent by Arduino.
The Arduino must communicate via the serial with the DFMini Player and send the control commands.
First, we must assemble the circuit shown in the Figure below.
After assembling this circuit, you must add the songs on your memory card. In this step, the songs should be renamed as 01, 02, 03, for example.
You cannot leave the songs with their names, as there will be a problem when the Arduino sends the command to execute the specific track. Therefore, you must configure as shown below.
After naming the files, write the following code on your Arduino.
The code presented above is quite simple and will help you to select the song by its number, stop, pause, control the volume and pass the tracks.
The musical control consists of sending data from the Arduino IDE serial to our Arduino board.
Initially, the system makes the configuration in the setup and checks if the SD Card is inserted in the module. If it is not inserted, the system presents a message to alert the user.
In addition, the system displays messages with system configuration options.
If the memory card is inserted, the code flow will enter the loop function.
The user can send the following control characters:
- Numbers 1 to 3: Select the song to be played;
- Letter s: Stop the song;
- Letter p: Pause the song;
- Send the + sign: Increase the song volume;
- Send the - signal: Decrease the song volume;
- Send the signal <: Select the previous song;
- Send the signal >: Select the next song;
From these signals, letters, and numbers, the Arduino will receive them via the serial and will control the music to be played.
Each condition is presented below and internally, with its respective commands.
LoRa Communication From Nodes to Master

LoRa is a low-power wireless modulation technology that enables devices to communicate over long distances with minimal energy consumption. "P2P" stands for "point-to-point, " meaning devices can communicate directly with each other without the need for intermediate network infrastructure such as base stations or routers.
By leveraging LoRa P2P, IoT devices can communicate directly with each other in environments requiring long-distance communication and low power consumption.
We can connect the Wio-E5 module to the UART socket directly as the below picture shows.
Download Library
The u8g2 library must be installed for this demo. Click to download the library and install it (How to install an Arduino Library).
Download the example
Copy the code stick on the Aruino IDE then upload it. One of them is used as a master, and the NODE_SLAVE macro definition in the code needs to be commented out, and the other is used as a slave, and the NODE_SLAVE macro definition in the code needs to be turned on.
Setting Up the Master

The master will house the
- Lora and Antenna
- SIM800L
- Arduino mega
- Power system
The master will collect the data from all of the deployes data and will send alert to the local people when an elephant is spotted near them and will send the data to the base station where we will be able to monitor the data from all the nodes.
Using the SIM800L Module for Alert From Master


The SIM800L is a quad-band GPRS module that is a highly integrated module developed with a TCP/IP protocol stack. SIM800L is a small cellular module allowing GPRS communication, sending and receiving SMS, and making and receiving voice calls.
it works on frequencies EGSM 900MHz, DCS 1800MHz, and PCS 1900MHz It supports a GPRS connection with download speeds of up to 85.6kbps. The module has an inbuilt TCP/IP stack that allows it to connect to the internet. The SIM800L also has an inbuilt RTC and can be used to send and receive text messages (SMS). making this module an excellent solution for any project that needs long-range connectivity.
Now, insert the SIM card into the back of the SIM800 module. Then, attach the SIM800 TX and RX to the Arduino D8 and D7 respectively. These are the serial UART connections that allow communication between the two modules.
If the power to the SIM800L is enough, the onboard LED starts blinking. If there’s not enough power, the LED blinks for almost three seconds and then turns off.
Here is the full sketch for the AT command test:
Test Code
Once you upload the code to the Arduino board, you’ll be able to send all the AT commands in order to send/receive text messages or make calls.
The FONA library is a library for interfacing with the SIM800 module. It allows you to send and receive SMS messages, make and receive calls, and connect to the internet. The SIM800 FONA library is open source and is released under the MIT license. The SIM800 FONA library is easy to use and is well documented. I would recommend this library to anyone looking for an easy way to interface with the SIM800 module.
The library I recommend is Adafruit’s FONA library you can go to Sketch > Include Library > Manage Libraries and type “FONA” in the search bar.
Download the source and click the library:
- Library SIM800L: Adafruit FONA
The library comes with a number of examples. The FONA_test sketch provides us access to all the SIM800l functions! If you upload the sketch and use the same wiring diagram.
The FONA library owns a simple send SMS() function that takes the number and message as parameters and returns true if the message was sent through the network successfully. Here’s an example code that sends one SMS:
Now we will make code the Arduino mega to send a message to the local people near the device to warn them of elephant sightings.
Data Monitoring and Logging Using NodeRed From Master


A Master will be collecting the information from all the deployed nodes and sending the data to the base station so that the authorities can monitor elephant spotting and the data can be used to analyze the elephant sighting pattern and behaviours so that we can make the solution more efficient and bring in necessary changes and take better actions to avoid elephant-human conflicts and for a better co-existence
Now lets setup Node-red :
1.Install Node.js
Download the latest LTS version of Node.js from the official Node.js home page. It will offer you the best version for your system.
Run the downloaded MSI file. Installing Node.js requires local administrator rights; if you are not a local administrator, you will be prompted for an administrator password on install. Accept the defaults when installing. After installation completes, close any open command prompts and re-open to ensure new environment variables are picked up.
while installing make sure to tick this box
Once installed, open a command prompt and run the following command to ensure Node.js and npm are installed correctly.
Using Powershell: node --version; npm --version
Using cmd: node --version && npm --version
You should receive back output that looks similar to:
2. Install Node-RED
Installing Node-RED as a global module adds the command node-red to your system path. Execute the following at the command prompt:
3. Run Node-RED
Once installed, you are ready to run Node-RED
Then open your comment prompt and type
It will show the initialization of the Node-red in the cmd
from there copy the http://127.0.0.1:1880/
and paste it into chrome browser
and this workspace will open up
After that workspace has opened up we need something called the node-red-dashboard
inorder to install it :
click on the three bars you see on the top right and then click on manage palette and then go to install section and paste "node-red-dashboard" there and install it
the window will look like this :
Now we can start setting up the flow in node-red and we will show the data in a table in the dashboard where we can monitor and log the data of elephant sighting from the nodes with the date, time and location
The EleTect dashboard will look like this.
Designing and Manufacturing the Casing for Nodes and Master


A casing for the Nodes and Master was designed using SolidWorks.
Design of Node
Design of Master
Manufacturing
The entire casing was fabricated using 3D printing, I used PLA+ as the material.I will give you the product link.If you need it you can purchase it.I found it quite good.Click on this link to purchase it.The manufacturing was done using Prusa and Ultimaker.
After the 3D printing process we finally assembled eveything and this is the final product.
Demonstration
Vision based model working
Audio based model Working
Scalability of the Project
1) Modular Design:TinyML-enabled nodes enable quick deployment over large elephant corridors. According to a 2021 International Union for Conservation of Nature (IUCN) study, TinyML and other modular technology are especially well-suited for wildlife conservation applications because of their low infrastructure requirements and simplicity of scalability.
2) Range Adjustment: Depending on the length of the forest boundary is, the system can be scaled up or down by adding or removing nodes. Elephant migration patterns were used to determine the optimal node density for cost-effectiveness, as shown by a 2023 deployment in Kenya's Namunyak Wildlife Conservancy.
3) Habitat Diversity: Eletect isn't just for certain kinds of forests. A 2022 study that was published in the journal Ecological Applications discovered that elephants in different African and Asian settings showed aversion to bee noises, indicating the deterrent's universality.
4) Integration with Existing Systems: The LoRa or LoRaWAN communication technology can potentially integrate with existing wildlife monitoring systems, enhancing overall effectiveness.
5) Anti-Poaching:
● Early Warning Systems: Rangers might be informed of any poaching activities by nodes equipped with acoustic sensors, which could pick up strange sounds or gunshots. African savanna anti-poaching operations were greatly enhanced by acoustic monitoring equipment, according to a 2022 study published in Global Ecology and Conservation.
● Tracking Animals: By combining TinyML with GPS, rangers may be able to track endangered animals in real time, keeping an eye on their whereabouts and discouraging poaching. A 2023 pilot study in Nepal proved how well a device like this is in tracking rhinos.
6) Military Applications:
● Perimeter Security: Unauthorized incursions near borders or sensitive military sites may be detected by nodes. TinyML-based acoustic monitoring systems fared well in perimeter security applications, according to a 2021 study published in Sensors.
● Early Warning for Explosives: By adding more sensors, the system might be able to identify the acoustic characteristic of IEDs, which would provide important early warnings. Current research in this field shows encouraging findings from a 2022 study published in the journal PLOS One.
7) Natural Disaster Detection: Nodes with additional sensors can detect changes in air pressure, humidity, or seismic activity, providing early warnings for natural disasters like floods or landslides. A 2020 report by the World Meteorological Organization (WMO) highlights the importance of low-cost, scalable sensor networks for disaster risk reduction.
Conclusion
In conclusion, the "EleTect" project represents a significant step forward in addressing the pressing issue of human-elephant conflicts in Kerala, India. Through innovative use of technology, community engagement, and sustainable practices, the project aims to mitigate the severity of these conflicts, protect lives, and promote coexistence between humans and elephants. By leveraging TinyML-enabled nodes equipped with vision and sound-based detection capabilities, the project provides early warning systems and deterrent measures to prevent elephant incursions into human habitats. The integration of solar power ensures the sustainability of the system, while partnerships with local authorities, wildlife organizations, and educational institutions enhance its effectiveness and reach. With a comprehensive approach to problem-solving, "EleTect" not only offers a scalable solution for Kerala but also sets a precedent for wildlife conservation efforts globally. Through collaboration, innovation, and a commitment to sustainability, "EleTect" embodies the potential of technology to address complex environmental challenges and foster harmonious relationships between humans and wildlife.
We would like to extend our sincere appreciation to Seeed Studio for generously providing the components necessary for this project. Their support has been integral to its success, and we are grateful for the opportunity to collaborate with such a dedicated and innovative team.