Emotion Buddy

This project was made for an assignment I received at HKU Game Art. The goal was to create a project using the Arduino.
I wanted to make something that could help people who have difficulty displaying their emotions. My concept is an emotion buddy. You can cycle through eyes and mouths options and make an emotion combination that best suits how you're feeling. You can put it next to you for others to see or hang it around your neck by adding a strap to it. It also holds a small powerbank so you can use it on the go.
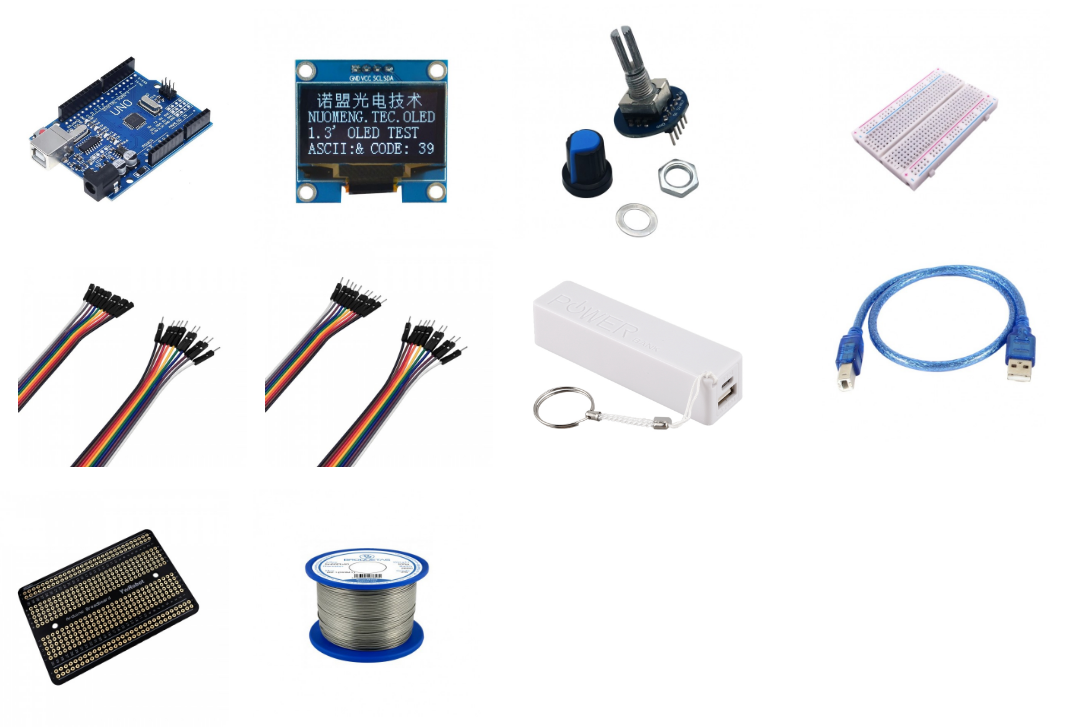
Supplies

1 x Arduino UNO R3
1 x 1.3 inch OLED Display 128x64 pixels
2 x rotary Encoder (module)
1 x breadboard
1 x USB-B to USB cable
1 x power bank (with USB output)
4 x female-male wires
12 x male-male wires
soldering tools
1 x solder tin
1 x breadboard PCB
3D printer
materials for 3D printing
hot glue gun
Testing


I first started with only one rotary encoder that could only turn 360 degrees to do a small test. I coded if statements that would print a different emotion as text on the serial monitor when the rotary encoder was a value between certain degrees (see test 1 video).
Later the rotary encoders modules arrived. These did not have a start and end point so they can be turned endless. With these rotary encoders you can turn trough the cycle of different emotion options but you don't have to go turn it all the way back to pick the first option. Instead it will the cycle will restart after you've turned it until the end of the cycle.
Finally I added the OLED display. I tried to use the u8g2 library to draw bitmaps. However, there would be a buffer and drawing the bitmap took a lot of time (see test 2 video). This meant that the rotary encoders did not have responsive feedback. This made it feel like they did not work. I looked for alternatives and I decided to use the u8x8 library. With u8x8 I could draw text directly on the display. This removed the delay and it made the rotary encoders feel responsive.
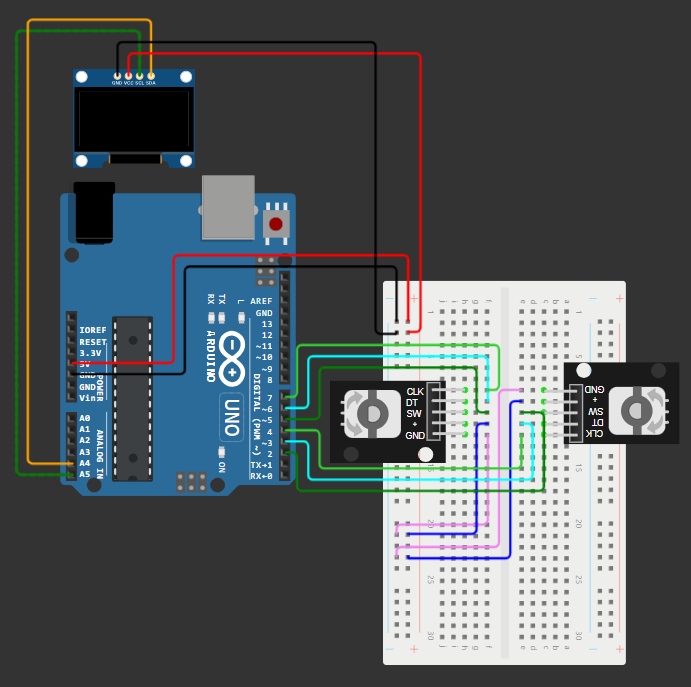
Electronic Scheme

Reorganize your electronics according to the electonic scheme.
This scheme will also be used later for soldering later on.
Code
Open up Arduino IDE and open up this ino file and upload it onto the Arduino.
Downloads
3D Model Sketches


I made some sketches for the case. I initially wanted to do an animal and the ears would be the rotary encoders. This would have the feeling of having a pet by your side. I thought that might make it less weird to keep this with you. It could however cause confusion that it is a pet displaying emotions instead of a display of your emotions. So I decided to go for a clean design. This way all the attention goes to the OLED display which displays your emotions.
I chose to make the case a 3D print since I want a compact and lightweight case.
After some sketching and measuring my components I went into blender. There I could work in scale. This helped me visualize how the components would all fit together.
Print 3D Model


Print the 3D model as seen in the image. I attached the stl files which are ready to be put in a slicer like Ultimaker Cura.
This is the model I printed, however the components do not fit in the case properly. I was also not able to print the entire bottom half because I reserved the printer for one day but I made a misprint. See the pictures for the 3D prints I printed.
I also made some changes to it later on. I filed the part holding the OLED display down because it was too low for the OLED display to fit in. I also made a hole on the top case for the adapter. I also made the hole on the bottom case a little bit bigger so it could fit the adapter and the charger for the powerbank.
Soldering


Now we want to solder everything together. If we use a PCB that is structured in the same way as a breadboard we can just copy exactly what we had in the electric scheme and solder it. I cut a litte bit off of the PCB since it would otherwise not be able to fit in the case.
If everything is soldered together well it should work just like before. I recommend to use a little bit of hot glue to keep the wires in place.
Putting It Together


When the soldering is done we can put everything in it's place.
First I put the PCB with the wires facing up in the top case. Then I add the Arduino on top of that facing up. The fit is not very good but I used some tape to keep it together. In the bottom case you can put the powerbank and connect the adapter from the Arduino to the powerbank through the holes.
The I put the top and bottom case onto eachother and used some tape to hold it together for now.
Finalizing


You could however still see the insides since the components are too big for the case. I made some hotglue strips the size of the case on baking paper. Then I glued the strips between the top and bottom case like a sandwich. Finally I added a lanyard to the top so you can wear it around your neck.
If I had more time then I would just remodel the case and print it out. However, I did not have enough time to do that and thus I opted for this option.
End Result
See the video for the end result.
Rotate the left rotary encoder to cycle through the eyes options.
Rotate the right rotary encoder to cycle through the mouth options.
Clicking on the rotary encoder clears the eyes or the mouth.
Reflection
I had never worked with electronics and did not even know what an Arduino was. It was very interesting to learn a bit about how electronics work and how they're made. Nowadays we're always surrounded by electronics, so knowing a bit about how they work is really useful.
The coding for Arduino was a bit different than the coding I've done until now. I was able to find answers to all my questions thanks to the active Arduino community.
I had also never before made a 3D print. I have always wanted to make a 3D print and this was a good oppertunity to do it. Measuring everything and making sure it all fits was very tricky. In the end I was not able to print a 3D print that could properly hold all the components. I should have probably made my first 3D print earlier so I had time to make a second iteration. I was only able to do one and since it did not fit, I ended up having to modify the case to make it work. However it is not very compact and it does not fit tightly together. So if I had more time I would definitely make more iterations and also look into using a smaller Arduino. I just used the Arduino I got in the schoolkit but it is a bit big. I would like to refine and iterate more in the future but I am quite satisfied with the end result of my first iteration.