Orbiting USS Enterprise Music Box Hat With Matching Illuminated Hat Stand:
by steve-gibbs5 in Craft > Costumes & Cosplay
839 Views, 5 Favorites, 0 Comments
Orbiting USS Enterprise Music Box Hat With Matching Illuminated Hat Stand:


Boldly crafting where no hat has gone before - join me on a mission to create wearable Star Trek fan art you can wear on your head.
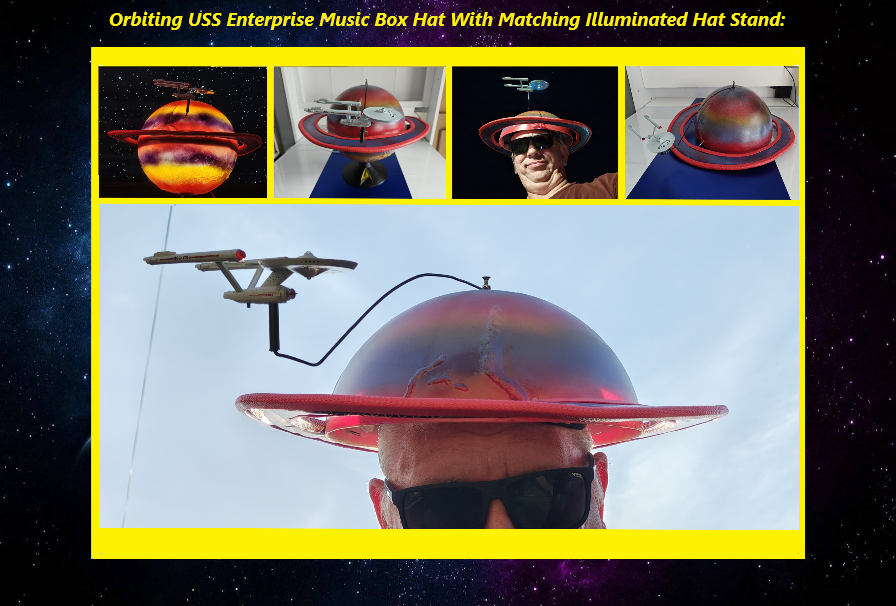
In this mission, we'll be building a wearable planet (well the top half of a planet), complete with the USS Enterprise going around it in orbit, the classic Star Trek theme on optional audio playback, and a matching bottom half of the planet which acts as both a hat stand the second half of an illuminated display piece. Whether you're preparing for a costume or con event, a sci-fi competition, a mad hatter tea party, or just seeking a glorious monument to your fandom, this project will boldly go straight to the top of your head for your away missions... and then rest on its own display pedestal when you're in your crew quarters.
The Project:
This is a plastic domed shape hat which is painted to look like a planet along with supported cardboard planetary rings that acts as a hat brim. The Enterprise slowly orbits the planet at around 5 RPM (Revolutions Per Minute) using a small DC motor and a length of 13 gauge coat hanger wire. The Enterprise itself has internal lighting that can be switched On or Off independently. A small recordable sound module and speaker plays the TV shows theme tune, and its recordable feature allows you to record what you want so you can play and record your own composition, or record the actual theme itself. And when the hat is not being worn at home, it sits on a hat rest which is painted to match the hat and make it look like a whole planet sitting on a small display stand. The hat rest has LED strip lighting on the inside so the planet glows at night. This build only uses a few basic tools and easily available materials so pretty much anyone can make their own.
The Inspiration:
Many years ago I saw a TV show that was about the Star Trek memorabilia that famous Trek fans had collected. This one guy, a British radio DJ had this 'Enesco' musical box display that played the TNG theme and had the Enterprise D orbiting it and I really wanted to get one myself. But it turns out that they were pretty rare and the one's that were available were incredibly expensive, so I never managed to get one. I watched the original Star Trek series fairly recently and it got me thinking about that display piece again, and played with the idea of actually making one myself. Then, while browsing Instructables I looked at the active competitions that were running and had a look at the 'Mad Hatter' competition entries. I loved what I saw, some truly imaginative and cool projects, then a flash of thought went through my head thinking that the orbiting Enterprise could make a cool hat. Then the further idea of a hat stand that could double up as a display piece came to me meaning that I could finally have a version of what I saw all them years ago. I already had a tiny 'Kirk' era Enterprise model which lit up and I wanted to use that... so I did, and, well you have seen the results. Something long awaited for, fun to build, and a bit mad, maybe a little silly, but ultimately a fun head topper and display piece that gets a lot of smiles.
The Making:
- A small 5 inch model of the USS Enterprise that lights up.
- 2 x acrylic clear dome hemispheres to be used, one for the hat and the other for the hat stand. I had an old lamp shade that would be perfect.
- Fit a recordable sound module that records and plays sounds so like the theme tune. This would be attached inside towards the back of the hat along with the small speaker.
- Use of a website that has a free audio composer where you can make your own tunes that has a music box style sound.
- A small 5 volt DC motor that slowly spins at 5 RPM to make the Enterprise orbit the hat. That would take the Enterprise about 12 seconds or so to make a full orbit.
- Two cardboard rings sandwiched together would be painted and attached to the hat.
- Wire coat hangers that would be cut/bent to size and shape, and be used to connect the motor to the ship, and support the planet rings.
- Spray paints to make the domes and cardboard ring look like a ringed gas planet.
- An LED light strip would be fitted into the dome that would act as the hat stand, and with the hat in place, illuminate the planet at night.
- Then finally a strap insert from an old safety hard hat to make our planetary hat stay on the wearer's head securely.
This project is a lot of fun to make and to wear, so lets set our phasers to fun, beam down to the following steps, and lets...
'Make it so'.
Supplies


Tools:
- Hot glue gun
- Needle nose pliers (2 pairs if you have them, helps a little better)
- Hobby knife
- Cutting board
- Wire cutters/strippers
- Hacksaw
- Sanding block and fine grit sandpaper
- Drill or soldering iron to make holes through plastic
- masking tape
- Cleaning cloth
- Scissors
- Electric wire shrink tubes
- Marker pen and pencil
- A nut, bolt and washers to join the bottom dome to the stand base
- Optional: Heat gun to make topography on the domes if wanted
Materials:
- 2 x acrylic clear dome hemispheres 25cm wide (or anything similar shaped and sized to fit your head)
- Recordable sound module with speaker that records and plays sounds
- Inner head support straps from a hard hat
- Slow rotation geared micro DC motor, 6 volt, 5 RPM
- Wire coat hanger, 12 gauge (or similar wire)
- Mini latching On/Off switch
- Spray paints for plastic (colours of your choice, I used red, purple, yellow, black, white and blue)
- 5 inch USS Enterprise model (the one I've linked to is very similar to what I already had and used)
- Scrap pieces of plastic
- MusicBoxManiacs Create melody maker (to make the music box style theme tune, or record your own tune)
- An old table lamp base or similar to make the hat stand base
- 1 meter white LED Strip
- Sheets of cardboard or similar for the planetary rings (hat brim)
- 'U' shaped rubber molding strip, red
*The material links I have listed above are U.K links as that's where I am, so they are only meant for reference so you can purchase the same or similar items in your location.
List of the Following Steps:
- Step 1: The Design: A quick guide to how I designed my hat and hat stand.
- Step 2: Making the Hat: Fitting the motor, head harness and paint prep.
- Step 3: Making the Rings: Cutting out the rings and fitting the hat supports.
- Step 4: Making The Hat Stand: Fitting the LED strip, hat rest and prep work for the base.
- Step 5: Painting: Tips and instructions on how to spray paint all of the pieces.
- Step 6: Final jobs and assembly: Installing the electronics, fitting the ring and some final jobs to finish off the hat and stand.
- Step 7: The Theme Tune: A quick guide to show how to use the music box creator, with music notes and tune ideas.
- Step 8: Final Log Entry: Some final thoughts about this project.
Build time:
- Two days including painting (could be less if quick dry/cure paint is used)
The Design:


In the designing of the hat, some important factors needed to be considered...
- Weight: It had to be light weight so it would be comfortable to wear.
- Location of components: With limited space, the motor, battery pack and sound module needed to be located so they didn't hinder the wearing of the hat, yet be accessible, especially for the battery pack.
- Strong yet lightweight wire had to be used to connect from the motor to the ship. Armature wire would be too flexible to take the weight of the ship, but coat hanger wire would be thin enough not to be too noticeable, but durable enough to hold its curved shape and hold the weight of the ship.
- The buttons to play the music and to turn the motor on and off would be located at the back of the hat.
- Both domes would be rubbed down/scuffed up with a sanding block to help the paint adhere and to defuse the LED lighting.
- The DC motor needed to be low voltage, ideally the same voltage as the sound module so it could run off the same battery pack. It also needed to be low profile so it could be located in a limited space as to not effect the head space in the hat, and also have a slow turning speed and run quietly.
- The inset from a safety hard hat attached to the upper dome to secure the hat to the wearer's head, with the possibility of an elastic chin strap would be decided later to help make the hat wearing more sturdy (I decided not to use one in the end).
- The base dome would be painted to match the hat half, a bright LED light strip attached to the inside of the dome to illuminate both halves of the planet in a dark environment when put together. This would be fitted to a sturdy base plate to sit on a desk top, table or display shelf.
- An small lip would be made using some plastic strips which would attach to the inside rim of the base. This lip would support the hat when placed onto the base and stop it sliding off.
With the above factors considered, some plans were drawn up to give me an idea of how it would look, making notes of anything else that needed to be considered or worked out. Lets begin making our hat.
Making the Hat:


We will start off making the hat itself, the center piece of the whole project. Stage 2 is optional and was to try which was to form some textured areas and add a little definition to simulate small land mass areas, craters and mountains etc. I was 50/50 whether to try this or not, but it's something I wanted to try as an experiment. You can leave the domes perfectly spherical, but if you wanted to try this, stage 2 will explain how I did it.
First we will prep and fit the DC motor.
- Using a sanding block and fine grit sandpaper (I used 180 grit), lightly sand the outside of both domes, moving in a circular motion. Wipe clean with a damp cloth to finish off. Put one of the domes to one side for now.
- (This is the optional stage): Using a heat gun, heat up areas inside of the dome and use a piece of wood to lightly dent and disform the surface to create the textured areas. Try not to go too close to the edge as you don't want to deform the diameter of the hat or the base.
- Cut a small hole in the top of the dome where the motor will be mounted (as I used an old lamp shade, it already had a hole I could use).
- Grab a small piece of scrap plastic sheet and cut out a rounded square or circle enough to cover the hole in the dome and leaving enough overlap to apply hot glue. Then melt or drill a hole for the motor shaft to fit though. Test fit the motor and make sure the shaft comes out of the top of the dome/hat and that it is high enough that the small hole in the shaft where the wire coat hanger will be inserted doesn't rub on the hat itself. Trim off some of the plastic where needed to help raise the motor.
- Glue or screw the motor to this plastic plate, then glue the plate to the inside top of the dome making sure the shaft of the motor is centered to the hole in the dome.
- Solder two wires to the motors wire terminals if you motor does not come pre-wired.
Now we will fit the the hard hat insert.
- Using another piece of scrap plastic, cut out a piece larger that the gap in the top of the insert (the size/shape may differ to the hard hat insert I used).
- Hot glue this piece to the outer side of the hard hat insert. This is to separate the bottom of the motor from your head.
- Now rub down the small plastic lugs that would originally hold the insert to the hard hat shell. Rubbing these down is to score the ends and make the hot glue adhere.
- Drop the insert to the dome and start hot gluing the lugs to the dome. Leave a small gap from the bottom edge of the dome to where you're attaching the lugs, as this gap will be needed to sit the hat onto the hat rest lip we will be making in the next step.
- When It is all glued together, test fit to make sure it sits on your head well. This also gives you the opportunity to look a little silly... very important :-)
And now we con look at making the wire attachment to hold our starship in place.
- With a wire coat hanger and a pair of wire cutters, cut the hooked part of the hanger off so you're left with just the straight wire. Straighten out the wire, feed one end into the motor shaft, screw it down to secure it, then carefully and gradually bent it into a curve a little wider than the hat.
- Use a pair of needle nose pliers and bend the wire so it is horizontal just a little higher than the base of the hat.
- Make a further 90 degree bend facing up then cut off the excess wire leaving around a 3 to 4 cm length to attach the ship to.
- The ship model I used had a little plastic nodule coming from the bottom, and a small plastic stand with a small hollow tube protruding upwards for the ships plastic nodule to fit in to. I cut this tube off from the stand and press fit it to the coat hanger wire where the ship would be mounted. I put the wire into a vice and gently tapped the tube over the wire with a hammer. If you use a different model, glue a small plastic nodule to the bottom of the ship, and use something like thick electric wire head shrink tubes or similar to fit over the wire. You want the ship to press fit in and not be able to spin around on the fitting.
- Test fit by attaching the wire to the motor shaft, then fix the ship into place, and temporarily connect the motor to a battery pack. What we are looking for is that the ship rotates freely without rubbing on anything, and that the ship is pointing and moving in the correct direction (not flying backwards). After a successful test, disconnect the motor from the battery pack, remove the ship, and the wire.
We can set aside the hat for now and make the hat brim/rings.
Top tips:
Take care if you use heat gun. Don't hold the gun to close to the plastic or hold it in one place for too long. Keep moving the gun around to evenly heat the surrounding area that needs heating/forming. And use gloves of a cloth when handling the heated plastic where necessary.
Scoring, keying, scratching up plastic pieces which need to be stuck together helps the hot glue stick to the pieces for a stronger bond as the glue seeps into these little scratches and grips better.
Making the Rings:


Two large sheets of cardboard are needed to account for the larger size than the diameter of the hat, and the width of the rings themselves. For this I used an old packaging box which was corrugated.
- Lay one sheet on the work surface, place one of the domes on top, the draw a circle around the dome onto the cardboard (this will only be used as a guide, not for cutting). Then remove the dome and draw a slightly larger circle, about 5cm or so, than the one you just drew. then draw a third circle to the width of the ring you want. I made mine about 8cm. You can either free hand or use a drawing compass to make the two outer circles.
- Place the cardboard onto a cutting board then cut out the two outer circles to leave you your first ring.
- Place your first ring onto the top of the other sheet of cardboard. Here, please note the direction of the corrugation (the faint lines in the cardboard itself), and align your ring at 90 degrees so the corrugations run in different directions (think of a grid). When the two rings are attached, having the corrugation running in different directions will help make the rings become more ridged.
- Trace around the ring with your pencil and draw a little mark on the cut and uncut ring to use as an alignment mark, then cut the ring out.
- Cut three equal lengths of coat hanger wire, about 10cm or so. These will be trimmed down later. With one ring on your work surface, hot glue the wire to the top of the ring, spaced out equally. Then using your alignment marks, apply some more hot glue to the ring then align and attach the second ring on top. If you're able to, place a flat weight on top of the rings to help compress the rings together while the glue sets.
With a final trim to neaten up the ring edges and make them equal, it can now be put to one side ready for painting.
Top tip:
As well as corrugated cardboard, strong flat cardboard can be used as well, or even plastic sheet like PVC or HIPS (High Impact Polystyrene).
Making the Hat Stand:


This is where we will use the second dome which we already prepared earlier. To make the hat stand, I used the base of an old table lamp, but you could also use a block of wood or anything that would be suitable. I also used some black scraps of plastic sheet. I used this as it is all I had to hand. Ideally I would have liked to use a clear or opaque plastic for the internal light strip to shine through.
We will start making the lip for the hat to sit over.
- Using a piece of scrap plastic, cut off a strip or some strips about 4cm wide and long enough to go around the full inner diameter of the dome.
- Rub down the strip with sandpaper to score the surface, then wipe clean with a damp cloth.
- Now apply hot glue to one half (lengthwise) to the strip and attach to the inside of the dome so 2cm is attached to the dome, and 2cm is overhanging the dome edge. This is there the hat halve will sit over, keeping it in place. Start by gluing a small part at one end to help hold the strip in place and making attaching the rest of it easier. Glue the strip in sections as the glue may cool down before you get to attach it.
Now to fit the LED light strip.
- Place the dome up side down onto a roll of tape or similar to support it. Then make a small hole to feed the LED strips power cable through. The hole should be located near the top of the dome (which will be the bottom when turned the right way up), and what will be the back of the hat stand (what will be facing away from you).
- Feed the power cable though the hole from the inside.
- Then start to peel back the adhesive backing from the light strip, and start attaching it to the inner hat stand lip. Follow it all around the lip until fully stuck down, then connect to power to test.
And now to attach the dome to the base.
- Make a hole in the very top of the dome (either drill of melt with a soldering iron).
- Make a hole through the base if it doesn't already have one, and feed a bolt and washer through it.
- Place the dome over the bolt, add another washer and screw a nut to fasten the dome to the base.
- Put the newly made hat stand onto your work surface and place the hat on top for test fitting. The take it apart ready for painting.
Top tip:
As I mentioned above, I used a black plastic strip to make the lip that helps the hat stay in place when on its stand. The only issue is that the LED lighting doesn't shine though it, leaving a dark stripe when illuminated. I'm not too bothered by this as I look at as this dark area around the equator is a shadow caused by the rings because planets are not illuminated from the inside, but rather external star/sun light reflecting off the planets surface (well that's my excuse anyway lol). But to avoid this, you could use a transparent or opaque plastic that will do the same job, but allow the internal light to shine through.
Painting:


With the build almost complete, we can now give our hat and stand some colour. This is where we can get really creative by choosing colours and designs to make your planetary hat truly your own. You can go with stripes of similar colours that blend into a gradient like a gas planet like I did, or go for a more topographical look mainly using a single colour with different shades... think of a hot molten volcanic planet, hot glowing red with different shades of reds and oranges with dark spots here and there. Or even use Earth as your inspiration with blues for water, greens for land mass and areas of white for cloud cover... the choice is yours.
As you've seen in the 'Materials' list, I opted for spray paint as we can give the two hemispheres some striking colour with thin coats allowing the display light to shine through when the hat is on the stand. A thin layer of acrylic paints and marker pens could also work if you want to add more details.
- With the two halves of the planet already sanded to diffuse the light and give a key for the paint to adhere to, give both halves a good clean and make sure it is then fully dry. Then mask off anything that doesn't need paint such as the bottom of the hard hat insert and the lip of the base dome that the hat will sit in to.
- Start by applying a first thin even coat (dust coat) of your primary colour, for me it was a red strip. All we are doing here is adding a very light base coat and not aiming for a solid colour. That will come with the following coats. Add the other colour stripes using the end of the DC motor to hold a spin the hat, and a nut and bolt to do the same with the base.
- Wait for the first coat to dry, about 20 minutes or so (check your paint can instructions for dry times), then apply a second slightly thicker dust coat of the base colour. When the second coat is dry, check to see if you're happy with the coverage and that light can shine through. If you're happy, move to the next stage or if you feel it needs it, apply a third and final light coat and leave to dry.
- While the domes are fully drying and curing, grab your planetary ring and spray paint that the colours you want. You can go much thicker with the paint here and use a pencil or thin marker pen to mark out the different rings when the paint is dry. Spray one side at a time and let dry, or hang the ring up somewhere with some wire or similar and spray both sides at the same time.
- Now paint the stand and the wire that holds the ship. I went for black here as it won't be so noticeable at night when the planet is illuminated. If you use a nice piece of natural wood for the base, you may not want to paint it and instead either leave it bare of give it a varnish to show off its natural beauty.
Now the painting is done, we can move on to final assembly.
Top tips:
If you want to get a gradient effect with the paint, just use a steady even hand and spray a bit closer, but just don't spray too close to the object otherwise you will get paint runs pretty quickly. It doesn't matter if you don't get exact straight lines because, as was said in the Alien 'Prometheus' movie... "Nature doesn't do straight lines".
As mentioned above, we only want light coats on the domes because we want light to pass through. So only do dust coats to build up the colour, enough for the light to shine through, but at the same time giving a nice coverage so they look good without lights, especially for the hat itself which won't be illuminated when you're wearing it.
Final Jobs and Assembly:


With the paint now dried and cured, we are now at warp 9 heading to completion.
Installing the ring.
- Turn the hat up side down and rest on a roll of tape. Then lay the ring on top with one wire at the front and the other two either side towards the back. Line up the ring so there is equal spacing all round and mark the wire so there is about 3cm that will sit inside the hat. Cut off the excess wire.
- Leaving the ring in place, melt or drill three holes into the hat where the wires are, leaving about a 2 to 3cm space from the edge so the hat can sit over the hat stand lip.
- Now insert the wire supports into the holes. The location of the wires should pretty much hold the ring in place with little to no movement. But to make it more secure and to move the sharp ends out of harms way, use a pair or needle nose pliers (or two pairs if you have them), and bend the ends of the wires 90 degrees inside the hat.
- To finish off the ring, attach the 'U' shape rubber molding strip around the outer edge, starting from the back of the hat. Then attach some more to the inner edge. You will have to trip small pieces off to go around the wire supports. Go around the ring pressing in the molding strips to make sure they are fully attached.
Now to fit the electronics. These will be installed on the inside of the hat at the back.
- With a fine point on a soldering iron or a small drill bit, make some small speaker holes in the back of the hat.
- With a small latching On/Off switch, join one end to the red positive wire of the DC motor to one terminal, then attach another piece of wire to the other terminal. Cover with shrink tubing to insulate the terminals.
- Cut then strip the red positive wires of the battery holder and sound module. Place some shrink tube over one wire, then join the wire from the motor switch and rejoin the battery holder and sound module wires, then cover with the shrink tube to insulate.
- Now cut and strip the negative sound module battery pack wire, join the negative motor wire and rejoin and insulate the wires.
- Place come hot glue around the edge of the sound module speaker and attach to the inside of the hat over the holes you made earlier.
- Now glue the sound module, the modules play and record buttons, and motor switch and the battery holder to the inside of the hat. Make sure the battery holder is easy to get to, to be able to change the batteries, and that it wont be in the way when you put the hat on. Also locate the sound module play button where you can have easy access while wearing the hat. The record button can be further up in the hat so you don't press it by accident while wearing the hat. And do the same with the motor switch, placing it in a position where you can have easy access while the hat is on your head.
- Now test to make sure everything works as it should. And also test fit the hat itself to make sure you can reach the buttons/switches okay while wearing it.
Over to the hat stand.
- Place the bolt and washer through the bottom of the hat stand base, then put the dome into position over the bolt, put the other washer on and screw the nut down.
- Before you tighten the nut and bolt, make sure the dome is sitting straight and that the LED power cable is at the back. Once you're happy, tighten them up (not so tight where you could damage the bottom of the dome).
- And a nice little bonus job. My Enterprise model came with a little black stand that's in the shape of the Starfleet insignia and you may have noted in the painting step that I painted it yellow. When the paint was fully dry I rubbed down the edges to make them black again, went around the edges with a black marker pen, then glued it to the front of the hat stand base. A nice and free little finishing touch.
- Before attaching the Enterprise, put the hat onto its new hat stand and test the lighting to make sure that not only the lights still work, but you're also happy with the way your new planet looks illuminated.
- And now attach the rod to the motor shaft making sure it is in the correct position, and finally attach the USS Enterprise ready for its official maiden voyage.
All that remains is to don your new headwear, press the motor switch, and have some fun. And then place it on its hat stand and see your orbiting wonder in action for yourself. All that's left to do now is to add that recognizable theme tune.
Top tips:
You probably noticed that I placed the buttons for the motor and to play the music in easily accessible places so they can be operated while wearing the hat. But if you get the same recordable sound module as I did, place the 'record' button out of reach from the play button as this will stop you accidently pressing it and deleting your original recording.
And also think about placement for the speaker. It's not particularly loud, but you don't want it near your ears so at the front or back of the hat is ideal.
The Theme Tune:


This is an optional step if you want to have the theme tune playing. For the music you have seen in the 'Materials' section that I chose a sound module that can have sound/music recorded onto it directly with its built in microphone. I got this one as it had an included speaker and battery holder, but there is another version that has a USB-C socket that connects to a PC so you can upload an MP3 track, so the choice is yours here to which one you opt for.
If you opt for the musical feature, you have a few options you can choose from...
- Compose your own theme tune version using a piano or keyboard,
- Use music software on a PC to compose your theme,
- If you have a copy of the theme tunes, record a section from that,
- You could even ditch the sound module and order a custom made wind up music box mechanism with the theme tune and attach that to the hat,
- Or you can do what I did below to have a music box style sound...
First thing is to go to the MusicBoxManiacs Create website which has a free melody maker to compose your music in the style of a wind up music.
- You will be presented with a grid with a music notes column on the left hand side. Click on one of the boxes in the grid and a note will play. Click it again and it will remove the note. Click in all of the box notes, spaced out correctly to make your melody. Test play and adjust the notes where necessary.
- Save your progress as you go, and when you finished your melody.
- You can now either hold the sound module mic up to your computer speaker, press the module's record button, then press play above the note grid on the website. When the tune finishes, press the module's record button again to stop the recording. Now press the module's play button to check that it sounds okay. Re-record it if necessary.
- Or you can click on 'Publish' which will give you a link to your new tune and you can then download it as an MP3 file to your computer. Then follow the above sequence to record it onto the sound module.
If you're not able to read music notes or composing music is not your jam, then please follow the grids I have included in the pictures above and also the attached supporting files, which is for the grid notes for the original Star Trek theme. Hey, I admit that it's no masterpiece, but it worked for me as a first attempt using this website composer, and it should give you a good starting point where I'm sure you can improve on it (if you do, please share your improved version in the comments).
And with our theme tune ready to play, all that remains is to put on our new hat, and let the Enterprise fly.
Final Log Entry:


And there you have it... your very own planetary hat, complete with your very own starship orbiting your head with the optional twinkle of music box style notes making up the original theme tune. And when you're not in a hat mood, it joins its base to make a delightful display piece that will turn heads in any starbase. Using a few inexpensive materials and basic tools, we've boldly gone where most milliners fear to tread. Very lightweight, pretty comfortable to wear, and also fairly sturdy. Just don't look down too sharply, and remember that little starship when you walk through doorways as you don't want to knock it off and send it to where no starship has gone before.
Of course you can also purchase, 3D print or scratch build a ship model and theme tune of your choice, any registry of the Enterprise, Voyager, the Defiant... even DS9 or a Bird of Prey with the accompanying music, the choice is yours. And that also goes for the overall hat design for the planet by choosing your own colour design, and the choice in the style of music whether its the music box style or a recording of the original theme tunes... you can make this hat with any style that suits you.
In fact, because the ship sits on a press fit support, I have plans to either purchase or even make the Enterprise D and Voyager models the same size with a little press fit nodule on the bottom so they can be interchangeable, along with a recording the corresponding theme tune on the sound module.
I did also play with the idea of adding another LED strip into the hat, but as it will only really be worn in lit environments, I didn't see the need for it and I actually like the look of the hat as is and also thought it would shine too much light on my forehead. But this is maybe something I'll look at again, a 5 volt strip that could connect to the existing sound module/motor battery holder as it's the same voltage, and make a small ring that would sit above the ring wire supports in the hat and attach the LED strip to that, facing up.
Although I love getting stuck in to larger more complex projects, I also do enjoy this is the sort of smaller scale project using only a few tools and materials, something really fun to design and make, and something that makes people smile and ask questions about. So until the next time, lets boldly wear our headgear with pride... and never underestimate the power of a good hat.
And instead of my customary "many thanks for reading, and happy making" sign off, I'll instead end with...
Live long and prosper!
Design, Make, Document, Share,
It’s the Instructables Way!