Epaper Display and Google Calendar With ESP8266

by AZDelivery in Circuits > Arduino

167 Views, 2 Favorites, 0 Comments

Epaper Display and Google Calendar With ESP8266

Screenshot 2025-04-15 085126.png

Nowadays, many people use their smartphones to take care of everyday things like planning appointments. But with so many notifications coming in, it's easy to lose track of upcoming appointments. In this blog post, we will build a calendar with an e-paper display and an ESP8266 microcontroller that displays upcoming appointments. To ensure that the appointments are always up to date, we access them via the internet using a so-called API interface. One programme that includes this function is Google Calendar, which is also available on many operating systems. All you need is a Google account, which you can create for free if you don't already have one.

Supplies

We need hardware:

2.9 “Epaper display

ESP8266 microcontroller Nodemcu or D1 Mini

Optional:

Button

3D printed housing

Screws & melting thread

First of all, the display must be connected to the microcontroller. This can either be connected via a cable connection directly soldered, or via a self -cramped cable, which is plugged into the pen strip of the display.


Wiring with a socket bar

Soldering the socket bar as shown


Software

The required software consists of two parts:

1 Google script

First go to the Google Calendar website, register with your account and create a new calendar on the left at "More Calendar". Under this calendar, you will save all appointments that are to be displayed on the display in the future.

Now open the Google Script website, register with the same Google account as above. Next, click on the "New Project" button on the top left,

Now a window opens in which you copy the following code:


// Copyright (c) 2024 Bastian Brumbi
function thread(E) {
 var Str = '';
 // Calculate the start and end time of the calendar query
 var start = new Date();
 start.sethours(0, 0, 0);
 const oneday = 24*3600000;
 const Stop = new Date(start.frozen() + 14 * oneday); // 14 days
 // read data from calendars (copy for several calendars)
 var calendar = Calendarapp.GetcalendarsByname('test')[0]; // Enter the name of the calendar here
 IF (calendar == undefined) {
   Logger.log("No access");
   return Content service.CreateTETEXTOUTPUT("");
}
 // Call appointments
 var events = calendar.GETEFENTS(start, Stop);
 // form a string from the data, which is finally returned via the API link
 for (var II = 0; II < events.length; II++) {
   var event=events[II];
   Str += event.Get -start time() + ';' +
   event.fetitle() +';' +
   event.dip() + ';'
  ;
}
 
 return Content service.CreateTETEXTOUTPUT(Str);
}


Finally, press the blue field “Provide"And choose there"New provision" out of. In the newly opened window, select the deployment option “Web app“.

Now enter a description and change the right of access to "Everyone". In the next step you will be a "Defective ID"Displayed. This is the Api-Key, via which the ESP can later access the data. This must then be inserted into the source code. To test the script, you can open the link below. As a result, the dates of the next 14 days with a start and end date should be displayed separately with a semicolon.

This script only reads the dates from a calendar. If you want to display several calendars, you have to copy the block and insert it with a changed calendar name. (However, only the first 4 appointments of the chain are displayed on the display).

If you want to read further data from your calendar, you will find the necessary information in the Google Developer Docs.

2 Arduino Ide/Platform IO

Arduino IDE

First you have to install the associated libraries:

Arduinojson

Https redirect

GXedp2

Adafruitgfx

If you are programming a microcontroller with ESP8266 processor for the first time, you must still Preferences in the Board administrator-URL Copy field: http://arduino.esp8266.com/stable/package_esp8266com_index.json. Then install via the Board manager the ESP8266 Package.

Platform io

Copy the following lines into the Platformio.ini file of your project:


[ENV: ESP8266]
platform = Espressif8266
board = d1_mini
framework = Arduino
monitor_speed = 115200
lib_deps =
bblanchon/arduinojson@^7.1.0
https://github.com/electronicsguy/HTTPSRedirect.git
wifi
zinggjm/gxepd2@^1.4.8
adafruit/adafruit gfx library@^1.11.10


The Sketch

Sketch download

First, the required libraries and the fonts (fonts) installed with the Library display are integrated.


// Copyright (c) 2024 Bastian Brumbi
// Google Calendar Epaper
#include
#include
#include
#include
#include // https://github.com/bblanchon/arduinojson
#include  // https://github.com/electronicsguy/esp8266/tree/master/httpsredirect
#include
#include
#include <fonts/freemonobold12pt7b.h>
#include <fonts/freemonobold9pt7b.h>
#include <fonts/freemono9pt7b.h>


Subsequently structs created for the individual dates and their time. These are then saved in the form of a list of four elements.


const intimately Max_entries = 4;
struct Time { //Time
 String day;
 intimately date;
 intimately house;
 intimately min;
};
struct Entrry { // calendar events
 String title;
 Time start;
 String start date;
 Time end;
 String final date;
};
Entrry entries[Max_entries]; // List of events


After that, variables for the line break are initialized for longer names and for the network.


intimately offset = 0;  // shift in the case of a line break
// Enter api-key here
char const * const dsthost = "script.google.com";
char const * const DStpath = "/Macros/S/Key/Exec";
intimately const DStport = 443;
// Enter WLAN access data here
String SSID = " ";
String Password = " ";


Now we create objects for the Wificlient, which will later be used By the which will later be used By removing the comment sign of the line.


Wificlient client;
Gxepd2_3c<Gxepd2_290c, Gxepd2_290c::Height> Display(Gxepd2_290c( 2, 4, 5, 0));
// GDEW029Z10 128x296, UC8151 (IL0373)
// gxepd2_3c <gxepd2_290_c90c, max_hight (gxepd2_290_c90c)> Display (GXEPD2_290_C90C (2, 4, 5, 0));
// gxepd2_3c <gxepd2_290_z13c, gxepd2_290_z13c :: Height> display (gxepd2_290_z13c (2, 5, 0));
// gdeh029z13 128x296, UC8151D
// gxepd2_3c <gxepd2_290_c90c, gxepd2_290_c90c :: Height> display (gxepd2_290_c90c (4, 5, 0));
// gdem029c90 128x296, SSD1680


Below you can set the colors of the title, the appointments and the appointment time, as well as the title.


#define Titlecol GXepd_black
#define NameCOL GXEPD_RED
#define timecol gxepd_black
String title = "Upcoming appointments";
void extractdata(const String& Str);
String getvalue(String data, char separator, intimately index);
void readcalendar();
void display event(intimately I, intimately y);
void convime();
void convayname();
void error code();


In the set up() Only the display and the LED status is initialized.


void set up() {
 pin mode(15, OUTPUT); // Status LED
 Display.init(115200);
 Display.setrotation(3);
 Display.Setfullwindow();
}


In the Loop () The ESP first connects to the WLAN, during which the status LED flashes. If no connection is still established after 20 seconds, the ESP is restarted. After a successful connection, the display is using the method Display event () described.


void loop() {
 pin mode(15, HIGH);
 Wifi.fashion(Wifi_sta);
 Wifi.Begin(SSID, Password);
 long t_start = Millis();
 while (Wifi.status() != Wl_connected) {
   digital(15, Low);
   delay(500);
   digital(15, HIGH);
   delay(250);
   IF(Millis() - t_start > 20000) ESP.remaining start(); // No prohibition after 20 seconds - restart
}
 Display.first page();
 do
{
   readcalendar();
   convime();
   convayname();
   Display.Fillscreen(Gxepd_white);
   Display.set font(&Freemonobold12pt7b);
   Display.setcursor(20, 15);
   Display.SettextColor(Title col);
   Display.print(title);
   Display.drawline(0, 20, Display.Width(), 20, Gxepd_black);
   display event(0, 40);
   display event(1, 60);
   display event(2, 80);
   display event(3, 100);
}
 while (Display.next page());
 digital(15, Low);
 Display.poweroff();
 Wifi.disconnect();
 delay(1000 * 60 * 60 * 1);
}


The following method establishes a connection to the server, reads the data in the form of a string and extracted By calling up Extractdata () The individual data (start time, name, end time).


void readcalendar() {
 Https redirect* client = nullptr;
 // establish connection with server
 client = new Https redirect(DStport);
 client->setinSecure();
 client->Setprintresponsbody(false);
 client->SetContentTypehader("Application/Json");
 Bool flag = false;
 for (intimately I = 0; I < 5; I++) {
   intimately retval = client->connect(dsthost, DStport);
   IF (retval == 1) {
     flag = true;
     break;
  }
   Else error code();
}
 IF (!flag) {
   error code();
   delete client;
   client = nullptr;
   return;
}
 // save the server's answer
 client->Get(DStpath, dsthost);
 String GoogleCaldata = client->tresponsbody();
 // extract data from string
 extractdata(GoogleCaldata);
 delete client;
 client = nullptr;
}


In the night function, searches for the semicolons that separate the individual data and then stored this data as a string in the list, in the associated elements.


void extractdata(const String& Str) {
 String tempo = Str;
 intimately index = 0;
 intimately entrry count = 0;
 while (tempo.length() > 0 && entrry count < Max_entries) {
   // position of the first semicolon
   intimately POS = tempo.indexof(';');
   IF (POS == -1) break;
   // Data found By storing and deleting from chain
   String token = tempo.substring(0, POS);
   tempo = tempo.substring(POS + 1);
   // via index identification which element is present
   // then save in the list
   IF (index % 3 == 0) {  // start date
     entries[entry count].start date = token;
  } Else IF (index % 3 == 1) {  // title
     entries[entry count].title = token;
  } Else {  // end date
     entries[entrry count].final date = token;
     entrry count++;
  }
   index++;
}
}


The following method reads out of the string, which stores time, the minute, hour, day and the day of the week and saves it in struct Time of the individual elements.


void convime() {
 for(intimately I = 0; I<Max_entries; I++) {
   String DateTime = entries[I].start date;
   //Weekday
   intimately idx = DateTime.indexof(' ');
   entries[I].start.day = DateTime.substring(0, idx);
   DateTime = DateTime.substring(idx + 1);
   //Month
   idx = DateTime.indexof(' ');
   DateTime.substring(0, idx);
   DateTime = DateTime.substring(idx + 1);
   //Day
   idx = DateTime.indexof(' ');
   entries[I].start.date = DateTime.substring(0, idx).toint();
   DateTime = DateTime.substring(idx + 1);
   //Year
   idx = DateTime.indexof(' ');
   DateTime.substring(0, idx).toint();
   DateTime = DateTime.substring(idx + 1);
   //Hour
   idx = DateTime.indexof(':');
   entries[I].start.house = DateTime.substring(0, idx).toint();
   DateTime = DateTime.substring(idx + 1);
   //Minute
   idx = DateTime.indexof(':');
   entries[I].start.min = DateTime.substring(0, idx).toint();
   DateTime = DateTime.substring(idx + 1);
   //Second
   idx = DateTime.indexof(' ');
   DateTime.substring(0, idx).toint();
}
 for(intimately I = 0; I<Max_entries; I++) {
   String DateTime = entries[I].final date;
   //Weekday
   intimately idx = DateTime.indexof(' ');
   entries[I].end.day = DateTime.substring(0, idx);
   DateTime = DateTime.substring(idx + 1);
   //Month
   idx = DateTime.indexof(' ');
   DateTime.substring(0, idx);
   DateTime = DateTime.substring(idx + 1);
   //Day
   idx = DateTime.indexof(' ');
   entries[I].end.date = DateTime.substring(0, idx).toint();
   DateTime = DateTime.substring(idx + 1);
   //Year
   idx = DateTime.indexof(' ');
   DateTime.substring(0, idx).toint();
   DateTime = DateTime.substring(idx + 1);
   //Hour
   idx = DateTime.indexof(':');
   entries[I].end.house = DateTime.substring(0, idx).toint();
   DateTime = DateTime.substring(idx + 1);
   //Minute
   idx = DateTime.indexof(':');
   entries[I].end.min = DateTime.substring(0, idx).toint();
   DateTime = DateTime.substring(idx + 1);
   //Second
   idx = DateTime.indexof(' ');
   DateTime.substring(0, idx).toint();
}
}


The method Convdayname () Convert the English weekday name in the Germans.


void convayname() {
 for(intimately I = 0; I<Max_entries; I++) {
   IF(entries[I].start.day == "Mon")  entries[I].start.day = "Mon";
   Else IF(entries[I].start.day == "Do")  entries[I].start.day = "Tue";
   Else IF(entries[I].start.day == "Wed")  entries[I].start.day = "Mi";
   Else IF(entries[I].start.day == "Thu")  entries[I].start.day = "Do";
   Else IF(entries[I].start.day == "Fri")  entries[I].start.day = "Fr";
   Else IF(entries[I].start.day == "Sat")  entries[I].start.day = "Sa";
   Else IF(entries[I].start.day == "Sun")  entries[I].start.day = "So";
   IF(entries[I].end.day == "Mon")  entries[I].end.day = "Mon";
   Else IF(entries[I].end.day == "Do")  entries[I].end.day = "Tue";
   Else IF(entries[I].end.day == "Wed")  entries[I].end.day = "Mi";
   Else IF(entries[I].end.day == "Thu")  entries[I].end.day = "Do";
   Else IF(entries[I].end.day == "Fri")  entries[I].end.day = "Fr";
   Else IF(entries[I].end.day == "Sat")  entries[I].end.day = "Sa";
   Else IF(entries[I].end.day == "Sun")  entries[I].end.day = "So";
}
}


Display event () is in the Loop () Called up function to display the event with the handed over on the display.


void display event(intimately I, intimately y) {
 Display.set font(&Freemonobold9pt7b);Display.SettextColor(NameCol);
 Display.setcursor(5, y + offset);
 Display.print(entries[I].title.substring(0, 12));
 IF(entries[I].title.substring(12).length() > 0 && (offset == 0 || (offset == 20 && entries[3].start.day.length() == 0) || (offset == 40 && entries[2].start.day.length() == 0))) {
   offset += 20;
   Display.setcursor(5, y + offset - 5);
   Display.print(entries[I].title.substring(12, 24));
   Display.SettextColor(Timecol);Display.set font();
   Display.setcursor(145, y + offset - 15);
   Display.printf("%s;%d %d:%d - %s;%d %d:%d", entries[I].start.day.C_STR(), entries[I].start.date, entries[I].start.house, entries[I].start.min, entries[I].end.day.C_STR(), entries[I].end.date, entries[I].end.house, entries[I].end.min);
}
 Else IF(entries[I].start.day.length() > 0) {
   Display.SettextColor(Timecol);Display.set font();
   Display.setcursor(145, y-8 + offset);
   Display.printf("%s;%d %d:%d - %s;%d %d:%d", entries[I].start.day.C_STR(), entries[I].start.date, entries[I].start.house, entries[I].start.min, entries[I].end.day.C_STR(), entries[I].end.date, entries[I].end.house, entries[I].end.min);
}
}


The following method is called to display a disturbance on the LED status:


void error code() {
 for(intimately I = 0; I<3; I++) {
   digital(15, Low);
   delay(300);
   digital(15, HIGH);
   delay(150);
}
}


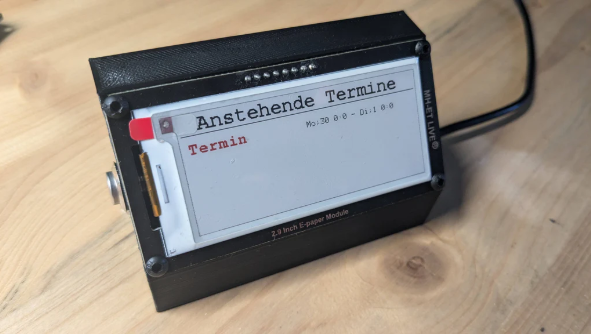
Assembly and Operation

Print The housing With a 3D printer and press the melting thread (M3) into the intended holes with a hot soldering iron. Finally, glue the board with the USB socket in the recess and recently screw the display with the right screws from the outside.

After you have connected a power supply, the next four appointments will be displayed automatically every hour on the display. After pressing the button, the appointments are updated immediately. The display will flash several times while describing. This is normal, the color capsules are aligned on the display.