Facial Recognition Laser Turret
by Radu Nicolae in Circuits > Raspberry Pi
260 Views, 1 Favorites, 0 Comments
Facial Recognition Laser Turret
.jpeg)
.jpeg)
I like my personal space. Most people respect it without being asked, but there is always someone who ends up standing a little too close while you are trying to work.
So for Project One I built something about it. The Personal Space Enforcer is a small sentry turret with a camera on the front. It watches the room, recognises the faces it sees, and if it recognises yours it swings around and points a laser pointer at your chest until you move.
The interesting part is who it targets. It only fires at people it can actually name. The model is trained on a fixed group of faces, so if you are not enrolled it has nothing to match you against and it leaves you alone. Getting a red dot on your shirt means you are on the list.
In this Instructable I go through the whole thing: gathering and labelling my own face dataset, training a YOLO26n model on my laptop, moving it onto a Raspberry Pi, driving two servos and a laser from that model's output, logging everything to a database, and wrapping it in a Gradio interface so you can enrol and remove faces without touching the code.
I am a first-year Creative Technologies & AI student at Howest, and this was my first project built end to end. I have tried to write down the parts that took me longest to work out rather than only the parts that went smoothly.
A word on the laser before anything else. This uses a low-power laser pointer module, and the one thing that genuinely matters is that it never points at anyone's eyes. I aim below the detected face and I put a physical stop on the tilt servo so the software cannot raise the beam past a set angle even if it wants to. If you build this, build that stop. It is the difference between a toy and something that hurts someone.
Supplies
Electronics
- Raspberry Pi 5 with SD card
- Power supply 5V 10A
- USB Camera
- 2 × servos for pan and tilt
- Laser pointer module 5V 650 NM
- LCD display I2C 16x2
- Status LED RGB
- Breadboard and jumper wires
- PCA9685 Servo Driver
There is no on/off switch. The turret starts when it gets power and stops when you pull the plug — see the note at the end of Step 5.
Housing
- Laser-cut plywood [FILL: thickness and sheet size]
- [FILL: screws, standoffs, glue — whatever holds it together]
Tools
- Laser cutter (Howest Makerlab)
- Screwdrivers
- A laptop with a GPU for training
- [FILL: soldering iron, if you soldered anything]
Software
- Raspberry Pi OS [FILL: version]
- Python [FILL: version]
- Ultralytics YOLO
- OpenCV
- Gradio
- Docker and Docker Compose
- [FILL: your database — MariaDB? SQLite? Postgres?]
- VS Code with the Remote SSH extension
Cost
Building this from scratch costs roughly [FILL: total]. The full bill of materials with part numbers, suppliers and prices is here: [FILL: exact link to your BOM — the deck wants a link that goes down to the file, e.g. https://github.com/…/blob/main/docs/BOM.xlsx, not "it's on my GitHub"]
How It Works
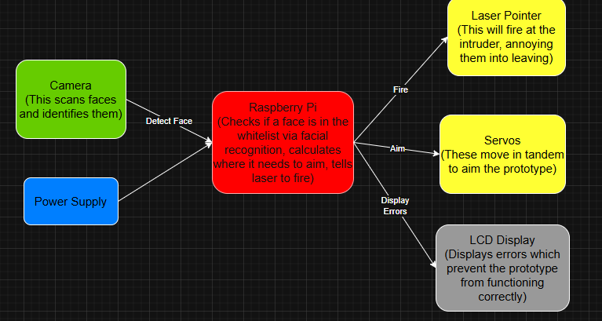
Before the build steps, here is the loop the whole thing runs on.
- The camera on the Pi grabs a frame.
- A YOLO26n model, trained on the faces of 7 people, looks for faces it recognizes and returns a box and a confidence score for each one.
- If a recognized face is found, the position of its box in the frame tells the Pi how far off-center the person is.
- The Pi converts that offset into pan and tilt angles and moves the two servos so the turret faces them.
- The laser switches on, aimed below the face so the beam lands on the chest.
- The whole event is written to the database: who, how confident, when it started and when the face was lost.
The LED shows the state at a glance: green while it is searching, red while it is locked on. The LCD is there for faults, so that if something breaks while the turret is running headless you can see why without plugging in a monitor.
Building the Dataset

This is a detection model, not a classifier, so every image needs a labelled box around the face, not just a folder name.
I photographed seven people, hundreds of images each. The shots varied. Different environments, different lighting, different distances, different clothes, different amounts of people nearby, different angles. The more variety, the better.
I then labeled the images using Roboflow, also split the images using it and then exported the dataset.
What I would do differently: I would focus more on making sure the labels included their face and not something else that can change, such as hair, glasses or other things. Together with enough variety in the kind of photos, that should be enough.
Everyone in the dataset gave permission to be photographed and to have their face used in the model. If you rebuild this, ask first — you are training a machine to point a laser at people.
Training the Model
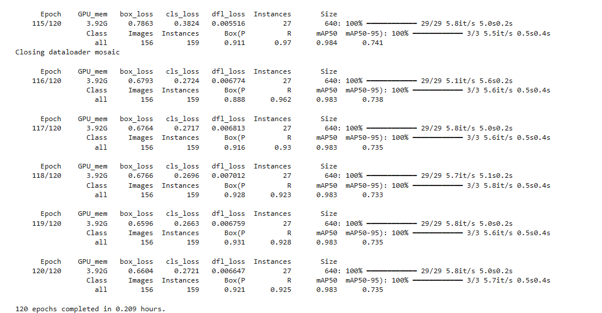
I trained YOLO26n on my laptop GPU rather than on the Pi. The Pi can run the model but it is far too slow to train one.
The results satisfactory, although it's important to note that my subjects didn't have too much diversity, all of them being white men of roughly the same age.
The trained weights live here: https://github.com/howest-mct/2025-26-projectone-ctai-RaduNicolae2006/blob/main/RPi/ai/best.pt
Moving it to the Pi. I copied the weights across with VS Code Remote SSH — connect to the Pi, then drag the file into the project folder.
Wiring
Everything hangs off two buses plus four GPIO lines.
I2C (bus 1)
Devices:
PCA9685 servo driver
LCD (PCF8574 backpack)
Addresses:
0x40
0x27
Servos — on the PCA9685, not the Pi
Servos:
Pan (left/right)
Tilt (up/down)
PCA9685 channels:
0
4
Both run at 50 Hz with a 500–2500 µs pulse range across 180°.
Driving hobby servos from a dedicated PWM board rather than the Pi's own pins is worth doing. The PCA9685 generates all sixteen channels in hardware, so servo timing does not compete with Python for CPU time — no twitching when the inference thread gets busy.
GPIO (BCM numbering)
Signal:
Laser signal
LED red
LED green
LED blue
Pin:
23
17
27
22
The LED is common anode: the shared pin goes to 3.3 V and each colour pin is pulled low to light it, so the PWM duty cycle is inverted in software. Each channel gets a calibration multiplier — 0.4 red, 0.7 green, 1.0 blue — because the three sub-LEDs have different forward voltages and efficiencies, and without it white comes out pink.
The laser module has its own current limiting, so the GPIO line only drives its Signal pin.
Powering the servos. The laser is powered by the Pi's own 5V pin, however the servos are powered by their own separate power supply to avoid brownouts. Every electronic shares a common ground.
Laser safety in the wiring. The pin is set as an output and driven low the moment the Laser object is constructed, so the beam is off before anything else initialises, and close() guarantees it ends off. No PWM runs on that pin unless brightness control is explicitly used — a PWM thread at 0% duty holds the pin low and fights a static high, so the laser would never light.
The Enclosure
.jpeg)
The housing is laser-cut plywood, cut in the Howest Makerlab, built to look like a sentry turret and the spray-painted.
The pan and tilt mechanism is deliberately simple. The first servo is fixed to the enclosure with double-sided tape. A disc is superglued to its horn, and the second servo sits on that disc, glued in place along with a few other small pieces. The camera and laser ride on the second servo. It is not elegant, but it is rigid enough that the camera does not wobble when the turret slews, which is the only thing that actually matters for tracking.
Most of the cabling stays inside the enclosure. Only the runs that have to reach the servos, the camera and the laser come out, and each of those has its own hole cut for it, so the wires stay where they are put instead of spreading across the desk.
The cutting files were drawn in Adobe Illustrator.
Setting Up the Raspberry Pi
I started from a prepared Raspberry Pi OS image supplied for the course, so I cannot redistribute it. On a clean Bookworm install you need I2C enabled, a virtual environment, and the packages from RPi/requirements.txt:
bash
The user running the app has to be in the i2c and gpio groups. The device nodes under /dev/i2c-* and /dev/gpiochip* are mode 660 owned by root:<group>, so group membership is what grants hardware access. Running as root instead is a bad idea — it can re-own those nodes and break the non-root path afterwards.
Running on boot
A systemd unit, personal-space-enforcer.service:
ini
bash
Three details in that unit matter more than they look.
Wants/After=network-online.target stops the app launching before WiFi is up, which would otherwise leave it advertising an address it does not have yet.
User=student rather than root, for the group-permissions reason above.
TimeoutStopSec=20 gives the shutdown handler room to run. When systemd sends SIGTERM the app catches it, turns the laser off and returns both servos to 90° before exiting — the same cleanup path as Ctrl+C. Without the longer timeout, systemd could SIGKILL the process mid-cleanup and leave the beam energised.
Reaching it
The app binds 0.0.0.0:7860. Open http://<pi-ip>:7860, or use the Pi's mDNS name if your machine supports it.
You do not have to hunt for the IP. Until someone connects, the LCD displays the address to browse to; once a viewer connects it switches to the live status screen.
Shutting down safely
There is no physical power button. Shutdown happens from the web interface: Debugging → System → Arm power-off → Shut Down & Power Off. It cuts the laser, homes the servos to 90°, then halts the Pi, so you can pull both supplies without leaving the beam live, the servos off-centre, or the SD card mid-write. Two guards stop an accidental click — the handler ignores the press unless the arming checkbox is ticked, and the browser asks for confirmation first.
Powering off needs one scoped sudo rule, since the app runs as a non-root user:
bash
That grants exactly one command, /usr/sbin/poweroff, and nothing else.
Detection, Aiming and Firing
Detection
YOLO runs every fifth streamed frame rather than every frame. Between detections, an optical-flow tracker moves the existing boxes along, so the overlay keeps up without the Pi trying to run inference thirty times a second.
Two settings stop the HUD flickering. After a scan that found something, empty scans for the next second do not clear the target — the box is carried forward by optical flow until a scan succeeds again or the window expires. And because YOLO's non-max suppression only de-duplicates within a class, a single face can come back as two different people at once; for logging, boxes overlapping by more than 0.5 IoU are treated as the same face and only the highest-confidence identity is kept.
Inference threads are capped so a YOLO burst cannot pin every core. The video is software-encoded for the browser on every frame, and if detection starves that encoder the stream stutters. Leaving one core free fixes it.
Aiming
Pure proportional control, one nudge per frame:
with Kp = 0.04 on both axes. The target point is horizontally centred but only a third of the way down the frame, not the middle — that is what puts the fixed laser offset on the torso instead of the face.
Two guards make it usable on real hardware. A 25-pixel deadzone means a face that is already close enough counts as centred, so the servos sit still instead of buzzing. And each correction is capped at 3° per frame, so a face that jumps across the frame — or a spurious detection — makes the turret glide over several frames rather than snapping and shaking the whole platform.
When several faces are in view, the largest box wins, on the assumption that the biggest face is the nearest person.
One thing you cannot work out from the code: whether a positive error needs a positive or a negative angle change depends entirely on how your servos are mounted. Both axes are inverted in this build. Test one axis at a time with a small step size — hold your face to the right of frame; if the turret pans away from you instead of toward you, flip that axis.
Firing
The laser only lights when every one of these holds, and cuts the instant any of them fails:
- the master enable is on and the operator is not hand-driving the turret
- a face is being tracked, with confidence at or above 0.5
- locked — the centring error is inside the deadzone on both axes
- settled — both commanded angles have moved less than 0.5° for three consecutive frames
Lock uses hysteresis: it engages inside 25 px but does not break until the error passes 40 px, so a face hovering at the deadzone edge keeps a steady beam instead of flickering.
Settle is the eye-safety guard, and it is checked every single frame. While the servos are slewing the beam is cut; it only comes back once they have been still for three frames. That is what stops the laser sweeping across the room at head height on its way to a target.
The Operation page also has a Force Laser override for demos. Force Off outranks everything. Force On bypasses the gate entirely — which is exactly as unsafe as it sounds, and is why teardown latches the override back to off, so a worker thread racing the shutdown cannot re-energise the beam on the way out.
The Database
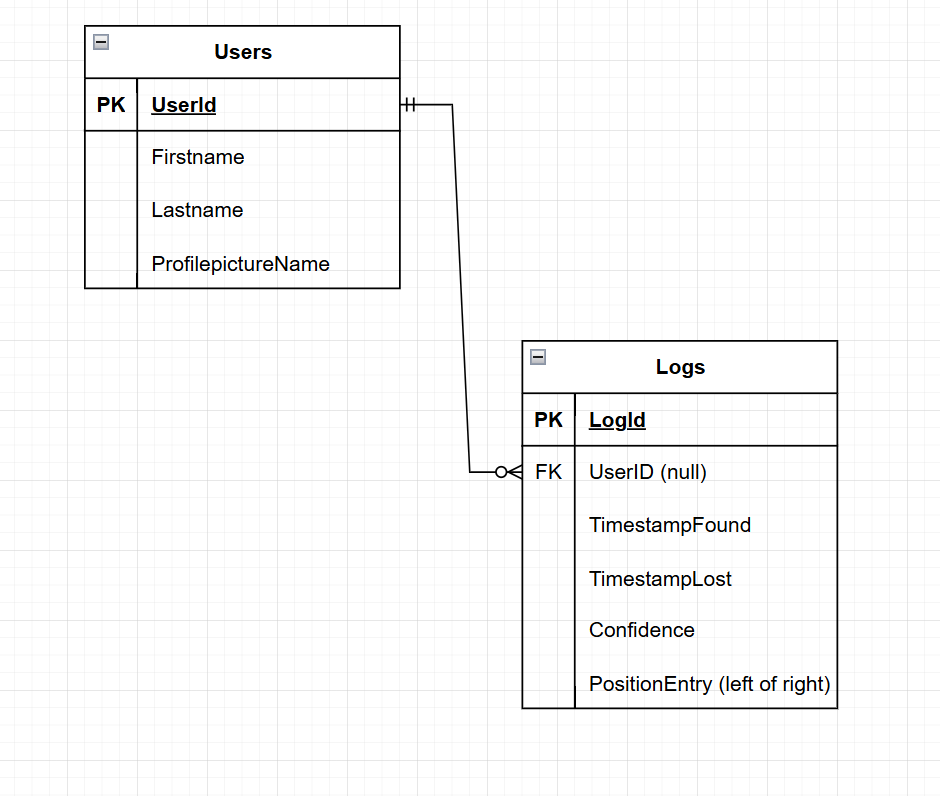
STEP 9 — The database
Postgres 16 in Docker, with two tables.
sql
timestamp_lost stays null while the person is still being tracked.
Two rules keep the log readable rather than a flood of one-frame rows. A face has to stay in view for three seconds before an appearance is logged at all, so people walking past do not generate rows. And once logged, a target may go missing for two seconds before the row is closed — that grace period absorbs single dropped YOLO frames, so one appearance does not get split into five.
The app never holds database credentials. It checks health by calling the API's /db-health endpoint over HTTP, and the API is the only thing that talks to Postgres.
The Gradio Interface
Four pages, served from a single ASGI app on port 7860 that carries both the Gradio UI and the WebRTC signalling.
- About — what the turret is and how to use it
- Data — who is being detected, confidence, and the appearance log
- Operating — live video with the targeting HUD, the manual D-pad, and the laser controls
- Debugging — faults, logs, settings and the power-off control
The HUD is worth a mention because of how it is built. It never draws on the video frames. It ships a small JSON payload to the browser ten times a second and the overlay is rendered client-side, so the Pi is not compositing graphics onto every frame before encoding it.
Video reaches the browser over WebRTC, peer to peer across the LAN. On the same network no STUN or TURN server is needed.
Docker
The database stack lives in RPi/api — Postgres, pgAdmin and a FastAPI service:
bash
Postgres runs postgres:16-alpine with its data in a named volume, and db/init mounted into /docker-entrypoint-initdb.d. Every .sql in there runs once, the first time the volume is created — so the schema builds itself on a fresh start. If you edit the schema afterwards, nothing happens until you run docker compose down -v, which wipes the volume and lets it re-run. That catches everyone once.
The API waits on a Postgres healthcheck rather than a plain depends_on, so it does not start querying a database that is still coming up.
pgAdmin is on port 5050, the API on 8000, Postgres on 5432.