DIY Collectible - Figure, Box, Card

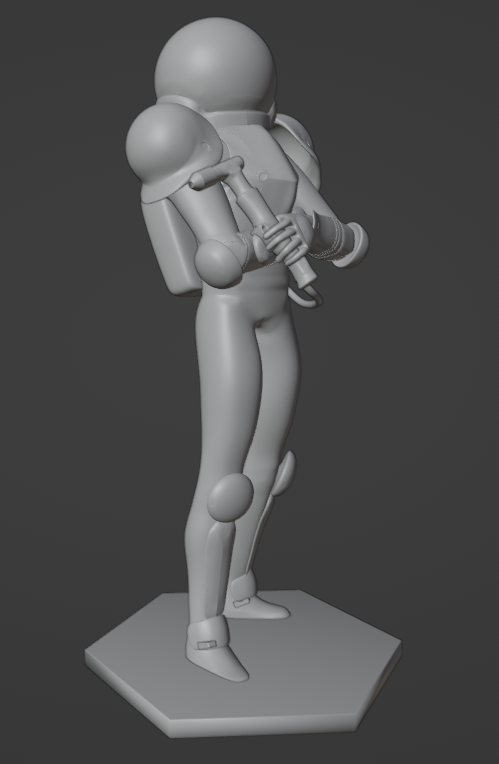
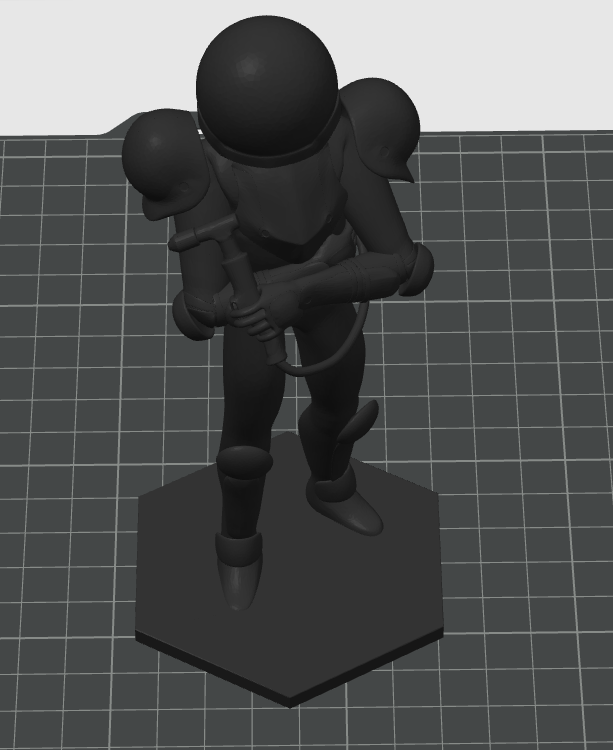
Unapologetic confidence. Gripping a tool that looks like it was salvaged in a junkyard. Armored to the chest. Reckless. Unafraid.
We cheer on our favorite heroes and villains; their character radiates beyond the screen and into physical form. However, these forms they take on, whether Funko Pop figures or small keychains, seldom evoke the same emotions we get feel seeing their digital forms. 1/6th scale figures fill this emotional void with crafted detail and thought, but leave behind a different emptiness in the wallet. So how can we create our own figurines from scratch, box art and all, without breaking the bank?
I'm glad you asked.
Supplies

You can find most of these supplies at home- but for some (like a 3D printer or a computer), you may have to scour a local school or Makerspace.
3D Modelling
Any laptop or desktop will work for creating low-poly 3D models. If detailed, high-poly models are desired, then a higher-end computer is needed.
Patience.
3D Printing
- Any 3D printer will work for this part of the process- from an Ender 3 Pro to a Bambu X1C. Don't worry- any 3D printer works as long as it works, has a slicer and available material.
For advanced users: if you would like your collectible to be multi-colored, any printer that can do multi color, like the Bambu X1C with the AMS, will work.
- A USB stick, micro SD or SD Card- depending on your printer, any of these options will work for uploading the file.
- PLA filament- One color for single-colored collectibles, 2 colors for dual-colored collectibles.
- (For Advanced users using multi-color machines) PVA.
PVA is a water-soluble filament (meaning soluble (dissolvable) in water). This means it makes for great support material- as instead of physically prying the supports from the model, you can simply dunk our figure into water for 12 hours. Fun!
Box and Card
- Cardstock paper.
- A 2D printer.
- Any design software like Inkscape, Illustrator, or Canva.
- Vinyl Archival Spray
- Superglue
- Bone Folder
- Precision Knife set
Concept & Design

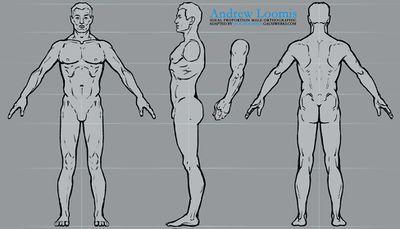

Here, gathering reference is as important as any future step. If the collectible will be made after an existing character, great! That means there will be a ton of front, side, and other views for reference- anywhere from 10-20 images works. Just be sure to have the model surrounded by reference material.
If the collectible will be made after a concept that doesn't exist (this being its first form), that's fine too. Make sure to get a lot of anatomy references so you have a rough outline, and be sure to find images of similar assets. For example, if your character has a robotic hand, find characters who have robotic hands for general direction on that specific part of the body.
After the reference is gathered, place it all in one scene. My guide uses Blender, but applies to any other 3D software available . The right views go to the right of the model, front views to front, etc. For images that aren't referencing a specific side, just place it at angle so you can look at it if needed.
(The last reference is by @Metal_Raymon)
3D Modelling
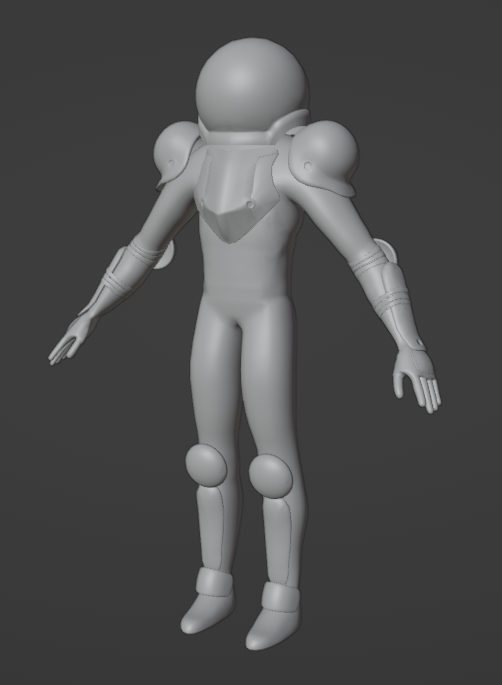
After getting the references in one scene, block out the model using scaled and rotated cubes for a general feel on their height and scale. This is especially helpful for human characters, as it helps you catch proportion mistakes later on. As a rule of thumb, I use 1 cube between two joints.
Next, shape out the model. Start with the torso of the character by taking a cube and applying a subdivision 'modifier' to it, turning it into a sphere. Essentially, you're going to sculpt out the shape of the character without actively using any of the software's sculpting tools.
With the cube-turned-circle, mirror the changes on the model's right to its left, and begin to shape out the torso by extruding, cutting, and slowly getting the shape you want.
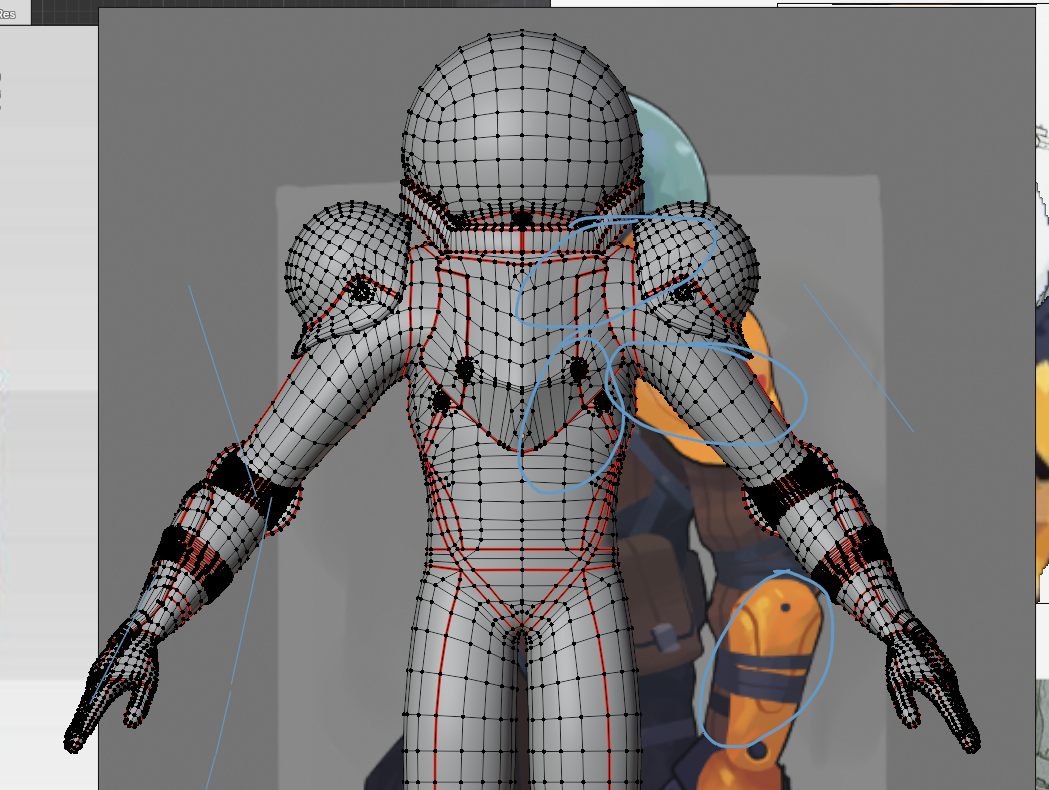
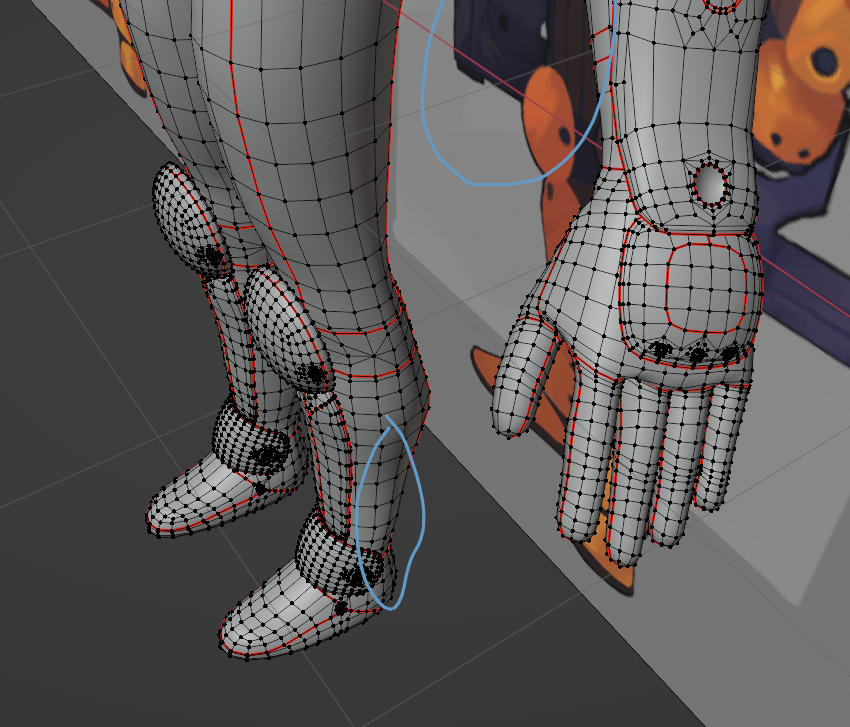
After the torso, you can move to either the legs or the arms. My personal preference is to continue to the legs, since the arms usually have hands, which have fingers, which are relatively difficult to nail down. Either way, continue to extrude and move each individual body part until the model looks just right. After you apply the modifier, be sure that the model is made up of quadrilateral faces- no triangles or pentagons (the one exception being circles).
(Last paragraph) Finally, detail and equipment. Feel free to take your time character's equipment- it'll pay off.
Rigging
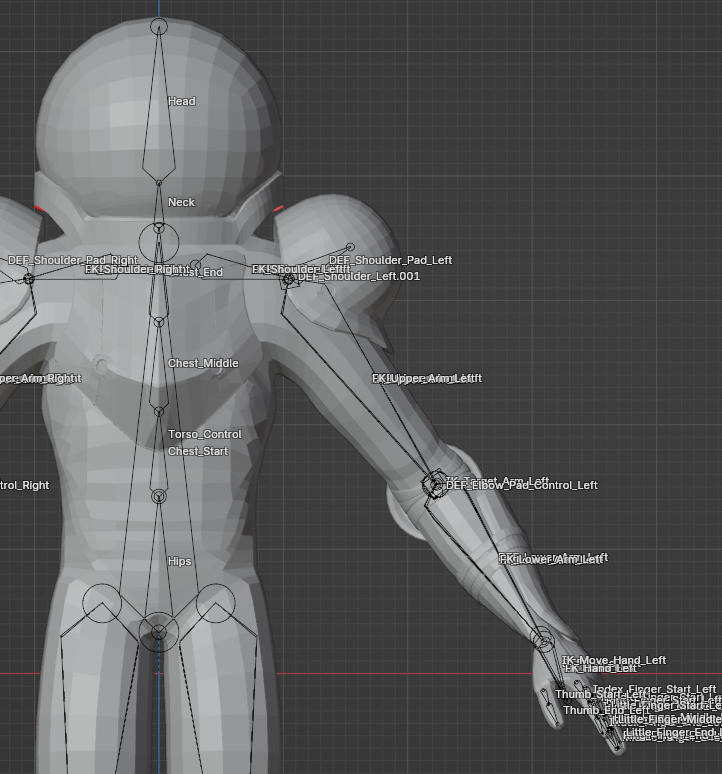
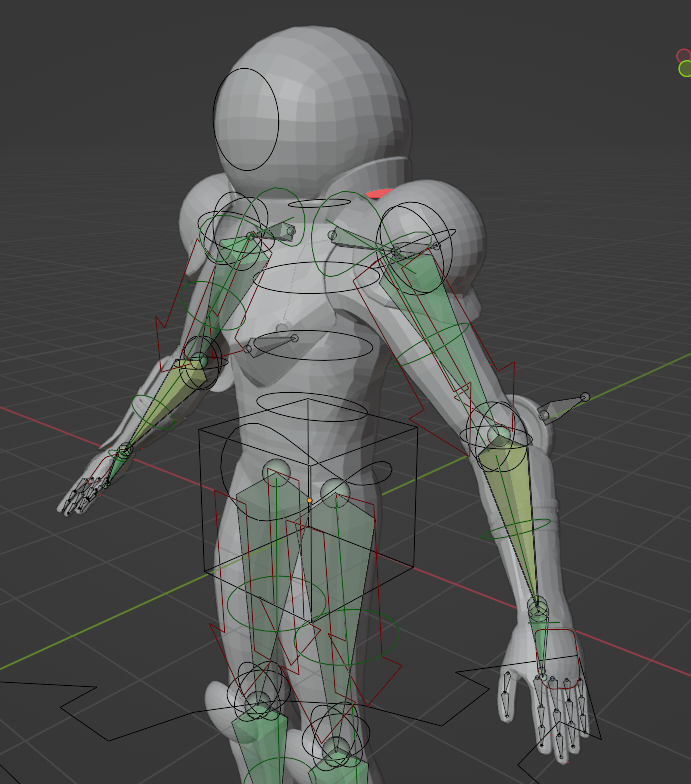
To keep this brief: you now have to give the model its skeleton and figurative muscles- enabling it to move (or dance) as you wish. You can either just give it a basic human skeleton rig from your software's template, or take it a bit further and give the different bones shapes, colors, and so on.
I used to get impatient at this step, but watching this video and this one really helped me understand how rigs work. Feel free to just leave your rig as is, or go deeper!
Slicing & Printing

'Slicing' a model is essentially exporting the file into a format the 3D printer can read. This step has several nuances though, so tread carefully.
First, determine how tall your collectible will be. Will it be 3 or 5 inches tall? Even bigger? The bigger the figure, the more detail you can fit in, but the more material the print will use. Keep this in mind as you plan out. Once you find out the height of your print, record the values for length and width as well- they will be useful when making the box.
From your given 3D software, export the model as a .obj after applying the subdivision modifier. You may notice some of the polygons are still visible. This is expected, since modelling software works with vertices and polygons to make each shape rather than curves, such as that in CAD software.
Make sure the slicer you downloaded has your 3D printer's profile/setting. If you happen to be new to 3D printing, the software 'OrcaSlicer' (Make sure you have the right website, just orcaslicer.com or the github page) is equipped with an array of 3D printers, and likely has the pre-configured settings for yours. If not, the manufacturer for your 3D printer will have a dedicated slicer software.
After you position the model and resize it as needed, simply press 'slice' and export your gcode (the format 3D printers read) to save your file in an accessible location. From here, you can just go to your printer and start the print.
The next step will cover several options for 3D printing the collectible- I recommend just giving it a read even if you don't plan to take any of the steps.
Advanced Slicing


- Multi-color
When printing my collectibles, I was fortunate enough to have access to a Bambu Lab X1C with the Automatic Material System, allowing me to print in multiple colors. In case I had the time to print a fully-colored set of my figures, I painted separate parts of my model to correspond to white and black filament for detail.
- PVA Supports
Usually, supports (even tree) are relatively difficult to take off of a print. For this reason, if your printer happens to support multiple materials or a second extruder, I highly recommend using PVA as a support interface. This allows your print to retain its quality when the supports come off, while decreasing the amount of manual force required to take off the supports. If using PVA with a multi-material system like the Bambu Labs' AMS, make sure to dry the PVA prior and print at about 20 mm/s when printing the PVA.
- Layer Height
Since the detail of the print is primarily determined by the nozzle size (standard being .4 mm) and height being several inches, one way you can increase the detail of our print is by decreasing the layer height. For more detail, feel free ot drop it from.2 mm to anywhere between .15mm to .12 mm; the result will be a more detailed figure. Keep in mind that a smaller layer height means a compromise with time.
- Bulk Printing
If you are printing the collectibles in bulk, slowing down the maximum volumetric flow rate for each filament you use, especially if the print is multi-color. The more objects there are on a single bed, the higher the chance of failure of any one, which may cause the others to fail as well. Slowing down the maximum volumetric flow rate value will essentially slow down the maximum amount of filament the nozzle can extrude at once; I adjusted mine to about 20 for PLA.
- Settings
Below are the settings that save more filament, ensure the prime tower doesn't fail, and a threshold angle for the supports (free or normal).
- Sparse Infill Pattern: Lightning
- Prime Tower Settings
- Max Speed: 80 mm/s
- Brim Width: 6mm
- Infill Gap: 160%
- Support Threshold Angle: 30
Be patient and careful. The printing process can go very smoothly or very roughly, and how it goes heavily depends you not giving up just as much as it depends on the printer. You got this.
Printing the Box

While the figure is printing, prepare the box.
Cardstock or paperboard are good choices for box material- paper board being the more expensive out of the two. With the model's dimensions from the slicer, use this website to create a template and customize for your figure. If your sizing dimensions happen to fit on letter paper, you can also use this template generator to configure your dimensions.
For this project, I worked with an artist so the box has box art- just like a collectible. Customizing the box itself is up to you- a minimal design works just as well as a detailed one.
After the template is finished, export it from the website as a png. Then, separating each side into an individual file, try to fit as many sides as you can onto letter-sized paper with canva.
Finally, export this new file as a pdf, and put it into adobe acrobat. Thankfully, the software has presets for printing on different types of paper, so simply select the Cardstock option in Properties when printing.
Scoring and Cutting the Box


This step uses a sharp blade. Always take caution with sharp objects.
Now that the box is printed out, the next step is to cut out the actual sides. Simply line up the seam with the blade, press down, and move the blade until you've reached about 2 cm away from the seam. Repeat this until every side of the box is cut out.
Use the bone folder to score each seam of the box. It's important the box is scored before folding, as this prevents accidental folds if trying to fold by hand.
Just as you cut the seam, score the seam where the box flap and side meet. This time, make sure the front side is facing down, so you're scoring the back of the box. Line up the seam with the folder, then press the paper down with one hand and the folder with the other. Repeat this until every flap folds inward with ease.
Spraying the Box

To give our boxes a glossy, action-figure-box look, spray them with Archival Spray.
Be sure to do this step outside- using Archival Spray inside is dangerous to anyone around the spray. Wear a mask when using it and follow the instructions on the can. Under each side, lay down some cardboard so the spray doesn't leak onto the ground and give each side 3 coats of spray. Afterwards, leave the cardstock to dry to prepare for the next step.
Gluing the Box

Now, its time to glue everything together. Use the bottom side as the base for gluing every other side together.
Carefully lay a flap over the bottom, ensuring the flap/side seam and bottom side line up together. Then, apply a line of superglue going from edge to edge and press the flap on the bottom for about 6 seconds. When adding a new side, glue together the side flaps as well. Repeat until all sides except the top are glued. (Be sure to follow your template so as to not accidentally glue a side upside-down)
If all the sides are glued on precisely, the top side should fit right in without having to bend or stretch the already-glued sides. Glue on the top side and you have the box!
Optional: the Card

If the box doesn't describe or explain what this collectible is supposed to be (which is what happened in my case), make a 'description' card that goes in every box. If you would like to maintain a sense of mystery around the figure- no card necessary.
First, take the length of the back and left sides, side to side (height will be the same), and make a new file with those dimensions in your design software of choice. Draw a line as an outline for where the card will be scored (where the back and left sides meet). Finally, begin designing the card. Again, feel free to be as detailed as necessary- think of it as a nice bonus to anyone who happens to come across your collectible.
After the design is finished, print the card out on cardstock and cut out the unnecessary material. Score the seam you outlined earlier, and place the card into the box.
Finishing Touches

Finally, place the now-printed figure into the box. Congratulations! You now have your very own collectible, made from scratch.
The collectible shown in this guide is a Series 1 figure by H/f- an organization dedicated to getting students interested in manufacturing (hence 'Plasma King'- corresponding to plasma torches).
We're excited to produce more figures and hope you found this guide helpful! (Series 2 is currently concept)