Classic Car Restomod - Part 4: Interior - Door Cards and Steering Wheel:
by steve-gibbs5 in Workshop > Cars
53 Views, 1 Favorites, 0 Comments
Classic Car Restomod - Part 4: Interior - Door Cards and Steering Wheel:
.PNG)
.PNG)
.PNG)
.PNG)
Welcome to Part 4 of my restomod Instructable collection for my 1976 Ford Cortina MK3 1600GT. So with the engine and most of the exterior work done, we will now move to the inside of the car.
In this part I will be explaining how I gave the door cards a make-over going from the basic single coloured cards to a more GLX and sporty look with real wood paneling, something that will be carried over tot the dashboard in Part 5. The door cards that came with the car were in very good shape although the black vinyl cloth covering needed some revitalisation.
So lets get straight to it.
Supplies
Parts:
- Set of 4 chrome door lock pins
- Set of 4 chrome inner door release handle trims
- Set of 4 GXL chrome trimmed window winder handles
Materials:
- White spray-on vinyl dye and primer
- Self-adhesive chrome edge profiling
- Red vinyl trim beading
- High gloss oak tongue and grove flooring planks (1 pack)
- High strength adhesive
- Vinyl rejuvenator compound
- Isopropyl alcohol cleaner
- Microfibre cloths
- Masking tape and old news papers
- 180 grit sandpaper
Tools:
- Trim removal tool
- Cross head screwdriver
- Flat head screwdriver
- Spring clip removal tool
- Knife
- Pencil
- Jigsaw with fine toothed wood cutting blade
- Drill/driver
Door Card Prep:
.PNG)
.PNG)
.PNG)
- Unscrew the old door locking pins, then remove the door handles (normally screwed in on old cars), slide out the inner door release handle trims, take out any ashtrays and then the window winder handles. These are normally held in with a cross head screw or retaining spring clips. These are the little suckers that can take off without warning never to be seen again, so take care when removing these. A proper spring clip removal tool is the best option to remove these without loosing them. If your car has door speakers attached, remove the speakers and disconnect the wiring.
- Carefully remove the door card using a removal tool trying not to pull the plastic clips out of the door card itself.
- Take this opportunity to give the whole door area a good clean and lubricate the window and locking mechanisms. An optional job you could do here is to add a vapor barrier using some thick plastic sheet and double sided foam tape.
- With the door card now removed, give them a good clean with warm soapy water then dry them off.
Paint Dyeing:
.PNG)
.PNG)
.PNG)
.PNG)
My door cards had stitched recess patterned areas which was where I was going to change the colour and add the wood paneling. Instead of spray painting the vinyl which wouldn't last because of the flexible nature of the material along with the foam backing on the cards and door handles, I used a product I never used before... spray on vinyl dye. The cans are more expensive than standard spray paint, but it did an excellent job with fantastic results.
Just to mention that I also removed and coloured the sun visors the same way, but I am unable to find the photos of them.
- Clean the door card areas to be coloured and door handles with isopropyl alcohol cleaner.
- Mask around the edges of the areas on the cards to be coloured, then lay a second masking layer with paper covering the rest of the card. In regards to the door handles, place a screw in one of the mounting holes and tie a piece of string then hang up in an area where you can spray the dye.
- Following the directions on the can, apply several coats of vinyl dye primer. This is a crucial step for the colour dye to adhere properly and to be long lasting. Use a light colour primer if spraying onto a dark colour.
- Then apply several coats of the dye. It goes on very much like spray paint, using light coats so it doesn't run, leaving it to dry between coats and building up layers.
- Finish off by applying a vinyl dye gloss 'topper' (of matt if you prefer). This is like a clear paint lacquer that further protects the items coloured and makes a nice shiny finish. Leave the parts to completely dry/cure for at least 24 hours then remove all of the masking.
Profile Edging & Wood Paneling:
.PNG)
.PNG)
.PNG)
.PNG)
.PNG)
.PNG)
.PNG)
.PNG)
The door card will be finished off with some red piping around the dyed areas, and adding wood panels with a chrome edge finish. The T&G wood planks I used were a laminated real oak wood with a very high gloss. These flooring planks were expensive, well expensive if you were to lay a living room floor, but as I only needed one pack it wasn't a big expense and I was very pleased with the end look. T&G flooring doesn't just have to be used for floors.
- Measure out the area you want to cover with the wood trim then make cardboard template for the front doors and rear doors if you have them on your car. You can use both sides of the template for both the right hand and left hand door. Just write the door sides on each side of the card.
- Cover the gloss side of the T&G plank with masking tape then place onto your work surface masked side down, then place the template on top and draw the shape onto the T&G.
- Using a jigsaw with fine toothed wood cutting blade, cut out the panel. Don't rush the cut as the fine toothed blade will take longer to cut with. This blade along with the masking tape will help stop the gloss side from chipping and splintering, resulting in a clean cut.
- Follow the above stages to cut out the other panels, but remembering to flip the template over for the opposite side door cards.
- Remove the masking tape and give the edges of the panels a light sanding with 180 grit sandpaper. Then give the panels a good clean removing any making tape residue.
- Drill some holes into the door cards where the panels are to be mounted. A good tip is to make a hole or small cross with a knife into the vinyl where you are going to drill. This will stop the drill bit snagging the vinyl and pulling/twisting it.
- Then using some small screws the depth of the door card and a little over half the depth of the T&G (so the screws grip well but don't penetrate the T&G), screw the panels to the card
- Now attach the chrome edge trim to the edges of the wood panels.
A final couple of jobs left to do.
- Lay the door cards flat and apply a small amount of silicone adhesive along the edges of the dyed areas and slowly attach the red trim beading making sure it is firmly attached and the lines are straight. Don't add too much adhesive as you don't want it to seep out of the sides when applying the beading. Leave the door cards flat until the adhesive has fully dried.
- Treat the rest of the un-dyed vinyl with a vinyl rejuvenator treatment to make the material supple and shine.
- Now we can re-fit the door cards and fit the new chrome door lock pins, the inner door release handle trims and the chrome trimmed window winder handles.
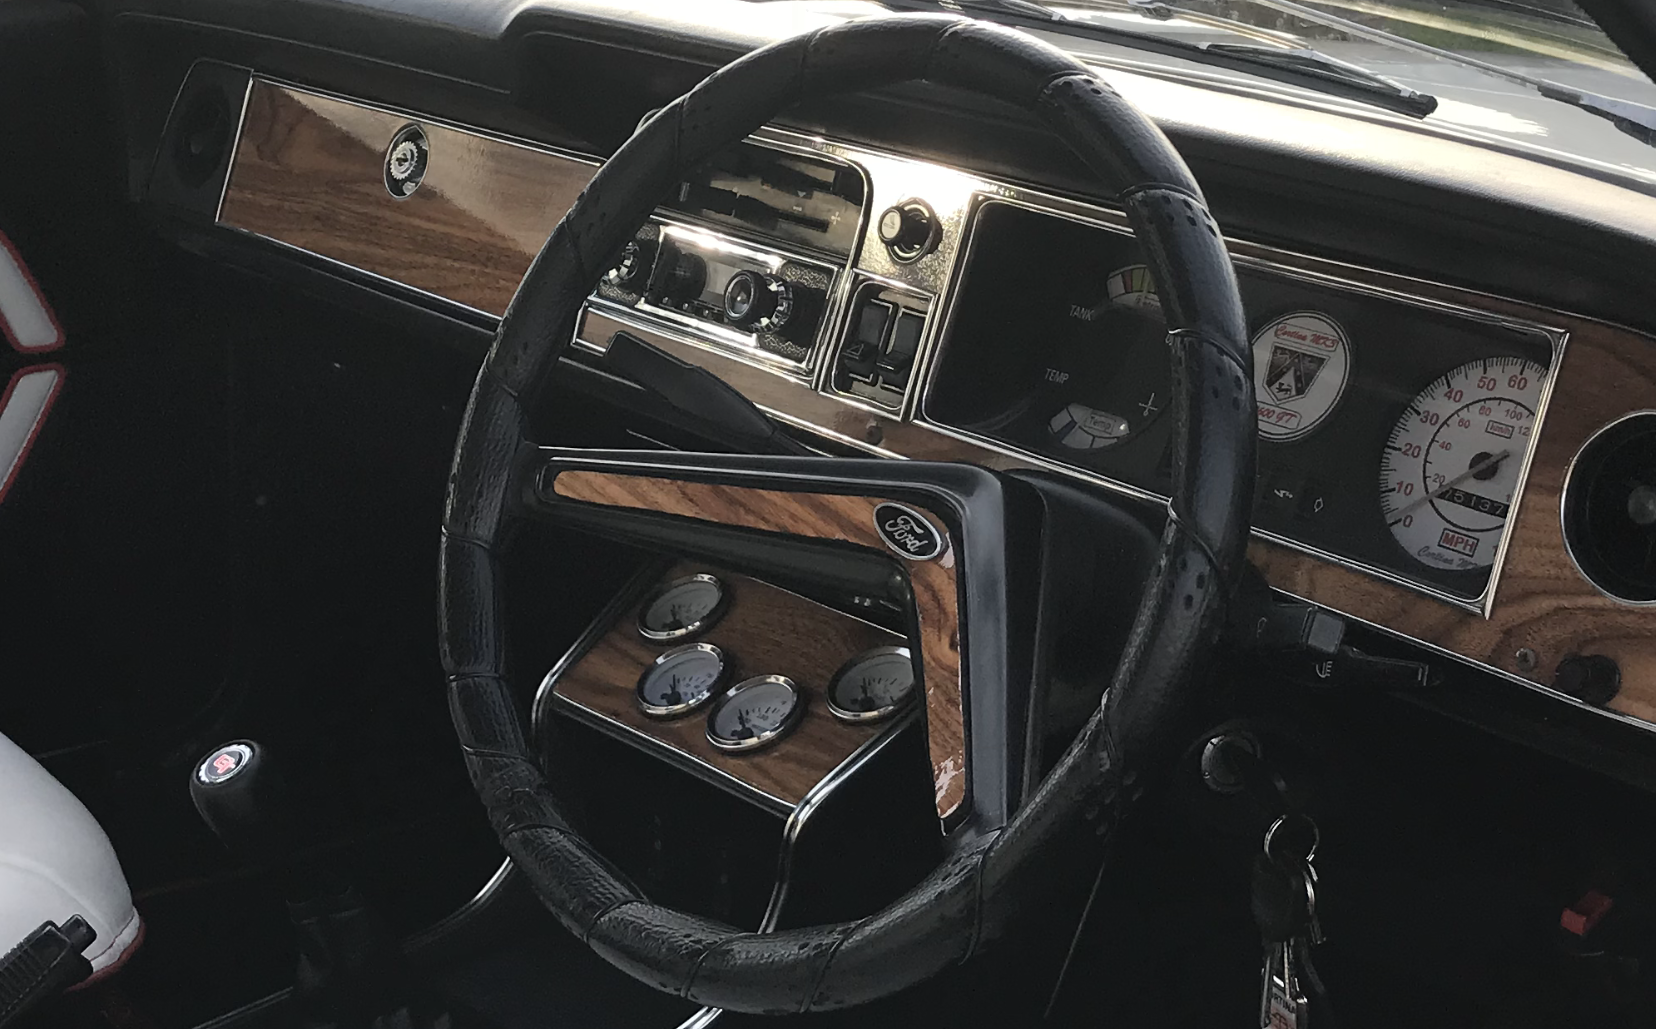
Steering Wheel:


.PNG)
.PNG)
- Remove the plastic steering wheel insert from the wheel, then remove the middle plastic piece.
- Measure out the area you want to cover with the wood trim then make cardboard template for the steering wheel insert.
- As with the door card panels, cover the gloss side of the T&G plank with masking tape then place onto your work surface masked side down, then place the template on top and draw the shape onto the T&G.
- Using a jigsaw with fine toothed wood cutting blade, cut out the panel.
- Remove the masking tape and give the edges of the panels a light sanding with 180 grit sandpaper. Then give the panels a good clean removing any making tape residue.
- Fit the new wood piece into the steering wheel insert and screw together, again making sure the screws are not too long so they penetrate through the gloss side.
- Finish off by adding some chrome edging around the wood panel.
- Then re-attach the insert to the wheel and give the steering wheel a good clean. I also added a small adhesive 'Ford' badge to the center of the wood panel.
Conclusion to Part 4:
.PNG)
So with the door cards, sun visors and steering wheel now newly dressed, it was time to work on the dashboard and center console to make them match. That's next in Part 5.
Hope to see you there.