Classic Car Restomod - Part 5: Dashboard and Center Console:
by steve-gibbs5 in Workshop > Cars
134 Views, 1 Favorites, 0 Comments
Classic Car Restomod - Part 5: Dashboard and Center Console:
.PNG)
.PNG)
.PNG)
.PNG)
.PNG)
Welcome to Part 5 of my restomod Instructable collection for my 1976 Ford Cortina MK3 1600GT. In Part 4, we moved onto the interior and gave the door cards, handles and sun visors a make-over, so now we will move onto the dashboard. The original dash and glove box door were completely black plastic with an old AM radio fitted. The back lights for the fuel, temp and speedo clocks surprisingly all worked but were not very bright. So I managed to get a GLX wood trim dashboard frame and glove box door although the wood trim was in poor shape. I decided to replace all of the dash bulbs with LED equivalents and give the gauges a facelift. And to make the car look more like the GXL version I also purchased a new/unused center console which although not an original part (because I couldn't find one for love nor money), this was a pretty good alternative and was a good price.
So let's crack on.
Supplies
Parts:
- GXL wood trim dashboard frame
- After market center console
- GXL wood trim glove box door
- Replacement LEDs for instruments
- Retro look Bluetooth/USB/DAB car stereo
- Pioneer 3 way parcel shelf mount stereo speakers and cable
Materials:
- Self-adhesive chrome edge profiling
- High gloss oak tongue and grove flooring plank
- Vinyl rejuvenator compound
- Glass cleaner
- Isopropyl alcohol cleaner
- Microfibre cloths
- Masking tape
- 180 grit sandpaper
- Heat shrink wire tubing
Tools:
- Trim removal tool
- Cross head screwdriver
- Flat head screwdriver
- Knife
- Pencil
- Jigsaw with fine toothed wood cutting blade
- Circular wood cutter
- Drill/driver
- Wire cutters/strippers
- Soldering iron
- Spanners
- Multimeter
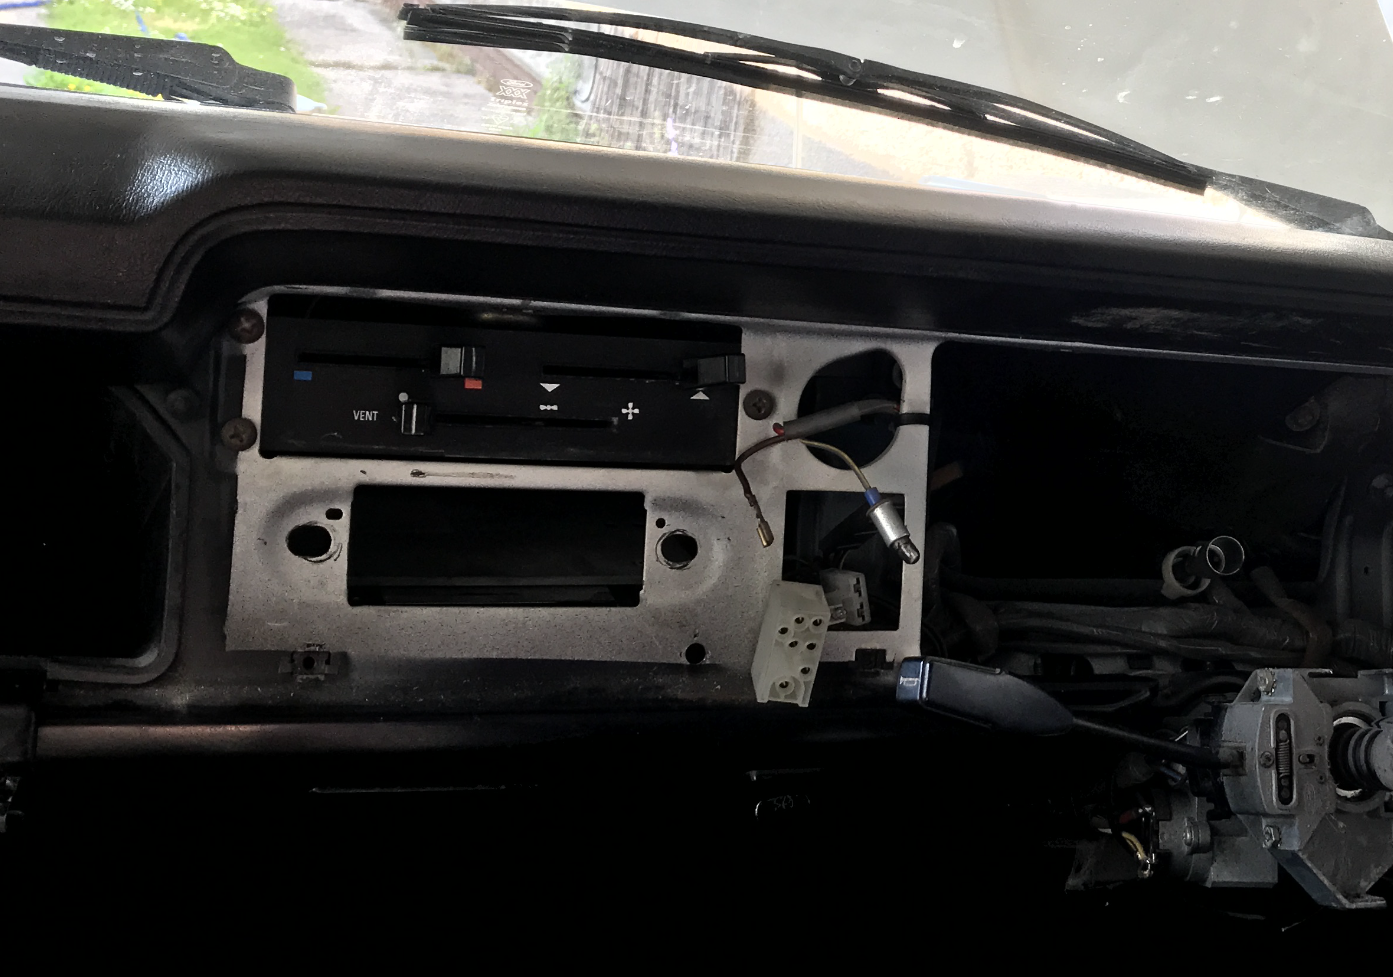
Dashboard Removal:
.PNG)
.PNG)
.PNG)
.PNG)
.PNG)
.PNG)
- Start off by disconnecting the car battery.
- Remove the steering wheel if it's still on, remove and unplug any buttons and switches and remove the radio knobs.
- Unscrew and pull away the dashboard frame. Carefully disconnect the speedo cable and wiring looms from the instrument panel, emphasis on 'carefully' as the years old plastic wiring clips may be brittle and could be a difficult job to replace.
- Remove the glove box door.
- Take this opportunity to give the dashboard area a good clean, lubricate any moving parts such as air blower linkages, steering rack and indicator switches.
- Remove the instrument panel from the old dashboard surround panel.
Binnacle Instruments Facelift:
.PNG)
.PNG)
.PNG)
.PNG)
.PNG)
.PNG)
I wanted to give the instruments a bit of a fresher look and make them more visible at night. To achieve this I measured the actual clocks/gauges, took photos of them which I opened up in a draw/paint program on my laptop, then made some new ones. I used the photos so I could get the correct scale and spacing for the MPH, temperature and fuel increments. Then it was just a case of printing them off and cutting them out to fit.
- With the instrument panel from the old dashboard surround panel removed, remove the instruments from the binnacle, then carefully remove the needle from the speedo.
- Give the instrument faces a clean with an alcohol cleaner.
- Attach a very high bond (VHB) double sided tape to the new instrument displays, remove the backing tape and attach to the instrument faces making sure they are perfectly aligned.
- Clean the binnacle transparent panel with glass cleaner on both sides and re-attach the instruments to the binnacle.
- Remove the old back lighting bulbs and replace with the new LED ones.
Put the instrument panel to one side for now as we will now work on the dashboard surround.
Dashboard and Glovebox:
.PNG)
.PNG)
.PNG)
.PNG)
.PNG)
.PNG)
.PNG)
.PNG)
.PNG)
.PNG)
- Remove the old wood trim panels from the new dash surround glovebox door and and give the surround and door a good clean.
- Cover the gloss side of a T&G plank the using the old wood trim as a template, place on top of the back of the T&G plank
- Cut the panels out with the jigsaw then sand the edges with 180 grit sandpaper.
- Attach the new wood trim to the dash surround panel using the old screws.
- Fit the instrument binnacle back to the dash surround panel.
- Cut out the glovebox latch hole with the circular wood cutter attached to the drill, then attach to the glovebox door.
- Re-attach the glovebox door but leave the dash surround panel off for now so we can fit the new stereo.
Retro Car Stereo Fitting:
.PNG)
.PNG)
.PNG)
.PNG)
.PNG)
In regards to fitting, the retro stereo is a like-for-like replacement for the original as it was the same size and had the the option to adjust the position of the volume and tuning knobs to fit into the dash mounting plate.
- Disconnect the battery again, and remove the old radio. Depending on the design, the volume and tuning knobs normally pull off with a little force which would have been done when we removed the dashboard surround panel.
- Identify the existing wires. Expect minimal wiring in a classic car compared to modern wiring looms.
- Use a multimeter to identify the power wires. For the direct live (Constant 12V), run a fused wire from the battery positive terminal or locate an existing always-live feed (often to the cigarette lighter) which keeps the stereo memory and clock.
- For the ignition live (switched 12V), find a wire that only has power when the ignition is on (e.g., from ignition switch or accessory wire).
- For the ground/Earth Connection, locate a good chassis ground point near the stereo mounting area. Sand back to bare metal for a clean earth, then bolt or screw securely.
- For the speakers I fitted a new pair of rear shelf speakers with new speaker wires running through the boot, along the floor and into the new stereo, ensuring correct polarity (+ to +, – to –) for proper sound quality. Match the stereo output wires, rear left, rear right, to new speaker cables.
- Connect the car’s aerial lead to the stereo. If the connector is different, use an appropriate adapter.
- Connect Stereo Wires
- Yellow wire (stereo memory) - Direct live 12V.
- Red wire (stereo power) - Ignition live 12V.
- Black wire - Chassis ground.
- Speaker wires - respective speakers.
- Blue/remote wire (if used) - amplifier or power antenna (optional).
- Always place an inline fuse (10–15A, depending on stereo spec) within 12 inches of the battery connection on the direct live feed.
- Feed the hands free microphone to a place where you want to mount it.
- Mount the Stereo to the dashboard. The retro stereo fits the same way as the original one.
- Reconnect battery and test to make sure that the clock/memory retains the settings when ignition is off, and that the stereo powers up with ignition on with the sound output on all speakers.
- Refit the dashboard surround panel, then attach the volume/tuning knobs along with the other cars switches.
- My car had a padded vinyl cover over the top of the dashboard. I cleaned it with warm soapy water, dried, the applied vinyl treatment.
Just to note, at this stage I didn't fully trace the new speaker wires under the carpet as the next job was to remove the carpet and seats which I cover in Part 6.
Center Console:
.PNG)
.PNG)
.PNG)
.PNG)
I mentioned that I purchased a new/unused center console which although not an original part, it was a pretty good alternative. It had a faux wood trim where a radio could be fitted, but I decided to fit four instrument illuminated clocks and cover the panel with a piece of the T&G wood I used for the rest of the cars trim.
- Mark out four equally sized and spaced holes, drill a starting hole with a large drill bit, and cut out the circles with a jigsaw.
- Make a cardboard template of the console panel then cover the gloss side of the T&G plank with masking tape then place onto your work surface masked side down, then place the template on top and draw the shape onto the T&G.
- Using a jigsaw with fine toothed wood cutting blade, cut out the panel. Don't rush the cut as the fine toothed blade will take longer to cut with. This blade along with the masking tape will help stop the gloss side from chipping and splintering, resulting in a clean cut.
- Attach the T&G panel to the console panel (glue or screw it in from behind), then fit the instrument clocks ensuring that the displays are level.
- Join all four live terminals and ground terminals on all four clocks (in series). Then place the center console into the car.
- Identify and splice into the dashboard back lighting live wire and run a cable to one of the clocks live terminal. Then do the same for the negative wire attaching the other end to the car body.
- Connect the clocks to their corresponding connections...
- Battery clock to the battery
- Splice the new fuel gauge clock wires into the original fuel gauge wires
- Connect the water temp clock to the original sender unit terminals
- And connect the oil pressure clock to the original oil pressure sender unit. If your car doesn't have a sender unit installed, check your car workshop manual to see how to fit one to your specific car.
- Finally secure the center console to the car. You will need to mark and drill some holes into the car where the mounting holes are located on the center console.
Although if you are going to change out the seats and carpet like we will be doing in the next part, you may want to hold off fitting the center console for now.
Conclusion of Part 5:
.png)
.PNG)
.PNG)
With a nice, clean shiny and fully functional dashboard now complete with a new modern stereo system with the classic look, it was now time to freshen up and upgrade the seats, which we will be doing in Part 6.
Hope to see you there.