Fused Bead Mosaics From Photos
by Zippityboomba in Design > Art
8032 Views, 113 Favorites, 0 Comments
Fused Bead Mosaics From Photos


This project uses a program I wrote that allows you to map any image to any fuse bead palette, so you can make realistic mosaic images from those iron-to-melt beads so popular with kindergartners. It runs in Excel 2016 (which you'll need in order to use it), though it may work in earlier versions as well -- I haven't tested. Others have written similar programs for iOS, Windows, etc., but as you will see, Excel has certain advantages.
Why use this method?
- Allows you to easily customize your project for a set palette of bead colors
- Allows you to easily make your own palettes
- Allows you to scale your project to a wide range of mosaic sizes
- Produces scale, printable plans for your project, that can slide under any transparent support tray
- Produces a purchase list of all the beads you will need
Not to belabor the obvious, but to complete this project you will need:
- A large pegboard. Perler sells quite large transparent ones that are ideal. I got mine at Jo-Ann's for $12.
- A messload of fuse beads. This program uses the Perler palette, but could be customized to other brands.
- Microsoft Excel
- A printer
- An iron
- Loads of time and patience for bead placement
For the curious, MirthMosaic Perler uses a serpentine Floyd-Steinberg algorithm for matching bead colors. Check it out here.
Open MirthMosaic Perler

Download and open the Excel file provided here. You will likely have to approve macros in order to use it; look for a button allowing you to do so when you first open the file.
The first choice you must make is how large to make your mosaic. In the orange box, enter the number of beads along the longest dimension of your final image. Remember, the number of beads you will need to place goes up as the square of the dimension, so be conservative. Values more than 50 will likely drive you insane trying to complete.
Next, click the button to select your image file. Mosaics work best on simple images, ideally high-contrast, high intensity colors, easily recognizable, and cropped to just the essential part of the image. If you are doing the Mona Lisa, crop your image to her face, only, before opening in MirthMosaic.
Downloads
Reading in the Image
MirthMosaic will then open your image file and pixelize it to the resolution you have chosen. This will take several seconds, because hey, Excel wasn't made for graphics work.
Don't be upset if the top 1 or 2 pixels come out the wrong color. This is a trival artefact I just haven't bothered to bug-shoot yet.
When your image is done being pixelized, admire its beauty. Then realize this is not what your mosaic will look like. You need to map those pixels into the fuse bead palette you have to work with!
Mapping to a Fuse Bead Palette

Click on any row in the box of available palettes to see what your image will look like with that palette.
MirthMosaic contains a list of the common Perler Bead colors. You can build your mosaic from the whole palette, or any sub-palette you like within this range. It's tempting to want to use the full palette for all images, but
unless you have special access to the folks at Perler, this would likely be the most expensive and time consuming way to go. A cheaper, easier plan is to buy several bags or a tray of pre-sorted beads, and limit your mosaic to those colors.
The four images here represent various default palettes you may choose. Starting at the top left and going in clockwise order, they are...
1) All -- the full palette of common Perler bead colors
2) BWG -- Black, white, and grey
3) Set 17605 -- A pre-sorted box of 16 colors sold by Perler
4) Custom 1 -- A selection of reddish hues. You can add or subtract from this palette as you wish.
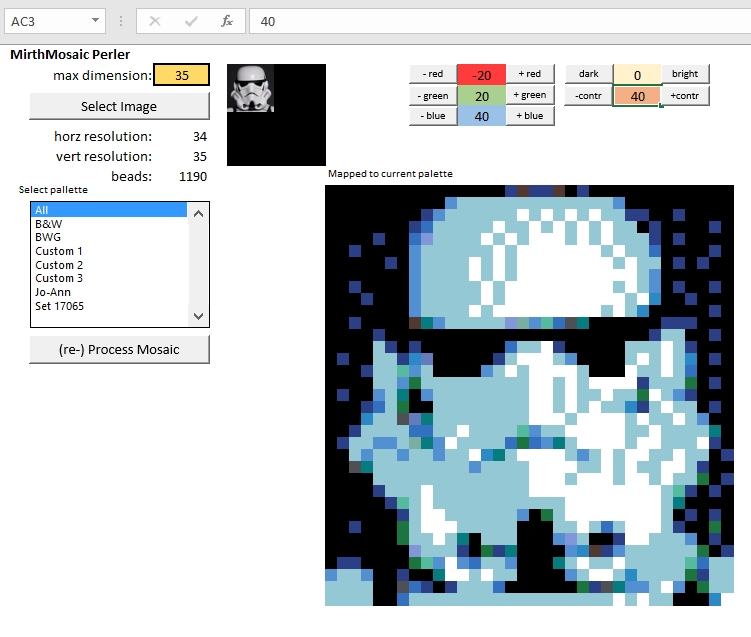
To better fit your available palette of beads (and make some cool pictures!), you may adjust the source image with the buttons for red/green/blue levels, brightness and contrast. I highly recommend tinkering with these settings, since they can make a boring image interesting, and a poor palette match into a beautiful one. In the Storm Trooper example here, I have reduced the red and increased the blue, as well as increased the contrast. It appears much more stylized this way, more like a 16-bit video game character than a photo.
The next step tells how to customize palettes...
Customizing Your Palette

See the image here. MirthMosaic has a sheet called "Pallette" containing a list of the names and sample colors of the common Perler beads. By manipulating the 1's in columns J through L, you can create your own custom palettes. Simply enter a "1" for every bead color you wish to include, and leave empty any bead you wish to exclude.
Purchase List

On the "Purchase List" tab, you will find the exact number of each color of bead you need to complete your mosaic. If your mosaic plan calls for 350 raspberry beads but you have only 200, you have 2 options:
- Substitute manually for a close color that you do have.
- Alter your image with the color adjustment buttons on the main page, so that less of it maps to raspberry.
For the screen shot here, Excel has filtered the list to only include names of bead colors used in a particular mosaic, rather than the full available palette. Print your list and go shopping!
Printing Your Plan

On the "Solution Indexes" and "Solution Indexes Reversed" sheets, you will find printable plans for your mosaic. To save on printer ink, you may wish to select the plan and clear the cell colors, leaving only the numbers. This will make it slower to assemble your mosaic, however.
Ideally, you will print your plan and place it behind a transparent pegboard, allowing you to quickly place beads in their correct location. Everyone's printer is different, however, and it can be challenging to exactly match up the plan to the size of your pegboard. I suggest tinkering with the column width and row height parameters in Excel until you get as close a match as possible. Also, when you print, choose the option to print row and column headers, so it's easier to keep your place as you assemble.
Completing Your Project


As always with fused bead projects, you will need to melt the beads with an iron over parchment paper in order to lock it in place. Take your time-- You've invested a lot of effort in the layout, and don't want to ruin it by jarring beads loose or burning them.
Hope you enjoy using MirthMosaic Perler. A version that uses melted Crayola crayons is here.
Thanks for reading,
Patrick