Game Night Card Dispenser

We created a simple card dispenser for the 4H Robotics Competition, using components from the Sparkfun kit and additional materials. The dispenser is designed to hold and dispense cards one at a time, triggered by a simple motor actuation. This system allows for a hands-free, accessible way to distribute cards, making it user-friendly and interactive, especially for kids. We built it with easily accessible materials to ensure that the project is reproducible, and I prioritized safety and simplicity to make it suitable for a learning environment.
Supplies

For This Project You Will Need:
- Cardboard Sheets ($14 on Amazon)
- From Sparkfun Kit... ($100 on Amazon)
- Gear Motor
- H-Bridge
- Button
- Switch
- Speaker
- Two LED
- Two 330 Ω Resistor
- Wires
- USB Cable
- Electrical Tape ($10 on Amazon)
- Deck of Cards ($5 on Amazon)
- Hot Glue Gun ($10 on Amazon)
- Rubber Bands ($9 on Amazon)
You will also need some sort of cutting tool and marker for the cardboard. Make sure you have a clear and safe workspace before beginning!
Building the Circuit on Arduino


Initial set up:
From the Sparkfun kit, connect the Breadboard and Arduino Uno to black base. These two components will serve as the main "motherboard" for the circuit. Then connect one cable to ground and one to 5V. Then wire the ground and 5V lines to top of breadboard to create rails. Color code cables as necessary.
Setting up the gear motor:
Place a H-bridge down and connect Vm to Vin, Vcc to 5V, GND to ground (GND), A01 to motors red motor wire, A02 to motors black motor wire, PWMA to D11, AIN2 to D12, AIN1 to D13, STBY to 5V.
Setting up the Speaker:
Place a speaker down on the breadboard, connect positive side to D9 and negative side to ground.
Setting up the LED:
Place one green LED and one red LED on the breadboard. Under each one connect a wire to ground and add a 330 Ω resistor. Connect the resistor under the red LED to D6 and the resistor under the green LED to D5.
Setting up the Button and Switch:
Place a button down across the bridge and wire one side to ground and one side to D3. Then place a switch above the button and wire that to the ground and 5V rails at the top of the breadboard. Finaly connect the switch to D2 with a wire from the middle pin of the switch.
Writing the Code

Establish Initial Variables:
This code begins by establishing initial variables to define the pins and constants for the connected hardware. Variables like slideswitch, button, Green_LED, Red_LED, speaker, PWMA, AIN1, and AIN2 assign specific pins on the microcontroller to components such as LEDs, a motor, and a speaker. Musical note constants (C4, D4, etc.) represent the frequencies for playback, while the arrays melody and noteDurations store a sequence of musical notes and their durations, respectively. These initial definitions provide the foundation for controlling the components in the subsequent sections.
Void Setup:
The setup() function configures the pins and initializes their modes. Input pins, such as button and slideswitch, are set up using INPUT_PULLUP and INPUT modes, respectively, to read their states. Output pins, including those for LEDs, the speaker, and motor control (PWMA, AIN1, and AIN2), are defined as outputs using pinMode(). This setup ensures that the hardware components are ready for operation and provides the necessary configurations for the main program logic in the loop() function.
Void Loop:
The loop() function contains the main logic, continuously checking inputs and controlling outputs. If the button is pressed, the motor starts running, the red LED turns on, and the speaker plays a single note. When the slideswitch is turned on, the motor remains active, the red LED stays on, and a melody plays, iterating through the melody and noteDurations arrays. If the slideswitch is turned off during playback, the melody stops immediately. When both the button is released and the slide switch is off, the motor stops, the green LED turns on, and the speaker is silenced. This structure creates a responsive system for controlling the hardware components.
The Full Code:
Here is the full code you can upload to the Arduino board...
Downloads
Main Construction


Building Cardboard Base:
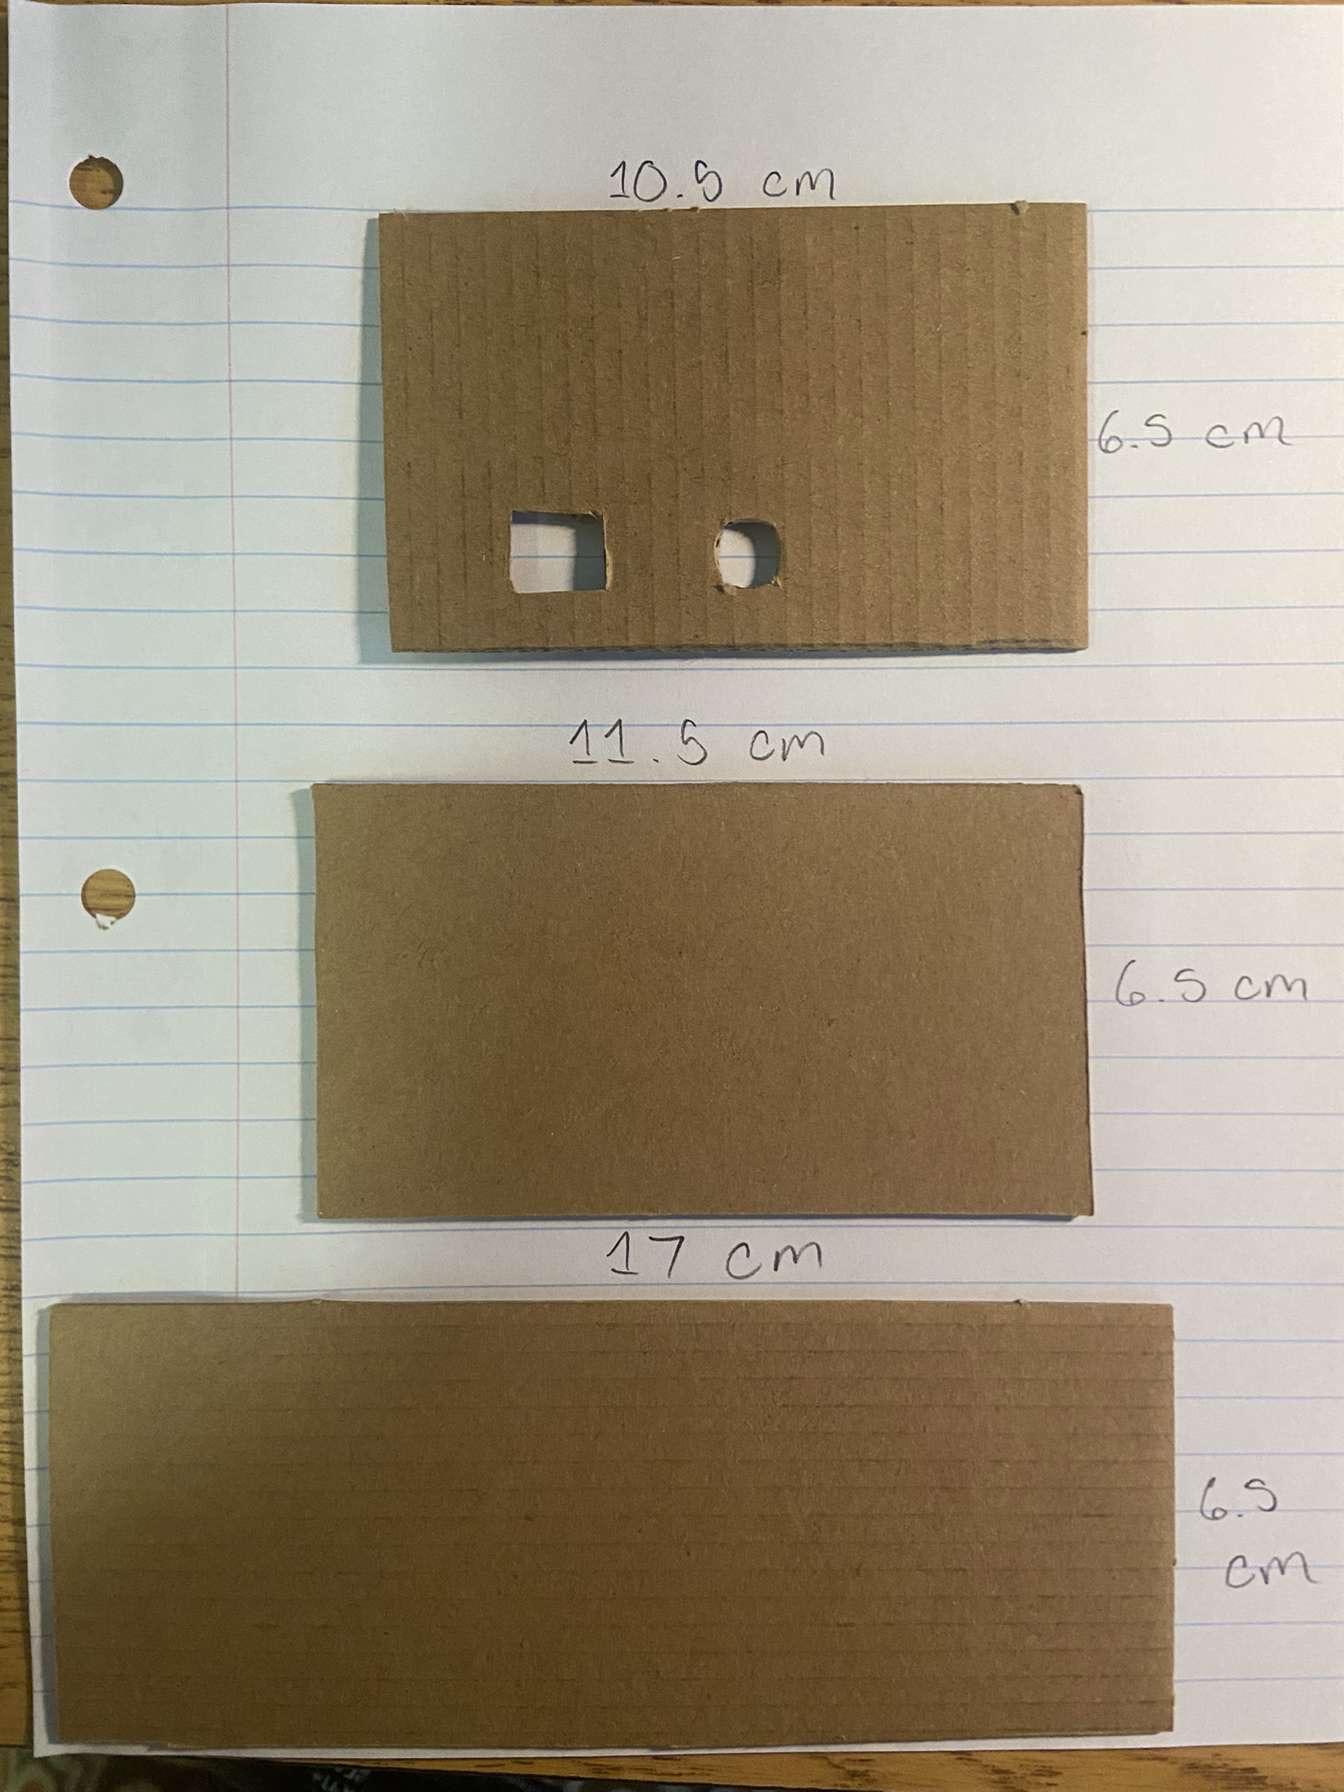
For the carboard base you will need some cardboard sheets, a cutting tool, glue, tape, and a ruler. Start by cutting up the cardboard sheets as shown above with the proper dimensions.
Main Construction Part 2


Putting Everything Together:
Glue all cut-out parts together as shown above using the hot glue gun. For the wheel, tape the support beam to the gear motor. Once all the cardboard is put together, follow this video which shows where to place the Arduino uno board and how to organize everything.
Video: https://drive.google.com/file/d/1TsDyN0ySaqSG91Ng_vyhulD2dGf0ETCw/view?usp=sharing
Final Touch Ups and Testing

Final Checks:
Double-check that all components are properly wired and connected securely. You can also use electrical tape to bind wires together to make them neater and more stable. Check that everything is glued together properly and that the Arduino board is properly set in. Finally, grab a deck of cards and test out your new machine!
Testing:
Attached below is a video demonstrating how this machine works.
All Done!